Part 3: PostfixAdmin – Create Virtual Mailboxes on Ubuntu Mail Server (PostgreSQL)
In previous articles, we discussed how to set up your own mail server on Ubuntu from scratch. In part 1 and part 2 of this tutorial series, we learned how to set up Postfix SMTP server and Dovecot IMAP server, but so far we can only have email addresses for users with local Unix accounts. This tutorial is going to show you how to create virtual mailboxes on Ubuntu mail server with PostfixAdmin, which is an open-source web-based interface to configure and manage a Postfix-based email server for many domains and users.
With virtual mailboxes, we don’t need to create a local Unix account for each email address. If you are going to set up a mail server for a company or organization, it’s always better to have an easy way to create virtual mailboxes in a web-based interface, which also allows users to change their passwords. That’s where PostfixAdmin comes in.
PostfixAdmin Features
- Manage mailboxes, virtual domains, and aliases
- Vacation/out-of-office messages (Personally I think it’s better done in Roundcube webmail)
- Alias domains (forwarding one domain to another with recipient validation)
- Users can manage their own mailbox (change alias, password and vacation message)
- Quota support for single mailboxes and total quota of a domain
- Fetchmail integration: You can fetch emails from your original email address to your new email address.
- Command-line client postfixadmin-cli for those who don’t want to click around in a web interface 😉
Notice
- This tutorial works on Ubuntu 22.04, Ubuntu 20.04, and Ubuntu 24.04.
- Once you finish part 3, you can no longer use local Unix accounts as email addresses. You must create email addresses from the PostfixAdmin web interface.
- This tutorial will show you how to install PostfixAdmin with the PostgreSQL database server. If you prefer to install PostfixAdmin with MariaDB database server, please follow this Postfixadmin/MariaDB tutorial.
Requirements
It’s required that you have followed part 1 and part 2 of this tutorial series before continuing to read this article. If you followed mail server tutorials on other websites, I recommend purging your configurations (sudo apt purge postfix dovecot-core) and start over with my tutorial series, so you are not going to be confused by different setup processes.
Once the above requirements are met, let’s install and configure PostfixAdmin.
Step 1: Install PostgreSQL Database Server
PostfixAdmin is written in PHP and requires a database (MySQL/MariaDB, PostgreSQL, or SQLite). This article will use the PostgreSQL database. Enter the following command to install PostgreSQL on Ubuntu.
sudo apt install postgresql postgresql-contrib
After it’s installed, PostgreSQL database server will automatically start and listens on 127.0.0.1:5432, as can be shown with:
sudo ss -lnpt | grep 5432
Sample output:
LISTEN 0 244 127.0.0.1:5432 0.0.0.0:* users:(("postgres",pid=24074,fd=5))
If you don’t see any output in the command line window, then PostgreSQL isn’t running. Start it with this command:
sudo systemctl start postgresql
To enable PostgreSQL to automatically start at boot time, run
sudo systemctl enable postgresql
If it still refuses to start, you need to check the log file under /var/log/postgresql/ to find out what went wrong.
Step 2: Download PostfixAdmin on Ubuntu Server
PostfixAdmin is included in the default Ubuntu repository. However, I don’t recommend it for the following reasons:
- It can create problems when you upgrade the Ubuntu system to a new version, resulting in upgrade failure.
- If you use Nginx, the
postfixadminpackage might automatically install Apache on your system. - If you use MySQL, this package might remove MySQL from your system.
- The default
postfixadminpackage has a login loop issue from time to time.
So I will show you how to install the latest version of PostfixAdmin. Go to PostfixAdmin Gitbub page to download the latest version. You can use the wget tool to download it from command line. The download link is always available in the format below. If a new version comes out, simply replace 3.3.11 with the new version number.
sudo apt install wget

wget https://github.com/postfixadmin/postfixadmin/archive/postfixadmin-3.3.11.tar.gz
Once downloaded, extract the archive to the /var/www/ directory and rename it to postfixadmin.
sudo mkdir -p /var/www/

sudo tar xvf postfixadmin-3.3.11.tar.gz -C /var/www/

sudo mv /var/www/postfixadmin-postfixadmin-3.3.11 /var/www/postfixadmin
Step 3: Setting Up Permissions
PostfixAdmin requires a templates_c directory, and the web server needs read and write access to this directory, so run the following commands.
sudo mkdir -p /var/www/postfixadmin/templates_c

sudo apt install acl

sudo setfacl -R -m u:www-data:rwx /var/www/postfixadmin/templates_c/
Starting with Dovecot 2.3.11, the web server user (www-data) needs permission to read Let’s Encrypt TLS certificate in order to do password hashing. Run the following two commands to grant permissions.
sudo setfacl -R -m u:www-data:rx /etc/letsencrypt/live/ /etc/letsencrypt/archive/
Step 4: Create a Database and User for PostfixAdmin
Log into PostgreSQL as the postgres user.
sudo -u postgres -i psql
Create the postfixadmin database. I named it postfixadmin, but you can use whatever name you like. (Don’t leave out the semicolon.)
CREATE DATABASE postfixadmin;
Create a database user (postfixadmin) and set a password. Replace postfixadmin_password with your preferred password. Note that the password should not contain the # character, or you might not be able to log in later.
CREATE USER postfixadmin WITH PASSWORD 'postfixadmin_password';
Grant permissions to the database user.
ALTER DATABASE postfixadmin OWNER TO postfixadmin;

GRANT ALL PRIVILEGES ON DATABASE postfixadmin TO postfixadmin;
Press Ctrl+D to log out of the PostgreSQL console.
Then run the following command to test if you can log in to PostgreSQL as postfixadmin user.
psql -h 127.0.0.1 -d postfixadmin -U postfixadmin -W
Press Ctrl+D to log out.
Step 5: Configure PostfixAdmin
The default PostfixAdmin configuration file is config.inc.php. We need to create a config.local.php file and add custom configurations.
sudo nano /var/www/postfixadmin/config.local.php
Add the following lines in the file, so PostfixAdmin can connect to PostgreSQL database. Replace postfixadmin_password with the real PostfixAdmin password created in step 4.
<?php
$CONF['configured'] = true;
$CONF['database_type'] = 'pgsql';
$CONF['database_host'] = 'localhost';
$CONF['database_port'] = '5432';
$CONF['database_user'] = 'postfixadmin';
$CONF['database_password'] = 'postfixadmin_password';
$CONF['database_name'] = 'postfixadmin';
$CONF['encrypt'] = 'dovecot:ARGON2I';
$CONF['dovecotpw'] = "/usr/bin/doveadm pw -r 5";
if(@file_exists('/usr/bin/doveadm')) { // @ to silence openbase_dir stuff; see https://github.com/postfixadmin/postfixadmin/issues/171
    $CONF['dovecotpw'] = "/usr/bin/doveadm pw -r 5"; # debian
}
Save and close the file. Note that we will use the ARGON2I password scheme. By default, PostfixAdmin and Dovecot use MD5-CRYPT, which is a weak password scheme. You can list available password schemes in Dovecot with the following command.
sudo doveadm pw -l
Sample output:
SHA1 SSHA512 BLF-CRYPT PLAIN HMAC-MD5 OTP SHA512 SHA RPA DES-CRYPT CRYPT SSHA MD5-CRYPT SKEY PLAIN-MD4 PLAIN-MD5 SCRAM-SHA-1 LANMAN SHA512-CRYPT CLEAR CLEARTEXT ARGON2I ARGON2ID SSHA256 NTLM MD5 PBKDF2 SHA256 CRAM-MD5 PLAIN-TRUNC SHA256-CRYPT SMD5 DIGEST-MD5 LDAP-MD5
Step 6: Create Apache Virtual Host or Nginx Config File for PostfixAdmin
Apache
If you use Apache web server, create a virtual host for PostfixAdmin.
sudo nano /etc/apache2/sites-available/postfixadmin.conf
Put the following text into the file. Replace postfixadmin.example.com with your real domain name and don’t forget to set DNS A record for it.
<VirtualHost *:80>
  ServerName postfixadmin.example.com
  DocumentRoot /var/www/postfixadmin/public

  ErrorLog ${APACHE_LOG_DIR}/postfixadmin_error.log
  CustomLog ${APACHE_LOG_DIR}/postfixadmin_access.log combined

  <Directory />
    Options FollowSymLinks
    AllowOverride All
  </Directory>

  <Directory /usr/share/postfixadmin/>
    Options FollowSymLinks MultiViews
    AllowOverride All
    Order allow,deny
    allow from all
  </Directory>

</VirtualHost>
Save and close the file. Then enable this virtual host with:
sudo a2ensite postfixadmin.conf
Reload Apache for the changes to take effect.
sudo systemctl reload apache2
Now you should be able to see the PostfixAdmin web-based install wizard at http://postfixadmin.example.com/setup.php.
Nginx
If you use Nginx web server, create a virtual host for PostfixAdmin.
sudo nano /etc/nginx/conf.d/postfixadmin.conf
Put the following text into the file. Replace postfixadmin.example.com with your real domain name and don’t forget to set DNS A record for it.
server {
   listen 80;
   listen [::]:80;
   server_name postfixadmin.example.com;

   root /var/www/postfixadmin/public/;
   index index.php index.html;

   access_log /var/log/nginx/postfixadmin_access.log;
   error_log /var/log/nginx/postfixadmin_error.log;

   location / {
       try_files $uri $uri/ /index.php;
   }

   location ~ ^/(.+\.php)$ {
        try_files $uri =404;
        fastcgi_pass unix:/run/php/php8.1-fpm.sock;
        fastcgi_index index.php;
        fastcgi_param SCRIPT_FILENAME $document_root$fastcgi_script_name;
        include /etc/nginx/fastcgi_params;
   }
}
Save and close the file. Then test Nginx configuration.
sudo nginx -t
If the test is successful, reload Nginx for the changes to take effect.
sudo systemctl reload nginx
Now you should be able to see the PostfixAdmin web-based install wizard at http://postfixadmin.example.com/setup.php.
Step 7: Install Required and Recommended PHP Modules
Run the following command to install PHP modules required or recommended by PostfixAdmin.
sudo apt install software-properties-common

sudo add-apt-repository ppa:ondrej/php

sudo apt update

sudo apt install php8.1-fpm php8.1-imap php8.1-mbstring php8.1-pgsql php8.1-curl php8.1-zip php8.1-xml php8.1-bz2 php8.1-intl php8.1-gmp php8.1-redis
If you use Apache, you also need to install the libapache2-mod-php package.
sudo apt install libapache2-mod-php
Then restart Apache.
sudo systemctl restart apache2
Step 8: Enabling HTTPS
To encrypt the HTTP traffic, we can enable HTTPS by installing a free TLS certificate issued from Let’s Encrypt. Run the following command to install Let’s Encrypt client (certbot) on Ubuntu 22.04 server.
sudo apt install certbot
If you use Apache, install the Certbot Apache plugin.
sudo apt install python3-certbot-apache
And run this command to obtain and install TLS certificate.
sudo certbot --apache --agree-tos --redirect --hsts --staple-ocsp --email [email protected] -d postfixadmin.example.com
If you use Nginx, then you also need to install the Certbot Nginx plugin.
sudo apt install python3-certbot-nginx
Next, run the following command to obtain and install TLS certificate.
sudo certbot --nginx --agree-tos --redirect --hsts --staple-ocsp --email [email protected] -d postfixadmin.example.com
Where
--nginx: Use the nginx plugin.--apache: Use the Apache plugin.--agree-tos: Agree to terms of service.--redirect: Force HTTPS by 301 redirect.--hsts: Add the Strict-Transport-Security header to every HTTP response. Forcing browser to always use TLS for the domain. Defends against SSL/TLS Stripping.--staple-ocsp: Enables OCSP Stapling. A valid OCSP response is stapled to the certificate that the server offers during TLS.
The certificate should now be obtained and automatically installed, which is indicated by the message below.

Step 9: Enable Statistics in Dovecot
PostfixAdmin needs to read Dovecot statistics. Edit the Dovecot configuration file.
sudo nano /etc/dovecot/conf.d/10-master.conf
Add the following lines to the end of this file.
service stats {
    unix_listener stats-reader {
    user = www-data
    group = www-data
    mode = 0660
}

unix_listener stats-writer {
    user = www-data
    group = www-data
    mode = 0660
  }
}
Save and close the file. Then add the web server to the dovecot group.
sudo gpasswd -a www-data dovecot
Grant permissions to the www-data user.
sudo setfacl -R -m u:www-data:rwx /var/run/dovecot/stats-reader /var/run/dovecot/stats-writer
Restart Dovecot.
sudo systemctl restart dovecot
Step 10: Launch the Web-Based Setup Wizard
Go to postfixadmin.example.com/setup.php to run the web-based setup wizard. First, you need to create a setup password for PostfixAdmin.

After creating the password hash, PostfixAdmin will display a line like below.
$CONF['setup_password'] = '$2y$10$58fIawuOb5y538RMBol/DOoqv2bJ7zhPRzRO.4Xq7MLeQJHmaFwF2';
You need to open the config.local.php file.
sudo nano /var/www/postfixadmin/config.local.php
Add the line displayed on PostfixAdmin setup page to the end of the file like below.


If you see the following error when trying to create a superadmin account,
Password Hashing - attempted to use configured encrypt backend (dovecot:ARGON2I) triggered an error: /usr/bin/doveadm pw -r 5 failed, see error log for details
It’s because the www-data user doesn’t have permission to read Let’s Encrypt TLS certificate. To fix it, run the following command to grant permissions.
sudo setfacl -R -m u:www-data:rx /etc/letsencrypt/live/ /etc/letsencrypt/archive/
Sometimes, you might also need to run the following command to fix this error.
sudo setfacl -R -m u:www-data:rwx /var/run/dovecot/stats-reader /var/run/dovecot/stats-writer
Once the superadmin account is created, you can log into PostfixAdmin at postfixadmin.example.com/login.php.

Step 11: Checking Tables in the Database
The PostfixAdmin setup process populates the postfixadmin database with some default tables. It’s helpful for us to know the names and structure of the tables. Log in to PostgreSQL console.
sudo -u postgres psql
Select the postfixadmin database.
\c postfixadmin;
List all tables in this database.
\dt;
Output:
                   List of relations
 Schema |         Name          | Type  |    Owner
--------+-----------------------+-------+--------------
 public | admin                 | table | postfixadmin
 public | alias                 | table | postfixadmin
 public | alias_domain          | table | postfixadmin
 public | config                | table | postfixadmin
 public | domain                | table | postfixadmin
 public | domain_admins         | table | postfixadmin
 public | fetchmail             | table | postfixadmin
 public | log                   | table | postfixadmin
 public | mailbox               | table | postfixadmin
 public | quota                 | table | postfixadmin
 public | quota2                | table | postfixadmin
 public | vacation              | table | postfixadmin
 public | vacation_notification | table | postfixadmin
(13 rows)
The 3 most important tables are:
domain: contains information on the domains that are using your mail server to send and receive email.mailbox: contains information on every email address, including hashed password and the location of mail files.alias: contains the alias of each email address.
If you are interested, you can check what columns each table contains. For example, the following command will show us the columns in the domain table.
\d domain;
Output:
                                    Table "public.domain"
     Column      |           Type           | Collation | Nullable |         Default
-----------------+--------------------------+-----------+----------+-------------------------
 domain          | character varying(255)   |           | not null |
 description     | character varying(255)   |           | not null | ''::character varying
 aliases         | integer                  |           | not null | 0
 mailboxes       | integer                  |           | not null | 0
 maxquota        | bigint                   |           | not null | 0
 quota           | bigint                   |           | not null | 0
 transport       | character varying(255)   |           |          | NULL::character varying
 backupmx        | boolean                  |           | not null | false
 created         | timestamp with time zone |           |          | now()
 modified        | timestamp with time zone |           |          | now()
 active          | boolean                  |           | not null | true
 password_expiry | integer                  |           |          | 0
Indexes:
    "domain_key" PRIMARY KEY, btree (domain)
    "domain_domain_active" btree (domain, active)
Log out of PostgreSQL console.
\q
Step 12: Configure Postfix to Use PostgreSQL Database
By default, Postfix delivers emails only to users with a local Unix account. To make it deliver emails to virtual users whose information is stored in the database, we need to configure Postfix to use virtual mailbox domains.
First, we need to add PostgreSQL map support for Postfix by installing the postfix-pgsql package.
sudo apt install postfix-pgsql
Then edit the Postfix main configuration file.
sudo nano /etc/postfix/main.cf
Add the following lines at the end of this file.
virtual_mailbox_domains = proxy:pgsql:/etc/postfix/pgsql/virtual_domains_maps.cf
virtual_mailbox_maps = proxy:pgsql:/etc/postfix/pgsql/virtual_mailbox_maps.cf
virtual_alias_maps = proxy:pgsql:/etc/postfix/pgsql/virtual_alias_maps.cf
relay_domains = $mydestination, proxy:pgsql:/etc/postfix/pgsql/relay_domains.cf
Where:
virtual_mailbox_domainspoints to a file that will tell Postfix how to look up domain information from the database.virtual_mailbox_mapspoints to files that will tell Postfix how to look up email addresses from the database.virtual_alias_mapspoints to files that will tell Postfix how to look up aliases from the database.
We want to use dovecot to deliver incoming emails to the virtual users’ message store, so also add the following line at the end of this file.
virtual_transport = lmtp:unix:private/dovecot-lmtp
Save and close the file. Next, we need to create the .cf files one by one. Create the pgsql directory.
sudo mkdir -p /etc/postfix/pgsql/
Create the virtual_domains_maps.cf file.
sudo nano /etc/postfix/pgsql/virtual_domains_maps.cf
Add the following content. Replace postfixadmin_password with the postfixadmin database password you set in step 4.
user = postfixadmin
password = postfixadmin_password
hosts = localhost
dbname = postfixadmin
#query = SELECT domain FROM domain WHERE domain='%s' AND active = true
#optional query to use when relaying for backup MX
query = SELECT domain FROM domain WHERE domain='%s' and backupmx = false and active = true
Create the virtual_mailbox_maps.cf file.
sudo nano /etc/postfix/pgsql/virtual_mailbox_maps.cf
Add the following content.
user = postfixadmin
password = postfixadmin_password
hosts = localhost
dbname = postfixadmin
query = SELECT maildir FROM mailbox WHERE username='%s' AND active = true
Create the virtual_alias_maps.cf file.
sudo nano /etc/postfix/pgsql/virtual_alias_maps.cf
Add the following content.
user = postfixadmin
password = postfixadmin_password
hosts = localhost
dbname = postfixadmin
query = SELECT goto FROM alias WHERE address='%s' AND active = true
Create the relay_domains.cf file.
sudo nano /etc/postfix/pgsql/relay_domains.cf
Add the following content.
user = postfixadmin
password = posfixadmin_password
hosts = localhost
dbname = postfixadmin
query = SELECT domain FROM domain WHERE domain='%s' and backupmx = true
Since the database passwords are stored in plain text so they should be readable only by user postfix and root, which is done by executing the following two commands.
sudo chmod 0640 /etc/postfix/pgsql/*
sudo setfacl -R -m u:postfix:rx /etc/postfix/pgsql/
Next, we need to change the value of the mydestination parameter in Postfix. Display the current value:
postconf mydestination
Sample output:
mydestination = $myhostname, linuxbabe.com, localhost.$mydomain, localhost
The mydestination parameter contains a list of domain names that will receive emails delivered to local Unix accounts. In part 1, we added the apex domain name (like linuxbabe.com) to mydestination. Since we are going to use virtual mailbox, we need to remove the apex domain name from the list by issuing the following command.
sudo postconf -e "mydestination = \$myhostname, localhost.\$mydomain, localhost"
Now let’s open the Postfix main configuration file again.
sudo nano /etc/postfix/main.cf
Add the following lines at the end of this file.
virtual_mailbox_base = /var/vmail
virtual_minimum_uid = 2000
virtual_uid_maps = static:2000
virtual_gid_maps = static:2000
The first line defines the base location of mail files. The remaining 3 lines define which user ID and group ID Postfix will use when delivering incoming emails to the mailbox. We use the user ID 2000 and group ID 2000.
Save and close the file. Restart Postfix for the changes to take effect.
sudo systemctl restart postfix
Next, we need to create a user named vmail with ID 2000 and a group with ID 2000.
sudo adduser vmail --system --group --uid 2000 --disabled-login --no-create-home
Create the mail base location.
sudo mkdir /var/vmail/
Make vmail as the owner.
sudo chown vmail:vmail /var/vmail/ -R
Step 13: Configure Dovecot to Use PostgreSQL Database
We also need to configure the Dovecot IMAP server to query user information from the database. First, run the following command to add PostgreSQL support for Dovecot.
sudo apt install dovecot-pgsql
Then edit the 10-mail.conf file.
sudo nano /etc/dovecot/conf.d/10-mail.conf
In part 2, we used the following mail_location. Email messages are stored under the Maildir directory under each user’s home directory.
mail_location = maildir:~/Maildir
Since we are using virtual mailbox domain now, we need to enable mail_home for the virtual users by adding the following line in the file, because virtual users don’t have home directories by default.
mail_home = /var/vmail/%d/%n/

Save and close the file. Then edit the 10-auth.conf file.
sudo nano /etc/dovecot/conf.d/10-auth.conf
In part 2, we used the following value for auth_username_format.
auth_username_format = %n
The %n would drop the domain if it was given. Because in part 2 we were using local Unix account for the username of every email address, we must use %n to drop the domain, so users were able to login with the full email address.
Now we are using virtual mailbox domains, which means the username of every email address includes the domain part, so we need to change the auth_username_format as follows. %u won’t drop away the domain. This allows users to log in with their full email address.
auth_username_format = %u
Then find the following line.
#auth_default_realm =
Change it to
auth_default_realm = example.com
This is to ensure users who didn’t enter the @example.com part in the username field can still log in. Dovecot will append the @example.com part if it’s not given by users.
Next, uncomment the following line at the end of this file, so Dovecot can query user information from PostgreSQL database.
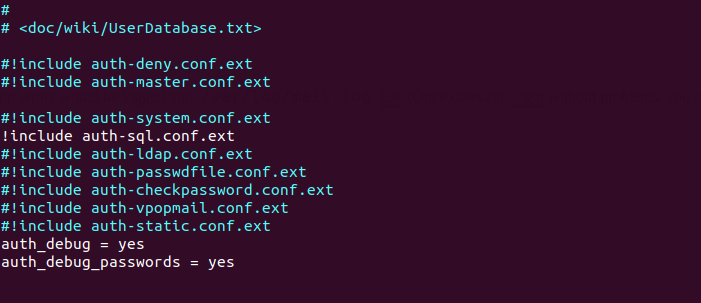
!include auth-sql.conf.ext
Now you probably don’t want local Unix users to send emails without registering email addresses in PostfixAdmin, then comment out the following line by adding the # character at the beginning, so Dovecot won’t query the local /etc/passwd or /etc/shadow file.
#!include auth-system.conf.ext
It can be helpful to add the following two lines in this file to debug login issues. The login errors would be logged into /var/log/mail.log file. (Once users can login without problems, you can comment out the following two lines.)
auth_debug = yes
auth_debug_passwords = yes
Save and close the file.
Edit the dovecot-sql.conf.ext file.
sudo nano /etc/dovecot/dovecot-sql.conf.ext
Here is the content that you should have in this file. By default, all lines in this file are commented out, so you can simply copy and paste them at the bottom. Replace password with the postfixadmin password you set in Step 2.
driver = pgsql

connect = host=localhost dbname=postfixadmin user=postfixadmin password=password

default_pass_scheme = ARGON2I

password_query = SELECT username AS user,password FROM mailbox WHERE username = '%u' AND active = true

user_query = SELECT maildir, 2000 AS uid, 2000 AS gid FROM mailbox WHERE username = '%u' AND active = true

iterate_query = SELECT username AS user FROM mailbox
Restart Dovecot.
sudo systemctl restart dovecot
When a user tries to log in, Dovecot would use the Argon2 algorithm to generate a password hash from the password entered by the user, then compare it with the password hash stored in the database.
Step 14: Add Domain and Mailboxes in PostfixAdmin
Log in to PostfixAdmin web interface as the admin. Click the Domain List tab and select New Domain to add a domain. You can choose how many aliases and mailboxes are allowed for this domain.

Then click Virtual List tab and select Add Mailbox to add a new email address for your domain.

Next, you can open your desktop email client such as Mozilla Thunderbird and add a mail account.
- In the incoming server section, select IMAP protocol, enter
mail.your-domain.comas the server name, choose port 143 and STARTTLS. Choosenormal passwordas the authentication method. - In the outgoing section, select SMTP protocol, enter
mail.your-domain.comas the server name, choose port 587 and STARTTLS. Choosenormal passwordas the authentication method.

Hint: You can also use port 993 with SSL/TLS encryption for IMAP, and use port 465 with SSL/TLS encryption for SMTP. You should not use port 25 as the SMTP port in mail clients to submit outgoing emails.
You should now be able to connect to your own email server and also send and receive emails with your desktop email client! Note that you cannot use local Unix accounts to login now. You must log in with the virtual user created from PostfixAdmin web interface.
Troubleshooting Tips
As a rule of thumb, you should always check the mail log (/var/log/mail.log) on your mail server when an error happens. The following is a list of specific errors and troubleshooting tips.
Can’t login from Mail Clients
If you can’t log into your mail server from a desktop mail client, scan your mail server to find if the ports are open. Note that you should run the following command from another Linux computer or server. If you run it on your mail server, then the ports will always appear to be open.
sudo nmap mail.your-domain.com
And check if Dovecot is running.
systemctl status dovecot
You can also check the mail log (/var/log/mail.log), which may give you some clues. If Dovecot fails to start, the error might not be logged to the /var/log/mail.log file, you can run the following command to see what’s wrong.
sudo journalctl -eu dovecot
If you see the following error in the mail log, it’s likely that you didn’t set a correct password in the .cf files under /etc/postfix/sql/ directory.
postfix/trivial-rewrite[28494]: warning: virtual_alias_domains: proxy:pgsql:/etc/postfix/sql/pgsql_virtual_alias_maps.cf: table lookup problem
postfix/trivial-rewrite[28494]: warning: virtual_alias_domains lookup failure
If you see the following error in the mail log, it’s because you forgot to add mail_location = maildir:~/Maildir in the /etc/dovecot/conf.d/10-mail.conf file.
open(/var/mail/[email protected]) failed: Permission denied (euid=2000(vmail) egid=2000(vmail) missing +w perm: /var/mail, we're not in group 8(mail), dir owned by 0:8 mode=0775
Cloudflare DNS
As I said in part 1, if you use Cloudflare DNS service, you should not enable the CDN (proxy) feature when creating DNS A record and AAAA record for the hostname of your mail server. Cloudflare doesn’t support SMTP or IMAP proxy.
Relay Access Denied
If you see the “relay access denied” error when trying to send emails from a mail client, it’s most likely that you use port 25 as the SMTP port in your mail client. As I said a while ago, you should use port 587 or 465 as the SMTP port in mail clients (Mozilla Thunberbird, Microsoft Outlook, etc) to submit outgoing emails. Port 25 should be used for SMTP server to SMTP server communications.

Connection Lost to Authentication Server
If you can’t send emails from a mail client, and you find the following line in the mail log (/var/log/mail.log), it might be that your email server is too slow and Dovecot takes more than 10 seconds to authenticate the user. Postfix times out at 10 seconds and drops the connection.
SASL PLAIN authentication failed: Connection lost to authentication server
You can avoid SASL connection timeout by enabling the submission service in Dovecot, so we can get rid of the submission service in Postfix and there won’t be SASL connection timeout.
First, edit Postfix master configuration file.
sudo nano /etc/postfix/master.cf
Disable the submission service in Postfix by commenting out the following lines.
#submission inet n - y - - smtpd
#  -o syslog_name=postfix/submission
#  -o smtpd_tls_security_level=encrypt
#  -o smtpd_tls_wrappermode=no
#  -o smtpd_sasl_auth_enable=yes
#  -o smtpd_relay_restrictions=permit_sasl_authenticated,reject
#  -o smtpd_recipient_restrictions=permit_mynetworks,permit_sasl_authenticated,reject
#  -o smtpd_sasl_type=dovecot
#  -o smtpd_sasl_path=private/auth
Save and close the file. Then restart Postfix.
sudo systemctl restart postfix
Next, install the Dovecot submission daemon.
sudo apt install dovecot-submissiond
Edit Dovecot main configuration file.
sudo nano /etc/dovecot/dovecot.conf
Enable the submission protocol.
protocols = imap lmtp submission
Then add the following lines at the end of this file. This tells Dovecot to relay the submitted email to Postfix SMTP server, so the email can be sent out.
submission_relay_host = 127.0.0.1
submission_relay_port= 25
submission_relay_trusted = yes
submission_relay_ssl = no
Save and close the file. Restart Dovecot.
sudo systemctl restart dovecot
Now check what process is listening on TCP port 587.
sudo ss -lnpt | grep 587
If everything is working, you should see that Dovecot is listening on port 587.
LISTEN 0      100          0.0.0.0:587        0.0.0.0:*    users:(("dovecot",pid=71047,fd=16))
LISTEN 0      100             [::]:587           [::]:*    users:(("dovecot",pid=71047,fd=17))
Now you should be able to send emails from a mail client like Thunberbird.
iOS Mail App
If you use the iOS Mail app to log into your mail server and encounter the following error.

You can try to fix it by enforcing SSL encryption, for both SMTP and IMAP.

Fun fact: It seems the iOS Mail app has difficulty in supporting STARTTLS on IMAP port 143, but it supports STARTTLS on the submission port 587.
Temporary Lookup Failure
If your mail server was working fine for some time, but suddenly you find the following error in the mail log,
Aug 25 20:25:24 mx postfix/trivial-rewrite[3313]: warning: virtual_alias_domains: proxy:pgsql:/etc/postfix/sql/pgsql_virtual_alias_maps.cf: table lookup problem
Aug 25 20:25:24 mx postfix/trivial-rewrite[3313]: warning: virtual_alias_domains lookup failure
Aug 25 20:25:24 mx postfix/submission/smtpd[3464]: NOQUEUE: reject: 451 4.3.0 <[email protected]>: Temporary lookup failure;  proto=ESMTP
Aug 25 20:25:24 mx postfix/submission/smtpd[3464]: Temporary lookup failure
It’s likely that your PostgreSQL/MySQL database stopped somehow. You can use the following command to check when your database server stopped.
sudo journalctl -eu postgresql
or
sudo journalctl -eu pgsql
A common cause for this situation is that your server is out-of-memory. Check if your server has enough memory.
htop
or
free -m
Automatically Clean the Junk Folder and Trash Folder
To delete emails in Junk folder for all users, you can run
sudo doveadm expunge -A mailbox Junk all
To delete emails in Trash folder, run
sudo doveadm expunge -A mailbox Trash all
I think it’s better to clean emails that have been in the Junk or Trash folder for more than 2 weeks, instead of cleaning all emails.
sudo doveadm expunge -A mailbox Junk savedbefore 2w
Then add a cron job to automate the job.
sudo crontab -e
Add the following line to clean Junk and Trash folder every day.
@daily doveadm expunge -A mailbox Junk savedbefore 2w;doveadm expunge -A mailbox Trash savedbefore 2w
You also need to allow the www-data user to read certificate files by adding the following line.
@daily setfacl -R -m u:www-data:rx /etc/letsencrypt/live/ /etc/letsencrypt/archive/
To receive report when a Cron job produces an error, you can add the following line above all Cron jobs.
MAILTO="[email protected]"
Save and close the file. And you’re done.
Change User Password in PostfixAdmin
Users can log into PostfixAdmin at https://postfixadmin.example.com/users/login.php, then change their passwords.
Restricting Access to Sendmail
By default, any local user can use the sendmail binary to submit outgoing emails. Now that your mail server is using virtual mailboxes, you might want to restrict access to the sendmail binary to trusted local users only, so a malicious user can’t use it to send a large volume of emails to damage your mail server’s reputation. Edit the Postfix main configuration file.
sudo nano /etc/postfix/main.cf
Add the following line to the end of this file, so only the root and www-data user can submit emails via sendmail. You can also add other usernames.
authorized_submit_users = root,www-data
Save and close the file. Then restart Postfix.
sudo systemctl restart postfix
Next Step
I hope this tutorial helped you install and use PostfixAdmin on Ubuntu to create virtual mailboxes. In part 4, I will show you how to set up SPF and DKIM with Postfix to improve email deliverability and in a future tutorial, I’m going to show you how to host multiple domains with PostfixAdmin.
If you want to access emails from a web browser, then I recommend Roundcube, which is a very popular and featured-rich open-source webmail client. As always, if you found this post useful, subscribe to our free newsletter to get more tips and tricks. Take care 🙂


Thank you very very much for doing all this work!
Hey, i got some problems, im goin step by step from your “how to”, and now i get one problem with Roundcube.
I can send emails out, but i don’t recive any emails.
They are not creating in /var/vmail/DOMAIN/USER/cur and anywhere…
/var/log/mail.log looks like:
I see mails still coming to /var/mail/* .
Any ideas what i can mess?
From the mail log, I can see that Postfix can’t connect to dovecot-lmtp. Make sure dovecot-lmtpd is installed.
Edit the Dovecot main configuration file.
Add lmtp to the supported protocols.
Save and close the file. Then edit the Dovecot 10-master.conf file.
Change the lmtp service definition to the following.
service lmtp {
 unix_listener /var/spool/postfix/private/dovecot-lmtp {
   group = postfix
   mode = 0600
   user = postfix
  }
}
Restart Postfix and Dovecot.
PS: The above process has been explained in Part 2 of this tutorial series.
My fault – of course i miss this section.
Thank you – greate job with that tutorial!
I’ve followed your instructions, but for some reason when I try to run postfixadmin.mydomain.com I get a 404 status. I’ve set up the A record, but I’m still getting a 404.
Obviously I’ve made a horrible mistake.
Any suggestions?
Can you visit postfixadmin.yourdomain.com/setup.php?
No. That gets me 404 as well.
Well, I finally got postfixadmin.mydomain.com/setup.php to open, and after a few tries I finally got the admin account set up. I proceeded to login.php, but whenever I try to click a link it takes me back to the admin login screen. I’m thinking this isn’t the expected behavior. Any ideas?
This seems to be a bug in PostfixAdmin 3.0.2.
To fix, edit the common.php file in the PostfixAdmin web root directory and comment out the following lines. (Add // at the beginning of each line.) The lastest version of PostfixAdmin doesn’t have these lines in common.php file.
if (defined('POSTFIXADMIN_LOGOUT')) {
        session_unset();
        session_destroy();
        session_start();
     }
Save and close the file and you should be able to use PostfixAdmin.
It worked! Thanks, but now I seem to have a Thunderbird problem. It’s just not able to login to the server.
When you login from Thunderbird, you can check if there’s any error in the mail log (/var/log/mail.log).
Here’s what I see most recently in the mail log:
Feb 2 02:07:18 grace postgrey[1411]: Process Backgrounded
Feb 2 02:07:18 grace postgrey[1411]: 2020/02/02-02:07:18 postgrey (type Net::Server::Multiplex) starting! pid(1411)
Feb 2 02:07:18 grace postgrey[1411]: Resolved [localhost]:10023 to [127.0.0.1]:10023, IPv4
Feb 2 02:07:18 grace postgrey[1411]: Binding to TCP port 10023 on host 127.0.0.1 with IPv4
Feb 2 02:07:18 grace postgrey[1411]: Setting gid to “126 126”
Feb 2 02:07:18 grace postgrey[1411]: Setting uid to “123”
Feb 2 02:07:20 grace opendkim[1651]: OpenDKIM Filter v2.11.0 starting (args: -x /etc/opendkim.conf)
I checked the log immediately after trying to log in from Thunderbird, which is still giving me the following error:
Unable to log in at server. Probably wrong configuration, username or password.
I hope this helps!
The above log messages is not related to login issue.
You should add the following two lines in /etc/dovecot/conf.d/10-auth.conf file to debug login issues.
Restart Dovecot and login again. Then you should be able to see dovecot errors in the /var/log/mail.log file.
After I restarted Dovecot, I found this error in the log:
Feb 2 06:40:53 grace dovecot: auth-worker(6367): Warning: pgsql: Query failed, retrying: You have an error in your SQL syntax; check the manual that corresponds to your MariaDB server version for the right syntax to use near ‘=1’ at line 1
Clearly, I’ve got a typo in an SQL table; the question is which one? I’ve looked at all seven in /etc/postfix/sql/ but they’re all good. When I look at /etc/dovecot/conf.d I don’t see anything that says sql or auth-worker, so I’m kind of stumped. Can you point me in the right direction?
Login is handled by Dovecot, not Postfix. You should look at your SQL syntax in the /etc/dovecot/dovecot-sql.conf.ext file. The content of this file should be:
This is turning into quite a bughunt! Now the log says it can’t find the “imap-sieve” plugin in /usr/share/dovecot/modules.
Run the following command to install sieve.
Sieve is already installed, but I made a typo in /etc/dovecot/conf.d/20-imap.conf; I typed “imap-sieve” instead of “imap_sieve” so it kinda choked.
So I’m now able to log into the server, but I can’t send email. I get an error message saying the SMTP server is either unavailable or is refusing SMTP connections. I’ve checked the SMTP server settings and they match what you’ve got in the tutorial.
Have you enabled the submission service in Postfix? Is port 587 open on your server? You can list running services and the associated ports on your server with:
I’ve opened port 587. How do I enable the submission service?
If ported 587 is listed in the output of
sudo netstat -lnpt, then you have enabled the submission service in Postfix. Steps of enabling submission service is described in part 2.The sudo netstat -lnpt command list running services and the associated port on your server.
Go to part 2 to enable submission service.
Well, after a good night’s sleep, I went back through Part 2 and found a few mistakes I made. Typo’s and the like, but significant all the same. Anyway, I fixed the errors, restarted Postfix, and checked netstat again, and now port 587 is open.
I tried sending an email from the new server, but this time I got an error message saying the connection timed out. I’m sure I’ve made another mistake, but I don’t know where!
Is the error message like this?
This indicates that port 25 (outbound) is blocked by your ISP or hosting provider, so you can’t send email directly to the recipient. You need to set up SMTP relay to bypass port 25 blocking.
No, it’s just a timeout message. Here it is:
Always check the error messages in the /var/log/mail.log file. If you don’t see any error message in the /var/log/mail.log file. This could mean that port 587 is still closed.
Run the following command to open port 587 in firewall.
Port 587’s open in the firewall. Tried sending another message, and the mail log shows the following:
Which file should I check? /etc/postfix/main.cf or /etc/postfix/master.cf?
In the /etc/postfix/main.cf file, find the following two lines.
smtpd_tls_session_cache_database = btree:${data_directory}/smtpd_scache

smtp_tls_session_cache_database = btree:${data_directory}/smtp_scache
This first parameter is the for the smtpd daemon, the second paramter is for the smtp client. Make sure they use different file names.
Fixed that! Now the problem seems to be I’ve neglected to include mail.mydomain.com in my LetsEncrypt certificate. Is there a way to expand the certificate, or do I need to trash it and get a new one?
You can expand the certificate to include more domain name. First, edit the Nginx virtual host for grace.koalatyworks.com. Add a new hostname in the server_name directive.
If there are two server_name directives, you need to change both of them.
Reload nginx, then run the following command to obtain a certificate with two names on it.
If the certificate is successfully obtained, restart Postfix and dovecot in order to pick up the new certificate.
I tried this, and it wants to take koalatyworks.com, www.koalatyworks.com, postfixadmin.koalatyworks.com, and nextcloud.koalatyworks.com off the certificate. I really don’t want to lose those!
Then why not create a dedicated virtual host for mail.koalatyworks.com, and obtain a separate certificate?
By the way, your domain koalatyworks.com doesn’t have MX record. You should create MX record as described in part 1.
Okay, I set the MX record and expanded my LetsEncrypt certificate to include grace.koalatyworks.com, but now I get this when I try to send an email:
I think I see the light at the end of the tunnel, but I hope it’s not an oncoming freight train!
Always check the /var/log/mail.log file.
Here it is, but I don’t see any obvious error messages. If there’s an unobvious one, please show me what to look for.
Does this help?
No. This is Dovecot log. You should look for Postfix log in the file. Try to send an email and look for any error message.
I tried sending another email but nothing new showed up in the mail log. The only error message I see is the one I sent you earlier.
If you followed my tutorial series in the proper order, the situation would have been much better.
I suggest reading the articles from part 1 to part 3 and compare the configurations.
It’s working now!
I rechecked /etc/postfix/master.cf and found I had put a period in one of the recipient restrictions instead of a comma. I fixed the typo, restarted Postfix, and now it’s working.
Your tutorial series is DA BOMB! Thanks for the effort, and thanks for all the help you’ve given me the last few nights!
Is the /usr/share/postfixadmin/templates_c/ directory supposed to be empty?
Yes, it’s empty by default.
Which Ubuntu version you are using? And are you using Apache or Nginx?
Ubuntu 18.04.3, and Nginx 1.16.1
Hey great series so far! I’ve completed this section but I’m having trouble with a few of the address of that I’ve added. When I try to login via IMAP I get an unknown user error because it looks like its not passing the @domain. I can login via the postfixadmin user interface and change the password of the mail box. If I changed the devcot sql file to use local_part instead of username I could login. But I can’t send email from outside to the mail box so I’m sure I missed something…
Can you run the following command and show the output here?
Hey! I ran into some issues as well. Authentication with Outlook for Android does not work for me. By running this command I got the following warning:
doveconf: Warning: please set ssl_dh= /etc/dovecot/dh.pem
Do you have any idea how this could be the cause of my problem?
Edit SSL/TLS config file.
Set DH parameters.
Save and close the file. Then generate the DH parameter.
Then restart Dovecot.
Hi! I followed the steps but when I try to go to https://postfixadmin.mydomain.com/setup.php it gives me the following error: File not found.
do you know how to fix this?
Much appreciated! and awesome tutorials 🙂
Any idea how to fix the error “File not found” when going to postfixadmin.mydomain.com/setup.php?
Perhaps you can try removing the trailing slash of document root in the Apache configuration file.
From this:
To this:
Help?
Have you followed part 2 to enable and configure the dovecot-lmtp service?
Yes, I followed part 1 and 2, all right, but you don’t receive email when I activate lmtp, these are the error logs.
Run the following command to check who is the owner.
Also check if Dovecot is running.
ubuntu@mail:~$ sudo ls -lh /var/spool/postfix/private/dovecot-lmtp
srw——- 1 postfix postfix 0 Jan 29 19:29 /var/spool/postfix/private/dovecot-lmtp
The owner is correct. It should be postfix. Perhaps your Dovecot server isn’t running?
I think this error should be the problem, how to fix the permission for the file?
I think that’s not the problem. If you run the command with sudo, the error would disappear.
Instead, you can check the dovecot log with:
In the /etc/dovecot/conf.d/10-ssl.conf file, you have a typo. It should be “protocols”, instead of “protocolos”.
I do thank you for this great tutorial.
I have a problem with the DNS A record in step 3 after creating the Apache virtual host and the setup file of postfixadmin does not open as a result. How do I have to create this A record in Linux?
You should create DNS record at your domain registrar’s website (such as NameCheap).
Since you are asking this question, I think you don’t have a domain name. You should buy one in order to set up your own email server. And I think you didn’t read part 1 and part 2 of this tutorial series. You should start reading from part 1.
Hello,
First of all, your tutorial is the best we can find on Internet. I searched a lot and I don’t know how I came to this one, but that’s the one I was looking for ! Keep up the good work !
The thing is, I had issues and I solved a lot of them. I am a the end of the tutorial, and I have problems with user authentication and maybe creation. Postfix Admin works fine, no errors when I create users, but when I try to connect whit a client, I get thoses logs.
Can you please give me a hint on this ?
Cordialy.
You should look at your SQL syntax in the /etc/dovecot/dovecot-sql.conf.ext file. The content of this file should be:
Thank you ! I just re-read my conf file and I wrote user_query = user_query… that is why it wasn’t working.
May I ask another question ? Is it normal that the password is display in clear in the logs ?
The password is hashed with ARGON2I. It’s not a clear-text password.
Yes, It should be, I know.
But see :
Disable login debugging in dovecot after you fixed the error.
Hello there,
After completing “Step 12: Add Domain and Mailboxes in PostfixAdmin” I can send emails but cannot reveing emails. Here is the error:
Final-Recipient: rfc822; [email protected]
Original-Recipient: rfc822;[email protected]
Action: failed
Status: 5.1.1
Diagnostic-Code: X-Postfix; unknown user: “USER1”
Can anyone help with?
Check the mail log (/var/log/mail.log) to find out what’s wrong.
That is too technical to understand but looks like DEVOCOT is reacting:
mail dovecot: imap-login: Disconnected (no auth attempts in 0 secs): user=, rip=XXX, lip=XXX, TLS handshaking: SSL_accept() failed: error:1417A0C1:SSL routines:tls_post_process_client_hello:no shared cipher, session=
All emails sent to my server are not rejected and nor received. The server looks dumb.
If you can, please post all warnings and errors in the mail log file.
/var/log/mail.log is a huge file.
the last error I can see is this:
Feb 20 10:25:18 mail dovecot: auth-worker(6353): pam(MEA@DOMAIN,2002:8a1:6df5:ca00:6464:72e6:b14c:c976,): pam_authenticate() failed: Authentication failure (Password mismatch?) (given password: PASSWORD)
Send an email to your email address, then open the mail log file and scroll down to the end of the file.
– When I send an email from my mail client to gmail, gmail receives it.
– When I send an email from gmail to my server I can’t see at my mail client nor at /var/vmail/XXX/YYY/cur.
– Now, if I drag and drop an email at mail client from one ICLOUD to INBOX of my server I can see it at /var/vmail/XXX/YYY/cur as well. If I delete it I can see a file at .Trash. as well.
– here it goes the lines at /var/log/mail.log:
Feb 20 11:10:13 mail postfix/smtpd[7185]: connect from unknown
Feb 20 11:10:13 mail postfix/smtpd[7185]: NOQUEUE: reject: RCPT from unknown[156.96.116.52]: 454 4.7.1 : Relay access denied; from= to= proto=ESMTP helo=
Feb 20 11:10:13 mail postfix/smtpd[7185]: disconnect from unknown[156.96.116.52] ehlo=1 mail=1 rcpt=0/1 rset=1 quit=1 commands=4/5
Feb 20 11:11:11 mail dovecot: auth-worker(7155): Debug: conn unix:auth-worker (pid=7154,uid=112): Disconnected: Connection closed (fd=-1)
Feb 20 11:11:23 mail postfix/smtpd[7185]: connect from mail-oln040092073024.outbound.protection.outlook.com[40.92.73.24]
Feb 20 11:11:23 mail postfix/smtpd[7185]: Anonymous TLS connection established from mail-oln040092073024.outbound.protection.outlook.com[40.92.73.24]: TLSv1.2 with cipher ECDHE-RSA-AES256-GCM-SHA384 (256/256 bits)
Feb 20 11:11:23 mail postfix/smtpd[7185]: 8B6293FB94: client=mail-oln040092073024.outbound.protection.outlook.com[40.92.73.24]
Feb 20 11:11:23 mail postfix/cleanup[7190]: 8B6293FB94: message-id=
Feb 20 11:11:23 mail postfix/qmgr[2553]: 8B6293FB94: from=, size=6339, nrcpt=1 (queue active)
Feb 20 11:11:23 mail postfix/lmtp[7191]: 8B6293FB94: to=, relay=none, delay=0.08, delays=0.07/0.01/0/0, dsn=4.4.1, status=deferred (connect to DOMAIN[private/dovecot-lmtp]: No such file or directory)
Feb 20 11:11:23 mail postfix/smtpd[7185]: disconnect from mail-oln040092073024.outbound.protection.outlook.com[40.92.73.24] ehlo=2 starttls=1 mail=1 rcpt=1 data=1 quit=1 commands=7
Feb 20 11:13:37 mail dovecot: imap(USER@DOMAIN): Logged out in=495 out=4253 deleted=0 expunged=0 trashed=0 hdr_count=0 hdr_bytes=0 body_count=0 body_bytes=0
This line:
indicates that Dovecot-LMTP is not working correctly. Please read the Dovecot LMTP instructions in part 2 carefully.
Thank You so much.
For a reason I dont know I skipped the “Using Dovecot to Deliver Email to Message Store”.
I am now on “7 Effective Tips for Blocking Email Spam with Postfix SMTP Server”.
– How di I redo completely this “sudo apt install postfixadmin”?
– I did something wrong and now when I type this command it does not going from the beginning to all the steps.
Purge PostfixAdmin.
Install PostfixAdmin again.
How do I add a NOREPLY email address?
Use the Postfixadmin web interface to add mailboxes. Plain and simple.
Thank you. But those email addresses accepts incoming email and a NOREPLY email address does not accept incoming email.
You can set a filter in the roundcube webmail for the noreply address to reject every incoming email. Plain and simple.
Thank you Xiao, these are some of the best tutorials I’ve ever followed. My comment about php-fpm is that your LAMP tutorial just says it *may* be required, which suggests it is optional. Given that is a separate tutorial to this series, it isn’t obvious whether this tutorial series requires “Apache PHP module” or “PHP-FPM”. Having seen this comment, I will complete the last bit of the LAMP tutorial and switch to PHP-FPM. Thanks again.
If you use Apache, PHP-FPM is not required, although you can use PHP-FPM if you prefer.
I had a problem with a missing, respevtively faulty dovecot configuration in the /postfix/master.cf file. I always got following message:
I opened the configuration and added following:
dovecot   unix  -       n       n       -       -       pipe
  flags=DRhu user=vmail:vmail argv=/usr/lib/dovecot/deliver -f ${sender} -d ${user}@${nexthop}
thus making it possible to send a mail to another Mail account. Worth mentioning is, that I skipped all the encryption part and setting everything locally. It took few tries but all in all, it is working now.
Hello!
I have followed the 1,st 2nd and 3rd parts of your tutorial. I set up virtual mailbox with Postgres instead of MySQL/MariaDB. I can send emails and it appears in e.g. gmail, but can’t receive any. Emails sent from postfixadmin are received.
Gmail sent me the following:
There is no error in “mail.log” nor “mail.err”. Can’t find any error in journal neither.
I had spam authentication issue, but commented out “auth-system.conf.ext”, because I use “auth-sql.conf.ext”:
Furthermore, I also modified /etc/postfix/main.cf and now it looks like (tried it without the comment as well):
Any suggestions?
This means that incoming connection to port 25 of your email server is blocked by a firewall. Make sure you have opened port 25 in iptables/ufw.
There might also be another firewall sitting in front of your own email server. If that’s the case, you need to open port 25 in that firewall as well.
You can use nmap command on another Linux machine to check if the inbound port 25 is open on your email server.
What do you mean by “spam authentication issue”?
Exactly, that was the problem. After I allowed port 25 it has started to work.
“What do you mean by “spam authentication issue”?” just a typo, I wanted to write “pam”.
Thank you very much 🙂
I’ve got this error:
dovecot[6965]: auth: Fatal: sql: Unknown database driver ‘pgsql’
dovecot[6953]: master: Error: service(auth): command startup failed
Can you help?
You need to install the
dovecot-pgsqlpackage, as described in step 11.Hi Great tutorials, I have followed part 1 and 2, (I did install a later stable version of php 7.4) but struggling with the end of Step 3.
http://postfixadmin.example.com/setup.php gets a file not found. It definitely hits my server, however I think it is still pointing to my other virtual host… mail.example.com.
Following your previous advice, I have tried removed the trailing ‘/’, this had no luck. I also tried playing about with /public/ which is where the setup.php file resides.
And I have tried removing the log file information.
I am now fairly sure that it has something to do with Virtual host setup.
Any help would be appreciated
Next idea will be to try and move the folder to a sub-directory of my default option although I am sure that you suggested its location separate for good reason?
N
UPDATE
I solved above issue. I had entered https, which didn’t help – as it meant it would not resolve on my safari , on my iPad the page loaded with errors.
I had to create a /templates_c folder/
and redirect to ‘public’ although this was advised by the URL
…..But hey – I have leant a lot about name-based virtual hosts.
I then got stuck with a 451 error but I had accidentally skipped a lot of your material out… and hadn’t created the cf files.
I didn’t reinstall the php stuff as I did that with the LAMP stack.
Thanks again – onto the next part which coincidentally was something i was going to ask 🙂
Great tutorials. I’m learning a lot. Thank you.
When I create Thunderbird user, it times out checking password (everything else good).
Mail.log shows
“Mar 29 13:16:30 mail dovecot: auth-worker(3486): Error: pgsql(localhost): Connect failed to database (postfixadmin): Access denied for user ‘postfixadmin’@’localhost’ (using password: YES) – waiting for 25 seconds before retry”
I’ve checked all code in Parts 1, 2 and 3 several times. Mysql opens with pgsql -u postfixadmin -p and the copied password I’ve used in
/etc/dbconfig-common/postfixadmin.conf
/etc/postfixadmin/dbconfig.inc.php
/etc/postfix/sql/pgsql_virtual_domains_maps.cf
/etc/postfix/sql/pgsql_virtual_mailbox_maps.cf
/etc/postfix/sql/pgsql_virtual_alias_domain_mailbox_maps.cf
/etc/postfix/sql/pgsql_virtual_alias_maps.cf
/etc/postfix/sql/pgsql_virtual_alias_domain_maps.cf
/etc/postfix/sql/pgsql_virtual_alias_domain_catchall_maps.cf
I welcome your advice on what I’ve missed.
Best regards,
Terry
Most likely your password was entered incorrectly in the .cf files.
Thank you Xiao Guoan,
I have very carefully checked again each one of the .cf files and all contain the pgsql database password correctly. I’m assuming this postfixadmin database password is the correct password for these cf files?
One thought – Is it possible that having an # in the password is causing the problem?
Another thought – I’ve just noticed 2 associated errors in the mail.err.1 log and these precede the failure to connect for postfixadmin :
Do these indicate anything that I need to change?
Hi Xiao Guo’an
The error was a postfixadmin password that contained #.
Perhaps good to suggest to readers to avoid symbols in passwords else identify which symbols cause problems?
Many thanks for your wonderful tutorials. I’m looking forward to the next.
Best wishes,
Terence
Great. Thanks for the tip.
It appears that all special characters may cause this issue. I had the same error when using
and
Hi, I’m getting this error
… relay=none, delay=0.07, delays=0.02/0.01/0.04/0, dsn=5.4.6, status=bounced (mail for … loops back to myself)
Thanks!
Please post your Postfix configuration with
postconf -n.alias_database = hash:/etc/aliases
alias_maps = hash:/etc/aliases
append_dot_mydomain = no
biff = no
compatibility_level = 2
inet_interfaces = all
inet_protocols = all
mailbox_size_limit = 0
mydestination = mail.***.eu, localhost.***.eu, localhost
myhostname = mail.***.eu
mynetworks = 127.0.0.0/8 [::ffff:127.0.0.0]/104 [::1]/128
myorigin = /etc/mailname
readme_directory = no
recipient_delimiter = +
smtp_tls_session_cache_database = btree:${data_directory}/smtp_scache
smtpd_banner = $myhostname ESMTP $mail_name (Ubuntu)
smtpd_relay_restrictions = permit_mynetworks permit_sasl_authenticated defer_unauth_destination
smtpd_tls_cert_file = /etc/ssl/certs/ssl-cert-snakeoil.pem
smtpd_tls_key_file = /etc/ssl/private/ssl-cert-snakeoil.key
smtpd_tls_session_cache_database = btree:${data_directory}/smtpd_scache
smtpd_use_tls = yes
virtual_alias_maps = proxy:pgsql:/etc/postfix/sql/pgsql_virtual_alias_maps.cf, proxy:pgsql:/etc/postfix/sql/pgsql_virtual_alias_domain_maps.cf, proxy:pgsql:/etc/postfix/sql/pgsql_virtual_alias_domain_catchall_maps.cf
virtual_gid_maps = static:2000
virtual_mailbox_base = /var/vmail
virtual_mailbox_domains = proxy:pgsql:/etc/postfix/sql/pgsql_virtual_domains_maps.cf
virtual_mailbox_maps = proxy:pgsql:/etc/postfix/sql/pgsql_virtual_mailbox_maps.cf, proxy:pgsql:/etc/postfix/sql/pgsql_virtual_alias_domain_mailbox_maps.cf
virtual_minimum_uid = 2000
virtual_transport = lmtp:unix:private/dovecot-lmtp
virtual_uid_maps = static:2000
Thank you for answering!
It seems you didn’t follow part 1 and part 2 of this tutorial series. Purge your Postfix and Dovecot configuration.
And start reading from part 1.
Wow, that was stupid. Sorry for bothering you.
Thank you so much for such detailed and beginner friendly tutorial.
I just have one issue, I am able to send the E-Mails but unable to receive any from External IDs (e.g. gmail). My mail.log also does not have any error.
Relevant application ports for ufw app like Postfix, Postfix SMTPS, Postfix Submission, Dovecot IMAP, Dovecot POP3, Dovecot Secure IMAP, Dovecot Secure IMAP, Dovecot Secure POP3, 25/tcp
are also open on the server, not sure what is wrong in my config.
Would appreciate if you have any advice on how I can resolve this issue.
postconf -n
alias_database = hash:/etc/aliases alias_maps = hash:/etc/aliases append_dot_mydomain = no biff = no compatibility_level = 2 inet_interfaces = all inet_protocols = all mailbox_command = procmail -a "$EXTENSION" mailbox_size_limit = 0 mailbox_transport = lmtp:unix:private/dovecot-lmtp milter_default_action = accept milter_protocol = 6 mydestination = localhost.$mydomain, localhost, $mydomain, mail.tealmail.com myhostname = mail.tealmail.com mynetworks = 127.0.0.0/8 [::ffff:127.0.0.0]/104 [::1]/128 myorigin = /etc/mailname non_smtpd_milters = $smtpd_milters policyd-spf_time_limit = 3600 readme_directory = no recipient_delimiter = + relayhost = smtp_tls_loglevel = 1 smtp_tls_mandatory_protocols = !SSLv2, !SSLv3, !TLSv1, !TLSv1.1 smtp_tls_protocols = !SSLv2, !SSLv3, !TLSv1, !TLSv1.1 smtp_tls_security_level = may smtp_tls_session_cache_database = btree:${data_directory}/smtp_scache smtpd_banner = $myhostname ESMTP $mail_name (Ubuntu) smtpd_milters = local:opendkim/opendkim.sock smtpd_recipient_restrictions = permit_mynetworks, permit_sasl_authenticated, reject_unauth_destination, check_policy_service unix:private/policyd-spf smtpd_relay_restrictions = permit_mynetworks permit_sasl_authenticated defer_unauth_destination smtpd_tls_cert_file = /etc/letsencrypt/live/mail.tealmail.com/fullchain.pem smtpd_tls_key_file = /etc/letsencrypt/live/mail.tealmail.com/privkey.pem smtpd_tls_loglevel = 1 smtpd_tls_mandatory_protocols = !SSLv2, !SSLv3, !TLSv1, !TLSv1.1 smtpd_tls_protocols = !SSLv2, !SSLv3, !TLSv1, !TLSv1.1 smtpd_tls_security_level = may smtpd_tls_session_cache_database = btree:${data_directory}/smtpd_scache smtpd_use_tls = yes smtputf8_enable = no virtual_alias_maps = proxy:pgsql:/etc/postfix/sql/pgsql_virtual_alias_maps.cf,proxy:pgsql:/etc/postfix/sql/pgsql_virtual_alias_domain_maps.cf,proxy:pgsql:/etc/postfix/sql/pgsql_virtual_alias_domain_catchall_maps.cf virtual_gid_maps = static:2000 virtual_mailbox_base = /var/vmail virtual_mailbox_domains = proxy:pgsql:/etc/postfix/sql/pgsql_virtual_domains_maps.cf virtual_mailbox_maps = proxy:pgsql:/etc/postfix/sql/pgsql_virtual_mailbox_maps.cf,proxy:pgsql:/etc/postfix/sql/pgsql_virtual_alias_domain_mailbox_maps.cf virtual_minimum_uid = 2000 virtual_transport = lmtp:unix:private/dovecot-lmtp virtual_uid_maps = static:2000You don’t have a valid MX record. You are using 648986190.pamx1.hotmail.com as your MX host. Instead, your MX record should point to mail.tealmail.com.
Hello, do you have any idea why catchall does’nt work? I’ve add alias @my.domain to [email protected] and add pgsql_virtual_alias_domain_catchall_maps.cf like in your tutorial but somehow the catchall doesn’t work, I can send email to [email protected] but not caught by [email protected], this mail server of mine already runs fine for years but I just tried to use catchall right now.
To create a catch-all in Postfixadmin, use * as alias.
It works on my mail server.
Hello!
(I write only in Portuguese, I’m sorry for the direct translation on google to English).
Once again I thank you for your great tutorial. I need to implement an email sending limit per sasl user, that email would be daily. I tried to configure Postfwd and policyd-rate-threshold more without success. Do you have any tools to refer me? It would be very positive to include an item in your tutorial to create email sending limit policies per user, this will help prevent attacks on email accounts for sending spam.
Thank you in advance.
I MADE IT THROUGH! 😀
Seriously, thank you for these tutorials, I have been trying to get a Linux-based email server up for my business and they never seemed to work right. I followed your three guides plus the DKIM/SPF/DMARC add-ons and I am successfully able to send email to everywhere but Yahoo.com. I think their DNS updates are VERY slow so I am going to try it again later. GMAIL and other domains are fine; in fact, a few suppliers who I never bothered to change my email address with have been emailing my account since I finished the last settings you outlined.
Hi Xiao
once again all appreciation for the best tutorial about a mail server.
need some help again
first off all, that issue with the redirection to login page everytime you click on a link in the web interface of postfix admin didn’t fix(at least for me) by commented those line in common.php. Checked on internet and found a fix from one guy(cristian boltz) that says it is a cookie issue and he sugested to create an empty file inside our postfixadmin web directory /usr/share/postfixadmin named favicon.ico and doing that fixed the issue
then, when I reply from my yahoo account back to my new created email account i gert in yahoo a rejection return saying that: 550.1.1 recipient address rejected. User unknown in local recipient table
thanks for some support
What is the output of this command:
postconf mydestinationandpostconf myhostnameHere you are. Thank You!
~$ postconf mydestination
mydestination = $myhostname, mail.10qconcept.com, localhost.com, , localhost
~$ postconf myhostname
myhostname = 10qconcept.com
You should not use 10qconcept.com as the hostname. Run the following command to set mail.10qconcept.com as the hostname.
Then restart Postfix.
Thank You again!
Hi,
while most people have problems with receiving mails, my issue is the exact opposite: I can receive mails just fine, but I cannot send any mails.
Content of /var/log/mail.log:
Output of postconf -n
alias_database = hash:/etc/aliases
alias_maps = hash:/etc/aliases
append_dot_mydomain = no
biff = no
compatibility_level = 2
inet_interfaces = all
inet_protocols = all
mailbox_command = procmail -a “$EXTENSION”
mailbox_size_limit = 0
mailbox_transport = lmtp:unix:private/dovecot-lmtp
mydestination = $myhostname, localhost.$mydomain, localhost, mail.jeremias-bohn.de
myhostname = mail.jeremias-bohn.de
myorigin = /etc/mailname
readme_directory = no
recipient_delimiter = +
relayhost =
smtp_tls_loglevel = 1
smtp_tls_mandatory_protocols = !SSLv2, !SSLv3, !TLSv1, !TLSv1.1
smtp_tls_protocols = !SSLv2, !SSLv3, !TLSv1, !TLSv1.1
smtp_tls_security_level = may
smtp_tls_session_cache_database = btree:${data_directory}/smtp_scache
smtpd_banner = $myhostname ESMTP $mail_name (Ubuntu)
smtpd_relay_restrictions = permit_mynetworks permit_sasl_authenticated defer_unauth_destination
smtpd_tls_cert_file = /etc/letsencrypt/live/mail.jeremias-bohn.de/fullchain.pem
smtpd_tls_key_file = /etc/letsencrypt/live/mail.jeremias-bohn.de/privkey.pem
smtpd_tls_loglevel = 1
smtpd_tls_mandatory_protocols = !SSLv2, !SSLv3, !TLSv1, !TLSv1.1
smtpd_tls_protocols = !SSLv2, !SSLv3, !TLSv1, !TLSv1.1
smtpd_tls_security_level = may
smtpd_tls_session_cache_database = btree:${data_directory}/smtpd_scache
smtputf8_enable = no
virtual_alias_maps = proxy:pgsql:/etc/postfix/sql/pgsql_virtual_alias_maps.cf, proxy:pgsql:/etc/postfix/sql/pgsql_virtual_alias_domain_maps.cf, proxy:pgsql:/etc/postfix/sql/pgsql_virtual_alias_domain_catchall_maps.cf
virtual_gid_maps = static:2000
virtual_mailbox_base = /var/vmail
virtual_mailbox_domains = proxy:pgsql:/etc/postfix/sql/pgsql_virtual_domains_maps.cf
virtual_mailbox_maps = proxy:pgsql:/etc/postfix/sql/pgsql_virtual_mailbox_maps.cf proxy:pgsql:/etc/postfix/sql/pgsql_virtual_alias_domain_mailbox_maps.cf
virtual_minimum_uid = 2000
virtual_transport = lmtp:unix:private/dovecot-lmtp
virtual_uid_maps = static:2000
Are you using port 25 for SMTP in your mail client? You should use port 587 or port 465.
Thank you so much, Windows’s standard Mail app apparently doesn’t have a specific port field, you have to specify it with the URL! That’s why I forgot to do this!
Also thanks for the great tutorial!
Thank you so much for the well detailed tutorial and the time spent to answer questions as regards this post.
I was able to achieve the part every part covered so far except that mails sent from third party providers like GMAIL does get delivered to my inbox.
E.G mail sent from ****@gmail.com doesnt get delivered to [email protected]
I know this has to do with my hostname but i couldn’t notice where i messed things up.
Below is the result of running : postconf mydestination
Also below are the last few lines of my /etc/postfix/main.cf
I hope you find time to look into my situation.
Thanks.
Also running
Then sending a mail to the server gives the following response
You didn’t follow step 10.
Thank you so much for attending to me.
I found that i left out the part that actually linked to the virtual maps
It works very well now.
Thank you so much for providing this information completely for free and still being willing to attend to someone who missed his steps.
I did the setup before changing the hash type so I couldn’t log in afterwards and had to rewrite the hash in the config file and create a new admin user. After that, I could log in and change the password of the previous admin account.
A problem was found with your Postfix virtual maps : The map source pgsql:/etc/postfix/sql/pgsql_virtual_alias_maps.cf cannot be used : Failed to query table : You have an error in your SQL syntax; check the manual that corresponds to your MariaDB server version for the right syntax to use near ‘from where = limit 1’ at line 1
Any ideas?
The error message is self-explanatory. The SQL syntax is wrong. Open the /etc/postfix/sql/pgsql_virtual_alias_maps.cf file and fix the syntax error.
10.5.4-MariaDB-1:10.5.4+maria~focal mariadb.org binary distribution
user = postfixadmin
password = password
hosts = localhost
dbname = postfixadmin
query = SELECT goto FROM alias WHERE address=’%s’ AND active = ‘1’
#expansion_limit = 100
You have apostrophes in the “query” line. They should be single quotes instead.
PS: It seems you are using Ubuntu 20.04. You should follow this PostfixAdmin tutorial.
Yes, yes we did follow 20.04; ended up here by a Google search accident see you over there @ 20.04 >>> Thanks ! ! !
How do we go about enabling or getting the vacation/ out of office to work in postfixadmin?
Yes, it would be interesting to cover that… the Postfixadmin documentation does not explain vacation/out-of-office responder configuration properly. 🙂
Postfixadmin doesn’t provide a graphical way to configure out-of-office messages. I think it’s better done in Roundcube webmail. And here’s how to set it up:
Install Roundcube Webmail and set up Out-of-office Message on Ubuntu 18.04
Install Roundcube Webmail and set up Out-of-office Message on Ubuntu 20.04
I have trouble when step:
Admin, Password and Password (again) leave empty?
I can’t Add Admin on this step. Can you help me Xiao? Thanks
Sorry Xioa, now everthing is fine. Hehe
“To fix, edit the common.php file in the PostfixAdmin web root directory and comment out the following lines.”
Where is location this file?
It’s /usr/share/postfixadmin/common.php 🙂
Ok, I found it. Thank you so much for attending to me 🙂
One question again please:
That is my mail.log, what is the meaning of this warning Xiao?
That’s because you upgraded Dovecot 2.2 to 2.3.
ssl_protocolshas been replaced byssl_min_protocolin v2.3.Edit
/etc/dovecot/conf.d/10-ssl.conffile, find the following line.Comment it out and add the following line.
Save and close the file. Then restart Dovecot.
Hi Xiao,
I have a rather strange issue about which I could not find that much online. When setting up the admin account on postfixadmin.example.org/setup.php (where example.org is of course my own domain), the page responds with “can’t encrypt password with dovecotpw, see error log for details”. The error log reports the following:
It seems dovecotpw cannot access the certificate and thus fails to encrypt the password. Running dovecotpw with sudo privileges from the command line works as intended, so there should not be any typos in 10-ssl.conf. I’ve checked with systemctl, and dovecot itself is running normally, if that’s of any help. My dovecot version is 2.3.11.3.
I could of course start changing permissions on the live or archive folders of my Nginx installation, but I am hesitant to do so. Do you have an alternative solution?
Oh my god, I’m having the same problem. I’m this guide for the second time, except using dovecot 2.3.11.3 (502c39af9). I’ve tried to chown and chmod the letencrypt/live directory to no avail – I’m almost convinced this is a bug in dovecot, but I can’t say for certain.
I’ve double checked to a tee all my configurations – it’s all kosher. I’m about to try downgrading dovecot to the exact version used in this article. Xiao, if you have any suggestions we’re all ears!
Found a solution to this! I downgraded dovecot to the version used in this article, dovecot 2.3.9.2 (cf2918cac), and it seems to be working. The first time I went through this tutorial, I used dovecot 2.3.10.1 (a3d0e1171) and it also works. So, this is probably just a problem with dovecot 2.3.11 most likely.
Anyway… here’s how you can downgrade. Edit the dovecot.list file you made while following the tutorial:
Change to the specific dovecot version. I used 2.3.9.2 and it worked:
Remove then re-install all the dovecot packages:
Remember, when prompted be sure to keep local configurations (unless you plan on following the guide again). Otherwise you might lose some progress.
Good luck!
Wow, I am trying for two days to fix this issue as well. One server is working normally but the new server I got stuck in that.
My old server is using dovecot 2.3.4.1 and the new is 2.3.11.3.
I lost the count how many times I started from scratch thinking I made some mistake.
I will try your suggestion and hope it works.
Thank you for sharing!
Thanks a lot Ozzypig. I was lost man. Just one thing, after re-installing dovecot, I run:
That’s beacuse you install an older version of dovecot after re-installing (run: dovecot –version), updating and/or upgrading (I can’t tell the difference) you get the 2.3.9.2 version you told us.
THANKS.
Hope Xiao can tell us something about this thing, why can’t we update/upgrade dovecot. I had the same error as Shabu and this was my solution because I couldn’t log in to the postfix Admin panel. I do update/upgrade almost 2 times a week at least, after the last dovecot update it was showing me the errors.
THANKS a lot
Hi Guys, after reinstalling an older version of dovecot, you have to keep in mind that you need to re-install other packages too. In my case, and after a couple of days, I found I missed the dovecot-pgsql package. There was an error in the logs telling : unknown driver:pgsql…..it wasn’t a typo but that package that wasn’t installed.
You just have to install it with:
Same problem here
thanks so much Ozzypig!
I redid all of it from the beginning – followed the tutorial to a tee.
Worked like a charm.
Thank you Xiao. You are a R0ckstar!
I have verified that everything works perfectly (once again, after backtracking) to the beginnings of step 9, when I move on to using the Mariadb data base. I should note that I have uninstalled and reinstalled all of the components of postfixadmin and it’s database then tried again. When it comes time to login to postfixadmin I link my domain, create another email account and Postfixadmin works fine. However, my ability to login from Thunderbird on my laptop and Spark on my Iphone is gone. Also, so is the ability to complete the test config with Roundcube.
So, heres where it gets interesting… (as I began to ask about in tutorial 2) I use
sudo tail -f /var/log/syslog | grep dovecotto watch for errors and get an error that states *unknown user* during the auth-worker process. After some thought and research it seems like it’s not getting anything from the Mariadb database, so I opened it up in phpMyAdmin to take a look (bear with me here, I have never used MySQL or phpMyAdmin before), I went to the Postfixadmin table and looked into the mailbox collumn. I inserted my user name into the name field, my password into the password field and my vmail path into the mairdir field. Phpmyadmin showed an error when I did. That lead me to this link (https://devanswers.co/problem-php-7-2-phpmyadmin-warning-in-librariessql-count/), documenting a bug in php 7.2 which was easy to fix and turned out to be inconsequential to my issues. Upon trying to re-login, I got an error stating that passwords mismatched and to use a PLAIN encryption scheme.A little more research/fiddling around and I had reverted the encryption in /etc/postfixadmin/config.inc.php back to ‘md5crypt’ and changed /etc/dovecot/dovecot-sql.conf.ext value to default_pass_scheme = PLAIN-MD5, then I went into Phpmyadmin and edited the mailbox collumn’s password funtion to MD5. That got me connected remotely to my mailserver. Cool.
But… there was only two boxes displayed under my account in Thunderbird, “Inbox” and “Trash”, that seemed odd. So, I sent a test email to my icloud account, which arrived just fine. Clearly I’m connected. Then I tried replying to that email and it was returned to sender. Using sudo tail -f /var/log/syslog | grep postfix I looked at the error, and the server was rejecting it. I tried sending from a different email account and got the same issue. I have lost the log entry stating what the error was, but researching it, it was rejecting them as if they were firewalled or maybe blacklisted. My ports are opened correctly and Im not running any blacklisting methods.
This morning I retested everything and now the postfix error is stating:
I just sent one from [email protected], so I’m certain that it exists, lol.
So heres a few things that I gather… I feel like from your tutorials that I shouldn’t need to manually enter my user name, password or mail path into the database and that it should have accepted the ARGON2I encryption format. Also, I should not be having emails returned to sender once I am able to login. All of these issues only happen once I begin the process of using the MySQL/Mariadb database. I’ve gone over your tutorials and cross-referenced them with a few others and this is all very straightforward and matches what you and others have done, but my results are wildly different.
At this point I am down to wiping out my VPS, reinstalling Ubuntu and trying again from scratch under the assumption that somewhere there was an install flaw. The only things I have done other than attempt to complete your tutorials have been setting the LAMP stack, setting up ssh, installing wordpress and setting up FTP. There just isn’t too many possibilities for conflicts and I am at a loss for causes.
I know this doesn’t offer anyone a solution, but I hope if anyone else runs into similar symptoms that I can save them the massive waste of time I’ve gone through to troubleshoot this, and if a solution presents itself (up to wiping the server) I will post it here to try and save them the headache. Any insights added by anyone would be appreciated too.
Thanks.
Hello. Hope you are doing well! I did all the steps and I think it is all ok right now. Even nmap mail.domain.com gave me all ports and it means it’s all working.
But I have a problem with roundcube.
When I log into roundcube, I get 504 gateway time-out, and in log file, I get such errors. I’m sure I’m using the correct password, and have no idea what is wrong here!
Roundcube was working correctly before this tutorial, now the problem is with database. What is the problem? Thank you for your help.
Make sure you have entered the correct password for the
postfixadmindatabase user in/etc/dovecot/dovecot-sql.conf.extfile.Hey Xiao! Thank you again for your amazing tutorials.
Problem was not incorrect password.
Problem was, I had ‘#’ in my password!
I wrote the solution here, just because this is almost impossible to figure out this is the problem.
So, the guy who is reading this comment, make sure you don’t use # in your postfixadmin account in database!
I followed your instructions in July and created the mail server successfully. However, now, I can’t log in to postfixadmin anymore. It says that the username or password is incorrect. It can’t be incorrect as I’ve stored them in Google and “Chrome”. I have two admin accounts and none of them can’t be used for logging in. So I changed the main password with “setup.php” and copied that hash into the configuration file. Then, I deleted one of the admin accounts directly in the database from the table “admin”. Finally, I tried to recreate that deleted admin account using “setup.php”. I get the following error message: “can’t encrypt password with dovecotpw, see error log for details”. I don’t even know where to look for that log. It isn’t postfixadmin’s log as there are no errors reported. And “dovecot”‘s service’s status is active – no problems, only two warnings after restart regarding to creating clean config file and and obsolete setting in SSL config file. So how can I restore the access to postfixadmin?
I had a look into the error log file of postfixadmin and found these complaints:
Is the issue connected to the permission problem? If so why is the permission denied?
It’s because the
www-datauser doesn’t have permission to read Let’s Encrypt TLS certificate. To fix it, run the following command to grant permissions.Hi Xiao,
Thank you ever so much for your tutorial. There are probably plenty of people who know how to do all this, but it takes someone special to put it down for anyone to understand it in the way you did. This is unfortunately quite rare in the linux-community.
I just wanted to mention that I ran into a little problem with one of the queries in step 10. My system is Debian 10 with postgresql 11.9.
I got an SQL-error with the following query:
SELECT goto FROM alias,alias_domain WHERE alias_domain.alias_domain = '%d' and alias.address = CONCAT('%u', '@', alias_domain.target_domain) AND alias.active = 1 AND alias_domain.active='1'The trouble was with “alias.active = 1” it was missing single quotes around the 1.
Anyway, I just bought you a beer.
Hi Xiao,
Thanks for this awesome tutorial, all 3 parts ! My question is regarding a part I find mentioned on the PostFixadmin sourceforge page but not in any tutorial. How does one get postfixadmin-cli on ubuntu 18.04 ? I’d like to create virtual mailboxes for users by triggering a script.
Thanks
B.M
Dear Xiao,
Thank you for this wonderful instruction. I have this email server up and running for over a year now. Love it so much. There is one thing which I couldn’t find out how to do it, I searched here at your site but couldn’t find it either.
How do I upgrade the postfix to the newer version? I’m running v3.0.2 but the latest is 3.3.6!
Thank you so much in advance for this.
Sincerely yours,
Quang
Hello, great tutorial.
How do I transfer my existing mails in unix account to virtual mailbox account ?
Move the
~/Maildirdirectory to/var/vmail/example.com/username/directory.Do you know if this post is worth installing of postfixadmin with iredmail?
You can install PostfixAdmin on an existing iRedmail server: Install PostfixAdmin on an Existing iRedmail Server (Ubuntu)
The steps are generally the same as described in this article, but when configuring Postfix and Dovecot, you should add PostfixAdmin configs to the existing iRedMail parameters. If a parameter doesn’t accept multiple values, then you should not modify the existing parameter. Also note that when configuring Dovecot on iRedMail, you should use the /etc/dovecot/dovecot.conf file.
The Best Tutorials on the Internet!!!!
Thank you LinuxBabe!!!!
Good Day Xiao
I implemented Part 1 and Part 2 of the guide and the server ran for 6 months sending a receiving mails from email clients, working a 100%.
Busy with part 3 config, with postfix.admin setup getting this error.
Error: Can’t connect to database
Please edit the $CONF[‘database_*’] parameters in config.local.php.
DEBUG INFORMATION:
PostgreSQL functions not available! (php5-pgsql installed?)
database_type = ‘pgsql’ in config.inc.php, are you using a different database?
Best Regards
Johan
sudo apt install php8.1-pgsql
Are you using Apache or Nginx?
hello !
its really a great blog to know in detail about this.
i tried as u said expect the tls , because i dont want that and i can able to login postfix admin but i cant able to send emails .
Will you pleaase help me on this
Hi Xiao! Thank you for the great tutorials. I have done Part 1 & 2 successfully but I can’t get this part to work.
In my postfixadmin panel it gives the error:
And yes I know that you explain to use setfacl to enable permissions for the www-data user, but that doesn’t do anything for me. Here is my question: are we supposed to create the www-data user? The first mention of www-data user is this:
I don’t have a www-data user on my system. Where does it come from? Is it meant to be created automatically in some step that I missed? Or am I supposed to use some other user that exists instead?
Thank you if you can help!
Oh, well I do have a www-data user, I now see that it is the nginx web server user, so that’s not the problem, but I still have the same error.
Here is a tail of the mail.log
Oh, well I do have a www-data user, I now see that it is the nginx web server user, so that’s not the problem, but I still have the same error.
Here is a tail of the mail.log