Part 3: PostfixAdmin – Create Virtual Mailboxes on Ubuntu Mail Server
In previous articles, we discussed how to set up your own mail server on Ubuntu from scratch. In part 1 and part 2 of this tutorial series, we learned how to set up Postfix SMTP server and Dovecot IMAP server, but so far we can only have email addresses for users with local Unix accounts. This tutorial is going to show you how to create virtual mailboxes on Ubuntu mail server with PostfixAdmin, which is an open-source web-based interface to configure and manage a Postfix-based email server for many domains and users.
With virtual mailboxes, we don’t need to create a local Unix account for each email address. If you are going to set up a mail server for a company or organization, it’s always better to have an easy way to create virtual mailboxes in a web-based interface, which also allows users to change their passwords. That’s where PostfixAdmin comes in.
PostfixAdmin Features
- manage mailboxes, virtual domains, and aliases
- vacation/out-of-office messages (Personally I think it’s better done in Roundcube webmail)
- alias domains (forwarding one domain to another with recipient validation)
- users can manage their own mailbox (change alias, password and vacation message)
- quota support for single mailboxes and total quota of a domain
- fetchmail integration: You can fetch emails from your original email address to your new email address.
- command-line client postfixadmin-cli for those who don’t want to click around in a web interface 😉
Note
- This tutorial works on Ubuntu 22.04, Ubuntu 20.04, and Ubuntu 24.04.
- This tutorial uses MariaDB/MySQL database server. If you prefer to use PostgreSQL database server, please follow this PostfixAdmin/PostgreSQL tutorial.
- Once you finish part 3, you can no longer use local Unix accounts as email addresses. You must create email addresses from the PostfixAdmin web interface.
Prerequisites
It’s required that you have followed part 1 and part 2 of this tutorial series before continuing to read this article. If you followed mail server tutorials on other websites, I recommend purging your configurations (sudo apt purge postfix dovecot-core) and start over with my tutorial series, so you are not going to be confused by different setup processes.
Once the above requirements are met, let’s install and configure PostfixAdmin.
Step 1: Install MariaDB/MySQL Database Server
PostfixAdmin is written in PHP and requires a database (MySQL/MariaDB, PostgreSQL or SQLite). This article will use MariaDB database, which is a drop-in replacement for MySQL. It is developed by former members of MySQL team who are concerned that Oracle might turn MySQL into a closed-source product. Enter the following command to install MariaDB on Ubuntu.
sudo apt install mariadb-server mariadb-client
Hint: If you prefer to use MySQL, you can install it with: sudo apt install mysql-server-8.0.
After it’s installed, MariaDB server should be automatically started. Use systemctl to check its status.
systemctl status mariadb
Output:
● mariadb.service - MariaDB 10.3.22 database server
     Loaded: loaded (/lib/systemd/system/mariadb.service; enabled; vendor preset: enabled)
     Active: active (running) since Fri 2020-04-10 14:19:16 UTC; 18s ago
       Docs: man:mysqld(8)
             https://mariadb.com/kb/en/library/systemd/
   Main PID: 9161 (mysqld)
     Status: "Taking your SQL requests now..."
      Tasks: 31 (limit: 9451)
     Memory: 64.7M
     CGroup: /system.slice/mariadb.service
             └─9161 /usr/sbin/mysqld
If it’s not running, start it with this command:
sudo systemctl start mariadb
To enable MariaDB to automatically start at boot time, run
sudo systemctl enable mariadb
Now run the post-installation security script.
sudo mysql_secure_installation
When it asks you to enter MariaDB root password, press Enter key as the root password isn’t set yet. Then enter y to set the root password for MariaDB server.

Next, you can press Enter to answer all remaining questions, which will remove anonymous user, disable remote root login and remove test database. This step is a basic requirement for MariaDB database security. (Notice that Y is capitalized, which means it is the default answer. )

Step 2: Download PostfixAdmin on Ubuntu Server
PostfixAdmin is included in the default Ubuntu repository. However, I don’t recommend it for the following reasons:
- It can create problems when you upgrade the Ubuntu system to a new version, resulting in upgrade failure.
- If you use Nginx, the
postfixadminpackage might automatically install Apache on your system. - If you use MySQL, this package might remove MySQL from your system.
- The default
postfixadminpackage has a login loop issue from time to time. You will also sometimes encounter theInvalid token! (CSRF check failed)error.
So I will show you how to install the latest version of PostfixAdmin. Go to PostfixAdmin Gitbub page to download the latest version. You can use the wget tool to download it from command line. The download link is always available in the format below. If a new version comes out, simply replace 3.3.11 with the new version number.
sudo apt install wget

wget https://github.com/postfixadmin/postfixadmin/archive/postfixadmin-3.3.11.tar.gz
Once downloaded, extract the archive to the /var/www/ directory and rename it to postfixadmin.
sudo mkdir -p /var/www/

sudo tar xvf postfixadmin-3.3.11.tar.gz -C /var/www/

sudo mv /var/www/postfixadmin-postfixadmin-3.3.11 /var/www/postfixadmin
Step 3: Setting Up Permissions
PostfixAdmin requires a templates_c directory, and the web server needs read and write access to this directory, so run the following commands.
sudo mkdir -p /var/www/postfixadmin/templates_c

sudo apt install acl

sudo setfacl -R -m u:www-data:rwx /var/www/postfixadmin/templates_c/
Starting with Dovecot 2.3.11, the web server user needs permission to read Let’s Encrypt TLS certificate in order to do password hashing. Run the following two commands to grant permissions.
sudo setfacl -R -m u:www-data:rx /etc/letsencrypt/live/ /etc/letsencrypt/archive/
Step 4: Create a Database and User for PostfixAdmin
Log into MySQL/MariaDB shell as root with the following command.
sudo mysql -u root
Once you are logged in, create a database for PostfixAdmin using the following command. I named it postfixadmin, but you can use whatever name you like. (Don’t leave out the semicolon.)
create database postfixadmin;
Then enter the command below to create a database user for PostfixAdmin. Replace postfixadmin_password with your preferred password. Note that the password should not contain the # character, or you might not be able to log in later.
create user 'postfixadmin'@'localhost' identified by 'postfixadmin_password';
Grants all privileges of postfixadmin database to the user.
grant all privileges on postfixadmin.* to 'postfixadmin'@'localhost';
Flush the privileges table for the changes to take effect and then get out of MariaDB shell.
flush privileges;

exit;
Step 5: Configure PostfixAdmin
The default PostfixAdmin configuration file is config.inc.php. We need to create a config.local.php file and add custom configurations.
sudo nano /var/www/postfixadmin/config.local.php
Add the following lines in the file, so PostfixAdmin can connect to MySQL/MariaDB database. Replace postfixadmin_password with the real PostfixAdmin password created in step 4.
<?php
$CONF['configured'] = true;
$CONF['database_type'] = 'mysqli';
$CONF['database_host'] = 'localhost';
$CONF['database_port'] = '3306';
$CONF['database_user'] = 'postfixadmin';
$CONF['database_password'] = 'postfixadmin_password';
$CONF['database_name'] = 'postfixadmin';
$CONF['encrypt'] = 'dovecot:ARGON2I';
$CONF['dovecotpw'] = "/usr/bin/doveadm pw -r 5";
if(@file_exists('/usr/bin/doveadm')) { // @ to silence openbase_dir stuff; see https://github.com/postfixadmin/postfixadmin/issues/171
    $CONF['dovecotpw'] = "/usr/bin/doveadm pw -r 5"; # debian
}
Save and close the file. Note that we will use the ARGON2I password scheme. By default, PostfixAdmin and Dovecot use MD5-CRYPT, which is a weak password scheme. You can list available password schemes in Dovecot with the following command.
sudo doveadm pw -l
Sample output:
SHA1 SSHA512 BLF-CRYPT PLAIN HMAC-MD5 OTP SHA512 SHA RPA DES-CRYPT CRYPT SSHA MD5-CRYPT SKEY PLAIN-MD4 PLAIN-MD5 SCRAM-SHA-1 LANMAN SHA512-CRYPT CLEAR CLEARTEXT ARGON2I ARGON2ID SSHA256 NTLM MD5 PBKDF2 SHA256 CRAM-MD5 PLAIN-TRUNC SHA256-CRYPT SMD5 DIGEST-MD5 LDAP-MD5
Step 6: Create Apache Virtual Host or Nginx Config File for PostfixAdmin
Apache
If you use Apache web server, create a virtual host for PostfixAdmin.
sudo nano /etc/apache2/sites-available/postfixadmin.conf
Put the following text into the file. Replace postfixadmin.example.com with your real domain name and don’t forget to set DNS A record for it.
<VirtualHost *:80>
  ServerName postfixadmin.example.com
  DocumentRoot /var/www/postfixadmin/public

  ErrorLog ${APACHE_LOG_DIR}/postfixadmin_error.log
  CustomLog ${APACHE_LOG_DIR}/postfixadmin_access.log combined

  <Directory />
    Options FollowSymLinks
    AllowOverride All
  </Directory>

  <Directory /var/www/postfixadmin/>
    Options FollowSymLinks MultiViews
    AllowOverride All
    Order allow,deny
    allow from all
  </Directory>

</VirtualHost>
Save and close the file. Then enable this virtual host with:
sudo a2ensite postfixadmin.conf
Reload Apache for the changes to take effect.
sudo systemctl reload apache2
Now you should be able to see the PostfixAdmin web-based install wizard at http://postfixadmin.example.com/setup.php.
Nginx
If you use Nginx web server, create a virtual host for PostfixAdmin.
sudo nano /etc/nginx/conf.d/postfixadmin.conf
Put the following text into the file. Replace postfixadmin.example.com with your real domain name and don’t forget to set DNS A record for it.
server {
   listen 80;
   listen [::]:80;
   server_name postfixadmin.example.com;

   root /var/www/postfixadmin/public/;
   index index.php index.html;

   access_log /var/log/nginx/postfixadmin_access.log;
   error_log /var/log/nginx/postfixadmin_error.log;

   location / {
       try_files $uri $uri/ /index.php;
   }

   location ~ ^/(.+\.php)$ {
        try_files $uri =404;
        fastcgi_pass unix:/run/php/php8.1-fpm.sock;
        fastcgi_index index.php;
        fastcgi_param SCRIPT_FILENAME $document_root$fastcgi_script_name;
        include /etc/nginx/fastcgi_params;
   }
}
- The above configuration uses php8.1-fpm, which is the default for Ubuntu 22.04.
- If you use Ubuntu 20.04, replace
php8.1-fpmwithphp7.4-fpm. - If you use Ubuntu 24.04, replace
php8.1-fpmwithphp8.2-fpm.
Save and close the file. Then test Nginx configuration.
sudo nginx -t
If the test is successful, reload Nginx for the changes to take effect.
sudo systemctl reload nginx
Now you should be able to see the PostfixAdmin web-based install wizard at http://postfixadmin.example.com/setup.php.
Step 7: Install Required and Recommended PHP Modules
Run the following command to install PHP modules required or recommended by PostfixAdmin.
Ubuntu 22.04
sudo apt install php8.1-fpm php8.1-imap php8.1-mbstring php8.1-mysql php8.1-curl php8.1-zip php8.1-xml php8.1-bz2 php8.1-intl php8.1-gmp php8.1-redis
Ubuntu 20.04
sudo apt install php7.4-fpm php7.4-imap php7.4-mbstring php7.4-mysql php7.4-json php7.4-curl php7.4-zip php7.4-xml php7.4-bz2 php7.4-intl php7.4-gmp php7.4-redis
Ubuntu 24.04
sudo apt install php8.2-fpm php8.2-imap php8.2-mbstring php8.2-mysql php8.2-curl php8.2-zip php8.2-xml php8.2-bz2 php8.2-intl php8.2-gmp php8.2-redis
If you use Apache, you also need to install the libapache2-mod-php package.
sudo apt install libapache2-mod-php
Then restart Apache.
sudo systemctl restart apache2
Step 8: Enabling HTTPS
To encrypt the HTTP traffic, we can enable HTTPS by installing a free TLS certificate issued from Let’s Encrypt. Run the following command to install Let’s Encrypt client (certbot) on Ubuntu server.
sudo apt install certbot
If you use Apache, install the Certbot Apache plugin.
sudo apt install python3-certbot-apache
And run this command to obtain and install TLS certificate.
sudo certbot --apache --agree-tos --redirect --hsts --staple-ocsp --email [email protected] -d postfixadmin.example.com
If you use Nginx, then you also need to install the Certbot Nginx plugin.
sudo apt install python3-certbot-nginx
Next, run the following command to obtain and install TLS certificate.
sudo certbot --nginx --agree-tos --redirect --hsts --staple-ocsp --email [email protected] -d postfixadmin.example.com
Where
--nginx: Use the nginx plugin.--apache: Use the Apache plugin.--agree-tos: Agree to terms of service.--redirect: Force HTTPS by 301 redirect.--hsts: Add the Strict-Transport-Security header to every HTTP response. Forcing browser to always use TLS for the domain. Defends against SSL/TLS Stripping.--staple-ocsp: Enables OCSP Stapling. A valid OCSP response is stapled to the certificate that the server offers during TLS.
The certificate should now be obtained and automatically installed, which is indicated by the message below.

Step 9: Enable Statistics in Dovecot
PostfixAdmin needs to read Dovecot statistics. Edit the Dovecot configuration file.
sudo nano /etc/dovecot/conf.d/10-master.conf
Add the following lines to the end of this file.
service stats {
    unix_listener stats-reader {
    user = www-data
    group = www-data
    mode = 0660
}

unix_listener stats-writer {
    user = www-data
    group = www-data
    mode = 0660
  }
}
Save and close the file. Then add the web server to the dovecot group.
sudo gpasswd -a www-data dovecot
Restart Dovecot.
sudo systemctl restart dovecot
Grant permissions to the www-data user.
sudo setfacl -R -m u:www-data:rwx /var/run/dovecot/stats-reader /var/run/dovecot/stats-writer
Step 10: Finish the Installation in Web Browser
Go to postfixadmin.example.com/setup.php to run the web-based setup wizard. First, you need to create a setup password for PostfixAdmin.

After creating the password hash, PostfixAdmin will display a line like below.
$CONF['setup_password'] = '$2y$10$58fIawuOb5y538RMBol/DOoqv2bJ7zhPRzRO.4Xq7MLeQJHmaFwF2';
You need to open the config.local.php file.
sudo nano /var/www/postfixadmin/config.local.php
Add the line displayed on PostfixAdmin setup page to the end of the file like below.

After saving the file, you need to refresh the PostfixAdmin setup page and enter the setup password again, then create the admin account. Please don’t use a Gmail, Yahoo Mail, or Microsoft email address for the admin account, or you might not be able to log in later. Use an email address on your own domain. You can create the email address later in PostfixAdmin.

If you encounter the following error when trying to create a superadmin account,
Password Hashing - attempted to use configured encrypt backend (dovecot:ARGON2I) triggered an error: /usr/bin/doveadm pw -r 5 failed, see error log for details
or
can’t encrypt password with dovecotpw, see error log for details
It’s because the www-data user doesn’t have permission to read Let’s Encrypt TLS certificate. To fix it, run the following command to grant permissions.
sudo setfacl -R -m u:www-data:rx /etc/letsencrypt/live/ /etc/letsencrypt/archive/
Sometimes, you might also need to run the following command to fix this error.
sudo setfacl -R -m u:www-data:rwx /var/run/dovecot/stats-reader /var/run/dovecot/stats-writer
Once the superadmin account is created, you can log into PostfixAdmin at postfixadmin.example.com/login.php.

Step 11: Checking Tables in the Database
The PostfixAdmin setup process populates the postfixadmin database with some default tables. It’s helpful for us to know the names and structure of the tables. Log in to MySQL/MariaDB console.
sudo mysql -u root
Select the postfixadmin database.
USE postfixadmin;
List all tables in this database.
SHOW TABLES;
Output:
+------------------------+
| Tables_in_postfixadmin |
+------------------------+
| admin                  |
| alias                  |
| alias_domain           |
| config                 |
| domain                 |
| domain_admins          |
| fetchmail              |
| log                    |
| mailbox                |
| quota                  |
| quota2                 |
| vacation               |
| vacation_notification  |
+------------------------+
13 rows in set (0.001 sec)
The 3 most important tables are:
domain: contains information on the domains that are using your mail server to send and receive email.mailbox: contains information on every email address, including hashed password and the location of mail files.alias: contains the alias of each email address.
If you are interested, you can check what columns each table contains. For example, the following command will show us the columns in the domain table.
DESCRIBE domain;
Output:
+-------------+--------------+------+-----+---------------------+-------+
| Field       | Type         | Null | Key | Default             | Extra |
+-------------+--------------+------+-----+---------------------+-------+
| domain      | varchar(255) | NO   | PRI | NULL                |       |
| description | varchar(255) | NO   |     | NULL                |       |
| aliases     | int(10)      | NO   |     | 0                   |       |
| mailboxes   | int(10)      | NO   |     | 0                   |       |
| maxquota    | bigint(20)   | NO   |     | 0                   |       |
| quota       | bigint(20)   | NO   |     | 0                   |       |
| transport   | varchar(255) | NO   |     | NULL                |       |
| backupmx    | tinyint(1)   | NO   |     | 0                   |       |
| created     | datetime     | NO   |     | 2000-01-01 00:00:00 |       |
| modified    | datetime     | NO   |     | 2000-01-01 00:00:00 |       |
| active      | tinyint(1)   | NO   |     | 1                   |       |
+-------------+--------------+------+-----+---------------------+-------+
Log out of MySQL/MariaDB console.
EXIT;
Step 12: Configure Postfix to Use MySQL/MariaDB Database
By default, Postfix delivers emails only to users with a local Unix account. To make it deliver emails to virtual users whose information is stored in the database, we need to configure Postfix to use virtual mailbox domains.
First, we need to add MySQL map support for Postfix by installing the postfix-mysql package.
sudo apt install postfix-mysql
Then edit the Postfix main configuration file.
sudo nano /etc/postfix/main.cf
Add the following lines at the end of this file.
virtual_mailbox_domains = proxy:mysql:/etc/postfix/sql/mysql_virtual_domains_maps.cf
virtual_mailbox_maps =
   proxy:mysql:/etc/postfix/sql/mysql_virtual_mailbox_maps.cf,
   proxy:mysql:/etc/postfix/sql/mysql_virtual_alias_domain_mailbox_maps.cf
virtual_alias_maps =
   proxy:mysql:/etc/postfix/sql/mysql_virtual_alias_maps.cf,
   proxy:mysql:/etc/postfix/sql/mysql_virtual_alias_domain_maps.cf,
   proxy:mysql:/etc/postfix/sql/mysql_virtual_alias_domain_catchall_maps.cf
Where:
virtual_mailbox_domainspoints to a file that will tell Postfix how to look up domain information from the database.virtual_mailbox_mapspoints to files that will tell Postfix how to look up email addresses from the database.virtual_alias_mapspoints to files that will tell Postfix how to look up aliases from the database.
We want to use dovecot to deliver incoming emails to the virtual users’ message store, so also add the following line at the end of this file.
virtual_transport = lmtp:unix:private/dovecot-lmtp

Save and close the file. Next, we need to create the .cf files one by one. Create the sql directory.
sudo mkdir /etc/postfix/sql/
Create the mysql_virtual_domains_maps.cf file.
sudo nano /etc/postfix/sql/mysql_virtual_domains_maps.cf
Add the following content. Replace password with the postfixadmin password you set in Step 2.
user = postfixadmin
password = password
hosts = localhost
dbname = postfixadmin
query = SELECT domain FROM domain WHERE domain='%s' AND active = '1'
#query = SELECT domain FROM domain WHERE domain='%s'
#optional query to use when relaying for backup MX
#query = SELECT domain FROM domain WHERE domain='%s' AND backupmx = '0' AND active = '1'
#expansion_limit = 100
Create the mysql_virtual_mailbox_maps.cf file.
sudo nano /etc/postfix/sql/mysql_virtual_mailbox_maps.cf
Add the following content.
user = postfixadmin
password = password
hosts = localhost
dbname = postfixadmin
query = SELECT maildir FROM mailbox WHERE username='%s' AND active = '1'
#expansion_limit = 100
Create the mysql_virtual_alias_domain_mailbox_maps.cf file.
sudo nano /etc/postfix/sql/mysql_virtual_alias_domain_mailbox_maps.cf
Add the following content.
user = postfixadmin
password = password
hosts = localhost
dbname = postfixadmin
query = SELECT maildir FROM mailbox,alias_domain WHERE alias_domain.alias_domain = '%d' and mailbox.username = CONCAT('%u', '@', alias_domain.target_domain) AND mailbox.active = 1 AND alias_domain.active='1'
Create the mysql_virtual_alias_maps.cf file.
sudo nano /etc/postfix/sql/mysql_virtual_alias_maps.cf
Add the following content.
user = postfixadmin
password = password
hosts = localhost
dbname = postfixadmin
query = SELECT goto FROM alias WHERE address='%s' AND active = '1'
#expansion_limit = 100
Create the mysql_virtual_alias_domain_maps.cf file.
sudo nano /etc/postfix/sql/mysql_virtual_alias_domain_maps.cf
Add the following content.
user = postfixadmin
password = password
hosts = localhost
dbname = postfixadmin
query = SELECT goto FROM alias,alias_domain WHERE alias_domain.alias_domain = '%d' and alias.address = CONCAT('%u', '@', alias_domain.target_domain) AND alias.active = 1 AND alias_domain.active='1'
Create the mysql_virtual_alias_domain_catchall_maps file.
sudo nano /etc/postfix/sql/mysql_virtual_alias_domain_catchall_maps.cf
Add the following content.
# handles catch-all settings of target-domain
user = postfixadmin
password = password
hosts = localhost
dbname = postfixadmin
query = SELECT goto FROM alias,alias_domain WHERE alias_domain.alias_domain = '%d' and alias.address = CONCAT('@', alias_domain.target_domain) AND alias.active = 1 AND alias_domain.active='1'
Since the database passwords are stored in plain text so they should be readable only by user postfix and root, which is done by executing the following two commands.
sudo chmod 0640 /etc/postfix/sql/*
sudo setfacl -R -m u:postfix:rx /etc/postfix/sql/
Next, we need to change the value of the mydestination parameter in Postfix. Display the current value:
postconf mydestination
Sample output:
mydestination = $myhostname, linuxbabe.com, localhost.$mydomain, localhost
The mydestination parameter contains a list of domain names that will receive emails delivered to local Unix accounts. In part 1, we added the apex domain name (like linuxbabe.com) to mydestination. Since we are going to use virtual mailbox, we need to remove the apex domain name from the list by issuing the following command.
sudo postconf -e "mydestination = \$myhostname, localhost.\$mydomain, localhost"
Now let’s open the Postfix main configuration file again.
sudo nano /etc/postfix/main.cf
Add the following lines at the end of this file.
virtual_mailbox_base = /var/vmail
virtual_minimum_uid = 2000
virtual_uid_maps = static:2000
virtual_gid_maps = static:2000
The first line defines the base location of mail files. The remaining 3 lines define which user ID and group ID Postfix will use when delivering incoming emails to the mailbox. We use the user ID 2000 and group ID 2000.
Save and close the file. Restart Postfix for the changes to take effect.
sudo systemctl restart postfix
Next, we need to create a user named vmail with ID 2000 and a group with ID 2000.
sudo adduser vmail --system --group --uid 2000 --disabled-login --no-create-home
Create the mail base location.
sudo mkdir /var/vmail/
Make vmail as the owner.
sudo chown vmail:vmail /var/vmail/ -R
Step 13: Configure Dovecot to Use MySQL/MariaDB Database
We also need to configure the Dovecot IMAP server to query user information from the database. First, run the following command to add MySQL support for Dovecot.
sudo apt install dovecot-mysql
Then edit the 10-mail.conf file.
sudo nano /etc/dovecot/conf.d/10-mail.conf
In part 2, we used the following mail_location. Email messages are stored under the Maildir directory under each user’s home directory.
mail_location = maildir:~/Maildir
Since we are using virtual mailbox domain now, we need to enable mail_home for the virtual users by adding the following line in the file, because virtual users don’t have home directories by default.
mail_home = /var/vmail/%d/%n/

Save and close the file. Then edit the 10-auth.conf file.
sudo nano /etc/dovecot/conf.d/10-auth.conf
In part 2, we used the following value for auth_username_format.
auth_username_format = %n
The %n would drop the domain if it was given. Because in part 2 we were using local Unix account for the username of every email address, we must use %n to drop the domain, so users were able to login with the full email address.
Now we are using virtual mailbox domains, which means the username of every email address includes the domain part, so we need to change the auth_username_format as follows. %u won’t drop away the domain. This allows users to login with the full email address.
auth_username_format = %u
Then find the following line.
#auth_default_realm =
Change it to
auth_default_realm = example.com
This is to ensure users who didn’t enter the @example.com part in the username field can still log in. Dovecot will append the @example.com part if it’s not given by users.
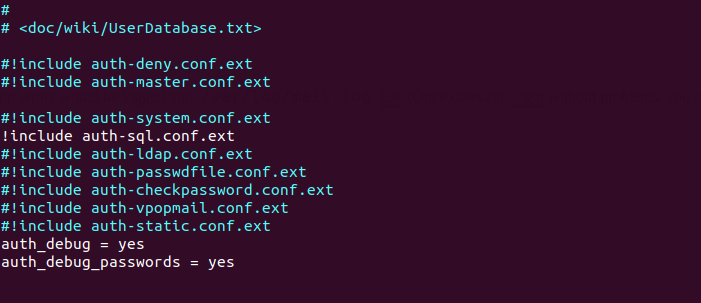
Next, uncomment the following line at the end of this file, so Dovecot can query user information from MySQL/MariaDB database.
!include auth-sql.conf.ext
Now you probably don’t want local Unix users to send emails without registering email addresses in PostfixAdmin, then comment out the following line by adding the # character at the beginning, so Dovecot won’t query the local /etc/passwd or /etc/shadow file.
#!include auth-system.conf.ext
It can be helpful to add the following two lines in this file to debug login issues. The login errors would be logged into /var/log/mail.log file. (Once users can login without problems, you can comment out the following two lines.)
auth_debug = yes
auth_debug_passwords = yes
Save and close the file.
Edit the dovecot-sql.conf.ext file.
sudo nano /etc/dovecot/dovecot-sql.conf.ext
Here is the content that you should have in this file. By default, all lines in this file are commented out, so you can simply copy and paste them at the bottom. Replace password with the postfixadmin password you set in Step 2.
driver = mysql

connect = host=localhost dbname=postfixadmin user=postfixadmin password=password

default_pass_scheme = ARGON2I

password_query = SELECT username AS user,password FROM mailbox WHERE username = '%u' AND active='1'

user_query = SELECT maildir, 2000 AS uid, 2000 AS gid FROM mailbox WHERE username = '%u' AND active='1'

iterate_query = SELECT username AS user FROM mailbox
Restart Dovecot.
sudo systemctl restart dovecot
When a user tries to log in, Dovecot would use the Argon2 algorithm to generate a password hash from the password entered by the user, then compare it with the password hash stored in the database.
Step 14: Add Domain and Mailboxes in PostfixAdmin
Log in to PostfixAdmin web interface as the admin. Click the Domain List tab and select New Domain to add a domain. You can choose how many aliases and mailboxes are allowed for this domain.

Then click Virtual List tab and select Add Mailbox to add a new email address for your domain.

Next, you can open your desktop email client such as Mozilla Thunderbird and add a mail account.
- In the incoming server section, select IMAP protocol, enter
mail.your-domain.comas the server name, choose port 143 and STARTTLS. Choosenormal passwordas the authentication method. - In the outgoing section, select SMTP protocol, enter
mail.your-domain.comas the server name, choose port 587 and STARTTLS. Choosenormal passwordas the authentication method.

Hint 1: You can also use port 993 with SSL/TLS encryption for IMAP, and use port 465 with SSL/TLS encryption for SMTP. You should not use port 25 as the SMTP port in mail clients to submit outgoing emails.
Hint 2: If you use Microsoft 365 Outlook email client, then you shouldn’t enable Secure Password Authentication (SPA), which is a proprietary Microsoft protocol. Your password is already encrypted by TLS.
You should now be able to connect to your own email server and also send and receive emails with your desktop email client! Note that you cannot use local Unix accounts to login now. You must log in with the virtual user created from PostfixAdmin web interface.
Troubleshooting Tips
As a rule of thumb, you should always check the mail log (/var/log/mail.log) on your mail server when an error happens. The following is a list of specific errors and troubleshooting tips.
Can’t login from Mail Clients
If you can’t log into your mail server from a desktop mail client, scan your mail server to find if the ports are open. Note that you should run the following command from another Linux computer or server. If you run it on your mail server, then the ports will always appear to be open.
sudo nmap mail.your-domain.com
And check if Dovecot is running.
systemctl status dovecot
You can also check the mail log (/var/log/mail.log), which may give you some clues. If Dovecot fails to start, the error might not be logged to the /var/log/mail.log file, you can run the following command to see what’s wrong.
sudo journalctl -eu dovecot
If you see the following error in the mail log, it’s likely that you didn’t set a correct password in the .cf files under /etc/postfix/sql/ directory.
postfix/trivial-rewrite[28494]: warning: virtual_alias_domains: proxy:mysql:/etc/postfix/sql/mysql_virtual_alias_maps.cf: table lookup problem
postfix/trivial-rewrite[28494]: warning: virtual_alias_domains lookup failure
If you see the following error in the mail log, it’s because you forgot to add mail_location = maildir:~/Maildir in the /etc/dovecot/conf.d/10-mail.conf file.
open(/var/mail/[email protected]) failed: Permission denied (euid=2000(vmail) egid=2000(vmail) missing +w perm: /var/mail, we're not in group 8(mail), dir owned by 0:8 mode=0775
Cloudflare DNS
As I said in part 1, if you use Cloudflare DNS service, you should not enable the CDN (proxy) feature when creating DNS A record and AAAA record for the hostname of your mail server. Cloudflare doesn’t support SMTP or IMAP proxy.
Relay Access Denied
If you see the “relay access denied” error when trying to send emails from a mail client, it’s most likely that you use port 25 as the SMTP port in your mail client. As I said a while ago, you should use port 587 or 465 as the SMTP port in mail clients (Mozilla Thunberbird, Microsoft Outlook, etc) to submit outgoing emails. Port 25 should be used for SMTP server to SMTP server communications.

iOS Mail App
If you use the iOS Mail app to log into your mail server and encounter the following error.

You can try to fix it by enforcing SSL encryption, for both SMTP and IMAP.

Fun fact: It seems the iOS Mail app has difficulty in supporting STARTTLS on IMAP port 143, but it supports STARTTLS on the submission port 587.
Temporary Lookup Failure
If your mail server was working fine for some time, but suddenly you find the following error in the mail log,
Aug 25 20:25:24 mx postfix/trivial-rewrite[3313]: warning: virtual_alias_domains: proxy:mysql:/etc/postfix/sql/mysql_virtual_alias_maps.cf: table lookup problem
Aug 25 20:25:24 mx postfix/trivial-rewrite[3313]: warning: virtual_alias_domains lookup failure
Aug 25 20:25:24 mx postfix/submission/smtpd[3464]: NOQUEUE: reject: 451 4.3.0 <[email protected]>: Temporary lookup failure;  proto=ESMTP
Aug 25 20:25:24 mx postfix/submission/smtpd[3464]: Temporary lookup failure
It’s likely that your MariaDB/MySQL database stopped somehow. You can use the following command to check when your database server stopped.
sudo journalctl -eu mariadb
or
sudo journalctl -eu mysql
A common cause for this situation is that your server is out-of-memory. Check if your server has enough memory.
htop
or
free -m
This error can also be caused by too many connections to the MariaDB/MySQL databases, so it can’t handle more queries. To fix this, you can increase the number of connections MariaDB/MySQL can handle.
sudo nano /etc/mysql/mariadb.conf.d/50-server.cnf
Find the following line in the Fine Tuning section.
#max_connections = 100
Uncomment it and change the value to 500.
max_connections = 500
If your server has lots of RAM, you can change it to a bigger number like 1000.
max_connections = 1000
Save and close the file. Then restart MariaDB/MySQL.
sudo systemctl restart mysql
Automatically Clean the Junk Folder and Trash Folder
To delete emails in Junk folder for all users, you can run
sudo doveadm expunge -A mailbox Junk all
To delete emails in Trash folder, run
sudo doveadm expunge -A mailbox Trash all
I think it’s better to clean emails that have been in the Junk or Trash folder for more than 2 weeks, instead of cleaning all emails.
sudo doveadm expunge -A mailbox Junk savedbefore 2w
Then add a cron job to automate the job.
sudo crontab -e
Add the following line to clean Junk and Trash folder every day.
@daily doveadm expunge -A mailbox Junk savedbefore 2w;doveadm expunge -A mailbox Trash savedbefore 2w
You also need to allow the www-data user to read certificate files by adding the following line.
@daily setfacl -R -m u:www-data:rx /etc/letsencrypt/live/ /etc/letsencrypt/archive/
To receive report when a Cron job produces an error, you can add the following line above all Cron jobs.
MAILTO="[email protected]"
Save and close the file. And you’re done.
Change User Password in PostfixAdmin
Users can log into PostfixAdmin at https://postfixadmin.example.com/users/login.php, then change their passwords.
Restricting Access to Sendmail
By default, any local user can use the sendmail binary to submit outgoing emails. Now that your mail server is using virtual mailboxes, you might want to restrict access to the sendmail binary to trusted local users only, so a malicious user can’t use it to send a large volume of emails to damage your mail server’s reputation. Edit the Postfix main configuration file.
sudo nano /etc/postfix/main.cf
Add the following line to the end of this file, so only the root, www-data and vmail user can submit emails via sendmail. You can also add other usernames.
authorized_submit_users = root,www-data,vmail
Save and close the file. Then restart Postfix.
sudo systemctl restart postfix
How to Deal with Data Breach with Alias
If you use the same email address to register accounts on every website, and the data is leaked to third parties due to various reasons, then lots of spammers will buy the leaked email database and send spam.
To prevent your email address from being the target of spammers, you can use PostfixAdmin to create an alias address for each website. If the data is leaked to third parties, you can delete the alias and create a new one, so you won’t be spammed by those third parties.
How to Upgrade PostfixAdmin
Sometimes there might be bugs in the current PostfixAdmin that can be fixed by upgrading to a new version. It’s very simple to upgrade PostfixAdmin. When a new version of PostfixAdmin comes out, then you need to
- Make a copy of the
/var/www/postfixadmin/config.local.phpfile to your home directory. - Remove the PostfixAdmin web directory (
sudo rm /var/www/postfixadmin/ -r) - Go through step 2, step 3, step 5, and step 10 again in this tutorial. When doing step 5, simply copy the
config.local.phpfile from your home directory. In step 10, the PostfixAdmin database schema will be automatically updated when you visit thesetup.phpweb page.
I once had a login loop problem in my PostfixAdmin installation and it’s fixed by upgrading PostfixAdmin to the latest version.
Next Step
I hope this tutorial helped you install and use PostfixAdmin on Ubuntu to create virtual mailboxes. In part 4, I will show you how to set up SPF and DKIM with Postfix to improve email deliverability and in a future tutorial, I’m going to show you how to host multiple domains with PostfixAdmin.
If you want to access emails from a web browser, then I recommend Roundcube, which is a very popular and featured-rich open-source webmail client. As always, if you found this post useful, subscribe to our free newsletter to get more tips and tricks. Take care 🙂


Hi Xiao,
Thanks for this part 3 of the Email Server. I have followed Part 1 and 2.
I’m new with Email server so just to confirm that I can start a fresh server and install this Part 3 to use Email Server with PostfixAdmin. And following installation from Part 4 – Part 9 for a EMAIL SERVER PRODUCTION?
Can we both install Postfix and PostfixAdmin as follow the full installation from Part1 – Part9 as this site: “https://www.linuxbabe.com/mail-server/setup-basic-postfix-mail-sever-ubuntu”?
Thanks so much.
Kind regards,
Quang
In the “prerequisites” section of this article, there’s a sentence: “It’s required that you have followed part 1 and part 2 of this tutorial series before continuing reading this article.”
Hi Xiao,
Thanks so much for the reply. Yes, I followed till nearly the end of Part 2.
However, I still couldn’t setup the email account with ThunderBird for both user1 & user2. Do not know what I did wrong. I am very careful with your detail instructions with step by step following.
It says: “Thunderbird failed to find the settings for your email account.” I also tried the other Port 993 & 465 with normal password as the Unix Password.
Should I just continue to the Cronjob part at the last session and go on to Part 3 with the virtual Mailbox? Feeling stuck here!
Much appreciated for your support.
Can you tell me what’s your domain name? If you don’t like to show your domain name in public, you can reply in email.
First, you MX record is wrong. You should create MX for your apex domain name like below.

Second, only port 22, 80 and 443 on your server are open.
Hi Xiao,
All working good now. Thanks so much. Learning new stuff every day by making a mistake!!!
Hello Xiao,
Thanks for the quick fix.
– Good news: I have got the email send and receive successfully after Part 2 with Thunderbird! Note: I set up Postfix with this subdomain: https://mail.mysite.com. I got score 8/10 at Mail-Tester.com due to have not set up SPF and DKIM in part 4 and 5 yet.
– Bad news: after Part 3, I stuck at Step 8: Finish the Installation in Web Browser. Go to postfixadmin.example.com/setup.php
I get this error at my website: https://mail.mysite.com – 403 Forbidden – nginx/1.14.0 (Ubuntu)
I think I made a terrible mistake when I started Part 3 by setting up the subdomain: postfixadmin.example.com as the same with postfix: https://mail.mysite.com in Part2 for Postfix.
To clarify my understanding as below:
I need to host one server as server 1: 111.222.333.444 for Part 1+2 with Postfix and point the A records DNS to https://mail.mysite.com?
And host another server as server 2: 555.666.777.888 for Part 3 to set up with PostfixAdmin and point the A records DNS to https://postfixadmin.mysite.com?
What am I doing wrong? Can we install both Postfix and PostfixAdmin in one server with the subdomain https://mail.mysite.com only?
Thanks again for your wonderful support and very quick reply.
Regards,
Quang
You can point mail.example.com and postfixadmin.example.com to the same IP address when creating DNS A record.
Hello Xiao Guoan. I have completed Step 6 The error was that postfixadmin is not using (config.local.php). I have made the changes you provided in (config.inc.php). I have deleted the mailbox through postfixadmin and created a new one. After this operation my mail client was able to connect, but I ran into a new problem. Given that lesson 3 was completed to the end, the password for logging into the admin panel of postfixadmin was created with the old encryption, and therefore I was no longer able to log into the admin panel of postfixadmin. It seems I will have to remove postfixadmin and reinstall it, but what will happen with the databases that postfixadmin has already created?
You don’t have to reinstall PostfixAdmin. Go to
postfixadmin.example.com/setup.phpto create a new superadmin account. Then delete the old superadmin account.Same system, same problem here!
I think Postfixadmin doesn’t use
config.local.phpbecauseconfig.inc.phptry to include it from/etc/postfixadmin/not from/usr/share/postfixadmin/…If PostfixAdmin doesn’t use it, you can create a symlink, so PostfixAdmin can find this file.
Hi – great tutorials!
I just tried to use
sudo setfacl -R -m u:www-data:rwx /usr/share/postfixadmin/templates_c/
and ubuntu 20.04 returns: sudo: setfacl: command not found
Maybe you could add the hint to install the acl package
sudo apt install acl
BR
Thanks for the tip.
Hey Xiao
I have finished part 3 tutorial and have come across an error when trying to send mail with thunderbird
An error occurred while sending mail. The mail server responded:
451 4.3.0 : Temporary lookup failure.
Please check the message recipient “Destination email address again” and try again.
I’ve checked the mail log and i believe it to be an error with
warning: proxy:mysql:/etc/postfix/sql/mysql_virtual_alias_domain_maps.cf lookup error for “Redacted Email Address”
It could be there’s no such email address created in Postfixadmin.
It’s likely that you didn’t enter a correct password for the
postfixadminuser in the .cf file under /etc/postfix/sql/ directory.Ni hao, Xiao!
I’m still having trouble getting Thunderbird to log into the server. I’ve even gone so far as to wipe the server and start over, but I still can’t log in from Thunderbird. What do you need to help me diagnose the problem?
Read the troubleshooting tips at the end of the article 🙂
Here’s the output from my mail log:
It looks to me like there’s a problem with the encryption of my password. Is there something I need to do with ARGON2I to make it work?
Maybe your config.loca.php file is missing the <?php opening tag.
Add the opening tag at the beginning of this file.
<?php
$CONF['encrypt'] = 'dovecot:ARGON2I';

$CONF['dovecotpw'] = "/usr/bin/doveadm pw -r 5";
if(@file_exists('/usr/bin/doveadm')) { // @ to silence openbase_dir stuff; see https://github.com/postfixadmin/postfixadmin/issues/171
    $CONF['dovecotpw'] = "/usr/bin/doveadm pw -r 5"; # debian
}
Then you should delete the old email address in PostfixAdmin and create a new one. If you can’t log into Postfixadmin, then go to the setup page https://postfixadmin.example.com/setup.php to create a new superadmin account.
That did it!
This is great stuff!
The last mail server I built was on Ubuntu 16.04 from the instructions at exratione dotcom, and it’s been working great.
But… recently, I decided it was time to move my mail server offsite to a VPS (my ISP won’t give me a PTR record for the static IP I’m paying for).
Just finished with part 3, and Thunderbird logs in and sends mail just fine!
I am following along, and everything seems to be working. I’ve only had a couple of challenges. But they were user error. Your instructions are very good. Log files are your friend (except with letsencrypt, because their logs aren’t that helpful lol).
Just a suggestion: if you’ve got t-shirts or mugs, I’d be thrilled to buy them.
Thanks,
Ron
Generally, this is all working very well. I had a hiccup though with KMail.
“Failed to transport message. Error during SSL handshake: error:1408F10B:SSL routines:ssl3_get_record:wrong version number.”
I think this was because I tried to sign the email. What’s happening here?
The email client can’t establish TLS connection with Postfix or Dovecot. Try a different email client.
But it’s KMail. I really like KMail and so I’d prefer to keep using it. Is there a setting somewhere either in KMail or maybe in my server config files that can enable this connection?
Ahh never mind. My bad. KMail somehow detected the wrong smtp port plus left out the fact i needed username and password for smtp.
I put the correct port and supplied my credentials and it works.
thanks!
Tq for good Tutorial,
how setup Postfix and multiple SSL certificates with postfixadmin? i if have setup 10-200 domain in same machine
Please read this article: How to Host Multiple Mail Domains in PostfixAdmin on Ubuntu
Hello everyone,
I’m trying to prepend the name of the user in the From section to be like this:
– From: My Full Name
Notice that the name is stored in the database the Mailbox table.
Can someone help me to deal with this ?
From: name is controlled in your mail client. (Thunderbird, Roundcube webmail, etc.)
It can be used with relay services?
Yes. Please read this article: How to Set up Postfix SMTP Relay on Ubuntu with Sendinblue. As long as you use the Postfix SMTP server, you can follow this guide to set up SMTP relay.
ni hao ma, I read all articles not even one is good for what I need. If you can help me I will be grateful by running a Postifx in browser by using Ubuntu 20.4 along with Sendgrid. I searched all the internet for clues and all youtube and nothing found. Can you help?
You mean you need a web-based admin panel that allows you to configure SMTP relay (sendgrid) without having to edit configuration files from the command line?
ni hao ma xie xie for your reply. All I want is to send/receive/read emails on my Google Cloud platform. I read all articles related to SMTP Integrating with the SMTP API, Postfix etc. I don’t have a start point how to start and what to do to solve this.
I installed Postfix and configured it to relay on Sendgrid. I want to send emails/receive/read them in my web interface. How can I do this? What are the steps do I must follow to enable a web interface of Postfix?
Hello Xiao,
one question, please:
is it possible with this configuration(POstfix-Dovecot-Postfixadmin-Roundcube) to send an automatic message to a user(emailaccount) that they should change their password at a certain period? or for this is necessary to use a control panel like webmin
Thanks!
You can use the Postfixadmin to send a broadcast message to all email accounts on the mail server. (Send email -> Broadcast message).
Unfortunately, the postfixadmin-cli doesn’t support this feature, so you can’t use add this task in Cron, but have to manually broadcast the message in PostfixAdmin web interface.
Hi Xiao, I am new to Linux and tried to follow your tutorial to the letter…….. however, I must have made a typo or missed a step as i can’t get Thunderbird to connect to my server and get the following message and whe I check the status of dovecot.
$ systemctl status dovecot
● dovecot.service - Dovecot IMAP/POP3 email server
     Loaded: loaded (/lib/systemd/system/dovecot.service; enabled; vendor preset: enabled)
     Active: active (running) since Fri 2020-06-26 01:55:50 AEST; 18h ago
       Docs: man:dovecot(1)
             http://wiki2.dovecot.org/
   Main PID: 37925 (dovecot)
      Tasks: 6 (limit: 9379)
     Memory: 6.8M
     CGroup: /system.slice/dovecot.service
             ├─37925 /usr/sbin/dovecot -F
             ├─37948 dovecot/anvil
             ├─37949 dovecot/log
             ├─37950 dovecot/config
             ├─38035 dovecot/stats
             └─62680 dovecot/auth

Jun 26 20:15:11 teseling.me dovecot[37949]: auth-worker(62694): Debug: Module loaded: /usr/lib/dovecot/modules/auth/lib20_auth_var_expand_crypt.so
Jun 26 20:15:11 teseling.me dovecot[37949]: auth-worker(62694): Debug: Module loaded: /usr/lib/dovecot/modules/auth/libdriver_mysql.so
Jun 26 20:15:11 teseling.me dovecot[37949]: auth-worker(62694): Error: mysql(localhost): Connect failed to database (postfixadmin): Access denied for user 'postfixadmin'@'localhost' (using password: YES) - waiting for 1 seconds before retry
Jun 26 20:15:11 teseling.me dovecot[37949]: auth-worker(62694): Debug: conn unix:auth-worker (pid=62680,uid=131): Server accepted connection (fd=13)
Jun 26 20:15:11 teseling.me dovecot[37949]: auth-worker(62694): Debug: conn unix:auth-worker (pid=62680,uid=131): Sending version handshake
Jun 26 20:15:11 teseling.me dovecot[37949]: lmtp(62679): Disconnect from local: Client has quit the connection (state=READY)
Jun 26 20:15:12 teseling.me dovecot[37949]: auth-worker(62694): Error: mysql(localhost): Connect failed to database (postfixadmin): Access denied for user 'postfixadmin'@'localhost' (using password: YES) - waiting for 5 seconds before retry
Jun 26 20:15:17 teseling.me dovecot[37949]: auth-worker(62694): Error: mysql(localhost): Connect failed to database (postfixadmin): Access denied for user 'postfixadmin'@'localhost' (using password: YES) - waiting for 25 seconds before retry
Jun 26 20:15:42 teseling.me dovecot[37949]: auth-worker(62694): Error: mysql(localhost): Connect failed to database (postfixadmin): Access denied for user 'postfixadmin'@'localhost' (using password: YES) - waiting for 125 seconds before retry
Jun 26 20:16:11 teseling.me dovecot[37949]: auth-worker(62694): Debug: conn unix:auth-worker (pid=62680,uid=131): Disconnected: Connection closed (fd=-1)
~
Your feedback would be appreciated.
The error indicates the
postfixadminuser can’t log into MySQL/MariaDB database server.Check the
.cffiles under/etc/postfix/sql/directory. The postfixadmin user password is included in those files. Make sure the password is correct. You can try to login as the postfixadmin user with this command.You will need to enter the password for the postfixadmin user.
You should also check the
/etc/dovecot/dovecot-sql.conf.extfile, which incudes the postfixadmin user password. Make sure it’s entered correctly.Also note that the postfixadmin password should not contain the # character.
When inspecting /etc/dovecot/dovecot-sql.conf.ext I realised I haven’t replaced “password” in
with the password I have set in step 2 when installing postfixadmin.
When restarting dovecot and postfix the error messages in /var/log/mail.log changed and are now: (I tried to remove a repetitive section of the error message lower down)
Well, “password mismatch” indicates you entered a wrong password in the /etc/dovecot/dovecot-sql.conf.ext file.
Is your mail server able to receive emails from other SMTP servers?
On second thought, it seems you are trying to login from a mail client via IMAP service, but the password for your email address wasn’t entered correctly.
Hi Xiao,
Thanks for your feedback. Your “second thought” regarding the incorrect mail client password pointed me to the answer.
I triple checked all my passwords and all were entered correctly.
It turned out that when I removed the ^ from my email address password the mail client (Thunderbird) was able to connect to the IMAP and SMTP services and I can now send and receive emails.
Now I will start on the other sections of your great tutorials.
Many thanks. Linuxbabe server guides are the gold standard for server setups.
Turns out my 20.04 was missing dependencies for mysql and that was the big deal; to get mysql installed again, filling in the missing dependencies, then purging it all! Reinstalling it all, (because of an intentional bug I allege), then one thing after another until something couldn’t go wrong, then again another zillion of other things were fixed that were very wrong, then finally this wonderful updated single line “connect = host=localhost dbname=postfixadmin user=postfixadmin password=password!” Yes indeed, in which you did update within the last 48 hours or so huh! Well if I may just say so myself, updated so eloquently thank you very much! I did notice, so I am pleased to inform you and everyone else, everything email wise is working as of now again and I couldn’t be more ecstatic today because of all this terrible nonsense completely and totally radically “fixed!” Thank you so very much for your wonderful informative and invaluable information that you freely provided to everyone without any doubt, of course willing to learn and it’s so fun that you make it so much darn fun too!
Have a Great Day,
ZUH
Could you explain how to configure the display of quota usage?
Please read the following article to set up quota in PostfixAdmin.
https://www.linuxbabe.com/mail-server/user-quota-postfixadmin-dovecot
Hello Xiao
This tutorial is amazing ! thanks for that.
Unfortunately I can’t send email. but receiving it’s ok.
/var/log/mail.log
I don’t understand “unknown user” , everything looks fine in database.
thanks for your help
Best regards
Because you didn’t include the
@domain.tldpart in the username. The username should be your full email address.Thank for your fast reply.
Effectively the @domain.tdl was missing in username (incoming/outgoing) field in Thunderbird.
Like this https://i.imgur.com/aemBKe3.png everything work fine. thank again.
And yes, this is the best tutorial on internet for mail server 🙂
amazing work !
Hi sir
is it possible to remove or edit the previous log and removing sensitive information (ip adress, mail adress) ? please
Sensitive information are now removed.
Hello Xiao,
Do you have any fail2ban jail to protect postfixadmin installations?
Thank You so much.
Use a self-hosted VPN to restrict access to PostfixAdmin: https://www.linuxbabe.com/debian/secure-email-server-against-hacking
Hi Xiao,
I have followed your tutorials with great success and have a functioning Postfix/Dovecot/Postfixadmin/Roundcube setup on Ubuntu 20.04, but I’m hitting a problem with the Fetchmail feature in Postfixadmin. Do you have any suggestions based on the error message in the log?
Thank you for your great work,
Eamonn
[Wed Aug 26 15:28:22.934975 2020] [proxy_fcgi:error] [pid 1065] [client xxx.xxx.xxx.xxx:52263] AH01071: Got error ‘PHP message: __LANG.pFetchmail_database_save_success used via read_f, but nothing replaced (value )’, referer: https://postfixadmin.mydomain.com/edit.php?table=fetchmail
Hi Xiao,
Thank you for your great tutorial. I followed them until this step (sudo dpkg-reconfigure postfixadmin) and I got errors as below:
/var/lib/dpkg/info/postfixadmin.prerm: 33: [: =: unexpected operator
/var/lib/dpkg/info/postfixadmin.config: 144: .: Can’t open /usr/share/dbconfig-common/internal/mysql
I checked mysql-server-8.0 is working. there was no mysql in the folder /usr/share/dbconfig-common/internal/
Thanks, John
Hi, I have followed your tutorials series – awesome and thank you! Everything has been working properly, but I encountered an issue with aliases I described here https://sourceforge.net/p/postfixadmin/discussion/676076/thread/6c7c7ce29a/
Could you look at it? Thank you in advance!
Hello Xiao,
first, thanks for this amazing tutorial!
I have a GlassFish application server running on my machine. I have also phppgadmin running on a different port, let say 5555 and configured with apache.
I use Nginx as a Reverse Proxy in front of GlassFish. (Ssl and configs for port 443 hasn’t been set yet.)
server {
  listen          80;
  server_name     my_domain;

  location / {
        proxy_set_header X-Forwarded-Host $host;
        proxy_set_header X-Forwarded-Server $host;
        proxy_set_header X-Forwarded-For $proxy_add_x_forwarded_for;
        proxy_pass http://my_ip_number:8080;
  }

  location /phppgadmin {
        proxy_set_header X-Forwarded-Host $host;
        proxy_set_header X-Forwarded-Server $host;
        proxy_set_header X-Forwarded-For $proxy_add_x_forwarded_for;

        proxy_pass http://my_ip_number:5555/phppgadmin;
  }
}
So now my problem: Creating a virtual host for PostfixAdmin like described above is not working for me. Visiting http://postfixadmin.my_domain/setup.php I get only a 404 from glassfish.
A DNS A record for the subdomain is set.
What is wrong with my configurations?
Thanks so much.
Kind regards,
Banifou
I solved my Problem by avoiding to create a virtual host for Postfixadmin. Instead, I just used nginx to forward everything from
to
.
Generating another SSL certificate is not necessary.
Everything works fine.
Hello Xiao,
Many thanks for your tutorials!
I have an issue with the encryption ARGON2ID. I have an issue during the authentification:
My file /usr/share/postfixadmin/config.local.php is like this:
I’ve add the authlib just in case, nevertheless it doesn’t work without it ether.
I’ve deleted and created a new email just in case… but this still doesn’t work 🙁
I’m expecting you will tell me to change for ARGON2I… still should we add the
Thanks!
If you use ARGON2ID to generate the password hash in Postfixadmin, you also need to use ARGON2ID in Dovecot.
And also edit
/etc/dovecot/conf.d/10-master.conf, findARGON2ID is RAM-hungry. Set the virtual memory size to at least 2G.
Hi Xiao,
first – mega howto! Thanks a lot for this great job!
It worked from the beginning on my Debian10 box. But I have one question.
Is there a way when I use many differnt domains from different customers, that each domain can use the own domain name for smtp and imap mailserver? Thunderbird send a error about the certificate. In the past was never a problem, but it would be nice when every customer can use his own domain name.
Please read this tutorial: How to Host Multiple Mail Domains in PostfixAdmin on Ubuntu
Hi, thanks.. i found a few hours later.
But now I have the next problem… can you explain how this quota for each user works?
I was use a few snippets from my old system – but it dont work.
Last night I thought I understand this combination after so many years 😀
It will be forever a black hole 🙂
Hi Lucky,
Please read the following article to set up quota in PostfixAdmin.
How to Configure User Quota in Dovecot & PostfixAdmin
Hi! Your tutorial is GREAT. Thank you for helping all of us with our mail servers. I really appreciate it.
However can you please tell what I might did wrong? It seams everything works fine – I can send messages to myself from my mail server and I receive it in Thunderbird, I can sent a messages to gmail account and I see them there too but I cant receive any messages from outside world.
Can you please help? I also new to Linux so I don’t know what should I attach so you can see my mistake.
It’s me again. I’v noticed that my postfix is not listening on port 25. It this a problem?
dad@mail:~$ sudo netstat -lnpt | grep master
tcp 0 0 0.0.0.0:443 0.0.0.0:* LISTEN 1059/nginx: master
tcp 0 0 0.0.0.0:587 0.0.0.0:* LISTEN 2136/master
tcp 0 0 0.0.0.0:80 0.0.0.0:* LISTEN 1059/nginx: master
tcp 0 0 0.0.0.0:465 0.0.0.0:* LISTEN 2136/master
tcp6 0 0 :::443 :::* LISTEN 1059/nginx: master
tcp6 0 0 :::80 :::* LISTEN 1059/nginx: master
Possible causes of not receiving emails
1. Your MX record is wrong.
2. Your mail server hostname doesn’t have DNS A record.
3. Your firewall doesn’t allow incoming connection to port 25.
4. Postfix isn’t listening on the public IP address.
5. Check the mail log (/var/log/mail.log) to find out if there are other errors in your configuration.
Yes, Postfix should be listening on port 25, in order to receive emails.
Of course. Thank you.
I don’t know how but I had commented this line
smtp inet n – y – – smtpd
so postfix wasn’t listening on port 25. This line fixed everything. Thank you!!
Xiao, This is a great writeup! Thanks for posting it.
I do have a question RE: PTR records.
In part one, I built a server and set the PTR record properly, like mail.domain1.com
At the conclusion of part three, if I then add other virtual domains like mail.domain2.com and mail.domain3.com.
How is that handled? Would domain2 and domain3 have issues with other MTA’s not “liking” what the server is set to?
As you stated in part one:
“Many MTAs accept email only if the server is really responsible for a certain domain. You should definitely set a PTR record for your email server so your emails have a better chance of landing in the recipient’s inbox instead of the spam folder.”
I’m sure I’m not explaining myself very well, sorry.
Your rDNS should just be set to one hostname, i.e. the hostname set in Postfix.
You don’t need to set rDNS for all your domains.
Hosted email services like G Suite and Microsoft Exchange Online all use one hostname for a server to send email for their customers.
Emails sent from G Suite users all use google.com in the hostname and emails sent from Microsoft Exchange Online users all use outlook.com in the hostname.
This is also true for other emails service providers like Mailchimp, Mailjet, SendPluse, etc. They all use one hostname for a single server and one IP address has just one rDNS record.
Please read the following article to find out how to get your email into the recipient’s inbox.
How to Stop Your Emails Being Marked as Spam
Hi Xiao,
Im receiving the following error when i try to create a super admin account in postfixadmin.
When check the log files of postfixadmin its telling me the following:
Fatal: Error in configuration file /etc/dovecot/conf.d/10-ssl.conf line 12: ssl_cert: Can’t open file /etc/letsencrypt/live/xxxx.xxxxxx.com/fullchain.
This means that somehow the cert cannot be read from the browser hence causing the error.
Do you know how to solve this?
Are you using Ubuntu 18.04?
Im using Ubuntu 20.10.
It’s because the www-data user doesn’t have permission to read Let’s Encrypt TLS certificate. To fix it, run the following two commands to grant permissions.
Hi Xiao,
Thank you for the response.
Can I install postfixadmin if I am using iredmail solution?
You can install PostfixAdmin on an existing iRedmail server: Install PostfixAdmin on an Existing iRedmail Server (Ubuntu)
The steps are generally the same as described in this article, but when configuring Postfix and Dovecot, you should add PostfixAdmin configs to the existing iRedMail parameters. If a parameter doesn’t accept multiple values, then you should not modify the existing parameter. Also note that when configuring Dovecot on iRedMail, you should use the
/etc/dovecot/dovecot.conffile.Some of the options in iredmail are paid only (in the web admin interface) and that’s why I was asking..
Hi Xiao,
Thank you for the great tutorials. I have successfully created my mail server with postfix, dovecot and postfixadmin. But after a while I have the problem, that postfixadmin / postfix will not create a user directory for a newly created user in the backend. Login to the new user is fine, but receiving emails does not work. Dovecot gives me the following error:
Error: Namespace ”: Mail storage autodetection failed with home=/var/vmail/mydomain.de/newMailUser/
The directory newMailUser is not existent in the vmail/mydomain.de directory. All existent other mail users can send and receive mails just fine.
When I created the vmail user the user is created but not as system user:
The user `vmail’ already exists, but is not a system user. Exiting.
Deleting and recreating does not change that.
Do you have any suggestions where the source of this problem might be? Thanks in advance.
Regards
Mario
Hi Xiao,
i have ruined my Postfixadmin installation.
Tryed to re-install it but no luck.
I dont have a /etc/postfixadmin/ folder any more, and it is not getting re-created by a reinstall.
Do you have a tip on how to reinstall postfixadmin?.
Regards
thomas
Started all over 🙂
Could you describe a way to use wildcard certificate with postfix/dovecot?
regards
thomas
what if I have some databases in the same server, is this progress will remove any existing DB in the same mysql server?
No. Your existing database will be intact.
I thought I’d try ARGON2ID but it doesn’t seem to be working.
I’m getting a password mismatch but comparing the hashes manually shows that they do.
Example:
ARGON2ID(password123) != ‘$argon2id$v=19$m=1048576,t=5,p=1$pvDQ2QrZRU0+auulfxb3Kw$c7hihLU/4zpXlURaN7FuuCRE7zVfGttf2178IcxwTpA’
You can check it with https://argon2.online
Anyway, switching back to ARGON2I is good enough for now.
Edit /etc/dovecot/conf.d/10-master.conf, find
ARGON2ID is RAM-hungry. Set the virtual memory size to at least 2G.
Then restart Dovecot.
Ah… thank you! Sorry for the duplication question just noticed the one 3 months ago
Hi Xiao,
i’ve got things to work now 🙂
Thank you for your great guides.
Is where a way to send a welcome email, to new users, like “here is your new mail box, this is your mail address and pw. You are forced to change pw at first login”?
Regards Thomas
I love your guides. I had postfixadmin working in the past, but with some upgrades I can no longer login.
I’m seeing this in my apache2 logs:
[Tue Jan 26 00:43:56.209719 2021] [php7:notice] [pid 2223259] [client x.x.x.x:61166] Failed to read password from /usr/bin/doveadm pw -r 5 ... stderr: doveconf: Fatal: Error in configuration file /etc/dovecot/dovecot.conf line 7: ssl_cert: Can't open file /etc/postfix/smtpd.cert: Permission denied\n, passw ord: , referer: https://postfixadmin.redacted.com/login.php [Tue Jan 26 00:43:56.210269 2021] [php7:notice] [pid 2223259] [client x.x.x.x:61166] Error while trying to call pacrypt(), referer: https://postfixadm in.redacted.com/login.php [Tue Jan 26 00:43:56.210302 2021] [php7:notice] [pid 2223259] [client x.x.x.x:61166] Exception: /usr/bin/doveadm pw -r 5 failed, see error log for det ails in /usr/share/postfixadmin/functions.inc.php:1056\nStack trace:\n#0 /usr/share/postfixadmin/functions.inc.php(1271): _pacrypt_dovecot()\n#1 /usr/share/p ostfixadmin/model/Login.php(33): pacrypt()\n#2 /usr/share/postfixadmin/public/login.php(63): Login->login()\n#3 {main}, referer: https://postfixadmin.omahach apterone.org/login.php [Tue Jan 26 00:43:56.210405 2021] [php7:notice] [pid 2223259] [client x.x.x.x:61166] PostfixAdmin admin login failed (username: [email protected], ip_address: x.x.x.x), referer: https://postfixadmin.redacted.com/login.phpHi, I have the same problem. If you can find the solution, please feel free to share it. Thank you! 🙂
Except that in my case it is directly linked to a file in “/etc/letsencrypt/live/mail…./privkey.pem”. I will add that I have run the commands:
I had to make sure Dovecot had access to my cert and key, as well as the dh.pem file. And then I could login to Postfixadmin, but some pages threw a Server 500 error and wouldn’t load. I had to add two new settings to my config.inc.php file for database_socket and password_expiry and that fixed those errors. I only really figured out what I needed to do by watching apache2 error logs and some trial and error. I don’t know if my setup is as secure as it should be now sadly.
Hi, I have noticed that after implementing this configuration, when sending messages from Thunderbird, I am getting an issue stating that the message cannot be placed in the “sent” folder. I’m wondering what could have gone wrong, because with earlier confirguration (Postfix + Dovecot) I didn’t have such error. Do you know what could be the cause ?
Below I put the exact message:
“The message was sent but a copy of the message has not been placed in the Sent folder due to network or file access errors”
Always check the mail log (/var/log/mail.log) when an error happens.
postfixadmin messed up with my existing environment i set up days ago. i already installed lnmp stack, after installing postfixadmin(apt install postfixadmin), mysql server could not start, and mariadb, php7.4, apache2 was installed by postfixadmin
i should install from source instead
You can remove MariaDB and Apache. Then restart MySQL server and Nginx.
I’ve been follow your tutorials with great results so far, but in this tutorial, everything seems to go right, sending email from outlook, setting up account using email clients, everything except receiving an incoming email. I’ve looked into /var/log/mail.log, and found that the email that is supposed to be delivered has the following msg:
any suggestions? thanks in advance for your help.
From the mail log, I can see that Postfix can’t connect to
dovecot-lmtp. Make suredovecot-lmtpdis installed.Edit the Dovecot main configuration file.
Add lmtp to the supported protocols.
Save and close the file. Then edit the Dovecot 10-master.conf file.
Change the lmtp service definition to the following.
service lmtp {
 unix_listener /var/spool/postfix/private/dovecot-lmtp {
   group = postfix
   mode = 0600
   user = postfix
  }
}
Restart Postfix and Dovecot.
PS: The above process has been explained in Part 2 of this tutorial series.
Thanks a lot! really helped. Now everything is working fine.
Hi Xiao,
thanks for your tutorials! I got stuck 🙁
Before I started this chapter I was able to send and receive emails. But now Im able to send email locally and externally, receive email locally, but not externally. External mail server error log:
Reason: [{LED=450 4.4.316 Connection refused [Message=Socket error code 10061] [LastAttemptedServerName=mydomain.net] [LastAttemptedIP=xxx.xxx.xxx.xxx:25] [VI1EUR04FT039.eop-eur04.prod.protection.outlook.com]};{MSG=Socket error code 10061};{FQDN=maydomain.net};{IP=xxx.xxx.xxx.xxx};{LRT=3/1/2021 6:43:20 PM}]. OutboundProxyTargetIP: xxx.xxx.xxx.xxx. OutboundProxyTargetHostName: mydomain.netNo entry in postfix log about receive email.
Do you have any idea? Thank you in advance.
SOLVED:
I blocked port 25 in firewall by mistake
solution:
sudo ufw allow 25/tcp
Hi,
i have followed the tutorial series up to this part(3) and have a fully functioning email server that works with virtual users now. YEY!!
Now the question is:
Is there a way to migrate users and their current passwords from an old mail server that uses local user accounts instead of virtual, to this new and shiny email server i just created? Also, old server doesnt use database in anyway.
I know i can copy/paste emails/folders from old server’s “/home/user/maildir” to new server’s “/var/vmail/domain/user/maildir” and it works, if i manually create a new user from postfixadmin GUI, but i havent managed to found a way to do what i asked above.
I hope i dont have to manually create 50+ accounts via postfixadmin and set new passwords for all users and mail them to each user individually :/
Hello Xiao,
– My Server will all steps of your tutorials as been working for months.
– Since the latest upgrade of Dovecot, accessing to postfixadmin is no longer available. When I enter email and password nothing happens and no error is giving.
– Here it goes the error at log of postfixadmin:
—
Kindest Regards,
Ale
It’s probably because you renewed the TLS certificate, so the
www-datauser doesn’t have permission to read Let’s Encrypt TLS certificate again. To fix it, run the following two commands to grant permissions.You can add the two commands to your Cron job so you don’t need to worry about it again.
– Thank You so much. That was the solution.
– The new dovecot version as something to do with the problembecause in my case /etc/letsencrypt/ was root:root since the installation day. The certificate was renewed 42 days ago and since than I already used postfixadmin.
—
Kindest Regards,
Ale
Hi Xiao Guoan, excellent tutorial, I got stuck creating the Postfixadmin Administrator, it started giving me error “setup password not specified correctly” and I have not been able to move forward. i configured the file /usr/share/postfixadmin/config.local.php, as you specified as follows:
create the Symlink:
.
I’m really sorry I couldn’t do it right and I’m asking you for some mistake made by me, thank you very much for your help.
Translated with www.DeepL.com/Translator (free version)
Hello, the problem has been solved, thank you very much.
I’ve just tried reinstalling Postfixadmin using PHP8.0 but all I’m getting is the white screen of death. Any suggestions?
Switch back to PHP7.4. The PostfixAdmin in the Ubuntu 20.04 repository currently doesn’t support PHP8.0.
Thanks for the great tutorial so far. I wanted to ask if postfixadmin can be installed into a web server that is different from my mail server? I’d like to avoid installing a webserver on my mail server, and just manage the mail server from a different server. Is this possible? Thanks again.
d
Yes, you can install PostfixAdmin on a separate host, but you need to set up MariaDB to allow remote connection and enable TLS encryption in MariaDB. Then edit PostfixAdmin configuration files to make it connect to a remote MariaDB database.
If you are worried about web server security, you can follow the tutorial below to secure your email server from hacking.
How to Secure Email Server Against Hacking with VPN (Debian/Ubuntu)
It explains how you can set up self-hosted VPN server and block public access to the web server. This is my preferred way to secure an email server, so I don’t have to separate the web server from the email server.
Got everything to work, except user folders are missing
/var/mail, /var/vmail and /~ are all completely empty (but exist).
When I open the mailbox on Thunderbird, I see only `Inbox` but it’s always empty. I sent a couple of e-mails from my gmail to my mail server and still nothing. Gmail reports my messages as successfully sent. What could be the issue?
Creating and deleting the mailbox via postfixadmin did not work.
What’s the value of
auth_username_formatin/etc/dovecot/conf.d/10-auth.conf?Currently it’s
%u, the default was%Luas far as I remember.Dovecot 2.3.7.2 (3c910f64b)
Postfix mail_version 3.4.13
What’s the value of
virtual_transport =in /etc/postfix/main.cf file? And can you see any error messages in /var/log/mail.log when sending emails from Gmail to your own domain?Thank you a lot for helping me with this.
virtual_transport = lmtp:unix:private/dovecot-lmtpUpon sending a message, no, but I did see the following in this file:
(DOMAIN.COM is replaced with my actual domain).
The same error is also seen, but prefixed with
Error: lmtp-server: conn unix:pid=10...Maybe I have misconfigured something, where can I look to change this setting?
Oh, yes, I see the problem. Instead of adding
mail_home = /var/vmail/%d/%n/, I set the mail_location to that. My bad, will fix, restart and retry.Yes! That fixed it. Thank you a lot for publishing this tutorial and for helping me debug this again, I will make a donation.
Everything works well so far except I have reached step 8 using the web-based install. Every time I try to connect the only thing I get is “This site can’t be reached. postfixadmin.domain.com refused to connect” from google chrome and I am unable to start anything at all. Is there any port that needs to be opened that I don’t know about? Domain is set correctly from what I can tell.
Go to https://dnsmap.io/ to check if the DNS record is propagated to the Internet. Also, make sure TCP port 80 and 443 are open on your server.
Hello Xiao,
The mail setup document is really good. The post you wrote was very instructive for me. Thank you for your hard work.
I have applied all of the documents of Part 1, part 2, part 3, part 4, part 5,
“How to Host Multiple Mail Domains in PostfixAdmin on Ubuntu“,
“Install Roundcube Webmail on Ubuntu with Apache/Nginx“.
All works except connecting from outlook android app.
After I made all the settings in the second part, I was able to connect to the server via the outlook android app and from other mails. Mail sending and receiving everything was working fine. I am using ssl ports. imap 993 smtp 465.
After I made the settings in the third part, I started unable to connect to the server from outlook android app. But I can connect from local mail program on my huawei phone. This may have happened due to what setting. After registering virtual users to the database and changing the encryption method? Or another setting?
Has anyone experienced this problem and solved it?
Ubuntu 20.04.2, Nginx, MariaDB, PHP
Ufw Status
———————–
LISTEN 0 100 0.0.0.0:465 0.0.0.0:* users: (("master", pid = 1023, fd = 22)) LISTEN 0 100 0.0.0.0:25 0.0.0.0:* users: (("master", pid = 1023, fd = 13)) LISTEN 0 100 0.0.0.0:587 0.0.0.0:* users: (("master", pid = 1023, fd = 18)) LISTEN 0 100 [::]: 465 [::]: * users: (("master", pid = 1023, fd = 23)) LISTEN 0 100 [::]: 25 [::]: * users: (("master", pid = 1023, fd = 14)) LISTEN 0 100 [::]: 587 [::]: * users: (("master", pid = 1023, fd = 19))LISTEN 0 100 0.0.0.0:143 0.0.0.0:* users: (("dovecot", pid = 539, fd = 38)) LISTEN 0 100 0.0.0.0:4190 0.0.0.0:* users: (("dovecot", pid = 539, fd = 15)) LISTEN 0 100 0.0.0.0:993 0.0.0.0:* users: (("dovecot", pid = 539, fd = 40)) LISTEN 0 100 [::]: 143 [::]: * users: (("dovecot", pid = 539, fd = 39)) LISTEN 0 100 [::]: 4190 [::]: * users: (("dovecot", pid = 539, fd = 16)) LISTEN 0 100 [::]: 993 [::]: * users: (("dovecot", pid = 539, fd = 41))gmail original post
---------------------------------
/var/log/mail.log
------------------------
I’m having the same issue.
I’m able to connect to my server by using GMAIL, Windows email app, but not Outlook. Were you able to resolve your issue?
Thank you for this beautiful series of email server tutorials! I’ve been having really good luck with everything until I tried adding postfixadmin so I can use virtual mailboxes/users. I’m using postgres instead of mariadb but that shouldn’t make much a difference.
Anyway, the error I get is: “Sender address rejected: not owned by user “. I tried logging the sql queries and it appears the username is getting cut off from the domain even though I have “auth_username_format = %u” so I think it’s not finding the alias. Here are the SQL queries when sending an email from the postfixadmin account “[email protected]” to an alias of that account “[email protected]”:
Shouldn’t it be looking up the full ‘[email protected]’ from the alias table? It’s using ‘%s’ in the config file to form the sql query. Any help would be greatly appreciated! Thank you!
I figured it out! I had this in master.cf under
so I replaced it with the database as the source and it worked!
My question is, I see you have “smtpd_sender_login_maps” in main.cf so what’s the difference between having it in main.cf or under submission in master.cf? When I completely remove it from master.cf I get the error again so now I have it both files.
Nevermind my last question. I had put smtpd_sender_login_maps in main.cf by mistake for testing so you don’t have that.
But why did I need to include it in master.cf? I don’t think your tutorial has that option under submission. Thanks again!
Hello Xiao,
For the past week I am looped at connecting email address to Thunderbird. I am getting the error “unable to login at server. probably wrong configuration username or password”.
I followed Part 1, 2 and 3 and as far as I know everything is configured except SSL certificate.
Why do I get password mismatch at the logs below?
auth-worker(27358): sql([email protected],127.0.0.1,): Password mismatch
Apr 13 21:44:40 postfix dovecot[2731]: auth-worker(27358): Debug: sql([email protected],127.0.0.1,): ARGON2I(user123) != ‘$1$d34950b9$No8iJiz>
Apr 13 21:44:40 postfix dovecot[2731]: auth: Debug: sql([email protected],127.0.0.1,): Finished passdb lookup
Apr 13 21:44:40 postfix dovecot[2731]: auth: Debug: auth([email protected],127.0.0.1,): Auth request finished
Apr 13 21:44:40 postfix dovecot[2731]: auth-worker(27358): Debug: sql([email protected],127.0.0.1,): Finished passdb lookup
Apr 13 21:44:40 postfix dovecot[2731]: auth-worker(27358): Debug: conn unix:auth-worker (pid=27271,uid=113): auth-worker: Finished
Apr 13 21:44:42 postfix dovecot[2731]: auth: Debug: client passdb out: FAIL 1 [email protected]
Apr 13 21:44:42 postfix dovecot[2731]: imap-login: Disconnected (auth failed, 1 attempts in 2 secs): user=, method=PLAIN, rip=127.0.0.1, lip>
Apr 13 21:45:40 postfix dovecot[2731]: auth-worker(27358): Debug: conn unix:auth-worker (pid=27271,uid=113): Disconnected: Connection closed (fd=-1)
This line
Indicates dovecot encrypts password with ARGONG2I, but the password stored in the database is encrypted with MD5. Please follow step 6 to configure PostfixAdmin to use Argon2I password scheme.
Then delete the old email address in Postfixadmin and create a new one.
Step 2: Install PostfixAdmin on Ubuntu 20.04 Server
For “choose the default database administrative user”, My default database admin user (on ubuntu 20.04), show up as “root”.
However, in your picture in the tutorial, your default database administrative user shows up as “debian-sys-maint”. Which “default”
database user name shoudl I be using?; “debian-sys-maint” or “root”?
“Default” means you don’t have to change it.
Thank you Xiao!
I just want to mention that I ran into some issues with the SQL queries in following files when using Postgresql instead of MySQL/MariaDB:
– /etc/postfix/sql/mysql_virtual_alias_domain_maps.cf
– /etc/postfix/sql/mysql_virtual_alias_domain_mailbox_maps.cf
– /etc/postfix/sql/mysql_virtual_alias_domain_catchall_maps.cf
It’s this part of the CONCAT in the query that cause issues:
It caused some issues with sending emails to external addresses and took some diving into the log files to figure out. The fix was adding single quotes like in the other parts where active was checked against 1.
Thought it could save someone the time to figure it out themselves if they run into the same issue as I did.
Thanks for the great content. I followed each step (also the ones in the preceding tutorials) but I’m stuck at step 3. I can’t reach
.
An
scan confirms that the A records are correct. Using nginx, do I have to do something similar as
(as far as I know, the equivalent would be creating a symbolic link)?
Could anyone please help me out?
Ah, found it. Sorry. php-fpm caused the issue.
I have a problem in Step 8. When i login in with setup_password i get errors:
⚠ Database – PostgreSQL (pdo_pgsql) extension not found
⚠ Database support – SQLite (pdo_sqlite) extension not found
And then when i create Superadmin Account nothing happens
Which database are you using? MySQL, MariaDB, PostgreSQL? If you use MySQL or MariaDB, then you can ignore this error.
You don’t log in with the setup password. Log in with the superadmin account password.
At login it gives me an error: Your email address or password is not correct.
Its is like it does not create superadmin account.
I think you can go to setup page again, and create a new superadmin account.
i get this error: 2021/05/05 20:34:06 [error] 19117#19117: *150 FastCGI sent in stderr: “PHP message: Failed to read password from /usr/bin/doveadm pw -r 5 … stderr: doveadm(www-data): Error: net_connect_unix(/run/dovecot/stats-writer) failed: Permission denied
It looks like you didn’t properly enable stats-reader and stats-writer. Here’s the proper way to do it.
Edit the Dovecot configuration file.
Add the following lines to the end of this file.
service stats {
    unix_listener stats-reader {
    user = www-data
    group = www-data
    mode = 0660
}

unix_listener stats-writer {
    user = www-data
    group = www-data
    mode = 0660
  }
}
Save and close the file. Then add the web server to the dovecot group.
Restart Dovecot.
Hi Xiao !!
I followed your part 1, 2, and 3. Now I’m able to add domains and mail boxes in the postfixadmin but I’m facing issues while trying to setup Microsoft Outlook/Windows mail
In Windows mail I’m able to login to the account but whatever mails I send go to the outbox (they are not sent).
In outlook I get a strange error
Please Help 🙏🙏
Are you using an outdated version of Outlook mail client? The standard Outlook mail client on Windows 10 works perfectly with the mail server setup in this tutorial series.
I think its outdated because I’m using Outlook 2007. But Why it happens in Windows Mail ??
Windows Mail
Use the full email address as username.
Here is the full configuration
Done But still not able to send mails :(. All mails are in outbox
Check your mail server log (/var/log/mail.log).
Hmm It has these lines in the end of the file
It says [email protected] doesn’t exist, so you should create this email address in PostfixAdmin?
Ahh ! I too thought like that. But I can’t understand why it is querying for [email protected] when I’m sending mails using [email protected]. Can you tell me the reason?
Maybe it’s an alias on your mail server?
This is my PostfixAdmin. I don’t have any aliases for root
Any idea why it’s not working? I even added a email [email protected] in PostfixAdmin but still not working 😕
Maybe the logs are generated by system mails, not by your Outlook mail client. Somtimes your server needs to automatically send important emails to the root user.
I can’t understand. How to fix this? I added a root email account still not working 😕
Try to send an email from Outlook mail client and check your mail log again.
I found this Error
I tried adding the user to mail group but I get another error saying the group does not exist. How to create the mail group ??
Sorry, there was a problem while copying the error. Here is the full error
So how to create the group ??
Every Ubuntu system has the
mailgroup by default. Run the following command to see if themailuser and group exist on your server.If it doesn’t exist, you can create it with the following command.
I added a new group as it did not exist
But now I’ve some new issues.
1. The mail.log file was filling up with lots of messages so I deleted that and created a new mail.log file in the same directory. For some reason I cant see any logs in that file. I even tried changing the permissions but it still shows “root” near mail.log when I run ls -l in /var/log directory
2. After adding that “mail” group, now I’m able to receive mails. But when I try to send any mail, it goes to the outbox. I’m not able to figure out why, since I don’t have the logs now : (
3. I logged in to [email protected] account. Incoming worked and outgoing did not, as expected but there were 57 mails from Cron Daemon with the following content
Subject : Cron /bin/bash /usr/local/bin/fail2ban_banned_db unban_db
To: [email protected]
Message:
All the mails have this same Error message.
I know I’m troubling you a lot. Please forgive me. I’m completely new to mail server and Ubuntu Linux in general.
Please Help !!!
You should not ignore the error messages in the
/var/log/mail.logfile. Restart Postfix and it should be able to log messages again to this file.The cron errors are irrelevant to your mail server problem.
I fixed the logging issue by doing this
But still I’m not able to send any mails from the server. I went through the logs and tried to find some errors in that. This line seems relevant to my issue
It says miss=2 (I’ve 2 mails not sent in my outbox).
Also I found these lines
I can understand something is wrong but can’t identify where. Also please help me to fix the cron issue as my root mail box is flooding with those mails
You forgot to disable PAM authentication in
/etc/dovecot/conf.d/10-auth.conffile. Comment out the following line.Then restart Dovecot.
Done but still not able to send mails. Not able to send mails. Still everything in outbox. I think there is a problem with postfix. By the way can you help me fix this issue ?
This is another new mail I get from Cron
Traceback (most recent call last): File "/opt/iredapd/tools/cleanup_db.py", line 28, in cleanup_sql_table(conn=conn_iredapd, File "/opt/iredapd/tools/../tools/__init__.py", line 90, in cleanup_sql_table _qr = conn.select(sql_table, File "/usr/local/lib/python3.8/dist-packages/web/db.py", line 898, in select return self.query(qout, processed=True) File "/usr/local/lib/python3.8/dist-packages/web/db.py", line 844, in query db_cursor = self._db_cursor() File "/usr/local/lib/python3.8/dist-packages/web/db.py", line 750, in _db_cursor return self.ctx.db.cursor() File "/usr/local/lib/python3.8/dist-packages/web/db.py", line 690, in _getctx self._load_context(self._ctx) File "/usr/local/lib/python3.8/dist-packages/web/db.py", line 702, in _load_context ctx.db = self._connect(self.keywords) File "/usr/local/lib/python3.8/dist-packages/web/db.py", line 730, in _connect return self.db_module.connect(**keywords) File "/usr/lib/python3/dist-packages/pymysql/__init__.py", line 94, in Connect return Connection(*args, **kwargs) File "/usr/lib/python3/dist-packages/pymysql/connections.py", line 325, in __init__ self.connect() File "/usr/lib/python3/dist-packages/pymysql/connections.py", line 599, in connect self._request_authentication() File "/usr/lib/python3/dist-packages/pymysql/connections.py", line 861, in _request_authentication auth_packet = self._read_packet() File "/usr/lib/python3/dist-packages/pymysql/connections.py", line 684, in _read_packet packet.check_error() File "/usr/lib/python3/dist-packages/pymysql/protocol.py", line 220, in check_error err.raise_mysql_exception(self._data) File "/usr/lib/python3/dist-packages/pymysql/err.py", line 109, in raise_mysql_exception raise errorclass(errno, errval) pymysql.err.InternalError: (1698, "Access denied for user 'iredapd'@'localhost'")If you don’t have deep understanding of Postfix and Dovecot, I don’t recommend installing PostfixAdmin on an existing iRedMail server. It’s an advanced setup and I won’t help if not getting paid. If you really want to use PostfixAdmin, I recommend building an email server from scratch.
Hi Xiao,
I’ve got everything working up until this point. However, I was hoping to tweak the settings so email are stored on a mounted network share.
1) In the /etc/postfix/main.cf file I attempted to change the “virtual_mailbbox_base = /mnt/Emails”
2) Then in /etc/dovecot/conf.d/10-mail.conf I changed “mail_home = /mnt/Emails”.
After these modifications I can accept emails however when I send emails through Thunderbird it says it can’t save emails in the sent folder. When I check the logs I’ve got “permission denied” errors.
To test permissions I’ve just given everybody rwx in my /etc/fstab on the network share.
//{xxx.x.x.xx}/Emails /mnt/Emails cifs credentials={Path},file_mode=0666,dir_mode=0777,vers3.0 0 0
Hi Xiao,
Thanks so much for the tutorial PostfixAdmin on Ubuntu 20.04, but I get “auth failed” when I setup a Thunderbird client The error from the dovecot log
I have gone over “Part 3: PostfixAdmin – Create Virtual Mailboxes on Ubuntu 20.04 Mail Server” many times and cannot find where I am going wrong. I list below snippets from relevant files with domain/password replaced for security.
Please can you or anyone else, suggest what I might be doing wrong?
Best,
Jules
from sudo journalctl -eu dovecot
file /etc/postfix/main.cf
file mysql_virtual_mailbox_maps.cf
file mysql_virtual_alias_maps.cf
user = postfixadmin
password = mypassword
hosts = localhost
dbname = postfixadmin
query = SELECT maildir FROM mailbox,alias_domain WHERE alias_domain.alias_domain = '%d' and mailbox.username = CONCAT('%u', '@', alias_domain.target_domain) AND mailbox.active = 1 AND alias_domain.active='1'
file sql/mysql_virtual_alias_domain_maps.cf
ser = postfixadmin
password = mypassword
hosts = localhost
dbname = postfixadmin
query = SELECT goto FROM alias,alias_domain WHERE alias_domain.alias_domain = '%d' and alias.address = CONCAT('%u', '@', alias_domain.target_domain) AND alias.active = 1 AND alias_domain.active='1'
file mysql_virtual_alias_domain_catchall_maps
# handles catch-all settings of target-domain
user = postfixadmin
password = mypassword
hosts = localhost
dbname = postfixadmin
query = SELECT goto FROM alias,alias_domain WHERE alias_domain.alias_domain = '%d' and alias.address = CONCAT('@', alias_domain.target_domain) AND alias.active = 1 AND alias_domain.active='1'
file /etc/dovecot/dovecot-sql.conf.ext
file /etc/dovecot/conf.d/10-mail.conf
Use the full email address as the username.
Thanks for spotting this.
I have tried three different email clients and the username in the dovecot log file always displays the mydomain.com dropped from the username. For the username, I am typing out [email protected] in the email clients.
Is there some setting in Ubuntu that drops the domain name automatically from usernames? What to try?
Kind regards,
Jules
For example, here is the log from Mailspring email client. I tried both SSL and non-SSL settings
———-IMAP———-
connect
* OK [CAPABILITY IMAP4rev1 SASL-IR LOGIN-REFERRALS ID ENABLE IDLE LITERAL+ AUTH=PLAIN AUTH=LOGIN] Dovecot (Ubuntu) ready.
ssl connect mail.mydomain 993 2
OpenSSL version: OpenSSL 1.1.0f 25 May 2017
connect ok
login
1 LOGIN “testuser2@mydomain” *********
1 NO [AUTHENTICATIONFAILED] Authentication failed.
———-IMAP———-
connect
STARTTLS connect
* OK [CAPABILITY IMAP4rev1 SASL-IR LOGIN-REFERRALS ID ENABLE IDLE LITERAL+ STARTTLS LOGINDISABLED] Dovecot (Ubuntu) ready.
1 STARTTLS
1 OK Begin TLS negotiation now.
connect ok
login
2 LOGIN “testuser2@mydomain” *********
2 NO [AUTHENTICATIONFAILED] Authentication failed.
Here is the corresponding log file from Dovecot. The user is shown as testuser2 instead of [email protected], even though I typed out [email protected] as the username in the email client.
=========================================================
May 08 02:11:15 mydomain.com dovecot[48733]: auth: Debug: auth client connected (pid=49648)
May 08 02:11:15 mydomain.com dovecot[48733]: auth: Debug: client in: AUTH 1 PLAIN service=imap secured=tls session=n4ElD8jBlrhRlqZa lip=192.168.1.91 rip=81.150.166.90 >May 08 02:11:15 mydomain.com dovecot[48733]: auth: Debug: sql(testuser2,81.150.166.90,): Performing passdb lookup
May 08 02:11:15 mydomain.com dovecot[48733]: auth-worker(49646): Debug: conn unix:auth-worker (pid=49645,uid=113): auth-worker: Handling PASSV request
May 08 02:11:15 mydomain.com dovecot[48733]: auth-worker(49646): Debug: sql(testuser2,81.150.166.90,): Performing passdb lookup
May 08 02:11:15 mydomain.com dovecot[48733]: auth-worker(49646): Debug: sql(testuser2,81.150.166.90,): query: SELECT username AS user,password FROM mailbox WHERE username = ‘testuser2′ AND active=’1’
May 08 02:11:15 mydomain.com dovecot[48733]: auth-worker(49646): sql(testuser2,81.150.166.90,): unknown user
May 08 02:11:15 mydomain.com dovecot[48733]: auth-worker(49646): Debug: sql(testuser2,81.150.166.90,): Finished passdb lookup
May 08 02:11:15 mydomain.com dovecot[48733]: auth-worker(49646): Debug: conn unix:auth-worker (pid=49645,uid=113): auth-worker: Finished
May 08 02:11:15 mydomain.com dovecot[48733]: auth: Debug: sql(testuser2,81.150.166.90,): Finished passdb lookup
May 08 02:11:15 mydomain.com dovecot[48733]: auth: Debug: auth(testuser2,81.150.166.90,): Auth request finished
May 08 02:11:17 mydomain.com dovecot[48733]: auth: Debug: client passdb out: FAIL 1 user=testuser2 [email protected]
May 08 02:11:17 mydomain.com dovecot[48733]: imap-login: Debug: Ignoring unknown passdb extra field: original_user
May 08 02:11:17 mydomain.com dovecot[48733]: imap-login: Disconnected (auth failed, 1 attempts in 2 secs): user=, method=PLAIN, rip=81.150.166.90, lip=192.168.1.91, TLS: read(size=686) failed: Connection reset b>May 08 02:12:15 mydomain.com dovecot[48733]: auth-worker(49646): Debug: conn unix:auth-worker (pid=49645,uid=113): Disconnected: Connection closed (fd=-1)
May 08 02:12:32 mydomain.com dovecot[48733]: auth: Debug: Loading modules from directory: /usr/lib/dovecot/modules/auth
May 08 02:12:32 mydomain.com dovecot[48733]: auth: Debug: Module loaded: /usr/lib/dovecot/modules/auth/lib20_auth_var_expand_crypt.so
May 08 02:12:32 mydomain.com dovecot[48733]: auth: Debug: Module loaded: /usr/lib/dovecot/modules/auth/libdriver_mysql.so
May 08 02:12:32 mydomain.com dovecot[48733]: auth: Debug: Read auth token secret from /var/run/dovecot/auth-token-secret.dat
May 08 02:12:32 mydomain.com dovecot[48733]: auth: Debug: auth client connected (pid=49650)
May 08 02:12:32 mydomain.com dovecot[48733]: auth: Debug: client in: AUTH 1 PLAIN service=imap secured=tls session=uVrEE8jBnblRlqZa lip=192.168.1.91 rip=81.150.166.90 >May 08 02:12:32 mydomain.com dovecot[48733]: auth: Debug: sql(testuser2,81.150.166.90,): Performing passdb lookup
May 08 02:12:32 mydomain.com dovecot[48733]: auth-worker(49652): Debug: Loading modules from directory: /usr/lib/dovecot/modules/auth
May 08 02:12:32 mydomain.com dovecot[48733]: auth-worker(49652): Debug: Module loaded: /usr/lib/dovecot/modules/auth/lib20_auth_var_expand_crypt.so
May 08 02:12:32 mydomain.com dovecot[48733]: auth-worker(49652): Debug: Module loaded: /usr/lib/dovecot/modules/auth/libdriver_mysql.so
May 08 02:12:32 mydomain.com dovecot[48733]: auth-worker(49652): Debug: conn unix:auth-worker (pid=49651,uid=113): Server accepted connection (fd=14)
May 08 02:12:32 mydomain.com dovecot[48733]: auth-worker(49652): Debug: conn unix:auth-worker (pid=49651,uid=113): Sending version handshake
May 08 02:12:32 mydomain.com dovecot[48733]: auth-worker(49652): Debug: conn unix:auth-worker (pid=49651,uid=113): auth-worker: Handling PASSV request
May 08 02:12:32 mydomain.com dovecot[48733]: auth-worker(49652): Debug: sql(testuser2,81.150.166.90,): Performing passdb lookup
May 08 02:12:32 mydomain.com dovecot[48733]: auth-worker(49652): Debug: sql(testuser2,81.150.166.90,): query: SELECT username AS user,password FROM mailbox WHERE username = ‘testuser2′ AND active=’1’
May 08 02:12:32 mydomain.com dovecot[48733]: auth-worker(49652): sql(testuser2,81.150.166.90,): unknown user
May 08 02:12:32 mydomain.com dovecot[48733]: auth-worker(49652): Debug: sql(testuser2,81.150.166.90,): Finished passdb lookup
May 08 02:12:32 mydomain.com dovecot[48733]: auth-worker(49652): Debug: conn unix:auth-worker (pid=49651,uid=113): auth-worker: Finished
May 08 02:12:32 mydomain.com dovecot[48733]: auth: Debug: sql(testuser2,81.150.166.90,): Finished passdb lookup
May 08 02:12:32 mydomain.com dovecot[48733]: auth: Debug: auth(testuser2,81.150.166.90,): Auth request finished
May 08 02:12:34 mydomain.com dovecot[48733]: auth: Debug: client passdb out: FAIL 1 user=testuser2 [email protected]
May 08 02:12:34 mydomain.com dovecot[48733]: imap-login: Debug: Ignoring unknown passdb extra field: original_user
May 08 02:12:34 mydomain.com dovecot[48733]: imap-login: Disconnected (auth failed, 1 attempts in 2 secs): user=, method=PLAIN, rip=81.150.166.90, lip=192.168.1.91, TLS: read(size=674) failed: Connection reset b>
Okay, there seems to be something very weird going on.
I edited file /etc/dovecot/dovecot-sql.conf.ext and replaced username with concat(username, ”), that obviously should do nothing, and it worked!!
username in the dovecot log files suddenly included the domain name.
Any idea why adding nothing to username, made the domain name appear in the username??
updated file /etc/dovecot/dovecot-sql.conf.ext
———————————————————
driver = mysql
connect = host=localhost dbname=postfixadmin user=postfixadmin password=mypassword
default_pass_scheme = ARGON2I
password_query = SELECT concat(username, ”) AS user,password FROM mailbox WHERE username = ‘%u’ AND active=’1′
user_query = SELECT maildir, 2000 AS uid, 2000 AS gid FROM mailbox WHERE username = ‘%u’ AND active=’1′
iterate_query = SELECT concat(username, ”) AS user FROM mailbox
Maybe you forgot to set
auth_username_format = %uin the/etc/dovecot/conf.d/10-auth.conffile?I checked but no, it’s not that. With commented lines removed..
file /etc/dovecot/conf.d/10-auth.conf
————————————–
disable_plaintext_auth = yes
auth_username_format = %u
auth_mechanisms = plain login
include auth-sql.conf.ext
auth_debug = yes
auth_debug_passwords = yes
I see from the log there’s an extra unknown passdb field:
original_user. On a clean Dovecot install, there’s no such field. Have you followed mail server tutorial from other websites?You can go to the
/etc/dovecot/directory and run the following command to find out which file contains the wordoriginal_userThanks. It didn’t come up with anything though. I don’t recall trying any other method but yours.
Many thanks for all your posts and articles. I did work through your other parts as well, and received a 10/10 on mail-tester.com !
Hopefully this anomaly issue won’t cause problems.
hi,
i have a problem withposftfixadmin
when i go the my page postfixadmin.toto.com/setup.php
i have this message:
No input file specified on a blank page.
have you an idea?
Best,
Hi Xiao
I was able to follow till step 6. On Step 8, I am receiving “Error Loading https://postfixadmin.mydomain.com/setup.php” “Host not found”. I have attached the screenshot. I am using Links2 (terminal web browser) tool as I do not have a GUI.
I am unsure what logs to attach, I can provide if any details are needed. I would appreciate your help.
Go to dnsmap.io to check if your DNS record is propagated to the Internet.
I am getting this response for MX and A records from the link you shared. i can send and receive emails with system alias. Not sure why i cannot access the postfixadmin setup page
Check the A record of postfixadmin.yourdomain.com.
I found the issue, it was an apache configuration that needed some changes from the previous settings. It is working now, but the certbot/letsencrypt challenge is failing http-01 is failing to complete the challenge. I got the same issue for the my domain cert but i used the below configuration
/etc/letsencrypt.cli
—
rsa-key-size = 4096
email = [email protected]
domains = mail.example.com, postfixadmin.example.com #used this to add additional domain
text = True
agree-tos = True
authenticator = webroot
webroot-path = /var/www/html
Then, created a cron task to renew the cert and executed it, that worked for me.
I am tiring to add another domain to it, but it is again failing with http-01 for postfixadmin.example.com. Any help would be appreciated.
I’m stuck on Step 8 Finish the Install in the Browser. I’m getting the following error:
Error: Can’t connect to database
Please edit the $CONF[‘database_*’] parameters in config.local.php.
DEBUG INFORMATION:
Connect: The server requested authentication method unknown to the client
Any ideas?
Thanks!
Erik
Maybe there’s a typo in the config.local.php file?
When running nmap mail.mydomain.com (from my server), I am seeing that mysql is running with an open tcp port on 3306. Is this right? I didnt’ think that mysql would have remote ports open, and also dont know how this is getting through (unblocked) by the firewall.
Always run nmap from another box. Running nmap on the server itself will make you think the ports are open when it’s closed.
Excellent! Thank you Xiao!
After installing dbconfig-no-thanks, I run ‘apt-mark showmanual’, and it seems somehow it has marked all of my ubuntu packages to manual upgrades. It also tries to install many apache packages if I attemt to uninstall postfixadmin. I now want to just install postfixadmin from the official maintainer’s binary. In order to do so, how would I go about properly uninstalling, but keeping the same configuration files so I dont’ have to start from scratch again? Remove all of the apache packages that install themselves from the metapackage while uninstalling would be ideal. Can you advise me how exactly I would go about uninstalling postfixadmin?
“Manual” means the package is installed by you typing
sudo apt install package-name.“Auto” means the package is installed automatically by the system.
apt-mark showmanualshows you the packages that are installed by you typingsudo apt install package-name. That’s all it means.You can remove postfixadmin by
Hello,
I am facing this error,please help.
thanks
The web server user needs permission to read Let’s Encrypt TLS certificate in order to do password hashing. Run the following two commands to grant permissions.
Hello, I have the same problem and executed the commands you recommended but the issue still persists. Any suggestions?
I managed to resolve the issue. Posting here hoping it may help others with a similar problem. I had to remove the following in the /etc/dovecot/conf.d/10-ssl.conf file: ssl_protocols = !SSLv3 !TLSv1 !TLSv1.1
This line is not needed in Ubuntu 22
Hello Dear Xiao
Encountered next issue.
Cannot send email from my Thunderbird client on step 14 Part3 of your Awesome tutorial.
In mail.log I have only this errors
Can you please help me to solve this issue?
You probably have a syntax error in the
/etc/postfix/main.cffile.As my instruction clearly shows, there should be an empty line when you add the
virtual_transportparameter.Hi Xiao, all worked up until the connection to MySQL, by Postfixadmin webpage.
The messages in browser indicate issue with MySQL connection, and whilie connecting on command line, it works.
This is on Ubuntu server 22.04 with Firefox. If I use Chrome, it only displays the PHP source… it doesn´t even parse the php code?
Thank you!
Oh – actually, I’ve found it.
In config.local.php the line for database_host should be remarked with an #
Now it started working.
I expected that I needed to add @localhost in the config.local.php file, but it is not.
Anyway, thanks for this awesome tutorial.
Hello Xiao,
great tutorial! i followed it and all works fine. 🙂
now i want to relay all mails for my domain to another mail-server.
so if i send an e-mail from [email protected] postfix should not look if the user is existing and give the e-mail to for example smtp.office365.com.
i edited the main.cf
did an postmap & reload
but i still get
how can i tell postfix to route everything outbound?
what is the matter this does not work?
thanks a lot
for getting a bit more detailed:
there is the postfix server with few mail accounts, such as no-reply@domain, newsletter@domain etc. this server only has to send e-mails. the mx records of domain1, 2, 3, … points to office 365 where the user mailboxes are stored. some other systems use the postfix (587) to send e-mails.
so far so good.
in case of preparing this server to send mass e-mails for example like newsletter i plan to route the 365 outgoing mails over the postfix for getting a good reputation first. there is only the option to route all traffic(365). adding all mailboxes to postfix is no option(i think the routing would work then).
but in this case i think the lookup if the mailbox is existing happens bevore routing(lookup transport_maps).
Turning smtpd_reject_unlisted_recipient to no is no option, too.
but also all outgoing e-mails for domain 1, 2, 3,… of 365 should be redirected to 365 where the mailboxe are stored.
also postfix has to accept all mails and relay them, even if the mailbox is non existant.
is there a way to handle this scenario?
best greets
I suggest adding the following commands to step 7 before restarting apache:
Because PHP FPM didn’t get enabled automatically with the installation, at least on Ubuntu 20.04.
And since I didn’t have PHP before, in step 10 the setup page was filled with errors and would not generate a password hash.
Thank you for this great series.
In the Dovecot documentation located at https://doc.dovecot.org/configuration_manual/dovecot_ssl_configuration/ it reads the following:
The main difference between ssl=required and disable_plaintext_auth=yes is that if (1) ssl=required, it guarantees that the entire connection is protected against eavesdropping (SSL/TLS encrypts the rest of the connection), while (2) disable_plaintext_auth=yes only guarantees that the password is protected against eavesdropping (SASL mechanism is encrypted, but no SSL/TLS is necessarily used).
In this tutorial, are we using the first (1) option to ensure that our entire connection is protected against eavesdropping?
In the Dovecot tutorial, there’s instructions to set
ssl=requiredin the/etc/dovecot/conf.d/10-ssl.conffile.Hi, great tutorial but I’m stuck with the setup.php of postfixadmin…
I logged in with setup hash but then it does nothing. I can’t create a Admin User.
I checked many logs and can’t find even a error Message why it didn’t start the environment Check.
Maybe you could help me?
NVM.
The setup.php was broken. I have taken the actual one from postfixadmin site and now it works.
Thank you for the tutorials. They are fantastic and I have a working email server. Still need to work through steps 4 – ? to finish the job but I have observed a strange issue. It’s only a minor problem but it is annoying.
I can successfully send and receive email using Thunderbird (or other applications) but I must configure using manual settings and not with the automatic configuration.
The example below shows trying to add the accounts to Thunderbird using the Automatic configuration. The Username field does not have the domain component as you can see in this image – https://imgur.com/CdpQvAX. I created a test user as [email protected] and when I try to connect the Dovecot logs show the mysql lookup only using test rather than the full email address.
Thunderbird Automatic Configuration
I have the dovecot-sql.conf.ext file configured like this
The dovecot 10-auth.conf file is configured with %u
auth_username_format = %u
Somewhere, the domain is being dropped and I cannot work out where.
The below is an example of the text from the dovecot debug log
You can see where it is performing the lookup without the domain component and as a result it fails. After adding the account manually, you can see in the same debug log where the lookup is performed using the full email address and passes successfully.
You can configure Dovecot to append @domain to the username if there’s no @domain in the username.
Edit the Dovecot 10-auth.conf file, find the following line.
Change it to
Save and close the file. Then restart Dovecot.
Followed the instructions on this page but keep getting the same error:
Your setup_password is in an obsolete format. As of PostfixAdmin 3.3 it needs regenerating.’; } if (!$authenticated || !$configSetupDone) { ?>
Can anyone help?
Screenshots of the errors. I have ran the php -r ‘echo password_hash(“password”, PASSWORD_DEFAULT);’ command and copied the password to the config.local.php file. Can’t figure out what I’m doing wrong.
Here are some screenshots of what I am seeing.
another screenshot
another.
There is an issue using Outlook 2016.
I tried Outlook for android, Outlook 365, Gmail, default Mail from Windows 10 and they all are able to connect to the server. However, Outlook 2016 in Windows 10 is not able to login to the server.
Can you provide Outlook 2016 download link so I can test it?
I just downloaded a free trial version of Outlook from Microsoft 365 and I successfully added my custom domain email address in Outlook.
First, start Outlook. click the
Advanceddrop-down menu and select manual account setup.Then, choose to set up a POP or IMAP account. I selected IMAP.
Next, enter the IMAP and SMTP host info.
Don’t enable Secure Password Authentication (SPA), which is a proprietary Microsoft protocol.
My first login attempt failed due to a typo in password. Once the typo is fixed, I can log in to my email accont with Outlook.
i’m stuck at the step “14”. As postfixadmin has no “Virtual List” but “Aliases” i created a new mailbox using that menu. After clicking the blue button for adding the mailbox after filling in the data postfixadmin doesn’t work anymore – every request times out. “postfixadmin_error.log” shows records whose time is three hours less and the last record is:
Check the following article to lean how to fix “upstream timed out” error.
How to Fix Common Nginx Web Server Errors
Specifically, check the “504 Gateway time-out” and “PHP-FPM Upstream Time Out” section.
login.php page is not able load
You should open TCP port 443 in firewall.
How to Fix Common Nginx Web Server Errors
I need some help here, I completed step 11 prior to setting up virtual accounts section I could connect using firebird and send/recieve emails. completed steps 12 and 13 now I cannot log in anymore, I am getting the following error on dovecote status.
imap-login: Disconnected: Auth process broken (disconnected before auth was ready, waited 30 secs): user=, rip=212.56.>
Sep 29 13:29:42 domain.co.uk dovecot[793]: auth: Fatal: sql: Unknown database driver ‘mysql’
Sep 29 13:29:42 domain.co.uk dovecot[679]: master: Error: service(auth): command startup failed, throttling for 60.000 secs
Sep 29 13:31:53 domain.co.uk dovecot[793]: auth: Debug: Loading modules from directory: /usr/lib/dovecot/modules/auth
Sep 29 13:31:53 domain.co.uk dovecot[793]: auth: Debug: Module loaded: sr/lib/dovecot/modules/auth/lib20_auth_var_exp
Sep 29 13:31:53 domain.co.uk dovecot[793]: auth: Fatal: sql: Unknown database driver ‘mysql’
cs
further to the post, when testing the config on firebird it works however it fails to login, I know the username and password work as I can log in through the postfixadmin portal,
You forgot to run the following command in step 13.
Then restart Dovecot.
Hi
I took a snapshot of step 11 where everything was working then repeated to remaining steps to 13 several times thinking I may have missed out on a step, but always get the same results.
this is the result of running
I have tried installing libssl 1.1.1 but this causes dovecot not to start. so repeated from step 12 again.
Which Ubuntu version are you using? And how did you install Dovecot?
I am on Ubuntu 22.04.1 and followed all the steps from part 1 and 2 into 3. from google searches libssl 1.1.1 has been replaced by 3 (I may be wrong). at the end of part 2 everything worked, I could send and receive emails, but not since the virtual mailbox (Part 3) setup.
I have used mysql with nginx on Ubuntu 22.04.1.
Version 2.3.16 (7e2e900c1a)
Thanks Xiao I think I have it working now, your question prompted me to look through the tutorial for the Ubuntu version and dovecot install. this is when I when I cam across the Dovecot install step 5 which says “Installing Dovecot 2.3 on Ubuntu 18.04 ,If you are using Ubuntu 22.04/20.4, you already have Dovecot 2.3. ”
since there are references to the different versions of Ubuntu I didn’t pick up on the message and blindly followed the steps thus reinstalling dovecot using Ubuntu v18 dovecot install. I guess that broke my dovecot/mysql.
This time around I skipped that half of the step and went straight onto step 6 and it is working. now to finally move on to the next stage
I have some problem as you. I skiped that steps for ubuntu 18 and still same problem.
@Xiao Guoan (Admin)
Thanks for your awesome tutorials! Really helpful for someone starting to learn mail servers.
If i could kindly ask one question:
Are you able to setup postfix and have virtual mailboxes without using mysql, apache/nginx and in extension postfixadmin?
I am wanting mail but I dont want to use webmail and I dont want to have sql as well as php and a webserver running as its just extra security issues for me.
Thanks!
Yes, you could set up virtual mailboxes without MySQL and PostfixAdmin, but I don’t have time and don’t have the desire to write a tutorial for it.
If you are worried about security, you should use a self-hosted VPN to restrict access to PostfixAdmin and Roundcube webmail: https://www.linuxbabe.com/debian/secure-email-server-against-hacking
I followed parts 1-3 and most things seem to work fine. But I experience the following issues:
– I added the mailaccount in Thunderbird with all the settings as above. Then I get a security exception: “This site attempts to identify itself with invalid information”. The location mentioned is mydomain.net, but that should be mail.mydomain.net, correct? Why do I get this error? I can confirm the security exception, but I don’t want this error at all 🙂 If I change the location myself to mail.mydomain.net and click on ‘Get Certificate’ it says: “This site provides valid, verified identification. There is no need to add an exception.” But then I can only cancel and the error message repeats.
– I sent two mails from my newly created account to two different mailaddresses. They both arrive. I tried replying to both of them. One does arrive, but from the other one I get an undeliverable message: “550 Requested action not taken: mailbox unavailable or not local.”
1. You used a TLS certificate for yourdomain.net in Postfix/Dovecot, but you should use a TLS certificate for mail.yourdomain.net in Postfix/Dovecot.
2. Enable debugging mode in Dovecot and dheck your /var/log/mail.log file.