A Practical Guide to GPG Part 1: Generate Your Public/Private Key Pair
This tutorial series will teach you how to use GPG (Gnu Privacy Guard) in the Linux terminal, so you will be able to send encrypted email messages and digitally sign documents.
What is GPG?
GPG (GNU privacy guard) is an open-source implementation of the OpenPGP protocol. It’s a free alternative to the PGP program. Then what is PGP? PGP (Pretty Good Privacy) is an encryption program developed in 1991 by Phil Zimmermann.
PGP and GPG are commonly used for two things.
- Encryption: encrypt emails and files like Edward Snowden does every day, so bad actors can’t read your encrypted emails and files.
- Signing: create digital signatures for signing documents. You can also use it to digitally sign all your outgoing emails, so the recipient can know the email hasn’t been tampered with. The software repository of your Linux distribution is also signed by a PGP key, so you can be sure that you are not downloading malware when running commmand
sudo apt updateorsudo dnf update.
PGP and GPG are sometimes interchangeable. You can say you have a PGP key or a GPG key.

Encryption at rest
If you run your own email server, you should know that a TLS certificate can be used to encrypt email traffic between SMTP servers, then why use GPG?
- A TLS certificate is used to encrypt email traffic in transit. Hackers can’t snoop on your email traffic and extract valuable information.
- GPG is used to encrypt emails at rest. If someone gains access to your computer, your emails are still safe, because only you have the passphrase to decrypt the email messages.
End-to-End Encryption
An email server admin can configure the server to encrypt all email messages at rest for users. This is a form of centralized encryption. Perhaps the email server admin has the private key and can decrypt all email messages. You can’t be sure that they can’t decrypt your emails.
In contrast, GPG uses end-to-end encryption, meaning the encryption is done on the user’s computer before sending it out to the recipient. The private key is stored on the user’s computer, so the email server admin can’t decrypt the email message.
Hint: It’s not required to run your own email server. You can use GPG with Gmail, Yahoo Mail, or any email account.
6 Parts Tutorial Series
The tutorial series is divided into 6 parts:
- Part 1: Generate Your Public/Private Keypair
- Part 2: Public Key Management
- Part 3: Encrypt and Decrypt Message
- Part 4: How to encrypt and decrypt emails in the Thunderbird email client
- Part 5: Digital Signature
- Part 6: How to Verify PGP Signature of Downloaded Software on Linux
This is part 1 of this series. At the end of this article, you should be able to generate your own public/private key pair and a revocation certificate, which is used to revoke your public/private key pair when your private key is compromised or you forget the passphrase for your private key.
Step 1: Install GPG
GPG is pre-installed on most Linux distributions, though you can run the following commands to install it.
- Debian/Ubuntu:
sudo apt install gpg - Fedora/CentOS/RHEL/Rocky Linux:
sudo dnf install gpg - Arch Linux:
sudo pacman -S gpg - OpenSUSE:
sudo zypper install gpg
This article uses the modern GPG 2.2 / 2.3 version. The legacy version (1.x) won’t be discussed. Most Linux distributions come with the modern 2.2 / 2.3 version.
- macOS users can use the gpgtools to install GPG.
- Windows users can install the GPG4win package. (You really shouldn’t be using Windows if you care about privacy.)
Step 2: Check Your GPG Version
Let’s check the GPG version on the system and some interesting tidbits. Run the following command.
gpg --version

As you can see, I’m using GPG 2.2.27. We also know that the configuration directory is ~/.gnupg, which will hold our public/private key files. It also tells us what algorithms are supported.
If you look closely, you can see that the insecure hash algorithm SHA1 is still supported in version 2.2.27 SHA1 is obsolete and you don’t want to use it to generate digital signatures.
Step 3: Create Your Public/Private Key Pair and Revocation Certificate
Run the following command to generate your key pair. GPG defaults to RSA keys. We use the --expert mode because it allows us to create more secure keys (ed25519).
gpg --expert --full-gen-key
Hint: If you generate GPG key on the console or in a pure command-line environment, you should run this command instead: gpg --expert --pinentry-mode=loopback --full-gen-key.
It asks you what kind of key you want. there’re 14 options. Choose the 9th option, so it will create an ECC (Elliptic curve cryptography) public/private keypair and an ECC signing key.

Then it asks you which elliptic curve you want. Choose the first option to create ed25519 keys.

Next, choose how long the key should be valid. 2 years is fine. You can always extend the time when it’s about to expire. Then it asks you if it’s correct. Notice that the default is No, press y then Enter to confirm it’s correct.

Now we need to provide some user identification information for the key. This is important because this information will be included in our key. It’s one way of indicating who is the owner of this key. The email address is a unique identifier for a person. You can leave the Comments field blank. Actually, you should never enter anything in the Comment field.

After that, it asks you to enter a passphrase to protect your private key. Enter a good and long passphrase and remember it. If you forget this passphrase, you won’t be able to unlock your private key.

Once you enter and confirm your passphrase. GPG will generate your keys in a jiffy.
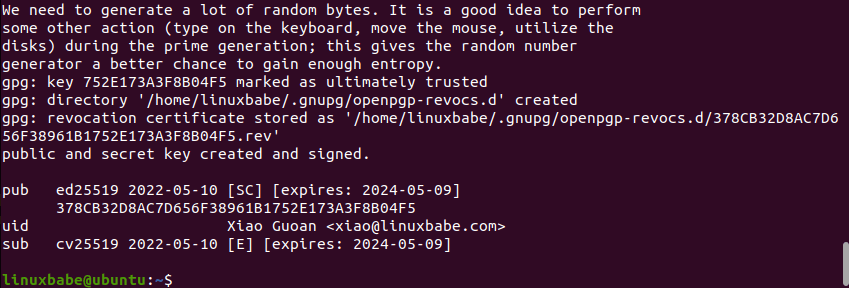
We can see from the above screenshot that GPG created a unique identifier for the public key (752E173A3F8B04F5). This unique identifier is in hex format. When someone wants to download your public key, they can use your email address or this hex value as a unique identifier.
GPG also created a revocation certificate.
Your private key is stored under the ~/.gnupg/private-keys-v1.d/ directory. There are two files with the .key extension. You should never share your private key with anyone. If your private key is compromised, you can use the revocation certificate to revoke your public key, which means you tell the rest of the world that this public key shall not be used anymore. I suggest that you open this revocation certificate with your text editor to see what’s inside there.
The public key ID (752E173A3F8B04F5) matches the last 16 bits of the key fingerprint. The key fingerprint is a hash of your public key.
Step 4: Export Your Public Key
Other people need your public key to send an encrypted message to you and only your private key can decrypt it. Use the following command to export your public key. The --armor option means that the output is ASCII armored. The default is to create the binary OpenPGP format. user-id is your email address.
gpg --armor --export user-id > pubkey.asc
The exported public key is written to pubkey.asc file. Give this file to anyone who wants to send an encrypted message to you.
Step 5: Export Your Private Key
Issue the following command to export your private key.
gpg --export-secret-keys --armor user-id > privkey.asc
The exported key is written to privkey.asc file.
Step 6: Protect Your Private Key and Revocation Certificate
Your private key should be kept in a safe place, like an encrypted flash drive. Treat it like your house key. Never share it with others. And you must remember your passphrase, otherwise, you can’t unlock your private key.
You should also protect your revocation certificate. If others have your revocation certificate, they can immediately revoke your public/private key pair and generate a fake public/private key pair.
Next Step
In part 2 you will learn how to upload your public key to a key server, so others can import your public key and send you encrypted messages. Take care!


Great tutorial. It would be great if you do a tutorial how to avoid pinentry prompting for a passphrase as most transfers are unattended on a server using “gpg-preset-passphrase.”
Perfect as usual. You are one of the best educator I’ve ever met.
Best wishes!
Unless there is some specific reason to do otherwise, keys should be generated with GPG V. 1.4 as a single 4096 bit RSA pair used for both signing AND decryption.
The future is ECC keys such as ed25519. 4096 bit RSA gives us almost nothing while costing us quite a lot: https://www.gnupg.org/faq/gnupg-faq.html#no_default_of_rsa4096
Hi,
Thanks A lot
I’m learning many cool things, thanks to you!
Xiao,
This is a great tutorial!
I believe you may have a typo in “Step 3”.
In the text, you have “–export”, rather than “–expert”.
Thanks. The typo is corrected.
Excellent as always, dear Xiao… we are on the same page, as I was doing exactly this on one of my VPS for preparation in running a full Monero (XMR) Node. You are truly a blessing to the Linux Community and I always look forward to seeing your news letters in my inbox. Peace and love to you…. many blessing always to the work of your hands. — Rick
many tx !
Very Cool LinuxBabe!
Everyone should use encryption.
This Tutorial looks amazing!
A+++
Hello Xiao Guoan.
I would like to make a proposal to you, it is easy to follow the tutorials but I don’t understand the output of :
[user@hosts~]$ gpg –list-keys
Could you go deeper into this program explaining the output and what the keys are composed of, because I don’t understand how the keys are stored nor how to sign the keys nor generate a web of trust.
Best regards.
Hi, why should the key comment be blank? Thanks.
Thanks for the tutorial,
helped me to be able to push to GitHub from the command line as they use the gpg and pass utility.
Great Work:)
I’m having a problem exporting the private key. I enter the command the way you have it written, and it asks for the passphrase. I enter the passphrase but it doesn’t accept it. What am I doing wrong?
Thanks you for this excellent tutorial. Very much appreciated!
I have a requirement where the pgp key need to be not signed so do we have a option when we create a pgp-keypair its not signed?
in the first part, command to revoke key is missing.