Part 4: How to Set up SPF and DKIM with Postfix on Ubuntu Server
After completing part 1 and part 2, we have a working Postfix SMTP server and Dovecot IMAP server. We can send and receive email using a desktop email client. Although I have correct MX, A and PTR records, my emails were flagged as spam by Gmail and Outlook mail. So in this part, we are going to look at how to improve email delivery to the recipient’s inbox by setting up SPF and DKIM on Ubuntu server.
What are SPF and DKIM Records?
SPF and DKIM are two types of TXT records in DNS that allow you to detect email spoofing and help legitimate emails deliver into the recipient’s inbox instead of the spam folder. If your domain is abused by email spoofing, then your emails are likely to land in the recipient’s spam folder if they didn’t add you to the address book.
SPF (Sender Policy Framework) record specifies which hosts or IP addresses are allowed to send emails on behalf of a domain. You should allow only your own email server or your ISP’s server to send emails for your domain.
DKIM (DomainKeys Identified Mail) uses a private key to add a signature to emails sent from your domain. Receiving SMTP servers verify the signature by using the corresponding public key, which is published in your DNS manager.
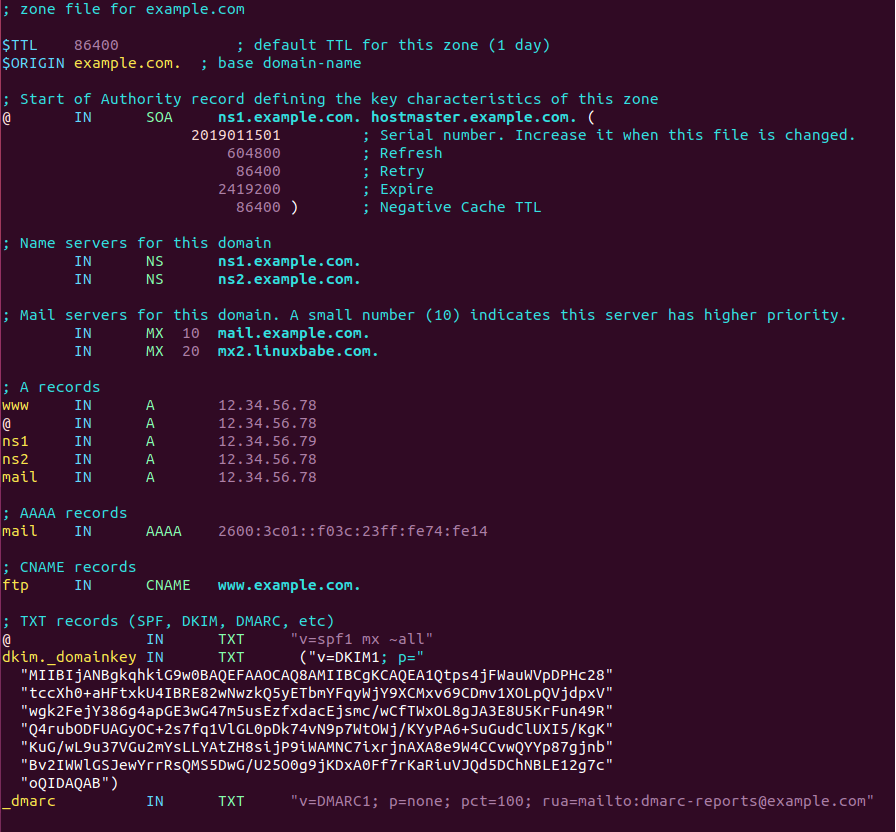
Step 1: Create an SPF Record in DNS
In your DNS management interface, create a new TXT record like below.
TXT @ v=spf1 mx ~all

Explanation:
- TXT indicates this is a TXT record.
- Enter @ in the name field.
- v=spf1 indicates this is an SPF record and the SPF record version is SPF1.
- mx means all hosts listed in the MX records are allowed to send emails for your domain and all other hosts are disallowed.
- ~all indicates that emails from your domain should only come from hosts specified in the SPF record. Emails that are from other hosts will be flagged as untrustworthy. Possible alternatives are
+all,-all,?all, but they are rarely used.
-all means that emails sent from not-allowed hosts should be rejected, never to land in the recipient’s inbox or spam folder. I have seen it used by facebook.com, but we generally don’t need such a strict policy.
Some folks might think that -all will be better as it will reject emails from untrusted hosts. Well, using -all in your SPF policy can cause your own emails to be rejected when the recipient has two SMTP servers and the main SMTP server goes offline, your emails will be temporarily stored on the backup SMTP server. When the main SMTP server comes back online, the email will be relayed from the backup SMTP server to the main SMTP server. Since you didn’t list the recipient’s backup SMTP server in your SPF policy, the email will be rejected by the recipient’s main SMTP server. So you should use ~all in your SPF policy.
Note that some DNS managers require you to wrap the SPF record with quotes like below.
TXT @ "v=spf1 mx ~all"
To check if your SPF record is propagated to the public Internet, you can use the dig utility on your Linux box like below. (On Ubuntu, you need to install the bind9-dnsutils package in order to use dig command: sudo apt install bind9-dnsutils)
dig your-domain.com txt
The txt option tells dig that we only want to query TXT records.

You can also use the dmarcian SPF surveyor to test your SPF record syntax.
Step 2: Configuring SPF Policy Agent
We also need to tell our Postfix SMTP server to check for SPF record of incoming emails. This doesn’t help ensure outgoing email delivery but help with detecting forged incoming emails.
First, install required packages:
sudo apt install postfix-policyd-spf-python
Then edit the Postfix master process configuration file.
sudo nano /etc/postfix/master.cf
Add the following lines at the end of the file, which tells Postfix to start the SPF policy daemon when it’s starting itself.
policyd-spf  unix  -       n       n       -       0       spawn
    user=policyd-spf argv=/usr/bin/policyd-spf
Save and close the file. Next, edit Postfix main configuration file.
sudo nano /etc/postfix/main.cf
Append the following lines at the end of the file. The first line specifies the Postfix policy agent timeout setting. The following lines will impose a restriction on incoming emails by rejecting unauthorized email and checking SPF record.
policyd-spf_time_limit = 3600
smtpd_recipient_restrictions =
   permit_mynetworks,
   permit_sasl_authenticated,
   reject_unauth_destination,
   check_policy_service unix:private/policyd-spf
Save and close the file. Then restart Postfix.
sudo systemctl restart postfix
Next time, when you receive an email from a domain that has an SPF record, you can see the SPF check results in the raw email header. The following header indicates the sender sent the email from an authorized host.
Received-SPF: Pass (sender SPF authorized).
Step 3: Setting up DKIM
First, install OpenDKIM which is an open-source implementation of the DKIM sender authentication system.
sudo apt install opendkim opendkim-tools
Then add postfix user to opendkim group.
sudo gpasswd -a postfix opendkim
Edit OpenDKIM main configuration file.
sudo nano /etc/opendkim.conf
Find the following line.
Syslog yes
By default, OpenDKIM logs will be saved in /var/log/mail.log file. Add the following line so OpenDKIM will generate more detailed logs for debugging.
Logwhy yes

Locate the following lines.
#Domain                 example.com
#KeyFile                /etc/dkimkeys/dkim.key
#Selector               2007
By default, they are commented out. Please don’t uncomment them.
Then, find the following lines. Uncomment them and replace simple with relaxed/simple.
#Canonicalization   simple
#Mode               sv
#SubDomains         no
Then add the following lines below #ADSPAction continue line. If your file doesn’t have #ADSPAction continue line, then just add them below SubDomains no.
AutoRestart         yes
AutoRestartRate     10/1M
Background          yes
DNSTimeout          5
SignatureAlgorithm  rsa-sha256

Next, add the following lines at the end of this file. (Note that On Ubuntu 18.04 and 20.04, the UserID is already set to opendkim)
#OpenDKIM user
# Remember to add user postfix to group opendkim
UserID             opendkim

# Map domains in From addresses to keys used to sign messages
KeyTable           refile:/etc/opendkim/key.table
SigningTable       refile:/etc/opendkim/signing.table

# Hosts to ignore when verifying signatures
ExternalIgnoreList  /etc/opendkim/trusted.hosts

# A set of internal hosts whose mail should be signed
InternalHosts       /etc/opendkim/trusted.hosts
Save and close the file.
Step 4: Create Signing Table, Key Table and Trusted Hosts File
Create a directory structure for OpenDKIM
sudo mkdir /etc/opendkim

sudo mkdir /etc/opendkim/keys
Change the owner from root to opendkim and make sure only opendkim user can read and write to the keys directory.
sudo chown -R opendkim:opendkim /etc/opendkim

sudo chmod go-rw /etc/opendkim/keys
Create the signing table.
sudo nano /etc/opendkim/signing.table
Add the following two lines to the file. This tells OpenDKIM that if a sender on your server is using a @your-domain.com address, then it should be signed with the private key identified by default._domainkey.your-domain.com. The second line tells that your sub-domains will be signed by the private key as well.
*@your-domain.com    default._domainkey.your-domain.com
*@*.your-domain.com    default._domainkey.your-domain.com
Save and close the file. Then create the key table.
sudo nano /etc/opendkim/key.table
Add the following line, which tells the location of the private key.
default._domainkey.your-domain.com your-domain.com:default:/etc/opendkim/keys/your-domain.com/default.private
Save and close the file. Next, create the trusted hosts file.
sudo nano /etc/opendkim/trusted.hosts
Add the following lines to the newly created file. This tells OpenDKIM that if an email is coming from localhost or from the same domain, then OpenDKIM should only sign the email but not perform DKIM verification on the email.
127.0.0.1
localhost

.your-domain.com
Save and close the file.
Note: You should not add an asterisk in the domain name like this: *.your-domain.com. There should be only a dot before the domain name.
Step 5: Generate Private/Public Keypair
Since DKIM is used to sign outgoing messages and verify incoming messages, we need to generate a private key for signing and a public key for remote verifier. Public key will be published in DNS.
Create a separate folder for the domain.
sudo mkdir /etc/opendkim/keys/your-domain.com
Generate keys using opendkim-genkey tool.
sudo opendkim-genkey -b 2048 -d your-domain.com -D /etc/opendkim/keys/your-domain.com -s default -v
The above command will create 2048 bits keys. -d (domain) specifies the domain. -D (directory) specifies the directory where the keys will be stored and we use default as the selector (-s), also known as the name. Once the command is executed, the private key will be written to default.private file and the public key will be written to default.txt file.
Make opendkim as the owner of the private key.
sudo chown opendkim:opendkim /etc/opendkim/keys/your-domain.com/default.private
And change the permission, so only the opendkim user has read and write access to the file.
sudo chmod 600 /etc/opendkim/keys/your-domain.com/default.private
Step 6: Publish Your Public Key in DNS Records
Display the public key
sudo cat /etc/opendkim/keys/your-domain.com/default.txt
The string after the p parameter is the public key.

In your DNS manager, create a TXT record, enter default._domainkey in the name field. Then go back to the terminal window, copy everything between the parentheses and paste it into the value field of the DNS record. You need to delete all double quotes and white spaces in the value field. If you don’t delete them, then the key test in the next step will probably fail.

Step 7: Test DKIM Key
Enter the following command on Ubuntu server to test your key.
sudo opendkim-testkey -d your-domain.com -s default -vvv
If everything is OK, you will see Key OK in the command output.
opendkim-testkey: using default configfile /etc/opendkim.conf
opendkim-testkey: checking key 'default._domainkey.your-domain.com'
opendkim-testkey: key secure
opendkim-testkey: key OK
Note that your DKIM record may need sometime to propagate to the Internet. Depending on the domain registrar you use, your DNS record might be propagated instantly, or it might take up to 24 hours to propagate. You can go to https://www.dmarcanalyzer.com/dkim/dkim-check/, enter default as the selector and enter your domain name to check DKIM record propagation.
If you see Key not secure in the command output, don’t panic. This is because DNSSEC isn’t enabled on your domain name. DNSSEC is a security standard for secure DNS query. Most domain names haven’t enabled DNSSEC. There’s absolutely no need to worry about Key not secure. You can continue to follow this guide.
If you see the query timed out error, you need to comment out the following line in /etc/opendkim.conf file and restart opendkim.service.
TrustAnchorFile /usr/share/dns/root.key
Step 8: Connect Postfix to OpenDKIM
Postfix can talk to OpenDKIM via a Unix socket file. The default socket file used by OpenDKIM is /var/run/opendkim/opendkim.sock, as shown in /etc/opendkim.conf file. But the postfix SMTP daemon shipped with Ubuntu runs in a chroot jail, which means the SMTP daemon resolves all filenames relative to the Postfix queue directory (/var/spool/postfix). So we need to change the OpenDKIM Unix socket file.
Create a directory to hold the OpenDKIM socket file and allow only opendkim user and postfix group to access it.
sudo mkdir /var/spool/postfix/opendkim

sudo chown opendkim:postfix /var/spool/postfix/opendkim
Then edit the OpenDKIM main configuration file.
sudo nano /etc/opendkim.conf
Find the following line (Ubuntu 18.04)
Socket local:/var/run/opendkim/opendkim.sock
or (Ubuntu 22.04/20.04)
Socket local:/run/opendkim/opendkim.sock
Replace it with the following line. (If you can’t find the above line, then add the following line.)
Socket local:/var/spool/postfix/opendkim/opendkim.sock
Save and close the file.
If you can find the following line in /etc/default/opendkim file.
SOCKET="local:/var/run/opendkim/opendkim.sock"
or
SOCKET=local:$RUNDIR/opendkim.sock
Change it to
SOCKET="local:/var/spool/postfix/opendkim/opendkim.sock"

Save and close the file.
Next, we need to edit the Postfix main configuration file.
sudo nano /etc/postfix/main.cf
Add the following lines at the end of this file, so Postfix will be able to call OpenDKIM via the milter protocol.
# Milter configuration
milter_default_action = accept
milter_protocol = 6
smtpd_milters = local:opendkim/opendkim.sock
non_smtpd_milters = $smtpd_milters
Save and close the file. Then restart opendkim and postfix service.
sudo systemctl restart opendkim postfix
Step 9: SPF and DKIM Check
You can now send a test email from your mail server to your Gmail account to see if SPF and DKIM checks are passed. On the right side of an opened email message in Gmail, if you click the show original button from the drop-down menu, you can see the authentication results.

Your email server will also perform SPF and DKIM checks on the sender’s domain. You can see the results in the email headers. The following is SPF and DKIM check on a sender using Gmail.
Received-SPF: Pass (mailfrom) identity=mailfrom; client-ip=2607:f8b0:4864:20::c2d; helo=mail-yw1-xc2d.google.com; [email protected]; receiver=<UNKNOWN>
Authentication-Results: email.linuxbabe.com;
	dkim=pass (2048-bit key; unprotected) header.d=gmail.com [email protected] header.b="XWMRd2co";
	dkim-atps=neutral
Postfix Can’t Connect to OpenDKIM
If your message is not signed and DKIM check failed, you can check postfix log (/var/log/mail.log) to see what’s wrong with your configuration. If you find the following error in the Postfix mail log (/var/log/mail.log),
connect to Milter service local:opendkim/opendkim.sock: No such file or directory
you should check if the opendkim systemd service is actually running.
systemctl status opendkim
If opendkim is running and you still see the above error, it means Postfix can’t connect to OpenDKIM via the Unix domain socket (local:opendkim/opendkim.sock).
To fix this error, you can configure OpenDKIM to use TCP/IP socket instead of Unix domain socket. (Unix domain socket is usually faster than TCP/IP socket. If it doesn’t work on your server, then you should use TCP/IP socket.)
sudo nano /etc/opendkim.conf
Find the following line:
Socket local:/var/spool/postfix/opendkim/opendkim.sock
Replace it with
Socket inet:8892@localhost
So OpenDKIM will be listening on the 127.0.0.1:8892 TCP/IP socket. Save and close the file. Then edit Postfix main config file.
sudo nano /etc/postfix/main.cf
Find the following line:
smtpd_milters = local:opendkim/opendkim.sock
Replace it with:
smtpd_milters = inet:127.0.0.1:8892
So Postfix will connect to OpenDKIM via the TCP/IP socket. Restart OpenDKIM and Postfix.
sudo systemctl restart opendkim postfix
Checking the OpenDKIM Logs
Sometimes, the OpenDKIM journal logs may help you find out what’s wrong.
sudo journalctl -eu opendkim
For example, I once had the following error.
opendkim[474285]: key '1': dkimf_db_get(): Connection was killed
opendkim[474285]: 16F53B606: error loading key '1'
I just need to restart OpenDKIM to fix this error.
sudo systemctl restart opendkim
Configuration Error in Email Client
DKIM signing could fail if you don’t use the correct SMTP/IMAP settings in your email client.
Correct Settings:
- SMTP protocol: enter
mail.your-domain.comas the server name, choose port 587 and STARTTLS. Choosenormal passwordas the authentication method. - IMAP protocol: enter
mail.your-domain.comas the server name, choose port 143 and STARTTLS. Choosenormal passwordas the authentication method.
or
- SMTP protocol: enter
mail.your-domain.comas the server name, choose port 465 and SSL/TLS. Choosenormal passwordas the authentication method. - IMAP protocol: enter
mail.your-domain.comas the server name, choose port 993 and SSL/TLS. Choosenormal passwordas the authentication method.
Wrong Settings:
- Use port 25 as the SMTP port in mail clients to submit outgoing emails.
- No encryption method was selected.
Port 25 should be used for SMTP server to SMTP server communication. Please don’t use it in your email client to submit outgoing emails.
You should select an encryption method (STARTTLS or SSL/TLS) in your email client.
Testing Email Score and Placement
You can also go to https://www.mail-tester.com. You will see a unique email address. Send an email from your domain to this address and then check your score. As you can see, I got a perfect score.

Mail-tester.com can only show you a sender score. There’s another service called GlockApps that allow you to check if your email is placed in the recipient’s inbox or spam folder, or rejected outright. It supports many popular email providers like Gmail, Outlook, Hotmail, YahooMail, iCloud mail, etc

Microsoft Mailboxes
In my test, the email landed in my Gmail inbox. However, it’s stilled labeled as spam in my outlook.com email although both SPF and DKIM are passed.
Microsoft uses an internal blacklist that blocks many legitimate IP addresses. If your emails are rejected by Outlook or Hotmail, you need to follow the tutorial linked below to bypass the Microsoft Outlook blacklist.
What if Your Emails Are Still Being Marked as Spam?
The most important two factors are domain reputation and IP reputation. You can use an email warm-up service to improve your reputation automatically.
I have more tips for you in this article:
Next Step
In part 5, we will see how to create DMARC record to protect your domain from email spoofing. As always, if you found this post useful, please subscribe to our free newsletter or follow us on Twitter, or like our Facebook page.
Note
In this article, I used umask 002 in the /etc/opendkim.conf file. A visitor commented below that this solved his problem. However, on Ubuntu 18.04 the default umask in /etc/opendkim.conf file is set to 007, which works fine on my production servers. The umask defines the permission of the OpenDKIM socket file (/var/spool/postfix/opendkim/opendkim.sock)
002: Users not in the opendkim group have read and execute permission, but no write permission.007: Users not in the opendkim group have no read, write, or execute permission.
If I remember correctly, the umask 002 value is the default on Ubuntu 14.04 and 16.04, so I used it when I was writing this article for a Ubuntu 16.04 server.
If you added postfix user to the opendkim group, there should be no need to change the umask to 002.
sudo gpasswd -a postfix opendkim
I listed this command in the installing OpenDKIM section, but why some people don’t pay attention and skip this command? I wonder.


Thanks for the guide!
I have a forwarding/relay address and I’ve been trying to set up postsrsd, but for the life of me it still fails DKIM checks! Wondering if this series can be expanded to provide Sender Rewriting Scheme (SRS)?
eg:
mydomain.com -> gmail.com DKIM PASS
[email protected] -> [email protected] -> [email protected] DKIM FAIL
Cheers
This is a fine tutorial. However, I was unable to pass the dkim checks until I
substituted a dash (-) for a tilde (~) in the spf record of my registrar. Any idea
why this could be?
this tutorial rocks! Got DKIM to work..finally!! …Thanks
Great tutorial cheers!! I have followed all the instructions to setup opendkim on aws ubuntu 14.04. Now, I am using Route 53 for DNS records management. I got KEY OK as described in the tutorial. But I have my mail server pointing to mail.mydomain.com and I don’t see dkim=pass when I test my installation. What should I change to make it work for subdomains?
You might want to suggest to add to opendkm.conf
LogWhy yes
So it will print what the problem is. I spent several hours figuring out permissions issues.
I have a problem with the file sudo nano /etc/default/opendkim and i can’t check the DKIM
This post saved me
https://serverfault.com/a/847442/438721
OK So I have a question. I followed everything step by step and even double and triple checked everything but every time I go to sudo opendkim-testkey -d your-domain.com -s default -vvv it tells me that ‘default._domainkey.MYDOMAIN.com’ record not found… Is there a reason its doing this and if so is there a way that I can uninstall and reinstall DKIM so that I can start over?
“Record not found” means that it can’t find your DKIM DNS record. DNS record can take some time to propagate to the Internet.
Hi i run my own bind server so i get key missing ? Any clue on where to look ? Thanks in advance
very Nice tutorial. Everything works fine for me but can I use the smtp variable on a mailer. Like gammadyne mailer
You should ask them before buying their product.
OpenDKIM Filter: Unable to bind to port local:/var/run/postfix/opendkim/opendkim.sock: No such file or directory
Hi, the socket should be
local:/var/spool/postfix/opendkim/opendkim.sockThanks for this. FYI, after following this guide, my SPF checks failed with SOFTFAIL. I had to update the SPF TXT record with my server’s IP address in order to get the SPF check to pass. Example:
v=spf1 mx ip4:11.22.33.44 ~all
thank u!
Ubuntu 18.04 >>> No matter what config files i edited, the service couldn’t work with /var/spool/postfix/opendkim, so i manually created the folder /run/opendkim or /var/run/opendkim and gave it ownership permissions to opendkim user & group.
The service started successfully, and the opendkim service created it’s PID in the created folder. Everything works normal now.
Never mind, please disregard my above post. It was a mistake done on my own end which resulted in the opendkim PID not working.
Hi.
Thanks for this awesome guide.
I have done my best to follow the guide, and I get the following error when I check the DKIM by sending a mail by using the following command:
echo “test email” | sendmail [email protected]
The opendkim.sock is empty, and when I try to open it by using Nano, it creates an empty file like if it hasn’t been created. I have no idea on what I’ve messed up.
I have even followed the guide twice to make sure I didn’t messed up anything, but I must have made a small mistake somewhere. Any idea on what I have done wrong?
Best regards SLJ.
Looks like you have duplicate configurations in
/etc/postfix/main.cffile. Don’t worry about the content of opendkim.sock.Hi.
Thanks for your reply. That was exactly the issue. An other guide which didn’t worked told me to put in those lines at an other place in the file.
I keep trying to get SPF and DKIM to work by following the guide, but i’m having the following problems which I have no idea on how to solve:
1. As soon as I have configured the SPF on Postfix, the server won’t send any mails at all. I’m doing exactly all the steps which is explain the section: Configuring SPF Policy Agent.
2. I thought I could avoid setting up SPF and just set up DKIM, but the same happens. Postfix restarts without any errors.
When I test the DKIM by using the following command: echo “test email” | sendmail [email protected]
I don’t get anything at all in the output. It’s just like doing a command which the console accepts without any comments or output.
I’m running a Mailman server. I don’t know if that makes any difference.
When testing the DKIM key, it says it’s not secure and then it says it’s okay. So I expect that part to be fine. But I don’t know why it says it’s not secure.
Do you have any ideas on how to bug fix this, or any clue on what’s wrong?
You won’t see anything on the command line when you send a test email to [email protected]. You will receive the report in your mailbox.
But, as explained, the mailserver stops working both when I set up SPF on the server, and when I connect DKIM to Postfix. It doesn’t give me any errors, and no mails comes through Mailman.
Hi,
Thank you for this detailed tutorial. It worked according to your instructions 🙂
I have 2 observations:
1. When testing setting with email using command “echo “test email” | sendmail [email protected]” there is no ‘From’ option. This would mean that email it was sent from would be @your-domain.com (in my case it would be user ‘pi’) and when you do not have such account created, report would not be delivered. Is this correct?
Maybe it will be worth adding i.e. “-aFrom:[email protected]”?
Funny enough, I have not recived report even using that option with specified From value 🙁
2. As per your suggestion, I have used Gmail to verify DKIM record and it looks very much correct, but it has landed in Spam folder anyway. I believe google use some other parameters to mark emails as spam.
This is what I got in the headers from Gmail raw message:
Authentication-Results: mx.google.com; dkim=pass [email protected] header.s=default header.b=b6ARK37a; spf=pass1. If there’s no From address, then Postfix will append the domain name to the username, so [email protected] is the From address and report will be sent to that address. You can use a command line mail client to see the report.
If you are setting up a email server on a Raspberry Pi in your home, there’s a high chance that your ISP blocks port 25. Ask your ISP if
that’s the case.
2. Yes, there are other factors. The most important two factors are domain reputation and IP reputation. You can use an email warm-up service to improve your reputation automatically!
Automatic IP and Domain Warm-up For Your Email Server
Hi.
Do you have any clue on why it won’t work for me? As soon as I set up SPF or DKIM, the Postfix mailserver stops working, and no mails comes through the mailinglists on the Mailman server. Any tips on how to bugfix on this is very much welcome.
You should take a look at Postfix log file (
/var/log/mail.log). If SPF or DKIM is not working, you will see errors in that file.Hi.
The log file didn’t gave me much useful information.
The following guide works for me:
How To Install and Configure DKIM with Postfix on Ubuntu Xenial 16.04 LTS
Setting up SPF and DKIM this way does not crash my server. Not even if the DKIM key do not match. I managed to get it all working by following this guide.
I’m not posting this to say that your guide is bad. It is really awesome, and gives a lot of great information. I’m posting the link to the other guide in case other people are having trouble on getting your guide to work. Maybe you will find it useful.
Feel free to remove this comment if you don’t feel it fits here.
I think the only difference is that I use Unix domain docket. The article you followed uses TCP/IP socket.
Superb tutorial. Tried many others and kept getting the configuration wrong. This time around it is working! Kudos mate, well done!
You are welcome 🙂
Worked in first attempt, just be careful if you are using bind9, you need to craft the record and split the key. Use below example for bind9. (Do not remove ending dot(.) after your-domain.com
The DKIM record output by OpenDKIM is in BIND format.

If you run your own authoritative DNS server with BIND9, simply copy the entire DKIM record output by OpenDKIM, don’t delete anything, and paste it to your BIND zone file.
The following screenshot shows an example DKIM record in a BIND zone file.
Followed carefully, but I get this error in mail.log
I’m on Ubuntu 12.04
There wasn’t a line with Socket, so I added it
Any suggestion on what I did wrong?
Ubuntu 12.04 is out of support cycle and I haven’t used openDKIM on 12.04. I suggest changing the socket file location in both /etc/default/opendkim and /etc/opendkim.conf file.
Then restart openDKIM and Postfix, cd into /var/spool/postfix/opendkim/ directory to see if the opendkim.sock can be found. If not, it’s likely a permission problem.
Finally! I got it to work on by removing the first slash:
instead of
Now the DKIM pass
Díky za pěkný návod….
Thanks for the nice tutorial.
This is an awesome guide. Worked perfectly for me. Thanks so much!
Hello great tutorial but i have two problems:
1. When i am testing the configuration i got this message: “key not secure, key OK”. Why isn`t secure?
2. Even if on mail-test i have 10/10, gmail is getting all my mails in spam. Any ideea?
Thank you for your good job
If you see “Key not secure”, don’t panic. This is because DNSSEC isn’t enabled on your domain name. DNSSEC is a security standard for secure DNS query. Most domain names haven’t enabled DNSSEC.
If your emails get into the spam folder, I have more tips for you in this article: How to stop your emails being marked as spam.
The most important two factors are domain reputation and IP reputation. You can use an email warm-up service to improve your reputation automatically!
Automatic IP and Domain Warm-up For Your Email Server
After following your instructions everything was OK. The only part you would need to update is to extend the /etc/postfix/main.cf if one is using SASL:
to
otherwise SMTP clients will fail.
Thank you so much for this comment.
If you have a “reject: RCPT from” in your mail.log when using SMTP this fixes it.
Thank you for this AWESOME tutorial!!!
This is a really good tutorial, one of the best I’ve seen.
I experienced the problem that some of my smtp processes were running in a chroot jail and others were not.
This was easily fixed by using a network instead of file sockets.
/etc/default/opendkim
/etc/postfix/main.cf
I now get 10/10, thanks so much for the tutorial!
Hi Thanks for the tutorial. I have been stuck on query timed out for days now. Tried specifying nameservers, turning off firewall. I search the logs and there is nothing. tail -f /var/log/syslog never shows anything happening when I run opendkim-testkey.
I can find the DKIM record of your domain without any problems, using the
digutility.Maybe you need to comment out the following line in
/etc/opendkim.conffile.Yeah, that’s what’s so frustrating. The problem is opendkim-testkey times out.
root@mail:/etc# opendkim-testkey -d mydomain.com -s 20190319 -vvv
opendkim-testkey: using default configfile /etc/opendkim.conf
opendkim-testkey: checking key ‘20190319._domainkey.mydomain.com’
opendkim-testkey: ‘20190319._domainkey.mydomain.com’ query timed out
And with the dig command and in opendkim.conf you can specify the nameserver used. So I used the same dns nameserver for both.
The important thing is that your domain can pass DKIM check and your email server can perform DKIM check on sender’s domain.
Maybe you need to comment out the following line in
/etc/opendkim.conffile.Hi,
I get a “warning: connect to private/policyd-spf: No such file or directory”
even though I can open /usr/bin/policyd-spf
my main.cf is check_policy_service unix:private/policyd-spf
and master.cf
policyd-spf unix - n n - 0 spawn user=policyd-spf argv=/usr/bin/policyd-spfCheck if file
/var/spool/postfix/private/policyd-spfexists.the file is not there for me. I get tthsi warning. Ubuntu 18
/usr/bin/policyd-spf is there.
I’m wondering what process is writing /var/spool/postfix/private/policyd-spf becuase the permissions for private are
drwx—— 2 postfix root 4096 Oct 15 15:55 private
where does user policyd-spf come in?
Hi Have setup DLKIM and SPF and DMARC showing pass into Gmail but DKIM showing ‘FAIL’ with domain.
Thanks
Mahendra
Please check the /var/log/mail.log file after sending out an email.
The problem is with adding the public key as a TXT record in DNS.
For the public key generated with opendkim-genkey, you need to remove all the double quotes and generate a single line record.
The single line looks should look like this (remove double quotes and other fields)
# Valid DKIM
v=DKIM1;p=KAABIjANBgkqhkiG9w0BAQEFAAOCAQ8AMIIBCgKCAQEA/fedRNEFQvCdtN0akUCMG686J7Kv7DfjP6CBNYbq0zppCF+gEnXmeRIAG1BNGtqE0DnpiOaePwXpuAC+izWHE4pBltSwczhTOz7dNHxQV3YmPs3pg12Zqm4ARuD9sCdJky/Tz+uPHUYp8GUuAJPOmqmg3lWw9AooPOYfJMLte5BeQ7KtSiyxirT5VfZdYj0VJXvvlIKT8X92OYWN8G0212XiFLyyQuxJixQL04BMG0bvBW8xrNDiNuiAkDGea/nUxKRMnuVKOvAa5JAhi/hNikCOP9NCibllwZLlS2E94bY9FVw+ymbBt0f4MMn/xxxxxxxxxxx
For me, Gmail validates DKIM: ‘PASS’ with domain domain.co.uk
However, any MX check for DKIM fails.
An email I sent to an Office365 account has the DKIM signature:
DKIM-Signature: v=1; a=rsa-sha256; c=relaxed/simple; d=domain.co.uk;
s=default; t=1621183584;
bh=NjeG3ZIwgH4wJjwmfOvaciQLFeNV4RmKNznppTYJ
I have already said in the article that “You need to delete all double quotes and white spaces”.
I don’t know what you mean by the following sentence.
“For me, Gmail validates DKIM: ‘PASS’ with domain domain.co.uk. However, any MX check for DKIM fails.”
Hi Xiao,
Thank you your reply.
I have checked mail log and found email successfully send to destination email address below i have mention log and google email original message.
Can you please check and help me out this.
May 4 05:24:56 makeabetterday postfix/qmgr[18458]: 0E898100C16: from=, size=420, nrcpt=1 (queue active)
May 4 05:24:56 makeabetterday postfix/smtp[18466]: 0E898100C16: to=, relay=gmail-smtp-in.l.google.com[74.125.195.27]:25, delay=0.48, delays=0.01/0.01/0.13/0.33, dsn=2.0.0, status=sent (250 2.0.0 OK 1556947496 r20si5523976pls.19 – gsmtp)
May 4 05:24:56 makeabetterday postfix/qmgr[18458]: 0E898100C16: removed
SPF: PASS with IP 52.26.165.93
DKIM: ‘FAIL’ with domain makeabetterday.co.uk
DMARC: ‘PASS’
If you can’t find DKIM errors in the mail.log file, check if your DKIM record is entered correctly in DNS.
Awesome tutorial.
I’ve written a self-contained tutorial on SPF/DKIM/DMARC implementation a while ago. Feel free to check it out: https://dmarcly.com/blog/how-to-implement-dmarc-dkim-spf-to-stop-email-spoofing-phishing-the-definitive-guide.
In the /etc/postfix/main.cf, change unix:private/policyd-spf to unix:private/policy-spf
Excellent guide, thank you!
Using this guide as of August 2019 on Ubuntu 18.04 (LTS) I found one issue with the opendkim socket permissions.
I found that changing the UserID in opendkim.conf to opendkim:postfix resolved the issue for me.
Thanks for tutorial.
I did everything on Ubuntu 18.04. And for now I have one error.
The following msg is from verifier.port25.com
———————————————————-
“iprev” check details:
———————————————————-
Result: fail (reverse lookup failed (NXDOMAIN))
ID(s) verified: policy.iprev=
DNS record(s):
x.x.x.x.in-addr.arpa. PTR (NXDOMAIN)
Could you give me some trouble shooting guide or hint?
what host u using?
I found a resolution.
My reverse domain does not be registered.
Hello
Very nice tutorials
Everything works as intended for me. but when am sending to gmail recipient my emals are going to the spam folder even though dkim and spf verification passed
Hi,
I have more tips for getting out of the spam folder in this article: How to stop your emails being marked as spam.
The most important two factors are domain reputation and IP reputation. You can use an email warm-up service to improve your reputation automatically!
Automatic IP and Domain Warm-up For Your Email Server
Hi,
Thank you. I gonna try your tips.
I spent some time pondering the DKIM key to be added to the DNS.
A full explanation was not given for this.
The public key comes like:
I was not sure if the second quoted part needs to be included, and if so how.
It needs to be included as the same string, like:
I think I have said in this article that you need to delete all double quotes and white spaces.
Still 5 star rated! As excellent as previous part 1 and part 2. Continue learning next part. Many thanks.
Hi,
Thanks, I am so happy I got my email server to work! But I want it to work even better, and when I test in mail-tester.com I get minus three for “You are not allowed to use one of your sender email addresses”. More specifically, I get these comments (and some more below them):
————————————————————————————————————-
[SPF] nnnn.link does not allow your server 88.888.888.888 to use [email protected]
and
What we retained as your current SPF record is:
v=spf1 mx ~allv=spf1 mx ~all
More information about this error:
nnnn.link: Junk encountered in record ‘v=spf1 mx ~allv=spf1 mx ~all’
———————————————————————————————–
Any clues as to what might be the matter?
Your SPF record is incorrect. It should be
v=spf1 mx ~all, notv=spf1 mx ~allv=spf1 mx ~allThank you so much! What a silly mistake!
HI, thank you very much for very well documented tutorial series. Nice work !
I think I found a typo on /etc/postfix/main.cf to allow postfix to connect to Milter service
should be :
Without that I had a warning error on /var/log/mail.log and dkim wasn’t applied.
After playing with Amavis, it turns out that
works with Postfix, Dovecot and OpenKIM. But if Postfix is integrated with Amavis or other software, then we probably need to use
Hi Xiao,
note that Amavis is not installed on my Ubuntu 18.04.03 server working with Postfix 3.3.0 & Opendkim (2.11.0~alpha-11) but I had to remove the starting / from smtp_milters path in order to connect to Milter service.
Ok. I think using
smtpd_milters = local:opendkim/opendkim.sockas default is better.Thank you for this extremely straightforward and simple tutorial. Allow me to add something I learned that wasn’t obvious when first processing through the tutorial:
* If your Postfix is running as a relay for authenticated hosts, you must put the IP addresses of those hosts in the trusted.hosts file
Xiao,
Thank you for your tutorials. I’ve used several of them and they are well written and concise. I really appreciate you taking the time to explain the how’s and why’s of the thing you do instead of just a series of cut and paste commands… it makes it much easier to troubleshoot when you know how the pieces are put together. You my friend are a great teacher.
lol buy her a beer like i did <3
Yikes… I got as far as testing the key and got the following:
opendkim-testkey: tag without value at end of key data
Google searches are finding nothing with opendkim-testkey: “tag without value at end of key data”
any ideas?
I figured it out. I was copying ONLY the information after the P=, and not the v=DKIM, etc.
Hi Team,
First of all, this postfix guide is the best I’ve ever found on the web. Clear, informative and the best thing is that it is workink as described.
So my question is regarding an SPF issue. I’ve implemented the SPF checks and it is working fine. However some domains i.e. amazone.co.uk, hotmail.com, outlook.com are rejected by postfix.
Here are a few logs….
550 5.7.23 : Recipient address rejected: Message rejected due to: SPF fail – not authorized. Please see http://www.openspf.net/Why?s=mfrom;id=20200317125758b8821ba6237a40e0a2b885d2d460p0eu@bounces.amazon.co.uk;ip=10.10.10.251;r=; from= to= proto=ESMTP helo=
550 5.7.23 : Recipient address rejected: Message rejected due to: SPF fail – not authorized. Please see http://www.openspf.net/Why?s=helo;id=eur04-vi1-obe.outbound.protection.outlook.com;ip=10.10.10.251;r=; from= to= proto=ESMTP helo=
Is there a way to whitelist some domains? Or what can be the solution for this?
Thanks in advanced!
10.10.10.251 is a private IP address. Why are you receving Amazon and outlook emails from this address?
My system is a bit complicated. Basically my server is sitting at home. I cannot have a static public IP here. So I’m hosting a MikroTIK EC2 instance and all my email flow is routed through a VPN tunnel. So the 10.10.10.251 is my VPN IP. I need to do like this because of the STATIC IP issue with my ISP.
All other emails are flowing smoothly without any problem at all. i.e. I can receive emails from other domains i.e. yours arriving perfectly.
Now I disabled the service by the time and the hotmail emails started to flow in.
Do you think this is related to the private IP what postfix can see?
Yes. That’s the problem. You should not relay emails from VPN gateway to your mail server. Instead, you should set up a mail proxy so that your mail server can see the SMTP client’s real IP address.
I think I will write about how to set up mail proxy in the following days.
Yes, I was suspecting that as well. I keep you following with that proxy setup. #donationisontheway
Thanks (^-^)
Hi Norbert,
I just published a tutorial for setting up SMTP and IMAP proxy: https://www.linuxbabe.com/mail-server/smtp-imap-proxy-with-haproxy-debian-ubuntu-centos
Ubuntu 18.04-
I followed the tutorial and got no errors, seemed like everything should be fine, but outgoing emails did not have dkim keys included.
After much searching, I discovered, in /var/log/syslog this error:
Again, after much searching I solved the problem with this answer:
https://askubuntu.com/a/1117490/992232
Namely, editing /lib/systemd/system/opendkim.service and removing the line:
Hope this helps someone else.
Oh my god, I had been stuck on that for the past week to no avail. You might be a stranger but I am exceptionally grateful to you for posting this solution. I needed this to work as part of my penultimate year project in uni, and you are such a saviour<3 Thank you x1000
Thanks again – Got through this part too. There were 1 main part I stumbled on here. So I am sharing if other people stumble in the same place.
Putting the DKIM public key into my DNS. (I am with OVH).
Formatting the Output from the:
sudo cat /etc/opendkim/keys/your-domain.com/default.txt command, its output tries to be helpful and splitting it up into 3 small parts. In short, you only really need two.
Trying to follow the author’s instructions, it becomes unhelpful. The author’s instructions, quite rightly, help you compile back up to one TXT string – however for my provider this was too long (An Error)
In short I had to… edit a text version…. of the DNS file and …apply the DKIM over two lines
this is what it looks like:
Line one: default._domainkey IN TXT (“part one of the code in quotes”
Line two: “second part with bracket at end after quote”).
This worked for me.
how on earth did u “edit a text version…. of the DNS file and”?
Thank you for the excellent tutorial! Worked like a charm!
I do have a question in relation to DKIM when it comes to multiple domains… what needs to be changed to accomodate sending and receiving for multiple domains on the same postfix server ?
Any help is greatly appreciated!
You can read the guide here: https://www.linuxbabe.com/mail-server/host-multiple-mail-domains-in-postfixadmin#dkim
Thank you once again! your tutorial was excellent!
Always a good sign if the comment section is longer than the post itself ; ) – excellent article, thanks for that.
A short remark: For AWS Route53 the DNS entry “default._domainkey.your-domain.com must be split into separate strings with a single space in between, eg. “v=DKIM1;k=rsa;” “…MIIBIjAN…” “…qhkiG9w0BA…”.
Great Tutorial, thanks a lot!
I am not sure what this command actually checks for:
I forgot do delete some spaces in the DNS TXT entry and the check with gmail failed. However this command said “Key ok”
I do not think opendkim-genkey generates the correct type of key.
I was seeing DKIM failures with my key on Gmail and other email checking services.
I discovered that opendkim-genkey generates a key that is NOT of type “RSAPublicKey”.
This type is required for DKIM checks to pass.
I was able to generate a proper “RSAPublicKey” DKIM key using the following commands:
# Creating DKIM private key of type RSAPublicKey (aka OpenSSL PEM format)
sudo ssh-keygen -b 2048 -t rsa -m PKCS8 -f ./default.private
# Turning private key into DKIM p= field (public key)
sudo ssh-keygen -y -e -m PKCS8 -f ./default.private
Don’t forget to ‘chown’ the new default.private file:
sudo chown opendkim:opendkim /etc/opendkim/keys//default.private
Set your “P=” data in your DNS DKIM entry to the public key generated by the second command.
This resulted in passing DKIM status on Gmail and other email checkers.
Please let me know if this helps anyone!
Thanks!
I’m not sure this is neccersary :/ but im not sure i had major dkim problems and almost killed a village of inocents in my rage but now its working fine for god knows what reason
Works for me! Thanks!
Good day, what if for some reason you wanted a setup where your outgoing messages were DKIM-signed, like what seems to be happening here, but you also wanted to:
1) Accept messages from domains not using DKIM
and
2) If the domain is using DKIM, and the key check fails, don’t deliver the message
Where are such policies specified?
1) OpenDKIM won’t reject emails not signed with DKIM.
2.) It’s not ideal to reject emails just because the DKIM check fails. DKIM is more commonly used in conjunction with SPF to form a DMARC policy, which you can use to reject emails that fail DMARC verification.
To understand how DMARC works, read this article: Creating DMARC Record to Protect Your Domain Name From Email Spoofing
To reject emails that fail DMARC verification, read this article: Set Up OpenDMARC with Postfix on Ubuntu to Block Email Spoofing/Spam
Thanks very much for the clarification. I had it conceptualized as all three having commonly used implementations for either direction, that each had separate implementations. But DKIM appears to be a one-stop-shop. Also, perhaps the fact that SPF has policy led me to expect that DKIM had its own in-protocol policy component as well. I did go ahead and set up DMARC for incoming, following your latter article.
SPF: PASS with IP Learn more
DKIM: ‘FAIL’ with domain mydomain.com Learn more
DMARC: ‘PASS’ Learn more
Still getting DKIM failed from gmail…
Hi Sameer,
Check out my comment from a couple weeks ago.
You might need to generate different DKIM keys (public and private) using the commands I mentioned.
This fixed my errors.
opendkim-genkey seems to not generate the proper key.
Hello everyone,
I’ve set up DKIM and passed with ‘sudo opendkim-testkey -d your-domain.com -s default -vvv’ but everytime I send an email there is no DKIM signature, it says it’s missing, is there something else I should be doing?
This is really odd. I installed this awhile ago, and I don’t recall changing anything. I didn’t have this problem, before. I have spamassassin installed, as well – I read, somewhere that, for reasons I didn’t understand, this could cause the problem I am seeing. For some reason, when I check my mail server on this site you suggested it now deducts two points from my score because it says I have two DKIM records. I have no idea why this would be happening. If you have any thoughts, I’d love to hear them.
Another awesome tutorial in the bag! Like the first three chapters, it worked like you’d tested it extensively 😉
While I know you already know this…. I’ve been through the DKIM cat & cut & paste exercise a few times before. If there is any suggestion I could offer, it is this:
Make sure to point out in simple terms (i.e. “break it down Romper Room style”) that… when you issue the ‘sudo cat /etc/opendkim/keys//default.txt’ command… it’s a good idea to copy and paste it into a text file, maximize that text document, and remove all the quotation marks.
When the key is longer than a certain number of characters (2048?) it is spit out as two separate long blocks of character strings. You’ve got to remove the quotes, and drop it as a single block of text into your TXT entry.
You *did* mention it in passing. But some folks are going to miss it, and either put two quoted blocks in the content box at their DNS provider… OR… they’ll try and make two entries. (ask me how I know 😉 )
Great work! On to chapter 5.
Hello everyone,
I have created DKIM at SMTP server and its getting passed when tested from local server.
Now we are are using same SMTP configurations for a server and sender is allowed at SMTP. Its saying DKIM=none.
Sender address is [email protected]. Is it because we used top level domain(your-domain) to create DKIM and now sender at server is @xyz.your-domain.com?
Yes. You need to create separate DKIM keys for sub-domains, basically treating them as different domains.
To set up OpenDKIM for multiple domains, you can read the guide here: https://www.linuxbabe.com/mail-server/host-multiple-mail-domains-in-postfixadmin#dkim
THANK YOU FOR THIS! I have been running my own Linux server for years and recently (past few years) email has been a real problem with delivery to other sites. The last straw when Gmail started blocking my server. I finally got around to trying this and got it all working! You made it easy to copy/paste and just get on with my life and not have to become an SME on all these things.
Hi!
I got the key, seems to be there. But when testing it, it says: key not secure. Someone told me that: ” It is an expected consequence of not using DNSSSEC”:
Is this normal? Am I missing something?
THANKS
Yes, the key is not secure when your domain name is not using DNSSEC. You don’t have to worry about it.
Thank you Xiao. 🤓👍
are we meant to add both the obscure strings to the DNS record (Publish Your Public Key in DNS Records section) ?
v=DKIM1; k=rsa; p=obscureString1 obscureString2
i ask cause im getting “key not secure” maybe this is due to propagation delay or maybe its a misunderstanding regarding the fact that there’s 2 obscure strings or maybe its due to that fact that im using ubuntu 16.04 (would that be a problem?)
maybe “Nolan Tenpas” has my solution
after perusing every single comment on this thread i am a wiser man.
the problem is that im not getting a DKIM pass from gmail.
It might be a propagation issue :/ (as suggested by mail-tester.com)
As I have said in this article, when you test the DKIM key, if you see “Key OK” in the command output, your DKIM record is correct.
If you see “Key not secure” in the command output, this is because DNSSEC isn’t enabled on your domain name. There’s absolutely no need to worry about “Key not secure”.
DKIM is the bane of my existance but for some reason its working now so thanks the lordy lord
and thank you dear! the angel of my existence!
I’ve followed your previous tutorials for setting up Postfix and Dovecot which have work perfectly. I’ve done the SPF section in this article which I have working properly. I’ve followed the DKIM instructions, opendkim and postfix are running without errors. When I send an email to any of the test sites I always see DKIM check: none.
Running on Ubunto 18.
At a loss, looked through all logs for any errors. Not seeing any information as to what’s happening. Even looked for ways to debug what’s happening, with no luck. Any ideas on what to even look for?
Add the following lines in
/etc/opendkim.conffile to produce more verbose logs.Save and close the file. Restart OpenDKIM.
Now OpenDKIM will produce more verbose logs in
/var/log/mail.logfile.I’m having the same issue. I’ve got Ubuntu 20.04. I’ve followed everything, checked it multiple times, added the LogWhy, and still no errors indicated but still DKIM=none and the the checker site says not signing. opendkim is running.
At a loss, too.
So, after some exchange with Xiao, I ended up deleting the socket and the directory. Then I recreated them. Turns out I got my lines confuses and improperly labeled the socket. Once I deleted the directory and did it all again, that is check the configs and rebuilt the socket, worked perfectly.
Thanks!
One more thing…I found in my efforts to troubleshoot this that the key.table shouldn’t have refile: at the start as the guide suggests. It has to do with how the domains are listed. When they are all on one line, you don’t use the refile. the signing.table file, since it has the wildcard, does require refile. So it would look like this:
Thank you for the great tutorials you are giving us with super details 🙂
I have a question: The steps above about DKIM. Do I have to repeat it for every domain that I use in postfix admin or just the domain of the mail server?
I mean something like this:
Yes. You can find more details on this page: https://www.linuxbabe.com/mail-server/host-multiple-mail-domains-in-postfixadmin
Great article! I ran into problems when I generated the 2048-bit default._domainkey, since my domain registrar did not allow for such long TXT records. It took me a long time to figure this out. However, after generating a 1024-bit key everything worked.
Hi
I have followed this guide to send and receive email but I have 2 problems
1. When sending an email to gmail -> I get a red icon saying – the sender did not encrypt this message
2. When receiving email, I get the mail when I type the mail command in the linux box. But I am not receiving it in outlook (I am sending and receiving) from outlook.
Problem 1 is more important as I want that users to see a green icon – instead of red.
Thanks,
Have you followed part 2 to enable TLS in Postfix and Dovecot? Add the following two lines in
/etc/postfix/main.cffile to enable TLS when Postfix sends outgoing emails.To enable encryption when Postfix receives emails, add the following two lines.
Restart Postfix
Check your mail log (/var/log/mail.log) to debug outlook issues.
I tested with Mail-tester.com and got a score of 1.2 and a saying that my mail nevers sees a mailbox: https://www.mail-tester.com/test-r31d18hwi&reloaded=1. “SpamAssassin” scores -5.8 and identification -3. The mail still landed in Gmail’s inbox not junk folder for the first time.
my DMARC reports I receive all PASS the DKIM and SPF tests–except for the report from att.net
Same ip address, same domain–always fails the DKIM check. Have you ever encountered that?
google, yahoo, verizon all pass.
—-
Excellent guides by the way 🙂
Hello!
About SPF options:
Never use: ~all – > it softfail and does nothing.
Use: -all -> Block/DROP if someone wants to f..k with UR domain
Actually, Using
-allin your SPF policy can cause your own emails to be rejected. I never use-all.The standard way to block forged emails is to use DMARC.
Yes, an SPF policy with
~alldoes nothing. But its power comes into play when SPF is used together with DKIM to form a DMARC policy.I have an error. This is my default._domainkey. What’s wrong Xiao?
Maybe you need to wait some time for your DKIM record to propagate to the Internet.
PERFECT!
I followed all your guides from DMARC and SPF / DKIM and its the best linux tutorials I ever seen… They are extremely easy to follow and I will buy you a beer for it! THANKS!
Two recommendations…
1. For the SPF DNS entries, if you use relay servers which my ISP require, the DNS, record you need to add those servers to the TXT record.
2. In the SPF guide, you write simply to add a new “smtpd_recipient_restrictions =” at the end of the main.conf file. If you already have this in your main, I got warnings “warning: /etc/postfix/main.cf, line 123: overriding earlier entry: smtpd_recipient_restrictions=” in my logs until i merged the entries…
Anyway, thanks a million!
Hi xaoi. first off your guides are some of the best ive ever seen and mostly work without a hitch.
But after i followed this guide i got it to work flawlessly with mail-tester on my main domain but when i duplicate it for the files for key/signing and hosts my first domain remains working but when i try to do it with my second the email doesnt even get sent.
i generated the keys for both domains. updated the dns(also using the bind9 guide you provided) to include the TXT record then used this link https://dkimcore.org/c/keycheck to verify the dkim key is updated to the current one.
Then finally when im done and i run my phpmailer script -> https://pastebin.com/fXuaLwQH in SSH and while my first domain(pihosting.ca) works great my second domain (truebud.ca) doesnt even send email. I tested it with mail-tester and it never got it.
What did i miss?
Always check your mail log (/var/log/mail.log) and Dovecot log (sudo journalctl -eu dovecot) to troubleshoot mail server problems.
Hi,
This is a great article and is extremely help full.
I managed to configure the sever as per the instruction and the DMARC ones as well.
On final testing all seems good on the google original email but I do see an error like this :
Dio you know how to fix this?
My server is Ubuntu 20.04 with postfix/devcoat/spamassing and i alos have install iredmail admin.
If you installed iRedMail, you don’t need to follow this SPF/DKIM tutorial.
The error is probably because you use an email address that hasn’t been created in iRedAdmin.
Hi,
Thank you for the quick reply.
All email accounts are created from within the iRedMail admin web page.
I did this for a learning, and it helped.
A side question do you know I can configure the the mail to act as a relay ONLY for all my all my internal servers, internal networks, I use about 4 different IP ranges.
Currently each ubuntu server is acting as it’s own mail releay, this does work, but I would prefere to have one relay server, rather then 4.
Loving this whole series. This is my first time setting up a personal email server and this series has walked me through it. It is designed for the simple person that has a small knowledge of computers. There are a few things I have had to change for my setup but worked through them. The biggest issue I have faced so far was getting DKIM to pass. Working on it across two days I finally ended up having to regenerate my key and come to find out my original attempt had gotten messed up somehow. Now it works beautifully.
Thanks for this article.
Very nice and easy to follow.
Great job.
Cheers!
I am not able to receive emails from otherwise it working fine. port 25 is blocked on my machine so I have to set up smtp relay, and so the dkim and SPF records.
So do I need to follow this tutorial? and why am I not retrieving any mails
Possible causes of not receiving email
1. Your MX record is wrong.
2. Your mail server hostname doesn’t have DNS A record.
3. Your firewall doesn’t allow incoming connection to port 25.
4. Postfix isn’t listening on the public IP address.
5. Check the mail log (/var/log/mail.log) and Dovecot log (sudo journalctl -eu dovecot) to find out if there are other errors in your configuration
SMTP relay service will only add DKIM signature to your outgoing emails. They can not verifiy DKIM signatures of incoming emails. So you still need to follow this tutorial to set up SPF and OpenDKIM.
Hi. Very nice tutorial.
When I send email by mail command to my gmail account I recive email from [email protected] but if I use sendmail it is [email protected]. Why so?
To specify the FROM address, use the following syntax.
The mail command is used only in part 1 to show you Postfix works. The remaining parts of this tutorial series assumes you want to use a graphical email client.
Hello dear support
as I get by dig command my dkim record, nevertheless postfix is blocked by milter
It’s very likely there’s a typo in your
/etc/opendkim/signing.tablefile or/etc/opendkim/key.tablefile.solved, thanks
Hi!
This is one of Internet’s best tutorials! Thanks!
I have done everything, double checked and tested. Everything improves and I get a 9/10 score from mail-tester.com. BUT it marks DKIM as not configured. But the tests made locally seems fine, then meaning that opendkim-testkey seems fine.
My test through mail tester.com says “Your mail is not signed with DKIM”. SPF is just fina and passes with distinction 😉
Any ideas?
Kind regards
Michael
Hey there,
thanks for this great tutorial. Everything works fine until I’ve tested my configuration with mail-tester.com
Mail-Tester says I have two DKIM signatures in my message. The only difference is the timestamp. One signature has 1611058629 and the other has 1611058628. How is this possible?
Thanks for the tutorials.
I had to use a key of 1024 for dkim, every time I paste in a 2048 bit txt it would get changed on the vps providers web interface somehow. It was incredibly frustrating so if anybody else may have that issue too. I can pass dkim and set up dmarc now.
your the best teacher and thx
To correctly setup dkim i needed to change the following based on the anwser to https://serverfault.com/questions/861642/opendkim-not-signing-mail
in /etc/opendkim.conf
from KeyTable refile:/etc/opendkim/key.table to KeyTable /etc/opendkim/key.table
in /etc/opendkim/key.table
from
default._domainkey.your-domain.com your-domain.com:default:/etc/opendkim/keys/your-domain.com/default.private
to
default._domainkey.your-domain.com your-domain.com:default:/etc/opendkim/keys/your-domain.com/default.private
Hello Xiao Guoan;
Thanks for all your great tutorials. Just a technical question. I was unable to find clarification on the net regarding “receiver=<UNKNOWN>”. Just curious to know what it is. Thanks.
The receiver is the email address of the SMTP
RCPT TO:command. For privacy reason, the email address is hidden, so it’s shown as UNKNOWN. See the man page: https://manpages.debian.org/testing/postfix-policyd-spf-python/policyd-spf.conf.5.en.html#HIDE_RCPT_TO_IN_RESULTS_HEADERThank you.
Hello, thanks for this great tutorial! I’m at the DKIM key test steps, and opendkim-testkey gives the result “unexpected reply class/type” for my domain. Any ideas here?
After a little more digging through syslog and other routes, I found this error was because DNS was resolving the domain inside my network (an NXDOMAIN error in syslog). Straightened out my DNS and voila! Figured I’d post back here in case anybody else ran in to something like this.
I am having the same issue. How did you straighten out your DNS. I am showing everything is good through my DNS service unless there is something I missed somewhere.
It was actually the local DNS resolver on my network not resolving the domain to the local IP instead of public IP.
I’m having the exact same issue, but still do not fully understand what you are saying, even your post below this. What exactly did you do to solve this? Im running a router behind my ISP router. Could it have something to do with that, or is this a server related issue? Please help!
I’m having the exact same issue, but still do not fully understand what you are saying, even your post below this. What exactly did you do to solve this? Im running a router behind my ISP router. Could it have something to do with that, or is this a server related issue? Please help!
When I try my Mail server with:
I have score 10/10, but has message:
How to fix it Xiao? Thank you..
mail-tester.com is designed for newsletter senders. If you don’t send newsletter, you don’t need the list-unsubscriber header.
Ok thank you Xiao Guoan, what about:
That’s no problem? How to fix it? Thanks
I need help. my DKIM comes back as failed when I email my google account. I have no errors or warnings in my log.
I have made a new Key pair and it is still failing. I have compared the key in the default.txt to what I have in my default._domainkey.davidsherer.us DNS entry and they match. So have no idea of what could be happening.
Do you have any insight?
You can go to https://www.dmarcanalyzer.com/dkim/dkim-check/, enter
defaultas the selector and enter your domain name to check if your DKIM record is valid.Thank you. Not sure how I copied the key wrong or even when I compared them they were the same. But the key was wrong. Fixed now and working.
I have gotten to the testing of the DKIM but it always fails. I use Google DNS and when I the key I removed all white space and double-quotes. Google adds double quotes and splits the key as it is too long. But now in the DKIM record checker it is still recording that there is white space. I am unsure if it is because of the way Google DNS splits it or if there is anything else I could do to change it and remove any whitespace. Thank you.
Right after setting up DKIM by following every bit of the tutorial, i attempted to send a mail using roundcube mail to my gmail as a test.
I got the following error “SMTP Error: [451] 4.7.1 Service unavailable – try again later” and my emails werent being sent at all
I then removed with “gpasswd -d postfix opendkim”
Now emails go through but with a Softfail for SPF and Fail for DKIM.
I know this guide has worked for many and there are many more knowledgeable people on linuxbabe. Any help please?
Same problem here
“SMTP Error: [451] 4.7.1 Service unavailable – try again later”
Any idea?
Thanks for such a great tutorial, I do have a question, but when I attempt to run the opendkim-testkey, I get a response that the key is missing, but I have followed the steps as written up until the point of testing. Any idea why this would be?
Maybe you need to wait for the DKIM DNS record to propagate?
For longer than a week?
Have you tried to verify your DKIM record at https://www.dmarcanalyzer.com/dkim/dkim-check/ ? Enter default as the selector and enter your domain name to check if your DKIM record is correct.
So it looks like the DNS entry was parsed strangely by my hosting provider, after copying it again and ensuring all random white space was removed, DKIM tests show that it is now a valid record. However, none of my outgoing mail seems to be signed. Messages are passing properly with SPF, but DKim doesn’t appear to be invoked at all.
I can not get dkim to work. I did find that when I check the status of opendkim I get this error:
example.org opendkim[3709]: 71DF42413F: signing table references unknown key ‘default._domainkey.example>
Any ideas?
After some more research there is an issue where there can be a carriage return character stuck in the signing.table file. After removing this it is working though I still have no DKIM tag when I send test email. It shows working fine with SPF thought.
Thanks, this is a great guide, and very clearly explained. Everything worked perfectly.
gmail is still marking my emails as spam 🙁 But not because of DKIM.
I’ll have a look at some of your other articles. Thanks very much
Have a look at this article: 7 effective tips to stop your emails from being marked as spam
The most important two factors are domain reputation and IP reputation. You can use an email warm-up service to improve your reputation automatically!
Automatic IP and Domain Warm-up For Your Email Server
I can no longer get OpenDKIM to stay running. On checking logs I find that it fails with error “opendkim[6595]: can’t configure DKIM library: failed to set nameserver list”. Any ideas from anyone on how to fix this?
Still had no luck with this and research has gotten me no where.
Maybe you need to comment out the following line in
/etc/opendkim.conffile.Just checked and that line is already commented out.
If you use Nameserver in the
/etc/opendkim.conffile, then it should be like this:Separate each IP address with a comma.
Hello. Congratulations on the excellent series of articles. I have a problem. After configuring SPF and DKIM I no longer receive emails, but I can send normally. Would you help me?
Always check your mail log (/var/log/mail.log).
Is there a way to sign all outgoing mail, but never verify incoming mail? `ExternalIgnoreList` apparently doesn’t do it. The mail is still processed, and a `Authentication-Results` header is added, only with “unprotected” for key, so that doesn’t help. I want Postfix to completely ignore incoming DKIM headers, but still always sign outgoing. Possible? Can’t find on https://wiki.archlinux.org/title/OpenDKIM
Change the mode from
Mode svtoMode sin/etc/opendkim.conffile.s: signing
v: verification
Also a big thanks (and a beer) for Xiao Guoan!
Another remark to warn others…
In the construction of the DKIM record I also first managed to screw up the removal of the white space.
The strange thing was that:
sudo opendkim-testkey -d your-domain.com -s default -vvv
would report the key as OK…
But:
https://www.dmarcanalyzer.com/dkim/dkim-checker
did not.
So carefully check your work for this step!
Hi Xiao,
Real fan of your linux guides however now unfortunately run in to the following problem:
I ran though this without tutorial problems but the the smtpd milter is used by Spamassassin as well ( as per another tutorial from you)
so my mail log now shows the following error:
The Milter is configured in postfix main.cf as follows:
This bit is very similar as the Spamassissin-Postfix config so I combined the two? mayby not the way to go?
Obviously the opendkim socket now is overridden and does not work and Spamaassasin socket does still work. Is there a way to combine the two or am I at the complete wrong end of the stick?
Keep up the great work!
Thank you,
Henk
Use multiple milters on one line.
That actually worked. It’s now working! (After I changed the folder/file permissions to the key files, silly me, der!)
All great now, thanks again!
Henk
A friend told me that a mail sent from my mail server via my “Nextcloud” instance had landed in his spam folder. So I sent a test mail from my mail server to my Gmail account and saw the following error message:
That IP address is the inner IP address, not the public IP address. The corresponding SPF-record for test.tennis24.ee. on my hosting provider is:
I can’t change it to have “ip6”-address as I get the following error message in “cPanel”:
What’s the solution?
If you can’t add IPv6 address in your SPF record, you can disable IPv6 in Postfix to prevent unnecessary IPv6 connections. Simply run the following command to disable IPv6 in Postfix.
Then restart Postfix.
From now on, Postfix will use only IPv4 address.
Thanks for your quick reply! Your suggestion works:
I’ve also got a suggestion from my hosting provider to write the sixth level IP address in SPF record as a range because it could be dynamic and not accessible otherwise.
Current Ubuntu (21.04) require little modification of trusted.hosts: removing asterisk from the front of domain:
.your-domain.com
works – with asterisk I got error:
xxx.your-domain.com not internal
Anyway – great tutorial!
Thanks
YOU ARE THE GREATEST MAN ALIVE!!!
Thank you so much, I am very new to email services and I understood everything from this tutorial. I could even set my own mail server in 3 hours thanks to you.
I am seriously grateful. I’ve been trying to set something that actually works for over a month now and your tutorial was a lifesaver!!!
Hi, Thanks. Just a tiny quibble about the use of “local:” in “smtpd_milters = local:pathname” (main.cf). It should really be “unix:” rather than “local:”. It does work, for obscure reasons that are not worth mentioning, and they are exactly identical on Linux, but the “local:” syntax is completely absent from Postfix documentation (except in relation to local_transport which is very different and has nothing to do with UNIX domain sockets). Only “inet:” and “unix:” are documented (see MILTER_README and SMTPD_POLICY_README). The “local:” prefix is the correct documented syntax for /etc/opendkim.conf, but it doesn’t agree with Postfix documentation.
hi. very good series for mail configurations. i have problem with yahoo and gmail. they block all my emails. by this article gmail unblock me but yahoo steel not receive my emails.
Thank you very much.excelent.
Ubuntu 20.04. I follow the guide but I’m getting this error in /var/log/mail.log:
Is it possible that OpenDKIM is more restrictive on Ubuntu 20.04? I will try to remove “opendkim” group from “postfix” user tomorrow, but I have a feeling that will have consequences elsewhere which will be hard to fix…
I fixed my issue by adding the following directive to /etc/opendkim.conf
It’s probably not the best approach, but that will have to do for now.
This additional line in /etc/opendkim.conf worked and
signatures have added to outgoing emails!!
Thanks @Gael Lafond
change the permission, so only the
opendkimuser has read and write access to the private key file. It works on my server.Thanks Xiao. That’s the first thing I did, but that didn’t help. The error message was still coming up. I also changed the access rights of the folder containing the key but the message was still coming up. I may give it another try. Maybe I didn’t restart the service properly or something.
I have also been having the same issue and can confirm that changing permissions on default.private did not resolve the problem
[Ubuntu 22.04]
Hi, just perfect. Everything works fine for me.
Now I want my email server to send emails on behalf of my another domain, just like the Mailchimp and Sendgrid do. How can I configure this? What DNS entries should I add in my another domain?
Thanks
Did someone know the cause of “unexpected reply class/type” error?
root@mail:~# opendkim-testkey -d domain.com -s default -vvv
opendkim-testkey: using default configfile /etc/opendkim.conf
opendkim-testkey: checking key ‘default._domainkey.domain.com’
opendkim-testkey: ‘default._domainkey.domain.com’ unexpected reply class/type (-1/-1)
root@mail:~#
Results on dmarcanalyzer.com about my domain says “seems to be a valid DKIM record”
Thanks!
Your tutorials are the best!! Thanks for your time and work on this, mail servers can be confusing.
Hello Xiao,
Thanks for the amazing tutorials series. I realize this is a lot of work to put together and saves us a lot of time.
I have been following the steps you discussed in the tutorials. After completing the entire Part 3 of the tutorials, I was able to receive emails in Thunderbird email [email protected] from my Gmail accounts. After completing the steps on Part 4 of the tutorial series, I was not able to send emails to “[email protected]” nor receive emails from my Gmail accounts.
I am hosting Django websites ( www.bambamboo.com, www.essentricswithgenevieve.com, www.liondancetoronto.ca ) and the email server on a single IP address. The hostname (bamboo-webserver) is different than the email domain name (essentricswithgenevieve.com).
Here are some of the details:
Here is the messages from the log file:
Any ideas?
Thanks,
Kin
I resolved the issue. It turns out that the acceptable PostgreSQL is true/false. MySQL acceptable Boolean values are 1 or 0.
For PostgreSQL:
For MySQL:
I was fine until my first attempts to run the opendkim service. The readout:
● opendkim.service - OpenDKIM DomainKeys Identified Mail (DKIM) Milter
    Loaded: loaded (/lib/systemd/system/opendkim.service; enabled; vendor preset: enabled)
    Active: failed (Result: exit-code) since Sun 2022-01-02 00:36:07 PST; 32s ago
      Docs: man:opendkim(8)
            man:opendkim.conf(5)
            man:opendkim-genkey(8)
            man:opendkim-genzone(8)
            man:opendkim-testadsp(8)
            man:opendkim-testkey
            http://www.opendkim.org/docs.html
   Process: 145257 ExecStart=/usr/sbin/opendkim -x /etc/opendkim.conf (code=exited, status=78)

Jan 02 00:36:07 ladonax systemd[1]: opendkim.service: Control process exited, code=exited, status=78/CONFIG
Jan 02 00:36:07 ladonax systemd[1]: opendkim.service: Failed with result 'exit-code'.
Jan 02 00:36:07 ladonax systemd[1]: Failed to start OpenDKIM DomainKeys Identified Mail (DKIM) Milter.
Jan 02 00:36:07 ladonax systemd[1]: opendkim.service: Scheduled restart job, restart counter is at 5.
Jan 02 00:36:07 ladonax systemd[1]: Stopped OpenDKIM DomainKeys Identified Mail (DKIM) Milter.
Jan 02 00:36:07 ladonax systemd[1]: opendkim.service: Start request repeated too quickly.
Jan 02 00:36:07 ladonax systemd[1]: opendkim.service: Failed with result 'exit-code'.
Jan 02 00:36:07 ladonax systemd[1]: Failed to start OpenDKIM DomainKeys Identified Mail (DKIM) Milter.
I include the error in case others have gotten this and are searching this thread for any of its contents. I noticed that this error message has come up a number of times on other forum sites, often including references to following this tutorial.
In my case, the error turned out to be a typo. While using nano to edit */etc/opendkim.conf* I inadvertently deleted the very first char of the file (a “#”). I discovered that this was the source of the error when going back and running the following test anew.
This test had passed initially. But on the retry when I was going back, trying to locate my problem, it indicated the point of failure as the first line of *opendkim.conf*, which allowed me to find the typo.
Now that this is fixed, the service runs successfully and all tests involving SPF and DKIM are passing.
To recap, if the opendkim service fails to run, I recommend diving into the log for diagnostics and keeping an eye out for things like typos or mismatched permissions.
It’s a tribute to the careful work that went into creating this tutorial that three years after its creation, it is still sound.
Hi Xiao,
I would like to Thank you for the the step by step notes to setup email server. Guess what I finish setup email server in one day, yeah and I am new to Linux have no experience with that. I am now following your tutorial for all mail server and how to secure.
As I said I have fully functional email server with Postfix/Dovecot/mariaDB/Nginx/SPF/Dmarc/Dkim/SSL/Roundcube.
All working I can send/receive emails.
I am using Ubuntu 20.04 on Virtual Machine. I did follow all steps you mentioned Step 1 to Step 4. Thank you.
Today, I was setting up identities on roundcube webmail. and start getting error “Server Error!”Error No. [600].
I did search on google but not getting much answer to fix this issue. Hope you can guide me.
One more thing i am missing is the tutorial about how to change RoundCube default logo skin ?
Once again Thank you.
Yesterday, I was try to buy you a beer when I was successfully send and received email. Please specify paypal account on your page where one can send money. Other than bit-coin things.
5 years later and this guide still works like a charm. Thank you for keeping it updated. Absolutely brilliant!
Took me couple of days to work it out but it did work. Got 9.5 score.
Took me hours to realize that the SPF data for postfix goes in master.cf not main.cf. That bug gave me serious heartaches
Hello!
First, thank you for this series. I have been following everything and had no issues until now. I ended with the postfixadmin steps and then went on to this part. In the previous part, I set up Thunderbird with my email and everything worked perfect. I continued with this and went through all the checks and all seemed to be okay. I validated all the records and I’m able to send email using sendmail to yahoo and google and it does not end up in spam.
Now for the issue: Thunderbird will connect when linking my account however, it will not send an email. It keeps asking me to retry or update my password. However, it does receive emails… I’m confused as to what this issue could be. I reviewed the log and the only thing that looks like it could be an issue is the following:
postfix/smtpd “disconnect from unknown[my home ip]”
dovecot imap-login user method……
dovecot imap(me) connection closed
There were so many configuration files we went through so I’m just not sure where to even begin.
On another note, what would I do in order to setup a subdomain email. In the previous tutorials we were using mail.your-website.com and now we use your-website.com. I have a case where I will want subdomains as hosts as well as my-domain. Is it as simple as replacing every instance of your-website.com with sub.youwebsite.com ?
THANK YOU!!
Looks like it had nothing to do with my server configuration. The issue was with Thunderbirds configuration.
In part 2, we were using local users unix sockets so my username was i.e., adam. This is how I tested originally with Thunderbird and everything worked fine.
In part3, we created virtual mailboxes for users where username is defined by the email address or in my case i.e., [email protected].
Simply changing my Thunderbird Outbound settings from adam to [email protected] fixed the issue. God I love this stuff( I really do).
Hopefully this helps if someone else is facing a similar issue.
Great tutorial! Works very well.
The only issue I now have is that after implementing this solution, postfix is no longer logging to the /var/log/mail/* folder. All my SMTP logging is now appearing in /var/log/syslog.
I’m running Ubuntu 20.04.3 LTS with postfix & rsyslog. Is this something I need to fix on the postfix side or the syslog side?
Please disregard my earlier message.
I had to upgrade my server in order to install openDKIM and the upgrade installed a new rsyslog config file which replaced my customised config file. All good now.
For the section “Publish Your Public Key in DNS Records”, where it says, “The string after the p parameter is the public key,” please mention that in the photo this string is broken up into two parts. Or, better yet, highlight the string you are referring to in the photo example itself. I initially had trouble with that part of the tutorial, because I thought where the closing quotation mark was was the end of the string you mentioned.
I have problem with the DKIM,
When I send email to a gmail account I can’t see that the DKIM is with status pass. Checking the header message there is no DKIM at all.
When I check locally with “sudo opendkim-testkey -d domain.net -s default -vvv” or mail-tester. dot com /spf-dkim-check I get all good or with mxtoolbox dot com . I created the records 2 days ago so they should be up to date.
using Debian 10 & Cloudflare
I’ve the same problem. Did you solve this problem?
For others that are using SPF, greylisting and a backup MX server: don’t forget to whitelist the IP of the backup MX server. You can do this by adding Whitelist = /32 to the config file that is located in /etc/postfix-policyd-spf-python.
If you don’t do this, first the email could get bounced by the greylist. Then it goes to the next backup MX server. That backup MX server will retry to deliver the email to your server, but of course, from it’s own IP address. The SPF will FAIL because the IP of the backup MX server isn’t in the SPF config of that mail (which makes sense).
I guess the Domain_Whitelist_PTR could also be used to specify the hostname.
I would not whitelist the IP address of the back MX server. If the sending domain deployed DMARC reject policy, an imposter could bypass DMARC reject policy because the email will always pass the SPF test.
If you have a backup MX server, I recommend creating 3 MX records:
Point mail.yourdomain.com and mail2.yourdomain.com to the same IP address. Point mail3.yourdomain.com to the IP address of the backup MX server.
I also recommend setting up Postscreen.
I thought that if I add it to the postfix-policyd-spf-python config, it would only be whitelisted for SPF? But indeed, one could bypass the SPF check this way. I’m not sure what the best strategy is then. Would Postscreen be a solution for backup MX servers?
In my case it seemed that my ISP is ending the support of backup MX, so it doesn’t work anyways. I will trust that any decent mail server will indeed resend the message as it’s supposed to.
“my ISP is ending the support of backup MX”? What does that mean? Are they going to block TCP port 25?
The best strategy for a backup MX with greylisting is to create 3 MX records as I have already explained.
You can enable and configure Postscreen on the primary mail server. It’s nice to have, but not a must.
I’m sorry that my message wasn’t clear. Normally I could use the mailserver from my VPS provider as a backup MX server; I’d give it a lower priority. When it receives mail for my domains, it would catch it, and try to delivery it to my own server a little while later. I contacted support to give me the IP addresses of their mail cluster, because the mail was rejected by my server because the SPF check failed. I thought I had fixed this by whitelisting their IP.
Their reply was that they will stop support for this backup MX feature. Spammers could abuse this by directly delivering the spam to the backup MX server, and then their server would send it to my server. Basically exact what you were telling me, but then for DMARC.
So eventually I had to remove their mail servers from my DNS entries. I now only have my own mail server, with no backup server that catches my mail in case my mailserver is down. But, if I understood correctly, the latest RFC’s for mailservers say that a mailserver should retry to deliver mails that bounced in the first attempt. This is important because I also installed the greylisting feature you described here. So I guess the backup MX technique is old nowadays, but I didn’t know this.
Yes, The SMTP protocol (RFC 2821) recommends that sending SMTP server should retry soft-bounced emails for at least 4-5 days. If you run a mail server on a cloud VPS, which typically has high uptime, you don’t have to run a backup MX.
So Based on your blog I cant use Cloudflare to set up my SMTP server that’s meaning I will lose DNS Propagation and it’s not good
So, have a solution to set up an SMTP server without avoiding DNS Propagation?
I’m not saying you can’t use Cloudflare. I mean you should not enable the proxy feature in Cloudflare for your mail server hostname (mail.example.com).
What is DNS propagation? It means your DNS records have been recognized by the whole Internet. Whether you use Cloudflare or not, your DNS records can always be recognized by the Internet.
Appreciate My Dear
Based on this tutorial – I created quick bash script for creating/signing key, adding domain to trusted hosts and testig DKIM. Here is the gist: https://gist.github.com/richardevcom/a79e8ca313c2b6f34f9ea8c02959165c
Thank you SO MUCH for the guide! Really helped me out.
Hi,
I am having an issue with not finding the public key. I am using a local DNS (BIND), so there isn’t a problem with propagating. I just copypasted the output of default.txt into my DNS Zone
When I use dig, I can find the TXT record:
Any suggestions what went wrong?
Hey Xiao,
Thank you 4 your tutorial. I have some troubles with DKIM. When i run opendkim-testkey i get error in syntax.
my default.txt looks like
default._domainkey      IN      TXT     ( "v=DKIM1; h=sha256; k=rsa; "
          "p=MIIBIjANBgkqhkiG9w0BAQEFAAOCAQ8AMIIBCgKCAQEA6XQuJM/168oGqokzxMQWe0n2ROm9sDebeobDnzp2156UV/ZZhJipmCrEh8xiiaTR+wfh2ndgT3/AR46+juA+PNBydmgPvL6NL9AwdW9Ho9YNK/4d2zQ17yyUg2ktwkpZKXUnq56MvNd2JFQ6D4z8R/gZ+ACr5HtukXKxrOM42WpMX14I+GGOI0dFRJlE2CCZwWJzJme80LXt+u"
          "81zsKgGK7ASNaLzw8fTB8QqhXZmaPqDEI7ksH80i1IXGXqQIDR9GjOWIyt6gW3osKTCs4OX8r9L014kFztqTqziOTz0fxMNaHCarRWHuXWgHmIIOI6gYUXpNaH47e47hWfIGWibQIDAQAB" )  ; ----- DKIM key default for mailmymail.de
I can not find any solution 4 this
Output:
Please remove the
TXTat the beginning, so it will look like this:thx a lot Xiao, now its just that the key is not secured
Another Perfect Tutorial!!!
A+
Best Instructions on the Internet!!!!
Thank you LinuxBabe!!!
A DKIM lesson learned: It took a while trying to find why my dkim line stated: dkim=neutral (invalid public key). It was only after doing ‘sudo dig TXT default._domainkey.your-domain.com’ that I spotted the problem. My domain registrar txt field was restricted to 255 (or less) chars. The dig results showed that the back end of the public key was fractured and not continuous and include an additional set of quotation marks (e.g. …xmESOQLy4CAOAvI86WRzKrsOKsy5vLng/a3atpx/QXhhqAZ+” “iuF4pkACzn5CnIzbCpju”) .
I read about someone else with a similar problem and the fix was to reduce the bits from -2048 too -1024 during key generation. After doing so, the dig output was one continuous line which results in a successful dkim dkim=pass [email protected] result.
Thank you for you excellent series of documentation.
server – Ubuntu 22.04
Very Best Regards
There’s a problem in this doc in that the KeyFile parameter in opendkim.conf needs to be changed to the path of the *private* key file, e.g. /etc/opendkim/keys//default.private. If this doesn’t happen, the opendkim-testkey test will fail; I had it pointing to the public key file instead and I was getting
This is because you have followed some stupid tutorial on another website before.
Locate the following lines.
By default, they are commented out. Please don’t uncomment them.
I have followed the whole series (up to this point) to get my replacement mail server running. When it came to dkim, I used the old sign/key pair from the machine I will be replacing. The old machine was a Kolab16/Ubuntu18.04 running OpenSSL 1.1.1
The new machine uses Ubuntu 22.04 and OpenSSL 3.0.2. The testkey runs fine- as expected. However, mail is never sent, and it looks like opendkim is failing the sign for some reason. The mail log shows the following:
For now, I would like to simply keep the key pair I have, since the Kolab server must remain in place for a while yet. It looks like OpenSSL is complaining about using a legacy resolver. How can I force that to happen in this case? I still want to keep all the rest of OpenSSL 3.x
You might need to change the ownership of the DKIM private key like this:
Don’t forget to add postfix to the opendkim group.
By the way, a domain name can have multiple DKIM records. Each mail server can have its own DKIM key. Just use a different DKIM selector. I use the
defaultDKIM selector in this tutorial, but you can have the following DKIM selectors.Changing the selector solved the problem for me- thanks!
This worked surprisingly well for something that has so many steps. Google stopped postfix from sending emails via smtp on 1/June. Then they started blocking my emails cause they weren’t DKIM signed.
DKIM’s DNS setting is very unforgiving, you can’t even have a space after the “;”
Thanks for this awesome tutorial! Everyone works except for DKIM. I’ve tried appmaildev DKIM tester and mail-tester.com to check for errors and DKIM always fails to get through. I’ve also checked my /var/log/mail.log but it seems that there’s not error related to DKIM. I’ve tried several variations like reducing the RSA encryption to 1024 bits to meet Namecheap’s requirement. I’ve been trying for days and I’m still stuck. Could you give me any pointers?
First, go to https://www.dmarcanalyzer.com/dkim/dkim-check/ to check if your DKIM is valid.
Then you can configure OpenDKIM to use TCP/IP socket instead of Unix domain socket. (Unix domain socket is usually faster than TCP/IP socket. If it doesn’t work on your server, then you should use TCP/IP socket.)
Find the following line:
Replace it with
So OpenDKIM will be listening on the 127.0.0.1:8892 TCP/IP socket. Save and close the file. Then edit Postfix main config file.
Find the following line:
Replace it with:
So Postfix will connect to OpenDKIM via the TCP/IP socket. Restart OpenDKIM and Postfix.
Hi Xiao,
Thanks a lot for your prompt reply. I’ve checked the validity of DKIM for several times and gone through the entire tutorial for several runs to check if I miss anything.
I’ve also tried the instructions you replied which is also given as part as a fallback plan in the tutorial.
Sadly, DKIM is still not attached in my mails. I’m using Namecheap, is there anything that I might not be aware of and is not shown in the tutorial? I’ve gone through the tutorial and comments for several runs so it’s unlikely that I’ll miss those out.
Hi Xiao,
Thank’s a lot for all that.
I’ve just set up a basic postfix + spf + dkim
I got a score 10/10 with https://www.mail-tester.com BUT when I send a message [email protected], I got this :
SPF : PASS avec IP 82.66.154.209 En savoir plus
DKIM : ‘FAIL’ avec le domaine famille-en-or.net En savoir plus
DMARC : ‘PASS’ En savoir plus
Thank’s very much in advance for any suggestion.
Hi,
I don’t know why, but now everything PASS.
Thank’s
When I go to dmarcanalyzer.com to check DKIM, I get “Error : We detected that your key in the DKIM record is invalid.” This is after making sure I’ve removed double quotes, spaces, and made sure it’s a single, one-line string before pasting it into the TXT record. What could I have missed? Everything else is working so far.
Okay, so, if anyone else misses this like I did, you need to copy the second quoted string as well, so that your key ends with “QAB”. The key doesn’t stop at the end of the first quoted string.
Hi Xiao
Wonderful howto (I follow Part1 to n…)
The roundcube/dovecot/postfix server work fine except the DKIM.
The mail are not sign befor to be send.
Il the mail log file I get
In my “/etc/opendkim/trusted.hosts” I have
    127.0.0.1
    localhost
    192.168.0.1/24

    *.mydomain.net
I look like the opendkim is not looking at the “trusted.hosts” ?
Any idee to find where I mis configure?
Many thanks
Maybe you need to remove the asterisk.
Then restart opendkim.
Hello Xiao
It is solved
I was performing submission with port 25. When passing to 587 (and adding certificate path where needed, the DKIM strat to works…
Maybe strange ?
But solved
Thanks again for this tuto
Port 25 isn’t for submission. You should use port 587 or 465 for submission.
Hi
the email is signed when I send an email from Webmin. Mail sent with Thunderbird is unsigned. No errors in /var/log/mail.log / journalctl -eu opendkim
DKIM Record Check = Ok
Why ?
Thunderbird > SMTP connection from “no encryption” to STARTTLS / SSL solved the problem.
Thank you for the great tutorial.
Hello Xiao,
I have followed the tutorial and everything is working except spf record.
When I sending email from server, all records is correctly displayed.
SPF = pass
DKIM = pass
DMARC =pass
But when I send email from gmail or others ISP to mail server, spf record displayed softfail.
Authentication-Results: spf=softfail (sender IP is xx.xx.xx.xx)
smtp.mailfrom=gmail.com; dkim=pass (signature was verified)
header.d=gmail.com;dmarc=pass action=none header.from=gmail.com;compauth=pass
reason=100
Received-SPF: SoftFail (protection.outlook.com: domain of transitioning
gmail.com discourages use of xx.xx.xx.xx as permitted sender).
I’ve been trying for days and I’m still stuck. Could you give me any pointers?
v=spf1 mx ip4:xx.xx.xx.xx ~all
This is such an incredibly great and concise how-to and had me running DKIM for multiple domains within an hour. Thank you!
Nice post. I learn something totally new and challenging on websites
Thanks it worked.
But if I have many domains on the same server, do I have to sign them all?
Simply follow step 4, step 5, step 6, and step 7 again with the new domain name. Then restart Postfix and OpenDKIM.
Nice post. I learn something totally new and challenging on websites
I receive this error “Error No. [600]” in the IDs
I searched the internet and I can’t find anything on how to solve this error
Roundcube Webmail 1.6.0
Copyright © 2005-2022, The Roundcube Dev Team
If you get this error:
The fix is:
Can anyone pls help,
SPF AND DMARC – PASS
AS WELL AS
Validate DKIM records by using the DKIM record checker SAYS DKIM IS VALID
But email has NODKIM Signature
and MAIL-TESTER said Your message is not signed with DKIM
Pls help
hi Xiao,
I followed all the steps for dkim, i used buranosaltycrew.it for domain, i verify all the dkim properties but when i send an email to google and i verify the signature the dkim domain parameter is set like this d=your-domain.com, like i was leaving some placeholder in some configuration file but i checked and its all ok.
If you see opedkim append d=your-domain.com to the headers but i don’t know where it came from. can you help me or someone have some solutions?
Hi Gabriele,
I have the similar problem, but after d= I have correct my domain name (like this: DKIM-Signature field added (s=default, d=my_domain.com)). Did you manage to solve it? Thank you in advance.
It’s okay, I misunderstood))
sudo opendkim-testkey -d hudsonregional.gov -s default -vvv
last line does not say “ok” it says “opendkim-testkey: multiple DNS replies for ‘default._domainkey.MYDOMAIN.COM’
I’m hosting on Route53 and was forced to separeate the txt input value into two using “v=DKIM1; h=sha256; k=rsa; p=asdfahjsdflkjasdfkljasdfklj” “asdfkhjaldjsflkajsdfkljasdfkljaldfjksalkdjsflajk;sdfjla;kdjsfjkl”
Not sure if that is causing the issue. I also have other DKIM keys from Office 365 for the same domain.
The solution to this in Route53 is to divide the input text exactly into two:
“first part” “Second part” divided by the “”
What do I need to do to set my clients smtp address to mail.my-domain.com, when the relayhost on postfix main.cf showing to relayhost = [smtp.strato.de]:465?
– DNS records?
– Firewall allow port 465?
– etc…?
Hi:
Xiao Guoan, Thank you very, very much!! Waited years to finally have eMail Server setup and properly!! At first test viola!! Everything good!
BUT my case (probably after editing something) was not able to RECEIVE emails even localhost complained about relay not allowed and bouncing. Think error was a space in mydestination (file main.cf). The space before localhost. Was a kind of difficult to find.
Congratulations!! Your are the best!!!
Edfel
Very well presented. Every quote was awesome and thanks for sharing the content. Keep sharing and keep motivating others.
I appreciate you sharing this blog post. Thanks Again. Cool.
Hi there to all, for the reason that I am genuinely keen of reading this website’s post to be updated on a regular basis. It carries pleasant stuff.
Great information shared.. really enjoyed reading this post thank you author for sharing this post .. appreciated
I am truly thankful to the owner of this web site who has shared this fantastic piece of writing at at this place.
You’re so awesome! I don’t believe I have read a single thing like that before. So great to find someone with some original thoughts on this topic. Really.. thank you for starting this up. This website is something that is needed on the internet, someone with a little originality!
I am truly thankful to the owner of this web site who has shared this fantastic piece of writing at at this place.
I like the efforts you have put in this, regards for all the great content.
There is definately a lot to find out about this subject. I like all the points you made
I appreciate you sharing this blog post. Thanks Again. Cool.
very informative articles or reviews at this time.
naturally like your web site however you need to take a look at the spelling on several of your posts. A number of them are rife with spelling problems and I find it very bothersome to tell the truth on the other hand I will surely come again again.
You’re so awesome! I don’t believe I have read a single thing like that before. So great to find someone with some original thoughts on this topic. Really.. thank you for starting this up. This website is something that is needed on the internet, someone with a little originality!
Pretty! This has been a really wonderful post. Many thanks for providing these details.
I very delighted to find this internet site on bing, just what I was searching for as well saved to fav
Great information shared.. really enjoyed reading this post thank you author for sharing this post .. appreciated
I really like reading through a post that can make men and women think. Also, thank you for allowing me to comment!
I appreciate you sharing this blog post. Thanks Again. Cool.
I am truly thankful to the owner of this web site who has shared this fantastic piece of writing at at this place.
Hi there to all, for the reason that I am genuinely keen of reading this website’s post to be updated on a regular basis. It carries pleasant stuff.
First off, big thanks for this outstanding in depth guide. It is very much appreciated.
Im up and running to 99%, I just cant get DKIM to work. I suspect its an communication error. This can be found in the logs if it helps:
Oct 23 14:36:13 mail postfix/cleanup[10330]: warning: milter local:opendkim/opendkim.sock: can’t read SMFIC_BODY reply packet header: Application error
The Keys and DNS are setup correctly and working.
Hi, I am also struggling with this error. Did you manage to find a solution?
Hi Max. I had no problem setting up dkim for my mail.my-domain.com, but when I added more virtual domains to my server via the postfixadmin we interface, I initially struggled to figure out how to get the dkim records working for them. I eventually sorted it out by redoing the dkim section of Xiao’s tutorial for each of the virtual domains, and everything is now working. I would be happy to try and help you if you haven’t already sorted out the issue.
This was beautiful Admin. Thank you for your reflections.
naturally like your web site however you need to take a look at the spelling on several of your posts. A number of them are rife with spelling problems and I find it very bothersome to tell the truth on the other hand I will surely come again again.
This is really interesting, You’re a very skilled blogger. I’ve joined your feed and look forward to seeking more of your magnificent post. Also, I’ve shared your site in my social networks!
I very delighted to find this internet site on bing, just what I was searching for as well saved to fav
I am truly thankful to the owner of this web site who has shared this fantastic piece of writing at at this place.
Drop a link to your favorite blog post of yours in the comments below, I’d love to read more.
Hi. Thanks for a great post, it was just to follow it to get it to work, but I had to adjust some small things (Ubuntu 18.04.4 LTS).
Perhaps this is obvious, I had to chmod on folder /etc/opendkim/keys/your-domain.com in step #5
And also add permission for postfix on chmod /var/spool/postfix/opendkim
Sorry, the last should be:
And also add permission for postfix on /var/spool/postfix/opendkim in step #8
Nov 22 03:06:52 mail.baderpetrick.de policyd-rate-limit[7546]: Traceback (most recent call last):
Nov 22 03:06:52 mail.baderpetrick.de policyd-rate-limit[7546]: File “/usr/bin/policyd-rate-limit”, line 36, in
Nov 22 03:06:52 mail.baderpetrick.de policyd-rate-limit[7546]: config.setup()
Nov 22 03:06:52 mail.baderpetrick.de policyd-rate-limit[7546]: File “/usr/lib/python3/dist-packages/policyd_rate_limit/utils.py”, line 144, in setup
Nov 22 03:06:52 mail.baderpetrick.de policyd-rate-limit[7546]: self._config = Config(config_file)
Nov 22 03:06:52 mail.baderpetrick.de policyd-rate-limit[7546]: ^^^^^^^^^^^^^^^^^^^
Nov 22 03:06:52 mail.baderpetrick.de policyd-rate-limit[7546]: File “/usr/lib/python3/dist-packages/policyd_rate_limit/utils.py”, line 88, in __init__
Nov 22 03:06:52 mail.baderpetrick.de policyd-rate-limit[7546]: self._config = yaml.load(f)
Nov 22 03:06:52 mail.baderpetrick.de policyd-rate-limit[7546]: ^^^^^^^^^^^^
Awesome! Its genuinely remarkable post, I have got much clear idea regarding from this post
Awesome! Its genuinely remarkable post, I have got much clear idea regarding from this post
This is an amazing tutorial. Thank you for providing it.
I am truly thankful to the owner of this web site who has shared this fantastic piece of writing at at this place.
https://pubhtml5.com/homepage/fmeat/
Hello Great article & stuff. Been following & learning from you a year.
I go through all the steps mentioned in article 1, 2,3,4 . my postfix email is server is ready and can send receive emails only on gmail. outlook rejects mail by saying your domain is in spamhaus DBL list. I have requested them to delist my ip as I have never used it in spamming etc. Spamhaus says there is configuration error from your side. Could you guide my why DBL is block although I have followed steps as mentioned. Ubuntu 22.04 Postfix
Dear Xiao, thank you for the email server series. I manged to get my single domain working by following everything, but when I added some virtual domain using the postfixadmin web interface, I could only get dkim to pass on the initial domain. I eventually figured out that I had to repeat the process for each domain to finally get dkim passing on all the virtual domains. Really great. Thank you!
Hey there I am trying to setup the opendkim through docker I followed your steps but my opendkim service is not starting. I check that from docker container you can see:
mypc@pc:~/usrmng$ docker exec -ti usrmng-postfix-1 bash
root@17c1df00dab0:/app# service opendkim status
* opendkim is not running
root@17c1df00dab0:/app#
can you help me ?
I did all this, and I had to reboot for it to create the opendkim.sock file. This has been the only way to get SPF/OpenDKIM to work on Ubuntu.
Hi there! Do you have any idea why the below transaction was not rejected and ended up with a spoofed email in my mailbox? Any hints are very appreciated.
Jun 23 05:59:49 vps123126 postfix/smtpd[4905]: connect from cloudhost-10613980.us-midwest-2.nxcli.net[199.189.225.34]
Jun 23 05:59:49 vps123126 postfix/smtpd[4905]: Anonymous TLS connection established from cloudhost-10613980.us-midwest-2.nxcli.net[199.189.225.34]: TLSv1.2 with cipher ECDHE-RSA-AES128-GCM-SHA256 (128/128 bits)
Jun 23 05:59:50 vps123126 policyd-spf[4913]: prepend Received-SPF: None (mailfrom) identity=mailfrom; client-ip=199.189.225.34; helo=cloudhost-11099524.us-midwest-2.nxcli.net; [email protected]; receiver=
Jun 23 05:59:50 vps123126 postgrey[1246]: action=pass, reason=triplet found, delay=716, client_name=cloudhost-10613980.us-midwest-2.nxcli.net, client_address=199.189.225.34/32, [email protected], [email protected]
Jun 23 05:59:50 vps123126 postfix/smtpd[4905]: 308B67D313: client=cloudhost-10613980.us-midwest-2.nxcli.net[199.189.225.34]
Jun 23 05:59:50 vps123126 postfix/cleanup[4914]: 308B67D313: message-id=
Jun 23 05:59:50 vps123126 opendkim[1132]: 308B67D313: cloudhost-10613980.us-midwest-2.nxcli.net [199.189.225.34] not internal
Jun 23 05:59:50 vps123126 opendkim[1132]: 308B67D313: not authenticated
Jun 23 05:59:50 vps123126 opendkim[1132]: 308B67D313: no signature data
Jun 23 05:59:50 vps123126 opendmarc[1111]: 308B67D313: ntf.com none
Jun 23 05:59:50 vps123126 postfix/qmgr[1947]: 308B67D313: from=, size=27840, nrcpt=1 (queue active)
Jun 23 05:59:50 vps123126 postfix/smtpd[4905]: disconnect from cloudhost-10613980.us-midwest-2.nxcli.net[199.189.225.34] ehlo=2 starttls=1 mail=1 rcpt=1 data=1 quit=1 commands=7
Hello!
I’m creating a demo to showcase how SPF, DKIM, and DMARC work within my own isolated VM environment. I currently have three VMs set up: a receiving Postfix server, a sending Postfix server, and a Bind9 DNS server.
After configuring DKIM on both servers and sending an email to the receiving Postfix server, I encountered the following error:
opendkim [9649]: 527139335: s=default d=dive.com a=rsa-sha256 SSL error:0200008A:rsa routines::invalid padding; error:020000072:rsa routines::padding check failed
opendkim [9649]: 527139335: bad signature data
However, when I checked the key on DKIM Core Key Checker, it showed that the key record is valid.
Could you provide some insight into this issue? It would be greatly appreciated.
Thank you!
Fyi, I simply copied the entire DKIM record output from openDKIM and pasted it to my Bind zone file.
Thank you for you very helpful tutorials. I like to think I am almost there, no problems with out going mail.
The problem I have is that almost all incoming email, from Outlook or Gmail for example, is marked DKIM failed in the email headers.
“Authentication-Results: mydomain.com;
dkim=fail reason=”signature verification failed” (2048-bit key; unprotected) header.d=outlook.com [email protected] header.a=rsa-sha256 header.s=selector1 header.b=oBs8oERG;”
but very occasionally one will pass
“Authentication-Results: mydomain.com;
dkim=pass (2048-bit key; unprotected) header.d=yahoo.com [email protected] header.a=rsa-sha256 header.s=s2048 header.b=sqtirQ3U;”
what’s occurring?
can anyone help me please I’m having trouble with the record not found when I check, if the DKIM is working
The following is that I can sign in my DNS record, and the public keys is signed, even with dig command I can see in the “Answer Section” that it is fine. however when it comes to checking the DKIM, I get response that “record not found”
Hello,
First I want to give my thanks for this wonderful & thorough tutorial on setting up your own email server. This is my first time trying to configure my AWS EC2 instance with my own mail domain & SSL since I know trying to set up an email server is NOT for the faint of heart – it is a daunting exercise requiring the patience of a SEAL trainee. That is not a joke, either.
Just to add my 2 cents, the step to add these lines to /etc/postfix/master.cf:
policyd-spf unix – n n – 0 spawn
user=policyd-spf argv=/usr/bin/policyd-spf
They should be concatenated as just 1 line at end of the /etc/postfix/master.cf file:
policyd-spf unix – – n – 0 spawn user=policyd-spf argv=/usr/bin/policyd-spf
Otherwise, PostFix will refuse to restart/run.
Cheers!!
It works as two lines as long as the second one is indented
Great tutorial but I had a problem where DKIM wasn’t signing messages relayed from an external client. Like Thunderbird on my computer, even though the user was authenticated and in the trusted domain. It turns out that the milter_mail_macros line in /etc/postfix/main.cf was missing {auth_type} and that macro is what opendkim uses to verify the user was authenticated. For completeness, mine now looks like:
milter_mail_macros = i {mail_addr} {client_addr} {client_name} {auth_authen} {auth_type}