How to Set Up Postfix SMTP Relay on Ubuntu with Sendinblue
This tutorial is going to show you how to set up Postfix SMTP relay with Sendinblue on Ubuntu. Postfix is a popular open-source SMTP server. Previously I wrote an article on how to easily set up a full-blown email server on Ubuntu with iRedMail, which helped a lot of readers run their own email servers.
However, some readers told me that port 25 is blocked by hosting provider/ISP as a way to control email spam, so they couldn’t send emails. Vultr would unblock port 25 if you ask them to, and ScalaHosting doesn’t block port 25 at all, so I recommend using ScalaHosting VPS. Some other hosting providers/ISPs like DigitalOcean would refuse to unblock port 25.
This tutorial works on all current Ubuntu releases, including Ubuntu 22.04, Ubuntu 20.04, and Ubuntu 18.04.
SMTP Relay To The Rescue
You can bypass port 25 and send emails via SMTP relay because it uses TCP port 587. With SMTP relay, your own email server doesn’t directly send email to the destination email address. Instead, there’s an intermediate mail server, also known as smart host or relay host, that sends emails on your behalf. Your email server communicates with the relay host on TCP port 587, then the relay host communicates with the recipient’s mail server on port 25.
SMTP relay can also help you get around anti-spam blacklists, if your IP address is blacklisted for whatever reason. The recipient’s mail server checks the relay host’s IP address against public anti-spam blacklists, instead of your server IP address and because SMTP relay services maintain good IP reputation, so your emails can get through IP blacklists.
Using Sendinblue To Send 300 Emails Per Day For Free
There are several email service providers (ESP) that can act as relay host. Some charge a little fee, some offer free quotas every month. In this article, I’d like to show you how to use Sendinblue, which is an email service provider that allows you to send 300 emails per day for free.
The nice thing about Sendinblue is that it doesn’t require you to enter your credit card details when you use the free SMTP relay service. There are other ESPs that offer free quota every month but requires you to enter credit card details. I know how frustrated it can be when you don’t have a credit card. Sendinblue is also easier to set up, compared to other ESPs.
Step 1: Create a Sendinblue Account
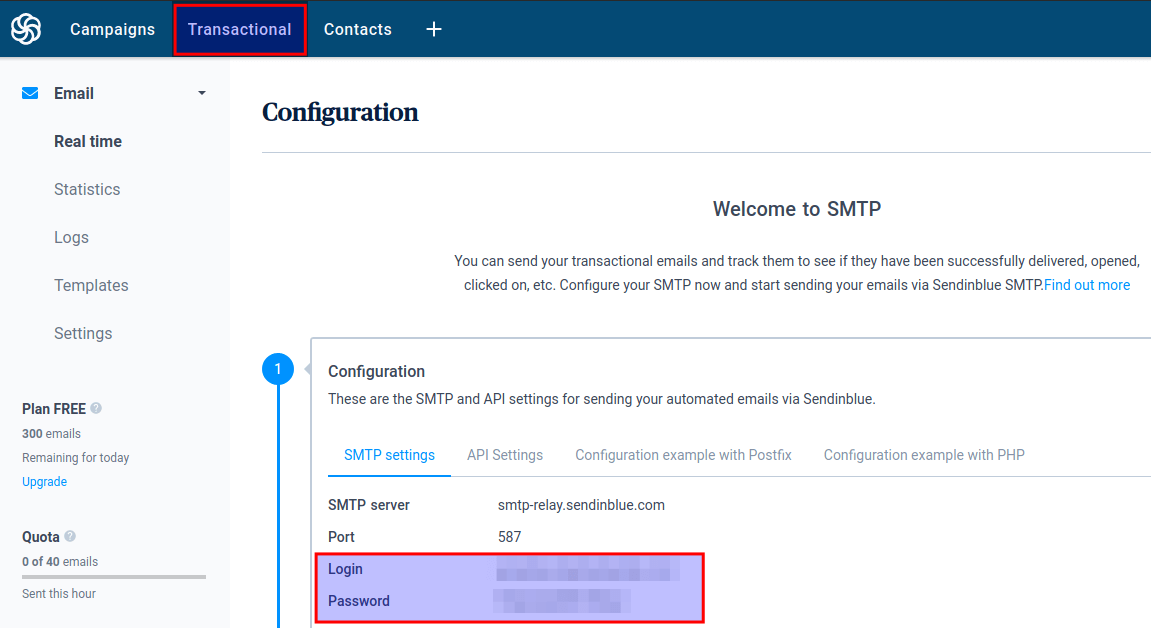
Create a free account at sendinblue.com. Once you complete your user profile, click the Transactional tab, you will get your SMTP settings. If there’s no SMTP settings, you need to contact Sendinblue customer service in order to activate the transactional email service.

Now you need to configure your Postfix SMTP server to use the Sendinblue SMTP settings.
Step 2: Set Up Postfix SMTP Relay with Sendinblue
First, let’s install Postfix SMTP server on Ubuntu with the following command. If Postfix is already running on your server, then skip installing Postfix, but you still need to install the libsasl2-modules package.
sudo apt install postfix libsasl2-modules
When you see the following message, press the Tab key and press Enter.

Then choose the second option: Internet Site.

Next, set the system mail name. For example, I enter my domain name linuxbabe.com.

After Postfix is installed, open the main configuration file with a command-line text editor like Nano.
sudo nano /etc/postfix/main.cf
Find the following line.
relayhost =
By default, its value is empty. Set the value of relayhost to [smtp-relay.sendinblue.com]:587.
relayhost = [smtp-relay.sendinblue.com]:587
Then add the following lines to the end of this file.
# outbound relay configurations
smtp_sasl_auth_enable = yes
smtp_sasl_password_maps = hash:/etc/postfix/sasl_passwd
smtp_sasl_security_options = noanonymous
smtp_tls_security_level = may
header_size_limit = 4096000
Save and close the file. Then create the /etc/postfix/sasl_passwd file.
sudo nano /etc/postfix/sasl_passwd
Add the SMTP relay host and SMTP credentials to this file like below. Replace smtp_username and smtp_password with the SMTP username and password given by SendinBlue. Note there’s a colon between the username and password.
[smtp-relay.sendinblue.com]:587 smtp_username:smtp_password
Be careful that you should not use the main Sendinblue account password. Instead, you should find the SMTP password in the Sendinblue transactional tab.

Save and close the file. Then create the corresponding hash db file with postmap.
sudo postmap /etc/postfix/sasl_passwd
Now you should have a file /etc/postfix/sasl_passwd.db. Restart Postfix for the changes to take effect.
sudo systemctl restart postfix
By default, sasl_passwd and sasl_passwd.db file can be read by any user on the server. Change the permission to 600 so only root can read and write to these two files.
sudo chmod 0600 /etc/postfix/sasl_passwd /etc/postfix/sasl_passwd.db
From now on, Postfix will send emails via Sendinblue.
Step 3: Add Sender Addresses
Click the drop-down menu on the upper-right corner of your Sendinblue account dashboard and select the Senders & IPs tab to add your domain and sender address.

Step 4: Set Up SPF/DKIM Authentication in SendinBlue
In this step, we need to set up SPF and DKIM record, which is strongly recommended if you want your emails to land in recipient’s inbox rather than spam folder.
- SPF: Sender Policy Framework. This is a DNS record that specifies what IP addresses are allowed to send email for your domain.
- DKIM: DomainKeys Identified Mail. Sendinblue will digitally sign your emails with a private key. The DKIM record contains a public key that allows recipient’s email server to verify the signature.
In your SendinBlue dashboard, click your account name on the upper-right corner, then click Senders & IPs. Select the Domains tab -> Manage -> Authenticate this domain.

A popup appears. You need to add the first 3 records for your domain.

After SPF and DKIM records are created, wait a few moments and click the RECORD ADDED. PLEASE VERIFY IT button. Depending on your DNS hosting service, your new DNS records can take some time to propagate on the Internet.
- Go to https://dnsmap.io check if your DNS records are propagated to the Internet.
- For DKIM record, go to https://www.dmarcanalyzer.com/dkim/dkim-check/, enter
mailas the selector and enter your domain name to check DKIM record propagation and if there’s error in your DKIM record.
If SPF and DKIM records are set up correctly and they are verified, your domain becomes authenticated in Sendinblue.

Sending Test Email
Now we can send a test email with mailx command like below.
sudo apt install bsd-mailx

echo "this is a test email." | mailx -r from-address -s hello to-address
You can also send a test email from your webmail client or desktop mail client. It is also a good idea to test your email score at https://www.mail-tester.com. As you can see, I got a perfect score.

Troubleshooting
Relay Access Denied
If your email wasn’t delivered and you found the following message in the mail log (/var/log/mail.log),
Relay access denied (in reply to RCPT TO command))
then you might need to edit the /etc/postfix/sasl_passwd file and remove the port number after the hostname like below.
smtp-relay.sendinblue.com smtp_username:smtp_passowrd
Save and close the file. Then build the index file again.
sudo postmap /etc/postfix/sasl_passwd
Restart Postfix for the changes to take effect.
sudo systemctl restart postfix
Now you can flush the email queue (attempt to deliver the previous emails).
sudo postqueue -f
Sendinblue SMTP account is not yet activated
If you found the following message in the mail log (/var/log/mail.log),
Your SMTP account is not yet activated. Please contact us at [email protected] to request activation.
Then contact Sendinblue customer service to activate the transactional email service.
Adding Additional Domains
If you set up a mail server on a new host for a new domain name, and you want to set up SMTP relay for this new domain name, then simply follow step 2, step 3 and step 4 again.
Wrapping Up
That’s it! I hope this tutorial helped you set up Postfix SMTP relay on Ubuntu to bypass port 25 or IP blacklists. As always, if you found this post useful, then subscribe to our free newsletter to get more tips and tricks. Take care 🙂


请教一下:我在sendinblue中的senders & IPs中senders的邮箱是注册sendingblue用的gmail邮箱,可以验证通过,但我自己域名的邮箱由于25端口被封无法接收sendinblue的邮件验证。但我本意就是想借助sendinblue中继我自己域名的邮箱邮件,这个可以做到吗?还有sendinblue可以中继接收邮件吗?
如果你的 ISP 把 inbound 和 outbound 的 25 号端口都封掉了,可以尝试下面文章所给出的方法接收并发送邮件。
If your ISP also block the inbound port 25, you can use the method described in the article below to receive emails.
Set Up SMTP & IMAP Proxy with HAProxy (Debian, Ubuntu, CentOS)
Xiao Guoan Many thanks to your excellent tutorials! your help is greatly appreciated!!
Thank you LinuxBabe!!!!!
Works Perfect!!!!
Hello, Thank you for explaining how to install Nextcloud and Nginx and postgresql I did it on Ubuntu 22.04 LTS.
I have some troubles with SMTP. My mail isn’t delivered I got this message in the log :
In the file : /etc/postfix/sasl_passwd, the information shall be wrote:
Or
I mean shall we write the [ ] or without [ ] ?
Any idea why I get error 530 ? (I am sure I have the right ID and right password)
Hi tenchu,
Both
smtp-relay.sendinblue.comand[smtp-relay.sendinblue.com]:587can work.You probably used your Sendinblue account password instead of the SMTP password. You should find the SMTP password in the Sendinblue transactional tab.
Thank Xiao Guoan for your help,
I went back to Sendinblue and I saw :
“The transactional platform has not been activated for your account. Please contact our customer service.”
Then I contacted the service I am waitting for their answers.
Thank you for this valuable tutorials.
With this method, can I also receive email too?
Thank you for this valuable tutorials.
With this method, can I also receive email too?
Great Instructions!!!!
Thank you LinuxBabe!!!!
Would this work if I’m using Plesk & Postfix and I want to use Sendinblue as the SMTP for many domains automatically? (It wouldn’t be economical to verify every customer’s domain and email)
Yes, you can use Sendinblue in Plesk with this method. Remember that Plesk might overwrite your custom configs when it’s upgraded to a new version. You can make a backup of your custom config file. After upgrading Plesk, you can easily revert back to your custom configurations.
This relay instructions work perfect before implementing Virtual Mailboxes from your other series.
After implementing Virtual Mailboxes, the /var/log/mail.log file shows that the email is not being relayed to the value specified in /etc/postfix/main.cf “relayhost = [desired.relay.com]:587” but instead is being relayed to my own MX record “mail.mydomain.com”.
How can I keep the desired relayhost when using virtual mailboxes and MYSQL queries?
Could you post your mail logs that shows email being relayed to your own MX host?
I got a score of 8.8 in mail-tester. Without mail-tester, the score was 9.8. Now, there are the following problems that weren’t present without sendinblue:
HEADER_FROM_DIFFERENT_DOMAINS
HTML_IMAGE_ONLY_04
HTML_MESSAGE
HTML_MIME_NO_HTML_TAG
MIME_HTML_ONLY
MSGID_FROM_MTA_HEADER
TVD_SPACE_RATIO
i meant “without sendinblue”.
Don’t be obsessed with mail-tester.com scores. If you can get a score above 7, you should be fine.
The most important factor for email deliverability are IP reputation and domain reputation.
🔥 Automatic IP and Domain Warm-up For Your Email Server
Thx Xiao Guoan, You saved my life.
We had a problem with our server with SPAM and got blocked in Gmail.
This solved our problem. Thx
Thank you so much.
I use Sendinblue as my relay SMTP, which helps a LOT.
Hi. As I said already about Magento you are really and truly a Hero. I discovered your site so late. Many thanks again.
Hello Thanks for the tutorial if port 25 is blocked and i use SMTP Relay, will I be able to receive emails
i got error like that
The above log is unrelated to SMTP relay, and it’s not an error. It just shows a user was trying to submit an outgoing emails to Postfix.
Thanks Xiao for this amazing guide. I’ve been successfully set up everything up. My server now can send/receive emails with the outside world.
However, my question is about the pre-user authentication. So now I can use SMTP, specifically in Python, I use connection = smtplib.SMTP(‘mail.mydomain.com’, 587)
to connect the SMTP. After that, I login in with any email account I have in my domain. Let’s say [email protected]. So I can send emails to using this account by specifying a from-address, in this case, it is [email protected].
The problem is, I can still use another from-address to send emails using the same login password! There is no extra authentication except for the first login. I can send emails under the name of [email protected]. How does this happen?
specifically the codes I’m using are
”’Python
import smtplib
conn = smtplib.SMTP(‘mail.mydomain.name’, 587)
# connected
conn. starttls()
# shows (220, b’2.0.0 Ready to start TLS’)
conn.login(‘[email protected]’, ‘password’)
# shows (235, b’2.7.0 Authentication successful’) ## this is the only authentication step
conn.sendmail(‘hello’, ‘message from user A’, ‘[email protected]’, ‘[email protected]’)
# this sends the message to ‘[email protected]’ successfully,
# however, just change the third argument, which is the from-address, it still works
conn.sendmail(‘hello’, ‘message from user B’, ‘[email protected]’, ‘[email protected]’)
# success too!
What do I need to do if I want each user to send only mails from his own address?
Could I use this to configure postfix to relay mail for delivery to specific domains while continuing to send other mail from my mail server e.g. relay mail to be delivered to apple accounts such as me.com, icloud.com, mac.com etc while continuing to send mail to gmail.com, outlook.com etc?
Yes, you can learn how to do it by following this tutorial: How to Bypass the Microsoft Outlook IP Blacklist & Other Blacklists. I use Microsoft email domains as an example. Simply replace them with the Apple email domains.
Great guide, thanks Xiao, Great work.
I followed this guide, all is well, but it seems my postfix server has ssl/tls issue with sendinblue, as the follows:
My postfix version is 3.5.8. And my main.cf file about TLS is as followed:
Any clue?
Thanks again.
I installed this from your tutorial before you changed it to include 22.04 and it worked great, using 20.04.
Now I was attempting to install it and get this. Maybe I’ll just install on 20.04 again.
apt-key is deprecated. Manage keyring files in trusted.gpg.d instead
Hi – Thanks for your article! Super helpful. I am able to send emails via the relay service. But, I am not able to receive any replies… Do I need to make any changes to the relay ?
Hi – great article. However, Sendinblue is now called Brevo, so the URL’s need to refer to brevo.com instead of sendinblue.com – took me a while to realise that was the problem, but now it’s all working perfectly. Thank you for your hard work!
host smtp-relay.brevo.com[1.179.116.1] said: 502 5.7.0
Please authenticate first (in reply to MAIL FROM command) i am getting this what is probable resolution?
I have the same issue
Thanks a million times! I was pulling my hair out before reading this. Appreciate it so much
Can we have a quick redo for newer Dovecot releases and the upcoming Ubuntu 26.04? Dovecot seems to have changed a lot of settings names, etc and I really can’t figure it out myself.
Other than that, awesome tutorial!
Thanks in advance
Sorry, wrong post!