How to Set Up ModSecurity with Nginx on Debian/Ubuntu
This tutorial is going to show you how to install and use ModSecurity with Nginx on Debian/Ubuntu servers. ModSecurity is the most well-known open-source web application firewall (WAF), providing comprehensive protection for your web applications (like WordPress, Nextcloud, Ghost etc) against a wide range of Layer 7 (HTTP) attacks, such as SQL injection, cross-site scripting, and local file inclusion.

Note: This tutorial works on all current Debian and Ubuntu versions, including Debian 11, Ubuntu 18.04, Ubuntu 20.04 and Ubuntu 22.04.
Web applications are inherently insecure. If you are a WordPress admin, you will probably hear news of hackers exploiting vulnerabilities in WordPress plugins and themes every once in a while. It’s essential that you deploy a WAF on your web server, especially when you have old applications that don’t receive updates. ModSecurity is originally created by Ivan Ristić in 2002, currently maintained by Trustwave SpiderLabs. It’s the world’s most widely deployed WAF, used by over a million websites. cPanel, the most widely used hosting control panel, includes ModSecurity as its WAF.
You may have heard other host-based firewalls like iptables, UFW, and Firewalld, etc. The difference is that they work on layer 3 and 4 of the OSI model and take actions based on IP address and port number. ModSecurity, or web application firewalls in general, is specialized to focus on HTTP traffic (layer 7 of the OSI model) and takes action based on the content of HTTP request and response.
ModSecurity 3
ModSecurity was originally designed for Apache web server. It could work with Nginx before version 3.0 but suffered from poor performance. ModSecurity 3.0 (aka libmodsecurity) was released in 2017. It’s a milestone release, particularly for Nginx users, as it’s the first version to work natively with Nginx. The caveat of ModSecurity 3 is that it doesn’t yet have all the features as in the previous version (2.9), though each new release will add some of the missing features.
Step 1: Install Nginx on Debian/Ubuntu
sudo apt install nginx
ModSecurity integrates with Nginx as a dynamic module, which allows you to compile source code of individual modules without compiling Nginx itself.
The Nginx binary needs to be compiled with the --with-compat argument, which will make dynamic modules binary-compatible with your existing Nginx binary. However, not every Nginx binary shipped from the default Debian/Ubuntu repository is compiled with the --with-compat argument.
Check the configure arguments of Nginx with the following command:
sudo nginx -V
All Nginx binaries in the PPA are compiled with the --with-compat argument.

Now we need to enable source code repository, so we will be able to download Nginx source code.
Ubuntu
sudo apt install software-properties-common
sudo apt-add-repository -ss
sudo apt update
Debian 11
Add the following lines in the /etc/apt/sources.list file.
deb-src http://deb.debian.org/debian/ bullseye main
deb-src http://security.debian.org/debian-security bullseye/updates main
Save and close the file. Then update the repository index.
sudo apt update
Step 2: Download Nginx Source Package
Although we don’t need to compile Nginx itself, we need the Nginx source code package in order to compile the ModSecurity dynamic module. Run the following command to make a nginx directory under /usr/local/src/ to store the Nginx source code package. Replace username with your real username.
sudo chown username:username /usr/local/src/ -R

mkdir -p /usr/local/src/nginx
cd into the Nginx source directory.
cd /usr/local/src/nginx/
Download Nginx source package with the commands below:
sudo apt install dpkg-dev

apt source nginx
If you see the following warning message, you can safely ignore it.
W: Download is performed unsandboxed as root as file 'nginx_1.19.5.orig.tar.gz' couldn't be accessed by user '_apt'. - pkgAcquire::Run (13: Permission denied)
Check out the downloaded source code files.
ls
Sample output:
nginx-1.19.5
nginx_1.19.5-3+ubuntu20.04.1+deb.sury.org+1.debian.tar.xz
nginx_1.19.5-3+ubuntu20.04.1+deb.sury.org+1.dsc
nginx_1.19.5.orig.tar.gz
Make sure the source code version is the same as your Nginx binary version (sudo nginx -v).
Step 3: Install libmodsecurity3
libmodsecurrity is the ModSecurity library that actually does the HTTP filtering for your web applications. On Debian 10 and Ubuntu 20.04, 22.04, you can install it with sudo apt install libmodsecurity3, but I recommend you compile the latest stable version from the source.
To compile libmodsecurity, first clone the source code from Github.
sudo apt install git

git clone --depth 1 -b v3/master --single-branch https://github.com/SpiderLabs/ModSecurity /usr/local/src/ModSecurity/

cd /usr/local/src/ModSecurity/
Install build dependencies.
sudo apt install gcc make build-essential autoconf automake libtool libcurl4-openssl-dev liblua5.3-dev libpcre2-dev libfuzzy-dev ssdeep gettext pkg-config libpcre3 libpcre3-dev libxml2 libxml2-dev libcurl4 libgeoip-dev libyajl-dev doxygen
Install required submodules.
git submodule init

git submodule update
Configure the build environment.
./build.sh

./configure
If you see the following error, you can ignore it.
fatal: No names found, cannot describe anything.
Compile the source code with the following command. By default, make will use only one CPU core. I have 4 CPU cores on my server, so I specify 4 jobs (-j4) for make to speed up the compilation process. Change 4 to your own number of CPU cores.
make -j4
After the make command finished without errors, install the binary.
sudo make install
It will be installed under /usr/local/modsecurity/ directory.
Troubleshooting Compile Errors
error #1
If you see the following error when running the make command, it’s probably because your server is out of RAM.
g++: internal compiler error: Killed (program cc1plus)
The following lines in /var/log/syslog file indicates the server is out of memory, so consider upgrading the server specs.

Alternatively, you can create swap space to solve out-of-memory problem. However, it should be only used as a temporary measure. Using swap space on SSD servers can be detrimental to system performance.
error #2
If you see the following error when compiling ModSecurity,
utils/geo_lookup.cc: In member function ‘bool modsecurity::Utils::GeoLookup::lookup(const string&, modsecurity::Transaction*, std::function<bool(int, const std::__cxx11::basic_string<char>&)>) const’:
utils/geo_lookup.cc:124:32: error: invalid conversion from ‘const MMDB_s*’ to ‘MMDB_s*’ [-fpermissive]
r = MMDB_lookup_string(&mmdb, target.c_str(), &gai_error, &mmdb_error);
It’s probably because you installed an outdated version of libmaxminddb-dev. You can remove this package.
sudo apt remove libmaxminddb-dev
And install libgeoip-dev, which is an alternative to libmaxminddb-dev.
sudo apt install libgeoip-dev
Then re-compile ModSecurity.
make clean

./configure

make -j4
Install the binary.
sudo make install
Step 4: Download and Compile ModSecurity v3 Nginx Connector Source Code
Update: ngx_http_modsecurity_module.so is included in the latest Ubuntu LTS repository. Run sudo apt install libnginx-mod-http-modsecurity to install it. No need to compile it from source code anymore.
The ModSecurity Nginx Connector links libmodsecurity to the Nginx web server. Clone the ModSecurity v3 Nginx Connector Git repository.
git clone --depth 1 https://github.com/SpiderLabs/ModSecurity-nginx.git /usr/local/src/ModSecurity-nginx/
Make sure you are in the Nginx source directory.
cd /usr/local/src/nginx/nginx-1.19.5/
Install build dependencies for Nginx.
sudo apt build-dep nginx

sudo apt install uuid-dev
Next, configure the environment with the following command. We will not compile Nginx itself, but compile the ModSecurity Nginx Connector module only. The --with-compat flag will make the module binary-compatible with your existing Nginx binary.
sudo ./configure --with-compat --with-openssl=/usr/include/openssl/ --add-dynamic-module=/usr/local/src/ModSecurity-nginx
Build the ModSecurity Nginx Connector module.
sudo make modules
The module will be save as objs/ngx_http_modsecurity_module.so. Copy it to the /usr/share/nginx/modules/ directory.
sudo cp objs/ngx_http_modsecurity_module.so /usr/share/nginx/modules/
Step 5: Load the ModSecurity v3 Nginx Connector Module
Edit the main Nginx configuration file.
sudo nano /etc/nginx/nginx.conf
Add the following line at the beginning of the file.
load_module modules/ngx_http_modsecurity_module.so;
Also, add the following two lines in the http {...} section, so ModSecurity will be enabled for all Nginx virtual hosts.
modsecurity on;
modsecurity_rules_file /etc/nginx/modsec/main.conf;

Save and close the file. Next, create the /etc/nginx/modsec/ directory to store ModSecurity configuration
sudo mkdir /etc/nginx/modsec/
Then copy the ModSecurity configuration file.
sudo cp /usr/local/src/ModSecurity/modsecurity.conf-recommended /etc/nginx/modsec/modsecurity.conf
Edit the file.
sudo nano /etc/nginx/modsec/modsecurity.conf
Find the following line.
SecRuleEngine DetectionOnly
This config tells ModSecurity to log HTTP transactions, but takes no action when an attack is detected. Change it to the following, so ModSecurity will detect and block web attacks.
SecRuleEngine On
Then find the following line (line 224), which tells ModSecurity what information should be included in the audit log.
SecAuditLogParts ABIJDEFHZ
However, the default setting is wrong. You will know why later when I explain how to understand ModSecurity logs. The setting should be changed to the following.
SecAuditLogParts ABCEFHJKZ
If you have a coding website, you might want to disable response body inspection, otherwise, you might get 403 forbidden errors just by loading a web page with lots of code content.
SecResponseBodyAccess Off
Save and close the file. Next, create the /etc/nginx/modsec/main.conf file.
sudo nano /etc/nginx/modsec/main.conf
Add the following line to include the /etc/nginx/modsec/modsecurity.conf file.
Include /etc/nginx/modsec/modsecurity.conf
Save and close the file. We also need to copy the Unicode mapping file.
sudo cp /usr/local/src/ModSecurity/unicode.mapping /etc/nginx/modsec/
Then test Nginx configuration.
sudo nginx -t
If the test is successful, restart Nginx.
sudo systemctl restart nginx
Step 6: Enable OWASP Core Rule Set
To make ModSecurity protect your web applications, you need to define rules to detect malicious actors and block them. For beginners, it’s a good idea to install existing rule sets, so you can get started quickly and then learn the nitty-gritty down the road. There are several free rule sets for ModSecurity. The OWASP Core Rule Set (CRS) is the standard rule set used with ModSecurity.
- It’s free, community-maintained and the most widely used rule set that provides a sold default configuration for ModSecurity.
- It contains rules to help stop common attack vectors, including SQL injection (SQLi), cross-site scripting (XSS), and many others.
- It can integrate with Project Honeypot.
- It also contains rules to detect bots and scanners.
- It has been tuned through wide exposure to have very few false positives.
Download the latest OWASP CRS from GitHub.
wget https://github.com/coreruleset/coreruleset/archive/v3.3.4.tar.gz
Extract the file.
tar xvf v3.3.4.tar.gz
Move the directory to /etc/nginx/modsec/.
sudo mv coreruleset-3.3.4/ /etc/nginx/modsec/
Rename the crs-setup.conf.example file.
sudo mv /etc/nginx/modsec/coreruleset-3.3.4/crs-setup.conf.example /etc/nginx/modsec/coreruleset-3.3.4/crs-setup.conf
Then edit the main configuration file.
sudo nano /etc/nginx/modsec/main.conf
Add the following two lines, which will make Nginx include the CRS config file and individual rules.
Include /etc/nginx/modsec/coreruleset-3.3.4/crs-setup.conf
Include /etc/nginx/modsec/coreruleset-3.3.4/rules/*.conf

Save and close the file. Then test Nginx configuration.
sudo nginx -t
If the test is successful, restart Nginx.
sudo systemctl restart nginx
Step 7: Learn How OWASP CRS Works
Let’s take a look at the CRS config file, which provides you with good documentation on how CRS works.
sudo nano /etc/nginx/modsec/coreruleset-3.3.4/crs-setup.conf
You can see that OWASP CRS can run in two modes:
- self-contained mode. This is the traditional mode used in CRS v2.x. If an HTTP request matches a rule, ModSecurity will block the HTTP request immediately and stop evaluating remaining rules.
- anomaly scoring mode. This is the default mode used in CRS v3.x. ModSecurity will check an HTTP request against all rules, and add a score to each matching rule. If a threshold is reached, then the HTTP request is considered an attack and will be blocked. The default score for inbound requests is 5 and for outbound response is 4.

When running in anomaly scoring mode, there are 4 paranoia levels.
- Paranoia level 1 (default)
- Paranoia level 2
- Paranoia level 3
- Paranoia level 4
With each paranoia level increase, the CRS enables additional rules giving you a higher level of security. However, higher paranoia levels also increase the possibility of blocking some legitimate traffic due to false alarms.

These are the two basic concepts you need to understand before using the CRS. Now we can close the file. The individual CRS rules are stored in /etc/nginx/modsec/coreruleset-3.3.0/rules/ directory. Each matching rule will increase the anomaly score.
Step 8: Testing
To check if ModSecurity is working, you can launch a simple SQL injection attack on your own website. (Please note that it’s illegal to do security testing on other people’s websites without authorization.) Enter the followign URL in your web browser.
https://yourdomain.com/?id=3 or 'a'='a'
If ModSecurity is working properly, your Nginx web server should return a 403 forbidden error message.

Firefox browser may fail to show the 403 error message. You can press Ctrl+Shift+I to open the developer tools window and select the network tab. Then press F5 to reload the web page. You should now see the 403 error code in Firefox.
If ModSecurity runs in DetectionOnly mode, it won’t block this SQL injection attack.
Step 9: Understanding the ModSecurity Logs
It’s important to analyze the ModSecurity logs, so you will know what kind of attacks are directed to your web applications and take better actions to defend against threat actors. There are mainly two kinds of logs in ModSecurity:
- debug log: disabled by default.
- audit log:
/var/log/modsec_audit.log
To understand ModSecurity audit logs, you need to know the 5 processing phases in ModSecurity, which are:
- Phase 1: Inspect request headers
- Phase 2: Inspect request body
- Phase 3: Inspect response headers
- Phase 4: Inspect response body
- Phase 5: Action (logging/blocking malicious requests)
They are also two types of logging file.
- Serial: one file for all logs. This is the default.
- Concurrent: multiple files for logging. This can provide better write performance. If you can notice your web pages slowing down after enabling ModSecurity, you can choose to use the concurrent logging type.
Events in the log are divided into several sections.
- section A: audit log header
- section B: request header
- section C: request body
- section D: reserved
- section E: intermediary response body
- section F: final response headers
- section G: reserved
- section H: audit log trailer
- section I: compact request body alternative, which excludes files
- section J: information on uploaded files
- section K: every rule matched by an event, in order of match
- section Z: final boundary
If you run a high-traffic website, the ModSecurity audit log can get too large very quickly, so we need to configure log rotation for the ModSecurity audit log. Create a logrotate configuration file for ModSecurity.
sudo nano /etc/logrotate.d/modsecurity
Add the following lines to this file.
/var/log/modsec_audit.log
{
        rotate 14
        daily
        missingok
        compress
        delaycompress
        notifempty
}
This will rotate the log file every day (daily), compressing old versions (compress). The previous 14 log files will be kept (rotate 14), and no rotation will occur if the file is empty (notifempty). Save and close the file.
If your ModSecurity log is empty, perhaps you need to restart Nginx.
sudo systemctl restart nginx
Step 10: Handling False Positives
ModSecurity is a generic web application firewall and not designed for a specific web application. The OWASP core rule set is also a generic rule set with no particular application in mind, so it’s likely that you will see false positives after enabling ModSecurity and OWASP CRS. If you increase the paranoia level in the CRS, there will be more false positives.
For example, by default, the CRS forbids Unix command injection like entering sudo on a web page, which is rather common on my blog. To eliminate false positives, you need to add rule exclusions to the CRS.
Application-Specific Rule Exclusions
There are some prebuilt, application-specific exclusions shipped with OWASP CRS. Edit the crs-setup.conf file.
sudo nano /etc/nginx/modsec/coreruleset-3.3.4/crs-setup.conf
Go to the Application Specific Rule Exclusions section and find the following lines.
#SecAction \
# "id:900130,\
#  phase:1,\
#  nolog,\
#  pass,\
#  t:none,\
#  setvar:tx.crs_exclusions_cpanel=1,\
#  setvar:tx.crs_exclusions_drupal=1,\
#  setvar:tx.crs_exclusions_dokuwiki=1,\
#  setvar:tx.crs_exclusions_nextcloud=1,\
#  setvar:tx.crs_exclusions_wordpress=1,\
#  setvar:tx.crs_exclusions_xenforo=1"
For instance, If I want to enable WordPress exclusions, the above lines should be changed to the following. Please be careful about the syntax. There should be no comments between t:none,\ and setvar:tx.crs_exclusions_wordpress=1". (The backslash \ character at the end indicates the next line is a continuation of the current line.)
SecAction \
  "id:900130,\
   phase:1,\
   nolog,\
   pass,\
   t:none,\
   setvar:tx.crs_exclusions_wordpress=1"
#  setvar:tx.crs_exclusions_cpanel=1,\
#  setvar:tx.crs_exclusions_drupal=1,\
#  setvar:tx.crs_exclusions_dokuwiki=1,\
#  setvar:tx.crs_exclusions_nextcloud=1,\
#  setvar:tx.crs_exclusions_xenforo=1"
Save and close the file. Then test Nginx configurations.
sudo nginx -t
If the test is successful, reload Nginx for the change to take effect.
sudo systemctl reload nginx
Note that if you have multiple applications such as (WordPress, Nextcloud, Drupal, etc) installed on the same server, then the above rule exclusions will be applied to all applications. To minimize the security risks, you should enable a rule exclusion for one application only. To do that, go to the /etc/nginx/modsec/coreruleset-3.3.0/rules/ directory.
cd /etc/nginx/modsec/coreruleset-3.3.4/rules
Rename the REQUEST-900-EXCLUSION-RULES-BEFORE-CRS file.
sudo mv REQUEST-900-EXCLUSION-RULES-BEFORE-CRS.conf.example REQUEST-900-EXCLUSION-RULES-BEFORE-CRS.conf
Then edit this file.
sudo nano REQUEST-900-EXCLUSION-RULES-BEFORE-CRS.conf
Add the following line at the bottom of this file. If your WordPress is using the blog.yourdomain.com sub-domain and the request header send from visitor’s browser contains this sub-domain, then ModSecurity will apply the rule exclusions for WordPress.
SecRule REQUEST_HEADERS:Host "@streq blog.yourdomain.com" "id:1000,phase:1,setvar:tx.crs_exclusions_wordpress=1"
If you have installed Nextcloud on the same server, then you can also add the following line in this file, so if a visitor is accessing your Nextcloud sub-domain, ModSecurity will apply the Nextcloud rule exclusions.
SecRule REQUEST_HEADERS:Host "@streq nextcloud.yourdomain.com" "id:1001,phase:1,setvar:tx.crs_exclusions_nextcloud=1"
Save and close this file. Then test Nginx configurations.
sudo nginx -t
If the test is successful, reload Nginx for the change to take effect.
sudo systemctl reload nginx
Custom Rule Exclusions
Enabling the prebuilt application-specific rule exclusions might not eliminate all false positives. If so, you need to examine the ModSecurity audit log (/var/log/modsec_audit.log), check which rule caused the false positive and add your custom rule exclusions in the REQUEST-900-EXCLUSION-RULES-BEFORE-CRS.conf file.
Section H in the audit log tells you which rule is matched. For example, If I try to use the <code>...</code> HTML in the comment form, ModSecurity blocks my comment. The following log tell me that the HTTP request matched a rule in REQUEST-941-APPLICATION-ATTACK-XSS.conf (line 527). The rule ID is 941310. The request URI is /wp-comments-post.php.

It’s detected as malformed encoding XSS filter attack. However, I want users to be able to use the <code>...</code> and <pre>...</pre> HTML tag in the comment form, so I created a rule exclusion. Add the following line at the bottom of the REQUEST-900-EXCLUSION-RULES-BEFORE-CRS.conf file.
SecRule REQUEST_URI "@streq /wp-comments-post.php" "id:1002,phase:1,ctl:ruleRemoveById=941310"
This line tells ModSecurity that if the request URI is /wp-comments-post.php, then don’t apply rule ID 941310. Save and close the file. Then test Nginx configuraion.
sudo nginx -t
If the test is successful, then reload Nginx.
sudo systemctl reload nginx
If a false positive matches multiple rule IDs, you can add rule exclusions in one line like so:
SecRule REQUEST_URI "@streq /wp-admin/post.php" "id:1003,phase:1,ctl:ruleRemoveById=941160,ctl:ruleRemoveById=941310,ctl:ruleRemoveById=942100"
Note: It’s not recommended to disable too many rules of level 1 in the OWASP CRS, as it will make your website be hacked much more easily. Only disable rules if you know what you are doing.
IP Whitelisting
If you want to disable ModSecurity for your own IP address, but leave it enabled for all other IP addresses, then add the following custom rule in the REQUEST-900-EXCLUSION-RULES-BEFORE-CRS.conf file. Replace 12.34.56.78 with your real IP address.
SecRule REMOTE_ADDR "@ipMatch 12.34.56.78" "id:1004,phase:1,allow,ctl:ruleEngine=off"
To whitelist a subnet, use the following syntax, which will whitelist the 10.10.10.0/24 network.
SecRule REMOTE_ADDR "@ipMatch 10.10.10.0/24" "id:1005,phase:1,allow,ctl:ruleEngine=off"
Save and close the file. Then test Nginx configurations.
sudo nginx -t
If the test is successful, restart Nginx for the change to take effect.
sudo systemctl restart nginx
Chaining Rules
If your Nginx has multiple virtual hosts, you may want to whitelist your IP address for a specific virtual host. You need to chain two rules like so:
SecRule REMOTE_ADDR "@ipMatch 12.34.56.78" "id:1004,phase:1,allow,ctl:ruleEngine=off,chain"
SecRule REQUEST_HEADERS:Host "@streq nextcloud.yourdomain.com" "t:none"
The chain keyword at the end of the first rule indicates that the ruleEngine=off action will only be taken if the condition in the next rule is also true.
(Optional) Integrate ModSecurity with Project Honeypot
Project Honeypot maintains a list of known malicious IP addresses, available free to the public. ModSecurity can integrates with Project Honeypot and block IP addresses on the Project Honeypot list.
Note that using Project Honeypot will make your website slower for new visitors, because your web server will need to send a query to Project Honeypot before it can send a response to the new visitor. However, once the IP reputation data is cached on your web server, the performance impact will be very minimal.
To use Project Honeypot, first create a free account on its website. Then go to your account dashboard and click the get one link to request an access key for the HTTP blacklist.

Next, edit the crs-setup.conf file.
sudo nano /etc/nginx/modsec/coreruleset-3.3.0/crs-setup.conf
Find the following lines.
#SecHttpBlKey XXXXXXXXXXXXXXXXX
#SecAction "id:900500,\
#  phase:1,\
#  nolog,\
#  pass,\
#  t:none,\
#  setvar:tx.block_search_ip=1,\
#  setvar:tx.block_suspicious_ip=1,\
#  setvar:tx.block_harvester_ip=1,\
#  setvar:tx.block_spammer_ip=1"
Remove the beginning # characters to uncomment them, and add your HTTPBL API key obtained from Project Honeypot.

Note that block_search_ip should be set to 0 (disabled), as we don’t want to block search engine crawlers. Save and close the file. Then reload Nginx.
sudo systemctl reload nginx
Now ModSecurity will query Project Honeypot on all HTTP requests. To test if this would work, edit the /etc/nginx/modsec/main.conf file.
sudo nano /etc/nginx/modsec/main.conf
Add the following line at the end of this file. This allows us to pass an IP address in an URL. (Once the test is successful, you can remove this line from the file.)
SecRule ARGS:IP "@rbl dnsbl.httpbl.org" "phase:1,id:171,t:none,deny,nolog,auditlog,msg:'RBL Match for SPAM Source'
Save and close the file. Test Nginx configurations.
sudo nginx -t
Then reload Nginx.
sudo systemctl reload nginx
Go to Project Honeypot website and find a malicious IP address, for example 134.119.218.243. Run the following command to test the HTTP blacklist.
curl -i -s -k -X $'GET' 'https://yourdomain.com/?IP=134.119.218.243'
Your web server should return a 403 forbidden response, because the IP address on Project Honeypot.
How to Use Brotli with ModSecurity in Nginx
Traditionally, web pages are compressed with GZIP for faster loading speed. Developed by Google, Brotli is a new compression algorithm that provides better compression ratio. It’s supported by all major web browsers. To use Brotli in Nginx, first you need to install the Brotli Nginx module from the the ondrej/nginx-mainline PPA.
sudo apt install libnginx-mod-brotli
Then open the main Nginx configuration file.
sudo nano /etc/nginx/nginx.conf
Add the following lines in the http {...} context.
        brotli on;
        brotli_comp_level 6;
        brotli_static on;
        brotli_types application/atom+xml application/javascript application/json application/rss+xml
             application/vnd.ms-fontobject application/x-font-opentype application/x-font-truetype
             application/x-font-ttf application/x-javascript application/xhtml+xml application/xml
             font/eot font/opentype font/otf font/truetype image/svg+xml image/vnd.microsoft.icon
             image/x-icon image/x-win-bitmap text/css text/javascript text/plain text/xml;
Save and close the file, then test Nginx configurations.
sudo nginx -t
If the test is successful, restart Nginx.
sudo systemctl restart nginx
Now go to the home page your website, open the developer tools in your web browser (In Firefox you can press Ctrl+Alt+I to open it up). Select the Network tab, and press F5 to reload the web page. Click on the main HTML page.

Check the response header on the right sidebar. If the content-encoding is set to br, then you have successfully enabled Brotli compression in Nginx.

If the content-encoding is gzip, then your Nginx web server is still using GZIP.
Upgrading Nginx
ModSecurity integrates with Nginx as a dynamic module, so every time the Nginx binary is upgraded, you need to rebuild the ModSecurity module for Nginx. This will make your application offline for a few minutes.
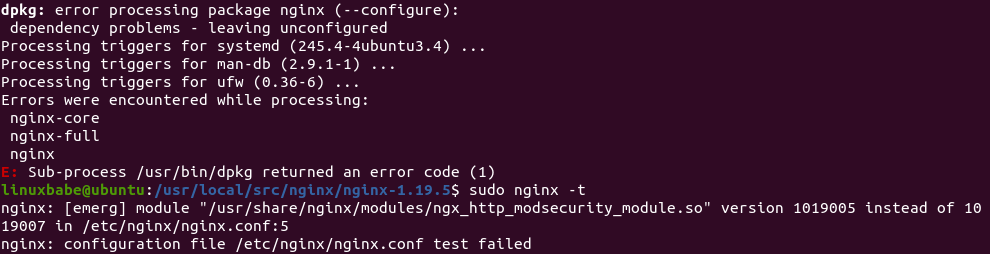
If a newer version of Nginx is available in the repository, the sudo apt upgrade command will upgrade Nginx. The newer version of Nginx is not going to be compatible with the previously compiled ModSecurity module. If Nginx is upgraded by the sudo apt upgrade command, it will fail to restart as shown in the screenshot below.

And if you run sudo nginx -t command, it tells you that Nginx expects a new version of the ModSecurity module.

My advice is to prevent Nginx from being upgraded when you run sudo apt upgrade command. This can be achieved by the following command:
sudo apt-mark hold nginx
Now if you run sudo apt update;sudo apt upgrade, and the package manager tells you that the nginx package is held back from upgrading, then it means there’s a new nginx version available in the repository.

You should download the new Nginx source package and compile the ModSecurity module again. Move the newly-compiled ModSecurity module to /usr/share/nginx/modules/ directory. Basically that means you need to remove everything under /usr/local/src/ directory (sudo rm /usr/local/src/* -rf ) and go through step 2 and step 4 again.
Then unhold Nginx.
sudo apt-mark unhold nginx
And upgrade Nginx.
sudo apt upgrade nginx
Once the upgrade is complete, hold Nginx again.
sudo apt-mark hold nginx
To show what packages are held, run
apt-mark showhold
Nginx Plus
If you use the commercial Nginx Plus web server, then ModSecurity is included in the Nginx Plus binary. It’s known as the NGINX WAF.
If you don’t want to spend time re-compiling the ModSecurity source code, then you might want to purchase Nginx Plus, as the ModSecurity module is pre-compiled in the Nginx Plus binary. Benefits of Using ModSecurity 3.0 with NGINX Plus:
- You don’t need to compile the ModSecurity dynamic module yourself; NGINX, Inc. provides a precompiled module for you, saving time and effort.
- NGINX, Inc. has extensively tested the dynamic module, so you know it’s suitable for production usage.
- NGINX, Inc. continually tracks changes and updates the module for every important change and security vulnerability, so you don’t have to do this yourself.
- Each new release of NGINX Plus includes a new version of the dynamic module, so you can upgrade without having to re-compile ModSecurity.
- You get 24×7 support with both installation of the ModSecurity and the OWASP Core Rule Set, as well as troubleshooting and debugging assistance.
How to Disable ModSecurity for a Virtual Host
In this tutorial, I added the following line in the http {...} context.
modsecurity on;
This will enable ModSecurity for all Nginx server blocks (aka virtual hosts). If you want to disable ModSecurity for a specific server block, then edit the server block file (/etc/nginx/conf.d/example.com.conf) and add the following line to the server {...} context.
modsecurity off;
Reload Nginx for the change to take effect.
sudo systemctl reload nginx
FAQ
Static Module vs Dynamic Module in Nginx
- A static module must be compiled with Nginx and it’s integrated with Nginx as one binary. It can’t be unloaded from Nginx.
- A dynamic module is a separate package from the main Nginx binary. It can be loaded and unloaded in Nginx.
What does Binary Compatible Mean?
- If a dynamic module is not binary compatible, then the module and Nginx should be compiled together. If there’s an existing Nginx binary installed from a software repository using
apt-get, it must be removed and you need to install the compiled Nginx binary in order to use the dynamic module. - If a dynamic module is binary compatible, then this module can be compiled individually without compiling Nginx. The module can be used with your existing Nginx binary installed from a software repository. It’s not perfect, though.
No matter a module is static or dynamic, binary compatible or non binary compatible, if you upgrade the Nginx binary later, you need to compile the module again.
Upgrade Server RAM
ModSecurity can use a fair amount of RAM. If you can see the following error in your Nginx error log (/var/log/nginx/error.log), it means your server is short of RAM.
fork() failed while spawning "worker process" (12: Cannot allocate memory)
sendmsg() failed (9: Bad file descriptor)
sendmsg() failed (9: Bad file descriptor)
sendmsg() failed (9: Bad file descriptor)
You need to restart Nginx and upgrade server RAM, then the above error is not going to happen again.
How to Upgrade OWASP CRS
Besides upgrading the ModSecurity Nginx module, you also need to upgrade the core rule set when a new version comes out. The process is straightforward.
- Go through step 6 again to install the new version of core rule set.
- Then go to step 10. Copy of your custom rules in the
crs-setup.confandREQUEST-900-EXCLUSION-RULES-BEFORE-CRSfile.
Next, test Nginx configurations.
sudo nginx -t
If the test is successful, reload Nginx for the change to take effect.
sudo systemctl reload nginx
How do you know if the new version is working? Launch a simple SQL injection attack like in step 8 and check your server logs. It will show you the CRS version that’s preventing this attack.
Wrapping Up
I hope this tutorial helped you set up ModSecurity web application firewall with Nginx on Debian/Ubuntu. You may also want to check out other security tutorials.
- How to Use UFW Firewall on Debian, Ubuntu, Linux Mint
- Set Up Automatic Security Update (Unattended-Upgrade) on Ubuntu
- Canonical Livepatch Service: Patch Linux Kernel on Ubuntu without Reboot
- 2 Simple Steps to Set up Passwordless SSH Login on Ubuntu
- 5 Effective Tips to Harden SSH Server on Ubuntu
As always, if you found this post useful, then subscribe to our free newsletter to get new tutorials.


Your tutorial is so much better than the one in NginX’s official site.
Thank You so much.
I have found this to be the most complete ModSecurity install instructions out there on the web. You have done an excellent job in answering the “how-to”s and the “why-for”s. The step-by-steps were flawless. This worked on the first try. I am reasonably confident that I will be able to recompile when NGINX upgrades/as-needed basis. Thank you!
Very good tutorial, but the audit log does not rotate. Would you add also instructions how to add the modsecurity auditlog to logrotate?
To configure log rotation for the ModSecurity audit log, create a logrotate configuration file for ModSecurity.
Add the following lines to this file.
/var/log/modsec_audit.log
{
        rotate 14
        daily
        missingok
        compress
        delaycompress
        notifempty
}
This will rotate the log file every day (daily), compressing old versions (compress). The previous 14 log files will be kept (rotate 14), and no rotation will occur if the file is empty (notifempty). Save and close the file.
Hi, your tutorial is awesome.
But compared to my server before the installation, when it had Debian and default NGINX and no modsecurity, it got 1,6GB more data.
Most of the new files are in the /usr/local/ folders.
Before I had that folder almost empty, 2mb but after this tutorial it has 1.3GB data.
So my question is, is all the files needed in the folder /usr/local/ or is there some files which I could delete after installing modsecurity ?
You can remove everything under
/usr/local/src/.Is the folder /usr/local/src/ModSecurity needed after the installation?
Which files can be removed from the /usr/local/src ?
You can remove everything under /usr/local/src/.
Thank you for your reply, great resource!
The below command line returns: SecRule: command not found on ubuntu 20.04
SecRule REMOTE_ADDR “^12\.34\.56\.78” “id:1004,phase:1,allow,ctl:ruleEngine=off”
This is not a Linux shell command. It’s a rule in ModSecurity. You should add the rule in the
REQUEST-900-EXCLUSION-RULES-BEFORE-CRS.conffile.I have a question about upgrading nginx, the tutorial mentions that when apt package manager tells me that a new version of Nginx is available, I should:
1. Download the new Nginx source package. What command I have to use to download the source package if I will put sudo apt upgrade on hold?
2. Compile the ModSecurity module again.
This means that I have to go through Step 2 (again): Download Nginx Source Package
3. Move the newly-compiled ModSecurity module to /usr/share/nginx/modules/ directory.
This can be achieved by:
Do I have to go again through step 5: Load the ModSecurity v3 Nginx Connector Module?
I understand that the last step is to unhold Nginx using:
Then upgrade:
Once the upgrade is complete, hold Nginx again:
I also understand that I don’t have to use:
But, what if I have Automatic Security Update (Unattended Upgrades) on Ubuntu on? What impact will this automatic update have on Upgrading Nginx?
I appreciate it if you provide us with more details about the maintenance part after we have ModSecurity on.
Basically you need to remove everything under
/usr/local/src/and go through step 2 and step 4 again.sudo apt upgradedoesn’t affect source code packages.Automatic security updates runs
sudo apt-get updateandsudo apt upgradein the background. Nginx is hold from upgrading.Great. Thank you!
shows nginx version: 1.19.5
Shall I keep checking on the version using sudo nginx -V so that I update? Is there a better way to do this? I used to run: apt update && apt upgrade -y without worrying about the version number. This will change now.
Any best practice I have to follow to remove everything under /usr/local/src/?
Shall I use:
OR, I can just go ahead with steps 2 and 4 and reinstall the whole thing there (overwrite)?
If you run
sudo apt update;sudo apt upgrade, and the package manager tells you that thenginxpackage is hold back from upgrading, then it means there’s a new nginx version available in the repository.Use
sudo rm /usr/local/src/* -rfto remove those files and sub-directories.I am glad that you have updated the article. Thank you!
Under the “Upgrading Nginx” paragraph, please add this:
After you go through step 2, the sample output will list the nginx version, in our example, that is:
Sample output:
In step 4, you should consider using the same nginx version when you point to the source directory:
Make sure you are in the Nginx source directory.
Just add something between these lines. I have tried it today and I was able to update to nginx/1.19.7 version.
No. It failed on my server.
If you compile the ModSecurity module against the old Nginx version, it’s not going to be compatible with the new Nginx version. You need to remove everything under
/usr/local/src/directory (sudo rm /usr/local/src/* -rf) and go through step 2 and step 4 again.You are right! I followed the instructions you mentioned in this tutorial, and I was able to update to Nginx version 1.19.7.
Thank you very much for the update and for keeping the website updated. This what makes us keep coming back!
Can we get more information about the Handling of False Positives in WordPress?
We need (1) more examples about how to read Section H in the audit log, (2) how to create new rules based on real examples of what we read in the log, and (3) how to reset the log by a command line or automate the reset process, say daily, so that we keep the database optimized. I have noticed that the log is long, and it keeps building.
This topic is linked to my previous message, for example, I have tried to restrict access to the WordPress login page to specific IPs with ModSecurity. I did the following:
I added the below code inside it:
SecRule REQUEST_URI "@eq /wp-login.php" \
  "chain, \
  id:'1009', \
  phase:1, \
  log, \
  pass"
  SecRule REMOTE_ADDR "@ipMatch 123.132.144.1,123.132.144.99" \
    ctl:ruleEngine=DetectionOnly
SecRule REQUEST_URI "@contains wp-login" "id:2010,phase:1,t:lowercase,log,deny,msg:'Warning, Access to Login page is Restricted'"
This did not work for me.
Alternatively, I tried to block the URL access to wp-admin and wp-login.php to all except my IP address using the nginx server, I have done the following steps:
1. I used an editor to edit: /etc/nginx/sites-available/domain.com
2. I added the following code:
          location ~ ^/(wp-admin|wp-login\.php) {
                allow 123.132.123.11;
                deny all;
                     }
This also did not work for me as it denied my access to the server, although I was using the correct IP and I have reloaded Nginx. Any idea why?
A tutorial around how to secure WP-login.php will be truly helpful.
Maybe you are accessing the website in IPv6?
My code is
location ~* ^/wp-admin/(setup-config|install)\.php$ {
      deny all;
      modsecurity off;
}

location = /wp-login.php {
    fastcgi_pass unix:/run/php/php7.4-fpm.sock;
    fastcgi_param SCRIPT_FILENAME $document_root$fastcgi_script_name;
    include fastcgi_params;
    include snippets/fastcgi-php.conf;

    allow 78.56.34.12;
    deny all;
}
On Ubuntu 20.04 with PHP7.4-FPM.
Thanks! I have just tried it On Ubuntu 20.04 with PHP8.0-FPM and it did not work. I have changed this line from:
To:
I have inserted that inside:
This is not the default file because I use blocks.
I get 403 Forbidden. In the URL, I get:
https://domain.com/wp-login.php?redirect_to=https%3A%2F%2Fdomain.com%2Fwp-admin%2F&reauth=1
I don’t have IPv6. See below:
That was wonderful article and I could build waf for my web server. However I am unable to write audit logs in JSON which I need to parse to ELK stack. Can you pls help?
Hi, sorry to bother again, can you think of any reason why ModSecurity might be incompatible with Brotli?
Having ModSecurity working correctly, when activating Brotli, the application (WordPress in this case, but I don’t think it matters) stops working completely. This is de error in the ModSecurity log: https://pastebin.com/zumqd0cH
Thanks for all your tutorials, they are really useful.
I just enabled Brotli on my Nginx WordPress server, and it works very well.
I got this all installed – I had a few problems with libmaxmind and memory, but a swap file and removed libmaxmind-dev, already had the libgeoip-dev installed but still had the problem, til I found this:
https://github.com/SpiderLabs/ModSecurity/issues/2254
So I compiled it with -with-maxmind=no and that seemed to work.
But all my tests just come up as 404, nothing is blocked? Not sure if it’s working?
I did wonder if it’s because my site is still on an IP, not a domain yet…and that I was looking at a static site, not WordPress (yet) although php and mysql are running on that server?
Xiao,
I installed ModSecurity before I updated Nextcloud, then started getting an error message saying that WevDAV was broken. I changed SecRuleEngine On back to DetectionOnly and the error went away. Is there a way to have WebDAV and ModSecurity?
Hi, what in a situation where I already have nginx installed on my VPS server from the Ubuntu repository ? There are several virtual hosts with websites running on this server.
Upgrading Nginx won’t delete your virtual host files.
OK, and should I uninstall nginx from the Ubuntu repository before doing the first step ?
No need to uninstall it.
Getting this error on Ubuntu 20.10:
$ cat /etc/apt/sources.list.d/ondrej-ubuntu-nginx-mainline-*.list
deb http://ppa.launchpad.net/ondrej/nginx-mainline/ubuntu/ hirsute main
deb-src http://ppa.launchpad.net/ondrej/nginx-mainline/ubuntu/ focal main
$ sudo apt update
Hit:1 http://nl.archive.ubuntu.com/ubuntu hirsute InRelease
Ign:2 http://ppa.launchpad.net/ondrej/nginx-mainline/ubuntu hirsute InRelease
Hit:3 http://nl.archive.ubuntu.com/ubuntu hirsute-updates InRelease
Hit:4 http://ppa.launchpad.net/ondrej/nginx-mainline/ubuntu focal InRelease
Hit:5 http://nl.archive.ubuntu.com/ubuntu hirsute-backports InRelease
Err:6 http://ppa.launchpad.net/ondrej/nginx-mainline/ubuntu hirsute Release
404 Not Found [IP: 91.189.95.85 80]
Get:7 http://security.ubuntu.com/ubuntu hirsute-security InRelease [101 kB]
Reading package lists… Done
E: The repository ‘http://ppa.launchpad.net/ondrej/nginx-mainline/ubuntu hirsute Release’ does not have a Release file.
N: Updating from such a repository can’t be done securely, and is therefore disabled by default.
N: See apt-secure(8) manpage for repository creation and user configuration details.
Ah im sorry. The issue was: deb http://ppa.launchpad.net/ondrej/nginx-mainline/ubuntu/ hirsute main, should have been focal main.
Excelent!
Great tutorial. i love practicing the knowledge which i get from this website…
i have question for you
i got this error
i have add
in REQUEST-900-EXCLUSION-RULES-BEFORE-CRS.conf and restart nginx
but i can’t save the post/page from the plugin builder
thanks for reply
thanks to myself and internet forum 😀
this problem has been solved after many hours spending it…
so this rule work fine:
FYI: i used nginx/1.19.8 , wordpress 5.++ , ubuntu focal(20.04)
Some commands fail without sudo ( ./configure and make -j4). But they work with sudo.
This is a great tutorial Xiao, many thanks!
Do you guys know how to have a dashboard/UI where we could see the logs in a nice place instead of the CLI?
Thanks!
If you encounter the error below whilst runing
In step 4
This will sort the issue
make modules make -f objs/Makefile modules make[1]: Entering directory '/usr/local/src/nginx/nginx-1.21.6' cc -c -fPIC -pipe -O -W -Wall -Wpointer-arith -Wno-unused-parameter -Werror -g -I src/core -I src/event -I src/event/modules -I src/os/unix -I /usr/local/modsecurity/include -I objs -I src/http -I src/http/modules \ -o objs/addon/src/ngx_http_modsecurity_module.o \ /usr/local/src/ModSecurity-nginx/src/ngx_http_modsecurity_module.c /usr/local/src/ModSecurity-nginx/src/ngx_http_modsecurity_module.c: In function ‘ngx_http_modsecurity_pcre_malloc_init’: /usr/local/src/ModSecurity-nginx/src/ngx_http_modsecurity_module.c:78:9: error: ‘pcre_malloc’ undeclared (first use in this function); did you mean ‘old_pcre_malloc’? 78 | if (pcre_malloc != ngx_http_modsec_pcre_malloc) { | ^~~~~~~~~~~ | old_pcre_malloc /usr/local/src/ModSecurity-nginx/src/ngx_http_modsecurity_module.c:78:9: note: each undeclared identifier is reported only once for each function it appears in /usr/local/src/ModSecurity-nginx/src/ngx_http_modsecurity_module.c:82:25: error: ‘pcre_free’ undeclared (first use in this function); did you mean ‘pkey_free’? 82 | old_pcre_free = pcre_free; | ^~~~~~~~~ | pkey_free /usr/local/src/ModSecurity-nginx/src/ngx_http_modsecurity_module.c: In function ‘ngx_http_modsecurity_pcre_malloc_done’: /usr/local/src/ModSecurity-nginx/src/ngx_http_modsecurity_module.c:102:9: error: ‘pcre_malloc’ undeclared (first use in this function); did you mean ‘old_pcre_malloc’? 102 | pcre_malloc = old_pcre_malloc; | ^~~~~~~~~~~ | old_pcre_malloc /usr/local/src/ModSecurity-nginx/src/ngx_http_modsecurity_module.c:103:9: error: ‘pcre_free’ undeclared (first use in this function); did you mean ‘pkey_free’? 103 | pcre_free = old_pcre_free; | ^~~~~~~~~ | pkey_free make[1]: *** [objs/Makefile:1232: objs/addon/src/ngx_http_modsecurity_module.o] Error 1 make[1]: Leaving directory '/usr/local/src/nginx/nginx-1.21.6' make: *** [Makefile:16: modules] Error 2That means you need to upgrade Nginx.
No, actually, I believe it is quite the opposite. (correct me if I am wrong). But this means you need to downgrade (not recommended) Nginx, since the newer versions of Nginx are built with the pcre2 library, which is not yet fully compatible, particularly with ARM devices such as a Raspberry pi. I encountered this error on my Raspberyy Pi 4 Ubuntu Server when using the Mainline Version of Nginx for the official Nginx Repo. Your only other option (aside from downgrading) is to use the
argument as stated in the above post.
The error message indicates ModSecurity is built with Nginx V1.23.2 source code, but the Nginx binary is still V1.22.1. Upgrade the binary to V1.23.2, then the error will be gone.
Can you explain why we are using the argument
in the build config? I looked at the instructions from the Nginx repository and they only mention using
with NO mention of
What exactly does
do and why does it differ from the official build instructions?
Absolutely fantastic guide. The best I’ve found, thank you !
On Step 8 when doing your test using
, I get a blank white page instead of a 403 error. However, in the logs, modsecurity shows that the site is blacklisting me successfully. Do you have any idea why I might not be getting the 403 error on my page? Please help…
Ideas how i can do this installation on nginx reverse proxy? i did try but it block all my website my reverse proxy is stand alone machine ubuntu 22.04.
On Nginx version /1.23.2,
sudo apt-add-repository -ssreturnsError: need a repository as argument. How can I correct this?On integration oh honeypot ligne is “sudo nano /etc/nginx/modsec/coreruleset-3.3.0/crs-setup.conf” should be “sudo nano /etc/nginx/modsec/coreruleset-3.3.4/crs-setup.conf” to be consitent with CRS database
how to uninstall it? It has caused me several inconveniences and I prefer to remove it and use WAF with Cloudflare.
I’m on the same boat. Each new step in this guide gets more complicated. 🙂
Does using Cloudflare reduce the need for ModSecurity?
when i am try to install brotli from ubuntu 20.04, facing this error.
sudo apt install libnginx-mod-brotli
Reading package lists… Done
Building dependency tree
Reading state information… Done
E: Unable to locate package libnginx-mod-brotli
How to resolve?
Looks like no package is available. You can build from source as per the following instructions: https://dev.to/koddr/how-to-install-brotli-module-for-nginx-on-ubuntu-20-04-2ocp
Note: I have not tried this yet
I originally followed someone else’s instructions for my server and just got burned by doing an upgrade of the server and nginx was updated on me which killed it due to invalid ModSecurity version.
I searched around how to fix and found out that you already had in your instructions to run `sudo apt-mark hold nginx` which would have prevented a bit of heartache today for me.
Thanks for the excellent resource!
https://github.com/JavaScriptDude
For others, here is the error you may see in your syslog if nginx is updated without updating ModSecurity:
DebianBase nginx[]: nginx: [emerg] module “/usr/share/nginx/modules/ngx_http_modsecurity_module.so” version instead of in /etc/nginx/nginx.conf:5
DebianBase nginx[]: nginx: configuration file /etc/nginx/nginx.conf test failed
DebianBase systemd[1]: nginx.service: Control process exited, code=exited, status=1/FAILURE
DebianBase systemd[1]: nginx.service: Failed with result ‘exit-code’.
I tried to enable ModSecurity for the URL (example.com) and all URLs of this domain, but disable it for example.com/index.html#!/users
I tried the following:
server {
listen 80;
listen 443 ssl;
if ($scheme != “https”){
return 301 https://$host$request_uri;
}
ssl_certificate /etc/nginx/ssl_cert/wildcard_example_com.pem;
ssl_certificate_key /etc/nginx/ssl_cert/wildcard_example_com.pem;
server_name a.example.com;
location / {
proxy_pass https://IpAdress:Port; #address of the Backend-Server
proxy_set_header Host $host;
proxy_set_header X-Real-IP $remote_addr;
proxy_set_header X-Forwarded-For $proxy_add_x_forwarded_for;
}
# now I want to disable ModSecurity for example.com/index.html#!/users
location = /index.html#!/users {
proxy_pass https://IpAdress:Port/index.html#!/users;
proxy_set_header Host $host;
proxy_set_header X-Real-IP $remote_addr;
proxy_set_header X-Forwarded-For $proxy_add_x_forwarded_for;
modsecurity off;
}
}
Disclaimer!!! I am not using Nginx as a webserver. I’m using it as a reverse proxy, so I don’t even know if it works with different locations
Hi dear,
I get this error when upgrading nginx as per your guidelines. The issue is with brotli
dpkg: error processing package nginx (--configure): installed nginx package post-installation script subprocess returned error exit status 1 dpkg: dependency problems prevent configuration of nginx-common: nginx-common depends on nginx (<< 1.25.5-2+ubuntu22.04.1+deb.sury.org+1.1~); however: Package nginx is not configured yet. dpkg: error processing package nginx-common (--configure): dependency problems - leaving unconfigured dpkg: dependency problems prevent configuration of libnginx-mod-http-brotli-filter:No apport report written because the error message indicates its a followup error from a previous failure. libnginx-mod-http-brotli-filter depends on nginx-abi-1.25.5-1; however: Package nginx-abi-1.25.5-1 is not installed. Package nginx which provides nginx-abi-1.25.5-1 is not configured yet. dpkg: error processing package libnginx-mod-http-brotli-filter (--configure): dependency problems - leaving unconfigured dpkg: dependency problems prevent configuration of libnginx-mod-http-brotli-static: libnginx-mod-http-brotli-static depends on nginx-abi-1.25.5-1; however: Package nginx-abi-1.25.5-1 is not installed. Package nginx which provides nginx-abi-1.25.5-1 is not configured yet. dpkg: error processing package libnginx-mod-http-brotli-static (--configure): dependency problems - leaving unconfigured No apport report written because the error message indicates its a followup error from a previous failure. No apport report written because MaxReports is reached already Errors were encountered while processing: nginx nginx-common libnginx-mod-http-brotli-filter libnginx-mod-http-brotli-static needrestart is being skipped since dpkg has failed E: Sub-process /usr/bin/dpkg returned an error code (1)I tested this on Debian 12.11 with Nginx 1.29, and it works successfully with OWASP Core Rule Set v4.16.0.
Just a small note: the module directory path is different on my setup. Instead of:
the modules are located in:
Thanks again — this guide was very helpful!
The maintainer of modsecurity has changed. Please modify the libmodecurity3 section.
Original:
[pre]
sudo apt install git
git clone –depth 1 -b v3/master –single-branch https://github.com/SpiderLabs/ModSecurity /usr/local/src/ModSecurity/
cd /usr/local/src/ModSecurity/
[/pre]
Should be this:
[pre]
sudo apt install git
git clone –recursive https://github.com/owasp-modsecurity/ModSecurity /usr/local/src/ModSecurity/
cd /usr/local/src/ModSecurity/
[/pre]
Woops. Ignore the above post. I did the pre’s wrong. Heres what I meant to post…
The maintainer of modsecurity has changed. Please modify the libmodecurity3 section.
Original:
Should be this:
The maintainer of Modsecurity-nginx has changed. Please make the following changes to Step 4 in the tutorial…
“Step 4: Download and Compile ModSecurity v3 Nginx Connector Source Code
The ModSecurity Nginx Connector links libmodsecurity to the Nginx web server. Clone the ModSecurity v3 Nginx Connector Git repository.”
The Original should be changed from this ….
to this …
All users following this guide should make these changes for the most up to date version of Modsecurity-nginx.
@Linuxbabe @Xiao Please make these changes to the tutorial, as nobody should be using the defunct Spiderlabs repository. All repositories should be made to reflect the new maintainer owasp.