How to Install Ghost Blogging Platform on Ubuntu Server 22.04/20.04
This tutorial will be showing you how to install the Ghost blogging platform on an Ubuntu 22.04/Ubuntu 20.4 server. Ghost is an open-source blogging software coded in Node.js, allowing you to create modern, beautiful blogs. Compared to WordPress, Ghost is lightweight and much faster because it’s built specifically for blogging and isn’t a comprehensive content management system like WordPress.
Ghost Features
At the time of writing, the latest version of Ghost is v4.47.0, release in May 4, 2022. Features of Ghost are as follows:
- A Markdown-based editor allows you to quickly write posts.
- Simple content management.
- Collaborative editing with your team.
- Scheduled publishing
- Built-in analytics
- Proper SEO is built in directly, with semantic markup, permalinks, XML sitemaps, canonical tags, and automatic metadata with manual overrides.
- Integrated AMP (Accelerated Mobile Pages) support
- Full RSS feeds, email subscription capture forms, and Slack webhook integration
- Hundreds of beautiful free and premium themes are available from the Ghost marketplace
- A nice-looking default theme Casper with dark mode support.
- A cross-platform desktop app is available for Linux, Mac, and Windows.
- The official Ghost Migrator WordPress plugin allows you to easily migrate from WordPress to Ghost.
The Ghost foundation offers managed hosting, but here we will see how to create a self-hosted Ghost blog on Ubuntu server.

Requirements
To run a Ghost blog, you need a server with at least 1GB of RAM. I recommend Kamatera VPS (Virtual Private Server), which features:
- 30 days free trial.
- Starts at $4/month (1GB RAM)
- High-performance KVM-based VPS
- 9 data centers around the world, including the United States, Canada, UK, Germany, The Netherlands, Hong Kong, and Isreal.
Follow the tutorial linked below to create your Linux VPS server at Kamatera. For best compatibility, please use the LTS version of Ubuntu like Ubuntu 22.04/20.04.
Once you have a VPS running Ubuntu, follow the instructions below.
You also need to have a domain name. I registered my domain name from NameCheap because the price is low and they give whois privacy protection free for life.
Note: I installed Ghost with a sudo user on Ubuntu. For best results, you should also follow this tutorial with a sudo user, not root. To add a sudo user, simply run
sudo adduser username
sudo adduser username sudo
Then switch to the new user.
su - username
Step 1: Update Ubuntu
If your server hasn’t been updated for some time, then run the following command to update existing software packages.
sudo apt update;sudo apt upgrade -y
Step 2: Install Node.js on Ubuntu
Ghost requires you to install the LTS version of Node.js and does not support non-LTS version. The latest version of Node.js is v18.x, but currently, Ghost is more compatible with Node.js v16.x. Add NodeSource repository using the command below.
curl -sL https://deb.nodesource.com/setup_16.x | sudo -E bash -
Then install Node.js.
sudo apt install -y nodejs
Check Node version.
node -v
Sample output:
v16.15.0
Check npm version:
npm -v
Sample output:
8.5.5
Step 3: Install MariaDB Database Server
Ghost supports MySQL and MariaDB. MariaDB is a drop-in replacement for MySQL. It is developed by former members of MySQL team who are concerned that Oracle might turn MySQL into a closed-source product. So let’s install the MariaDB database server.
Enter the following command to install it on Ubuntu 22.04/20.04.
sudo apt install mariadb-server mariadb-client
After it’s installed, MariaDB server should be automatically started. Use systemctl to check its status.
systemctl status mariadb
Sample output:
● mariadb.service - MariaDB 10.6.7 database server
   Loaded: loaded (/lib/systemd/system/mariadb.service; enabled; vendor preset: enabled)
   Active: active (running) since Sat 2022-05-04 11:13:27 UTC; 21s ago
     Docs: man:mysqld(8)
           https://mariadb.com/kb/en/library/systemd/
 Main PID: 3473 (mysqld)
   Status: "Taking your SQL requests now..."
    Tasks: 27 (limit: 505)
   CGroup: /system.slice/mariadb.service
           └─3473 /usr/sbin/mysqld
If it’s not running, start it with this command:
sudo systemctl start mariadb
To enable MariaDB to automatically start at system boot time, run
sudo systemctl enable mariadb
Now run the post-installation security script.
sudo mysql_secure_installation
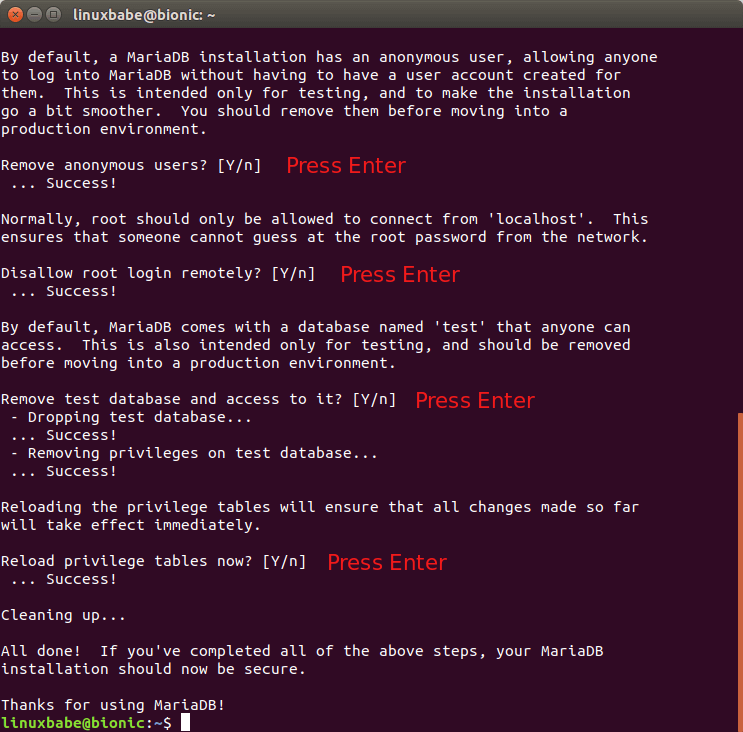
When it asks you to enter the MariaDB root password, press Enter key as the root password isn’t set yet. Then enter y to set the root password for MariaDB server.
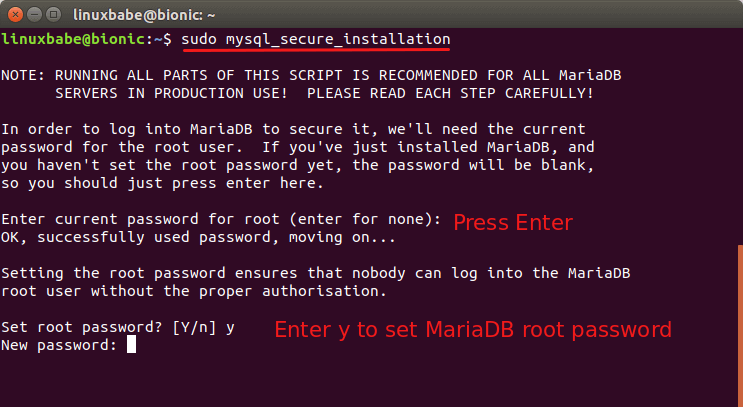
Next, you can press Enter to answer all remaining questions, which will remove anonymous user, disable remote root login and remove test database. This step is a basic requirement for MariaDB database security. (Note that the letter Y is capitalized, which means it’s the default answer.)
mariadb --version
Output:
mariadb Ver 15.1 Distrib 10.1.34-MariaDB, for debian-linux-gnu (x86_64) using readline 5.2
Step 4: Create a Database and User for Ghost
Now we need to log in to the MariaDB console and create a database and user for Ghost.
sudo mariadb -u root
Create a database for Ghost using the following command. I named it ghost, but you can use whatever name you like. (Don’t leave out the semicolon.)
create database ghost;
Then enter the command below to create a database user for Ghost and grant all privileges of the ghost database to the user.
grant all privileges on ghost.* to ghost@localhost identified by 'ghost_password';
Flush the privileges table for the changes to take effect and then log out of the MariaDB console.
flush privileges;

exit;
Step 5: Install Nginx Web Server
Ghost will use Nginx web server, so run the following command to install it from the default Ubuntu repository.
sudo apt install nginx
If you are using the UFW firewall, then you also need to open ports 80 and 443.
sudo ufw allow 80/tcp
sudo ufw allow 443/tcp
Step 6: Create A Record For Your Blog Domain Name
Before installing Ghost, it’s recommended that you create the DNS A record for your blog domain name. The A record points your domain name to the IP address of your Ubuntu server.
Step 7: Install Ghost on Ubuntu Server
Run the following command to install Ghost-CLI.
sudo npm install ghost-cli@latest -g
Then create a directory (/var/www/ghost/) for Ghost.
sudo mkdir -p /var/www/ghost/
Grant permissions to your user account. Replace username with your real username.
sudo apt install acl

sudo setfacl -R -m u:username:rwx /var/www/ghost/

sudo chmod 775 /var/www/ghost
Now change the working directory to /var/www/ghost/ and install Ghost.
cd /var/www/ghost/

ghost install
The installation may take a while. If you are using Ubuntu 22.04 and see the following message, you can ignore it and continue the installation.
System checks failed with message: 'Linux version is not Ubuntu 16, 18, or 20'
Some features of Ghost-CLI may not work without additional configuration.
For local installs we recommend using `ghost install local` instead.

If you use MariaDB instead of MySQL, then it might also tell you that MySQL is not found, you can continue anyway.
During the installation, you will be asked to enter your blog URL. Enter something like https://yourdomain.com. And you will need to enter the MariaDB database name, and user credentials you created in step 4.
? Enter your blog URL: https://yourdomain.com
? Enter your MySQL hostname: localhost
? Enter your MySQL username: ghost
? Enter your MySQL password: ghost_password
? Enter your Ghost database name: ghost
A ghost system user will be automatically created.
- It’s recommended that you accept to set up Nginx and SSL, so your blog will be available via the secure HTTPS protocol.
- Also, accept to set up the Systemd service so you will be able to start, stop or restart Ghost easily.
If you encounter the “Nginx is not installed. Skipping Nginx setup” error, please go to the Troubleshooting section at the end of this article to manually create the Nginx config file for Ghost.
Once Ghost was installed successfully, go to https://yourdomain.com/ghost to complete the setup. First, you need to create an account.

Then you can invite some staff users to your Ghost blog, or you can do it later.
Step 8: Edit the Nginx Config File
By default, the Nginx configuration file for Ghost contains one domain name. If you want Nginx to serve both the www domain and the non-www domain, edit the configuration file.
sudo nano /etc/nginx/sites-enabled/yourdomain.com.conf
Find the following line
server_name yourdomain.com;
Add the www domain.
server_name yourdomain.com www.yourdomain.com;
Save and close the file. Then delete the /etc/nginx/sites-enabled/yourdomain.com-ssl.conf file.
sudo rm /etc/nginx/sites-enabled/yourdomain.com-ssl.conf
Then install the Certbot Let’s Encrypt client
sudo apt install certbot python3-certbot-nginx
Obtain an SSL certificate for both the www domain and the non-www domain.
sudo certbot --nginx --agree-tos --redirect --hsts --staple-ocsp --email [email protected] -d yourdomain.com,www.yourdomain.com
Restart Nginx and you are done.
sudo systemctl restart nginx
Step 9: Set Up Email Notification
In order to send emails from your Ghost blog (for password resetting, inviting staff users, member signup, etc), you need to configure the SMTP settings. There are two options:
- Use an SMTP relay service (easier)
- Set up your own email server (takes more time)
SMTP Relay
If you would like to use an SMTP relay service, follow the tutorial linked below to set up Postfix SMTP relay on Ubuntu server.
Once that’s done, edit the Ghost configuration file.
sudo nano /var/www/ghost/config.production.json
By default the mail settings are as follows:
"mail": {
   "transport": "Direct"
},
Change it to:
  "mail": {
    "transport": "Sendmail",
    "from": "notifications@yourdomain.com"
  },
Save and close the file. Then restart Ghost via the systemd service.
sudo systemctl restart ghost_yourdomain-com.service
Now your Ghost blog should be able to send emails.
Use your own email server
If you would like to use your own email server, please read the following tutorial to easily set up your own email server.
Once you have your own email server, edit the Ghost configuration file.
sudo nano /var/www/ghost/config.production.json
By default the mail settings are as follows:
"mail": {
   "transport": "Direct"
},
Change it to use SMTP.
"mail": {
    "transport": "SMTP",
    "from": "[email protected]",
    "options": {
        "service": "yourdomain.com",
        "host": "mail.yourdomain.com",
        "port": 465,
        "secureConnection": true,
        "auth": {
            "user": "[email protected]",
            "pass": "the_email_account_password"
        }
    }
},
Note that Ghost doesn’t support port 587 for SMTP. Save and close the file. Then restart Ghost via the systemd service.
sudo systemctl restart ghost_yourdomain-com.service
Now your Ghost blog should be able to send emails.
Troubleshooting: How to Manually Set Up Nginx for Ghost
If during the installation you encounter the “Nginx is not installed. Skipping Nginx setup” error, then you need to manually create Nginx config file.
sudo nano /etc/nginx/conf.d/ghost.conf
Add the following lines in this file.
server {
    listen [::]:80;
    listen 80;
    server_name example.com www.example.com;

    root /var/www/ghost/;

    access_log /var/log/nginx/ghost.access.log;
    error_log /var/log/nginx/ghost.error.log;

    location / {
        proxy_set_header X-Real-IP $remote_addr;
        proxy_set_header HOST $http_host;
        proxy_set_header X-NginX-Proxy true;
        proxy_set_header X-Forwarded-Proto $scheme;

        proxy_pass http://127.0.0.1:2368;
        proxy_redirect off;
    }

    # allow Let's Encrypt checks on .well-known without proxying
    location ~ /.well-known {
        allow all;
    }
}
Save and close the file. Then Nginx configurations.
sudo nginx -t
If the test is successful, reload Nginx.
sudo systemctl reload nginx
In order to obtain a valid TLS certificate, we install the Certbot Let’s Encrypt client.
sudo apt install certbot python3-certbot-nginx
Obtain a TLS certificate for both the www domain and the non-www domain.
sudo certbot --nginx --agree-tos --redirect --hsts --staple-ocsp --email [email protected] -d example.com,www.example.com
Restart Nginx and you are done.
sudo systemctl restart nginx
Wrapping Up
That’s it! I hope this tutorial helped you install Ghost blog on Ubuntu server. As always, if you found this post useful, then subscribe to our free newsletter to get more tips and tricks. Take care 🙂


I got the following at the end of the ghost install
Message: ER_ACCESS_DENIED_ERROR: Access denied for user ‘ghost’@’localhost’ (using password: YES)
I used the same password i set earlier on.
Maybe your password contains a special character like # that prevents you from logging in?
yeah, I’m probably making some rookie error like that… Will try again
worked second time round. At the “sudo mysql_secure_installation” I entered my ssh keyphrase at the first “enter current password for root” instead of pressing enter… this seemed to work. ps, I don’t really know why… doing it your may might work, as well… just didn’t seem to work for me last time (might have entered it in incorrectly, or something, I might try again to double check). Cheers for the guide. Also, would you know anything about adding in an R shiny server to the droplet (and having it set to the sub-domain shiny.mydomain.com or mydomain.com/shiny ?) At the moment when I try this i get the ghost 404 page missing error.
sudo setfacl -R -m u:username:rwx /var/www/ghost/
—> sudo: setfacl: command not found
Install the
aclpackage.