Set Up Your Own WireGuard VPN Server on Ubuntu 24.04/22.04
This tutorial is going to show you how to set up your own WireGuard VPN server on Ubuntu. WireGuard is made specifically for the Linux kernel. It runs inside the Linux kernel and allows you to create fast, modern, and secure VPN tunnel.
WireGuard VPN Features
- Lightweight and super fast speed, blowing OpenVPN out of the water.
- Cross-platform. WireGuard can run on Linux, BSD, macOS, Windows, Android, iOS, and OpenWRT.
- User authentication is done by exchanging public keys, similar to SSH keys.
- It assigns static tunnel IP addresses to VPN clients. Some folks may not like it, but it can be very useful in some cases.
- Mobile devices can switch between Wi-Fi and mobile network seamlessly without dropping any connectivity.
- It aims to replace OpenVPN and IPSec in most use cases.
WireGuard is my VPN protocol of choice to eliminate the need to set up TLS encryption for my private networks.
Requirements
To follow this tutorial, you will need a VPS (Virtual Private Server) that can access blocked websites freely (Outside of your country or Internet filtering system). I recommend Kamatera VPS, which features:
- 30 days free trial.
- Starts at $4/month (1GB RAM)
- High-performance KVM-based VPS
- 9 data centers around the world, including United States, Canada, UK, Germany, The Netherlands, Hong Kong, and Isreal.
Follow the tutorial linked below to create your Linux VPS server at Kamatera.
Once you have a VPS running Ubuntu, follow the instructions below.
This tutorial assumes that the VPN server and VPN client are both running Ubuntu operating system.
Step 1: Install WireGuard on Ubuntu Server and Desktop
Log into your Ubuntu server, then run the following commands to install WireGuard.
Ubuntu 24.04/22.04/20.04
Ubuntu 24.04/22.04/20.04 ships with a Linux kernel that has a built-in wireguard module, so simply run the following commands.
sudo apt update
sudo apt install wireguard wireguard-tools
Ubuntu 18.04
Ubuntu 18.04 ships with Linux kernel 4.15, so users need to install the hardware-enablement kernel first (HWE), which will install kernel 5.4 on your system.
sudo apt update
sudo apt install linux-generic-hwe-18.04-edge
Restart your Ubuntu 18.04 server and install WireGuard.
sudo shutdown -r now
sudo apt install wireguard wireguard-tools wireguard-dkms
Install WireGuard on the Client Side
Then use the same commands to install WireGuard on your local Ubuntu computer (the VPN client). Note that you also need to install the openresolv package on the client to configure DNS server.
sudo apt install openresolv
Step 2: Generate Public/Private Keypair
Server
Run the following command on the Ubuntu server to create a public/private key pair, which will be saved under /etc/wireguard/ directory.
wg genkey | sudo tee /etc/wireguard/server_private.key | wg pubkey | sudo tee /etc/wireguard/server_public.key


Client
Run the following command to create a public/private key pair on the local Ubuntu computer (the VPN client).
wg genkey | sudo tee /etc/wireguard/client_private.key | wg pubkey | sudo tee /etc/wireguard/client_public.key
Step 3: Create WireGuard Configuration File
Server
Use a command-line text editor like Nano to create a WireGuard configuration file on the Ubuntu server. wg0 will be the network interface name.
sudo nano /etc/wireguard/wg0.conf
Copy the following text and paste it to your configuration file. You need to use your own server private key and client public key.
[Interface]
Address = 10.10.10.1/24
ListenPort = 51820
PrivateKey = cD+ZjXiVIX+0iSX1PNijl4a+88lCbDgw7kO78oXXLEc=

[Peer]
PublicKey = AYQJf6HbkQ0X0Xyt+cTMTuJe3RFwbuCMF46LKgTwzz4=
AllowedIPs = 10.10.10.2/32

Where:
- Address: Specify the private IP address of the VPN server. Here I’m using the 10.10.10.0/24 network range, so it won’t conflict with your home network range. (Most home routers use 192.168.0.0/24 or 192.168.1.0/24). 10.10.10.1 is the private IP address for the VPN server.
- PrivateKey: The private key of VPN server, which can be found in the
/etc/wireguard/server_private.keyfile on the server. - ListenPort: WireGuard VPN server will be listening on UDP port 51820, which is the default.
- PublicKey: The public key of VPN client, which can be found in the
/etc/wireguard/client_public.keyfile on the client computer. - AllowedIPs: IP addresses the VPN client is allowed to use. In this example, the client can only use the 10.10.10.2 IP address inside the VPN tunnel.
Save and close the file. (To save a file in Nano text editor, press Ctrl+O, then press Enter to confirm. Press Ctrl+X to exit.)
Change the file permission mode so that only root user can read the files.
sudo chmod 600 /etc/wireguard/ -R
Client
Use a command-line text editor like Nano to create a WireGuard configuration file on your local Ubuntu computer. wg-client0 will be the network interface name.
sudo nano /etc/wireguard/wg-client0.conf
Copy the following text and paste it to your configuration file. You need to use your own client private key and server public key.
[Interface]
Address = 10.10.10.2/24
DNS = 10.10.10.1
PrivateKey = cOFA+x5UvHF+a3xJ6enLatG+DoE3I5PhMgKrMKkUyXI=

[Peer]
PublicKey = RaoAdsIEIwgV9DHNSubxWVG+nZ1GP/c3OU6A/efBJ0I=
AllowedIPs = 0.0.0.0/0
Endpoint = 12.34.56.78:51820
PersistentKeepalive = 25
Where:
- Address: Specify the private IP address of the VPN client.
- DNS: specify 10.10.10.1 (VPN server) as the DNS server. It will be configured via the
resolvconfcommand. You can also specify multiple DNS servers for redundancy like this:DNS = 10.10.10.1 8.8.8.8 - PrivateKey: The client’s private key, which can be found in the
/etc/wireguard/client_private.keyfile on the client computer. - PublicKey: The server’s public key, which can be found in the
/etc/wireguard/server_public.keyfile on the server. - AllowedIPs: 0.0.0.0/0 represents the whole Internet, which means all traffic to the Internet should be routed via the VPN.
- Endpoint: The public IP address and port number of VPN server. Replace 12.34.56.78 with your server’s real public IP address.
- PersistentKeepalive: Send an authenticated empty packet to the peer every 25 seconds to keep the connection alive. If PersistentKeepalive isn’t enabled, the VPN server might not be able to ping the VPN client.
Save and close the file.
Change the file mode so that only root user can read the files.
sudo chmod 600 /etc/wireguard/ -R
Step 4: Enable IP Forwarding on the Server
In order for the VPN server to route packets between VPN clients and the Internet, we need to enable IP forwarding. Edit sysctl.conf file.
sudo nano /etc/sysctl.conf
Add the following line at the end of this file.
net.ipv4.ip_forward = 1
Save and close the file. Then apply the changes with the below command. The -p option will load sysctl settings from /etc/sysctl.conf file. This command will preserve our changes across system reboots.
sudo sysctl -p
Step 5: Configure IP Masquerading on the Server
We need to set up IP masquerading in the server firewall, so that the server becomes a virtual router for VPN clients. I will use UFW, which is a front end to the iptables firewall. Install UFW on Ubuntu with:
sudo apt install ufw
First, you need to allow SSH traffic.
sudo ufw allow 22/tcp
Next, find the name of your server’s main network interface.
ip -c a
As you can see, it’s named enp3s0 on my Ubuntu server.

To configure IP masquerading, we have to add iptables command in a UFW configuration file.
sudo nano /etc/ufw/before.rules
By default, there are some rules for the filter table. Add the following lines at the end of this file. Replace enp3s0 with your own network interface name.
# NAT table rules
*nat
:POSTROUTING ACCEPT [0:0]
-A POSTROUTING -s 10.10.10.0/24 -o enp3s0 -j MASQUERADE

# End each table with the 'COMMIT' line or these rules won't be processed
COMMIT
In Nano text editor, you can go to the end of the file by pressing Ctrl+W, then pressing Ctrl+V.

The above lines will append (-A) a rule to the end of POSTROUTING chain of the nat table. It will link your virtual private network with the Internet. And also hide your network from the outside world. So the Internet can only see your VPN server’s IP, but can’t see your VPN client’s IP, just like your home router hides your private home network.
Make sure there are no spaces at the beginning of each line.
By default, UFW forbids packet forwarding. We can allow forwarding for our private network. Find the ufw-before-forward chain in this file and add the following 3 lines, which will accept packet forwarding if the source IP or destination IP is in the 10.10.10.0/24 range.
# allow forwarding for trusted network
-A ufw-before-forward -s 10.10.10.0/24 -j ACCEPT
-A ufw-before-forward -d 10.10.10.0/24 -j ACCEPT

Save and close the file. Then enable UFW.
sudo ufw enable
If you have enabled UFW before, then you can use systemctl to restart UFW.
sudo systemctl restart ufw
Now if you list the rules in the POSTROUTING chain of the NAT table by using the following command:
sudo iptables -t nat -L POSTROUTING
You can see the Masquerade rule.

It can take some time for UFW to process the firewall rules. If the masquerade rule doesn’t show up, then restart UFW again (sudo systemctl restart ufw).
Step 6: Install a DNS Resolver on the Server
Since we specify the VPN server as the DNS server for client, we need to run a DNS resolver on the VPN server. We can install the bind9 DNS server.
sudo apt install bind9
Once it’s installed, BIND will automatically start. You can check its status with:
systemctl status bind9
Sample output:
● named.service - BIND Domain Name Server
     Loaded: loaded (/lib/systemd/system/named.service; enabled; vendor preset: enabled)
     Active: active (running) since Sun 2020-05-17 08:11:26 UTC; 37s ago
       Docs: man:named(8)
   Main PID: 13820 (named)
      Tasks: 5 (limit: 1074)
     Memory: 14.3M
     CGroup: /system.slice/named.service
             └─13820 /usr/sbin/named -f -u bind
If it’s not running, start it with:
sudo systemctl start bind9
Edit the BIND DNS server’s configuration file.
sudo nano /etc/bind/named.conf.options
Add the following line to allow VPN clients to send recursive DNS queries.
allow-recursion { 127.0.0.1; 10.10.10.0/24; };

Save and close the file. Then edit the /etc/default/named files.
sudo nano /etc/default/named
Add -4 to the OPTIONS to ensure BIND can query root DNS servers.
OPTIONS="-u bind -4"
Save and close the file.
By default, BIND enables DNSSEC, which ensures that DNS responses are correct and not tampered with. However, it might not work out of the box due to trust anchor rollover and other reasons. To make it work properly, we can rebuild the managed key database with the following commands.
sudo rndc managed-keys destroy
sudo rndc reconfig
Restart BIND9 for the changes to take effect.
sudo systemctl restart bind9
Then you need to run the following command to allow VPN clients to connect to port 53.
sudo ufw insert 1 allow in from 10.10.10.0/24
Step 7: Open WireGuard Port in Firewall
Run the following command to open UDP port 51820 on the server.
sudo ufw allow 51820/udp
Step 8: Start WireGuard
server
Run the following command on the server to start WireGuard.
sudo systemctl start [email protected]
Enable auto-start at system boot time.
sudo systemctl enable [email protected]
Check its status with the following command. Its status should be active (exited).
systemctl status [email protected]
Now WireGuard server is ready to accept client connections.
Client
Start WireGuard.
sudo systemctl start [email protected]
Enable auto-start at system boot time.
sudo systemctl enable [email protected]
Check its status:
systemctl status [email protected]
Now go to this website: https://icanhazip.com/ to check your public IP address. If everything went well, it should display your VPN server’s public IP address instead of your client computer’s public IP address.
You can also run the following command to get the current public IP address.
curl https://icanhazip.com
Troubleshooting Tips
Check if Port 51820 is open
First of all, install the nmap port scanner on the VPN client.
sudo apt install nmap
And scan the UDP port 51820 of the server. Replace 12.34.56.78 with your server’s real public IP address.
sudo nmap -sU -pU:51820 12.34.56.78
If WireGuard server is running, the port scan result should be open or open|filtered.

If the scan result is closed, then WireGuard server is not running, or you didn’t open UDP port 51820 in the firewall.

Check the log of the WireGuard server to find if there’s any wrong.
sudo journalctl -eu wg-quick@wg0
Can’t ping
You can ping from the VPN client to VPN server (ping 10.10.10.1) to see if the tunnel works. If you see the following error message in the ping,
ping: sendmsg: Required key not available
it might be that the AllowedIPs parameter is wrong, like a typo. After fixing the typo, restart both the VPN server and VPN client.
Another reason might be that you forgot to add ListenPort = 51820 in the server config file.
Public IP Doesn’t Change
If the VPN tunnel is successfully established, but the client public IP address doesn’t change, that’s because the masquerading or forwarding rule in your UFW config file is not working. I once had a typo in the /etc/ufw/before.rules file, which caused my computer not to be able to browse the Internet.
Note that I don’t recommend using SaveConfig=true in the [Interface] section of the WireGuard configuration file. SaveConfig tells WireGuard to save the runtime configuration on shutdown. So if you add additional [Peer] in the configuration file and then restart WireGuard, your newly-added configs will be overwritten.
Enable Debug logging in Linux Kernel
If you use Linux kernel 5.6+, you can enable debug logging for WireGuard with the following command.
sudo su -
echo module wireguard +p > /sys/kernel/debug/dynamic_debug/control
Then you can view the debug logs with
sudo dmesg -wH | grep wireguard
or
sudo journalctl -kf | grep wireguard
If you see the following error, it means the public key is wrong.
Invalid handshake initiation
Restart
If your VPN still doesn’t work, try restarting the VPN server.
sudo systemctl restart [email protected]
Then stop the VPN client.
sudo systemctl stop [email protected]
And upgrade software packages on the VPN client.
sudo apt update; sudo apt upgrade
Next, reboot the VPN client.
sudo shutdown -r now

sudo systemctl start [email protected]
If your WireGuard VPN can only work after a restart, consider adding a cron job to automatically restart the service.
sudo crontab -e
Add the following line in this file.
@daily systemctl restart [email protected]
Speed Comparison between WireGuard & OpenConnect
On one of my VPS servers, I installed both WireGuard and OpenConnect VPN server. The speed test is as follows. It might not look fast to you, because the connection between my computer and the VPN server isn’t very good. How fast you can get depends on the latency and packet loss rate between the VPN client and VPN server.
- WireGuard is the winner. It’s nearly 3 times faster than OpenConnect.
- OpenConnect over TCP BBR is faster than OpenConnect over UDP. Surprise? Folks often say UDP is faster than TCP.
WireGuard is able to reach 52296 Kbps (about 51 Mbit/s) when playing YouTube videos.

OpenConnect (TLS with TCP BBR algorithm) is able to reach 16504 Kbps (about 16 Mbit/s) when playing YouTube videos.

OpenConnect (TLS on UDP) is able to reach 12997 Kbps (about 12.7 Mbit/s) when playing YouTube videos.

Adding Additional VPN Clients
WireGuard is designed to associate one IP address with one VPN client. To add more VPN clients (Windows, Android, iOS, etc), you need to create a unique private/public key pair for each client, then add each VPN client’s public key in the server’s config file (/etc/wireguard/wg0.conf) like this:
[Interface]
Address = 10.10.10.1/24
PrivateKey = UIFH+XXjJ0g0uAZJ6vPqsbb/o68SYVQdmYJpy/FlGFA=
ListenPort = 51820

[Peer]
PublicKey = 75VNV7HqFh+3QIT5OHZkcjWfbjx8tc6Ck62gZJT/KRA=
AllowedIPs = 10.10.10.2/32

[Peer]
PublicKey = YYh4/1Z/3rtl0i7cJorcinB7T4UOIzScifPNEIESFD8=
AllowedIPs = 10.10.10.3/32

[Peer]
PublicKey = EVstHZc6QamzPgefDGPLFEjGyedJk6SZbCJttpzcvC8=
AllowedIPs = 10.10.10.4/32
Each VPN client will have a static private IP address (10.10.10.2, 10.10.10.3, 10.10.10.4, etc). Restart the WireGuard server for the changes to take effect.
sudo systemctl restart [email protected]
Then add WireGuard configuration on each VPN client as usual.
Configure VPN Client on iOS/Andorid
Since I have an iPhone, I will show you how to configure WireGuard client on iOS. Install the WireGuard app from the App store. Then open this app and click the Add a tunnel button.
You have 3 methods to create a new WireGuard tunnel.
- create from file or archive
- create from QR code
- Create from scratch
Choose the QR code method, since it’s easier. Run the following command on the server to generate a WireGuard public/private key for the iOS client.
wg genkey | sudo tee /etc/wireguard/ios_private.key | wg pubkey | sudo tee /etc/wireguard/ios_public.key
Next, create a WireGuard config file for the iOS client.
sudo nano /etc/wireguard/ios.conf
Add the following lines.
[Interface]
Address = 10.10.10.3/24
DNS = 10.10.10.1
PrivateKey = mNiZvB+sASN/+ZiJkMyan1ZZOzCXkrjYPlbg7rZJ7Fc=

[Peer]
#VPN server
PublicKey = OMaXX7XD+wEYWfYyFcZZBN4vFSC16A1e8t80ONiJKWY=
AllowedIPs = 0.0.0.0/0
Endpoint = 12.34.56.78:51820
PersistentKeepalive = 25
Where:
- Address: Specify the private IP address for the iOS client.
- DNS: specify 10.10.10.1 (the VPN server) as the DNS server. You can also specify multiple DNS servers for redundancy like this:
DNS = 10.10.10.1,8.8.8.8. Note that the iOS app doesn’t support theDNS = 10.10.10.1 8.8.8.8syntax. - PrivateKey: The iOS client’s private key, which can be found in the
/etc/wireguard/ios_private.keyfile. - PublicKey: The server’s public key, which can be found in the
/etc/wireguard/server_public.keyfile on the server. - AllowedIPs: 0.0.0.0/0 represents the whole Internet, which means all traffic to the Internet should be routed via the VPN.
- Endpoint: The public IP address and port number of VPN server. Replace 12.34.56.78 with your server’s real public IP address.
- PersistentKeepalive: Send an authenticated empty packet to the peer every 25 seconds to keep the connection alive. If PersistentKeepalive isn’t enabled, the VPN server might not be able to ping the VPN client.
Save and close the file. Then run the following command on the WireGuard VPN server to generate a QR code from the iOS config file.
sudo apt install qrencode

sudo cat /etc/wireguard/ios.conf | qrencode -t ansiutf8
Next, scan a QR code from the iOS WireGuard app, so the content in the /etc/wireguard/ios.conf file will be imported to the WireGuard iOS client.
Once the tunnel is added on the iOS client, we also need to add a [peer] in the WireGaurd server config file.
sudo nano /etc/wireguard/wg0.conf
Like this:
[Interface]
Address = 10.10.10.1/24
PrivateKey = UIFH+XXjJ0g0uAZJ6vPqsbb/o68SYVQdmYJpy/FlGFA=
ListenPort = 51820

[Peer]
PublicKey = 75VNV7HqFh+3QIT5OHZkcjWfbjx8tc6Ck62gZJT/KRA=
AllowedIPs = 10.10.10.2/32

[Peer]
# iOS client
PublicKey = YYh4/1Z/3rtl0i7cJorcinB7T4UOIzScifPNEIESFD8=
AllowedIPs = 10.10.10.3/32
Save and close the file. Then restart the WireGuard VPN server.
sudo systemctl restart [email protected]
Now you can establish WireGuard VPN connection from the iOS app.
Configure Windows Client
Download the WireGuard installer for Windows.
Once it’s installed, start the WireGuard program. You need to right-click on the left sidebar to create a new empty tunnel. It will automatically create a public/private key for the Windows client.

Now you need to add other information.
[Interface]
PrivateKey = mNiZvB+sASN/+ZiJkMyan1ZZOzCXkrjYPlbg7rZJ7Fc=
Address = 10.10.10.4/24
DNS = 10.10.10.1

[Peer]
# VPN server
PublicKey = OMaXX7XD+wEYWfYyFcZZBN4vFSC16A1e8t80ONiJKWY=
AllowedIPs = 0.0.0.0/0
Endpoint = 12.34.56.78:51820
PersistentKeepalive = 25
Where:
- Address: Specify the private IP address for the Windows client.
- DNS: specify 10.10.10.1 (the VPN server) as the DNS server. You can also specify multiple DNS servers for redundancy like this:
DNS = 10.10.10.1,8.8.8.8. Note that the Windows app doesn’t support theDNS = 10.10.10.1 8.8.8.8syntax. - PrivateKey: The Windows client’s private key, which is automatically created.
- PublicKey: The server’s public key, which can be found in the
/etc/wireguard/server_public.keyfile on the server. - AllowedIPs: 0.0.0.0/0 represents the whole Internet, which means all traffic to the Internet should be routed via the VPN.
- Endpoint: The public IP address and port number of VPN server. Replace 12.34.56.78 with your server’s real public IP address.
- PersistentKeepalive: Send an authenticated empty packet to the peer every 25 seconds to keep the connection alive. If PersistentKeepalive isn’t enabled, the VPN server might not be able to ping the VPN client.
Hint: On Windows, you can use the PowerShell program to SSH into your Linux server.

Save the configuration.
Once the tunnel is added on the Windows client, we also need to add a [peer] in the WireGaurd server config file.
sudo nano /etc/wireguard/wg0.conf
Like this:
[Interface]
Address = 10.10.10.1/24
PrivateKey = UIFH+XXjJ0g0uAZJ6vPqsbb/o68SYVQdmYJpy/FlGFA=
ListenPort = 51820

[Peer]
PublicKey = 75VNV7HqFh+3QIT5OHZkcjWfbjx8tc6Ck62gZJT/KRA=
AllowedIPs = 10.10.10.2/32

[Peer]
# iOS client
PublicKey = YYh4/1Z/3rtl0i7cJorcinB7T4UOIzScifPNEIESFD8=
AllowedIPs = 10.10.10.3/32

[Peer]
# Windows client
PublicKey = wJpwC/gCWXZTGa5lQReKowRvymaaEUav0N1qeK74HlQ=
AllowedIPs = 10.10.10.4/32
Save and close the file. Then restart the WireGuard VPN server.
sudo systemctl restart [email protected]
Now you can establish WireGuard VPN connection on Windows.
Automatic-Restart When VPN Connection Drops
Sometimes the VPN connection would drop due to various reasons. You can run the following command to check if the VPN client can ping the VPN server’s private IP address (10.10.10.1). If the ping is unsuccessful, then the command on the right will be executed to restart the VPN client. || is the OR operator in Bash. It executes the command on the right only if the command on the left returned an error.
ping -c9 10.10.10.1 > /dev/null || systemctl restart [email protected]
The ping will be done 9 times, i.e 9 seconds. You can use a for loop in the Bash shell to make the whole command run 6 times, i.e. 54 seconds.
for ((i=1; i<=6; i++)) do (ping -c9 10.10.10.1 > /dev/null || systemctl restart [email protected]) done
Now we can create a Cron job to automate this task. Edit the root user’s crontab file on the VPN client.
sudo crontab -e
Bash isn’t the default shell in Cron. You can add the following line at the beginning of the Crontab file to make it the default.
SHELL=/bin/bash
Then add the following line at the end of this file.
* * * * * for ((i=1; i<=6; i++)) do (ping -c9 10.10.10.1 > /dev/null || systemctl restart [email protected]) done
This Cron job will run every minute, and there will be 6 checks every minute. Save and close the file.
How to Enable IPv6 in WireGuard VPN
Edit the WireGuard server config file.
sudo nano /etc/wireguard/wg0.conf
Add private IPv6 address along with the IPv4 address.
[Interface]
Address = 10.10.10.1/24, fda9:4efe:7e3b:03ea::1/64
ListenPort = 51820
PrivateKey = cD+ZjXiVIX+0iSX1PNijl4a+88lCbDgw7kO78oXXLEc=

[Peer]
PublicKey = AYQJf6HbkQ0X0Xyt+cTMTuJe3RFwbuCMF46LKgTwzz4=
AllowedIPs = 10.10.10.2/32, fda9:4efe:7e3b:03ea::2/64
Save and close the file. Restart WireGuard server.
sudo systemctl restart wg-quick@wg0
Then edit the WireGuard client config file.
sudo nano /etc/wireguard/wg-client0.conf
Add private IPv6 address along with the IPv4 address.
[Interface]
Address = 10.10.10.2/24, fda9:4efe:7e3b:03ea::2/64
DNS = 10.10.10.1
PrivateKey = cOFA+x5UvHF+a3xJ6enLatG+DoE3I5PhMgKrMKkUyXI=

[Peer]
PublicKey = RaoAdsIEIwgV9DHNSubxWVG+nZ1GP/c3OU6A/efBJ0I=
AllowedIPs = 0.0.0.0/0, ::0/0
Endpoint = 12.34.56.78:51820
PersistentKeepalive = 25
Save and close the file. Then restart WireGuard client.
sudo systemctl restart wg-quick@wg-client0
If you encounter the following error,
RTNETLINK answers permission denied
Then you need to enable IPv6 on the client.
sudo nano /etc/sysctl.d/60-custom.conf
Add the following lines.
net.ipv6.conf.all.disable_ipv6 = 0
net.ipv6.conf.default.disable_ipv6 = 0
net.ipv6.conf.lo.disable_ipv6 = 0
Save and close the file. Then apply the changes.
sudo sysctl -p /etc/sysctl.d/60-custom.conf
Enable IPv6 Forwarding on the VPN server
Then we need to enable IP forwarding for IPv6 on the VPN server. Edit sysctl.conf file.
sudo nano /etc/sysctl.d/60-custom.conf
Add the following line in this file.
net.ipv6.conf.all.forwarding=1
Save and close the file. Then apply the changes with the below command.
sudo sysctl -p /etc/sysctl.d/60-custom.conf
Configure IPv6 Masquerading on the Server
Next, we need to set up IPv6 masquerading in the server firewall, so that the server becomes a virtual router for VPN clients.
sudo nano /etc/ufw/before6.rules
By default, there are some rules for the filter table. Add the following lines at the end of this file. Replace ens3 with your own network interface name.
# NAT table rules
*nat
:POSTROUTING ACCEPT [0:0]
-A POSTROUTING -s fda9:4efe:7e3b:03ea::/64 -o ens3 -j MASQUERADE

# End each table with the 'COMMIT' line or these rules won't be processed
COMMIT
In Nano text editor, you can go to the end of the file by pressing Ctrl+W, then pressing Ctrl+V.
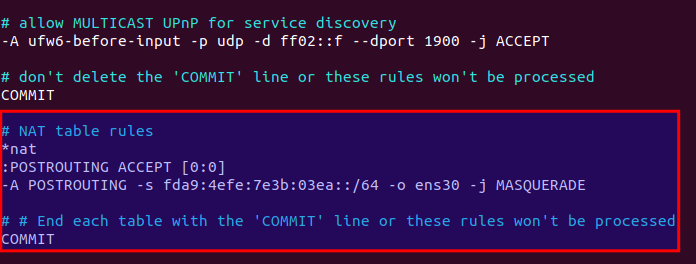
By default, UFW forbids packet forwarding. We can allow forwarding for our private IPv6 network. Find the ufw6-before-forward chain in this file and add the following 3 lines, which will accept packet forwarding if the source IP or destination IP is in the fda9:4efe:7e3b:03ea::/64 range.
# Allow IPv6 forwarding for VPN
-A ufw6-before-forward -s fda9:4efe:7e3b:03ea::/64 -j ACCEPT
-A ufw6-before-forward -d fda9:4efe:7e3b:03ea::/64 -j ACCEPT

Save and close the file. Restart UFW for the change to take effect.
sudo systemctl restart ufw
Now if you list the rules in the POSTROUTING chain of the NAT table by using the following command:
sudo ip6tables -t nat -L POSTROUTING
You can see the Masquerade rule.

Advanced Usage
Now I will show you how to use policy routing, split tunneling, and VPN kill switch with WireGuard VPN. Note that it’s not recommended to use them in conjunction with each other. If you use policy routing, then you should not enable split tunneling or VPN kill switch, and vice versa. This section is for advanced users. If you are a WireGuard beginner and don’t know what they are used for, then don’t apply the instructions in this section.
Policy Routing
By default, all traffic on the VPN client will be routed through the VPN server. Sometimes you may want to route only a specific type of traffic, based on the transport layer protocol and the destination port. This is known as policy routing.
Policy routing is configured on the client computer, and we need to stop the VPN connection first.
sudo systemctl stop [email protected]
Then edit the client configuration file.
sudo nano /etc/wireguard/wg-client0.conf
For example, if you add the following 3 lines in the [interface] section, then WireGuard will create a routing table named “1234” and add the ip rule into the routing table. In this example, traffic will be routed through VPN server only when TCP is used as the transport layer protocol and the destination port is 25, i.e, when the client computer sends emails.
Table = 1234
PostUp = ip rule add ipproto tcp dport 25 table 1234
PreDown = ip rule delete ipproto tcp dport 25 table 1234

Note: The client should be running Ubuntu 20.04 or up in order to configure policy routing. The ip utility on Ubuntu 18.04 doesn’t support the ipproto and dport argument.
Save and close the file. Then start the WireGuard client.
sudo systemctl start [email protected]
If you want to route traffic for TCP port 80 and 443, use the following syntax.
Table = 1234
PostUp = ip rule add ipproto tcp dport 80 table 1234; ip rule add ipproto tcp dport 443 table 1234
PreDown = ip rule delete ipproto tcp dport 80 table 1234; ip rule delete ipproto tcp dport 443 table 1234
Remember that you should stop the WireGuard VPN connection before changing policy routing rules.
You can also specify a port range like below (TCP port 26 to TCP port 10240).
Table = 1234
PostUp = ip rule add ipproto tcp dport 26-10240 table 1234
PreDown = ip rule delete ipproto tcp dport 26-10240 table 1234
If you want to specify both TCP and UDP ports, then remove ipproto tcp.
Table = 1234
PostUp = ip rule add dport 26-10240 table 1234
PreDown = ip rule delete dport 26-10240 table 1234
You might want to configure the VPN client to use the VPN tunnel only when the traffic is destined to certain IP addresses. You can do so with the to option.
Table = 1234
PostUp = ip rule add to 10.0.0.0/24 table 1234
PreDown = ip rule delete to 10.0.0.0/24 table 1234
Split Tunneling
By default, all traffic on the VPN client will be routed through the VPN server. Here’s how to enable split tunneling, so only traffic to the 10.10.10.0/24 IP range will be tunneled through WireGuard VPN. This is useful when you want to build a private network for several cloud servers, because VPN clients will run on cloud servers and if you use a full VPN tunnel, then you will probably lose connection to the cloud servers.
Edit the client configuration file.
sudo nano /etc/wireguard/wg-client0.conf
Change
AllowedIPs = 0.0.0.0/0
To
AllowedIPs = 10.10.10.0/24
So traffic will be routed through VPN only when the destination address is in the 10.10.10.0/24 IP range. Save and close the file. Then restart WireGuard client.
sudo systemctl restart [email protected]
You can also allow multiple IP ranges. Let’s say the VPN server also manages the 10.10.20.0/24 network, then you can configure AllowedIPs on the VPN client like this:
AllowedIPs = 10.10.10.0/24, 10.10.20.0/24
So the VPN client can reach the 10.10.20.0/24 network via the VPN server, and vice versa.
To add a single IP address, use the following syntax.
AllowedIPs = 10.10.10.0/24, 10.10.20.0/24, 8.8.8.8/32
This tells the client to use the VPN server when communicating with 8.8.8.8.
VPN Kill Switch
By default, your computer can access the Internet via the normal gateway when the VPN connection is disrupted. You may want to enable the kill switch feature, which prevents the flow of unencrypted packets through non-WireGuard interfaces.
Stop the WireGuard client process.
sudo systemctl stop [email protected]
Edit the client configuration file.
sudo nano /etc/wireguard/wg-client0.conf
Add the following two lines in the [interface] section.
PostUp = iptables -I OUTPUT ! -o %i -m mark ! --mark $(wg show %i fwmark) -m addrtype ! --dst-type LOCAL -j REJECT
PreDown = iptables -D OUTPUT ! -o %i -m mark ! --mark $(wg show %i fwmark) -m addrtype ! --dst-type LOCAL -j REJECT
Like this:
[Interface]
Address = 10.10.10.2/24
DNS = 10.10.10.1
PrivateKey = cOFA+x5UvHF+a3xJ6enLatG+DoE3I5PhMgKrMKkUyXI=
PostUp = iptables -I OUTPUT ! -o %i -m mark ! --mark $(wg show %i fwmark) -m addrtype ! --dst-type LOCAL -j REJECT
PreDown = iptables -D OUTPUT ! -o %i -m mark ! --mark $(wg show %i fwmark) -m addrtype ! --dst-type LOCAL -j REJECT

[Peer]
PublicKey = RaoAdsIEIwgV9DHNSubxWVG+nZ1GP/c3OU6A/efBJ0I=
AllowedIPs = 0.0.0.0/0
Endpoint = 12.34.56.78:51820
PersistentKeepalive = 25
Save and close the file. Then start the WireGuard client.
sudo systemctl start [email protected]
Multiple Addresses in WireGuard Interface
If you are a long-time Ubuntu desktop user, you probably know that you can use the Network Manager to obtain multiple IP addresses from your home router for the Ethernet interface. A WireGuard interface can also have multiple IP addresses. For example, you can have two IP addresses on the VPN client.
[Interface]
Address = 10.10.10.2/24
Address = 10.10.10.3/24
....
In this case, you need to allow multiple IP addresses on the VPN server for this particular client, or the VPN client might not be able to connect to the VPN server.
[Peer]
...
AllowedIPs = 10.10.10.2/32, 10.10.10.3/32
You can use the following command to check the IP addresses belonging to a network interface.
ip -c a
Note
- The
ifconfigcommand can show only IP address for a network interface. - If you set up another WireGuard interface in a new
.conffile, then it needs to bind to a port other than 51820, or you will see the ” Address already in use” error.
Wrapping Up
That’s it! I hope this tutorial helped you install and configure WireGuard on Ubuntu. As always, if you found this post useful, then subscribe to our free newsletter to get more tips and tricks 🙂


What if the server uses a dynamic public IP? I would like to build this in my home server but don’t have a static public IP from my isp.
You need a domain name and a dynamic DNS service (such as no-ip.com) to translate the domain name into an IP address. Then in the client configuration file, use your domain name instead of an IP address.
You also need to configure port forwarding (UDP 51820) in your router.
I’m having a problem with the WireGuard client. When I try to restart it after setting up the VPN Kill Switch, I get an error message. Systemctl status [email protected] tells me there’s a bad integer value for option “–mark”. Is there something I’ve missed?
Comment out the PostUp and PreDown lines in the client configuration file. Then stop the WireGuard client process.
Edit the client configuration file.
Uncomment the PostUp and PreDown lines. Save and close the file. Then start the WireGuard client.
Umm, which PostUp and PreDown lines? There are two each. Here’s the file:
Am I trying to do too much?
Yes, I don’t think policy routing and VPN kill switch should be used together. With policy routing, there is traffic that will need to use the usual Internet connection. However, VPN kill switch is meant to stop the flow of the normal Internet traffic.
Okay, I deleted the Policy Routing lines and restarted Wireguard Client unsuccessfully. Here’s the output:
I wonder about the “bad integer value” that I see. I’ve obviously done something terribly wrong. What can I do to help figure this out?
What’s your output of
sudo wg show wg-client0 fwmark? Mine isoffI get
I must’ve missed something in the article, but I can’t tell what.
Many thanks for useful tutorials!
I just configured Wireguard server/client, but on the client I only can communicate to the server and cannot use/browse the internet as usual. I added the ‘Policy Routing’ to the client but I cannot start Wireguard.
Error:
Is the client running Ubuntu 18.04? I just found that the ip utility on Ubuntu 18.04 doesn’t support the ipproto argument.
On Ubuntu 20.04, I can find the ipproto argument when checking the man page:
man ip-rule. It can’t be found on Ubuntu 18.04.Yes I’m using Ubuntu 18.04. I don’t think I need Policy Routing now, I just gave it a try.
But I was able to completely install Wireguard and now I’m using it.
Thank you for the very comprehensive tutorial!
From my client ip, 192.168.0.17, I should be able to ping or telnet into server ip, 192.168.0.16, Right? But I cannot
My bad, use the same ip as my internal lan, rather a separated tunnel.
Hi Xiao Guoan,
Great turorial, precise, clear and easy to follow.
I still have a couple of questions:
1- about DNS: is there a way, in WireGuard server configuration, NOT to alter Client’s DNS like we can do in OpenVPN? I use Stubby for encrypted DNS (I followed your tutoral for that) and I surely do NOT want to use the ones on my Server side.
2- is there a way to ‘see’ that Wireguard is in use (like you can see when you use OpenVPN a little ‘lock’)?
Thanks in advance,
If you don’t want to use the server-side DNS resolver, edit the WireGuard client configuariton file.
Remove the following line from the file.
Save and close the file. Then restart WireGuard client.
Actually, using 10.10.10.1 as DNS resolver will also encrypt your DNS queries. I don’t think you need to stick with Stubby.
When the VPN client is running in command line mode, there’s no way to indicate that you are using VPN on your desktop environment. The only way to know is to check your current public IP address.
Thanks for your answers.
It seems clear if I don’t use the DNS line in the client conf, it does mean then WireGuard on the Server side will use the DNS from my client, right?
Besides, I keep Stubby for my OpenVPN connection
No. The server will use its own DNS resolver.
i want to connect to vpn server with wiregaurd app on windows
i downloaded it and i gave it the “wg-client0.conf” file. this is the error that app gave me:
2020-07-31 02:32:23.616721: [MGR] Starting WireGuard/0.1.1 (Windows 10.0.18363; amd64)
2020-07-31 02:32:23.622721: [MGR] Starting UI process for user ‘Vahid@DESKTOP-8BTKEQO’ for session 1
2020-07-31 03:28:37.195610: [MGR] Exited UI process for user ‘Vahid@DESKTOP-8BTKEQO’ for session 1 with status 0
2020-07-31 16:01:46.511021: [MGR] Starting WireGuard/0.1.1 (Windows 10.0.18363; amd64)
2020-07-31 16:01:46.520022: [MGR] Starting UI process for user ‘Vahid@DESKTOP-8BTKEQO’ for session 1
2020-07-31 16:02:03.899022: [TUN] [wg-client0] Starting WireGuard/0.1.1 (Windows 10.0.18363; amd64)
2020-07-31 16:02:03.900022: [TUN] [wg-client0] Watching network interfaces
2020-07-31 16:02:03.902023: [TUN] [wg-client0] Resolving DNS names
2020-07-31 16:02:03.910023: [TUN] [wg-client0] Unable to resolve one or more DNS hostname endpoints: No such host is known.
2020-07-31 16:02:03.932020: [TUN] [wg-client0] Shutting down
2020-07-31 16:07:04.281539: [MGR] [wg-client0] Tunnel service tracker finished
2020-07-31 16:07:10.150539: [TUN] [wg-client0] Starting WireGuard/0.1.1 (Windows 10.0.18363; amd64)
2020-07-31 16:07:10.151538: [TUN] [wg-client0] Watching network interfaces
2020-07-31 16:07:10.153538: [TUN] [wg-client0] Resolving DNS names
2020-07-31 16:07:10.163538: [TUN] [wg-client0] Unable to resolve one or more DNS hostname endpoints: No such host is known.
2020-07-31 16:07:10.163538: [TUN] [wg-client0] Shutting down
Maybe you missed some parts. Is your DNS running?
Did you make these parts?
systemctl status bind9
Edit the BIND DNS server’s configuration file.
sudo nano /etc/bind/named.conf.options
Add the following line to allow VPN clients to send recursive DNS queries.
allow-recursion { 127.0.0.1; 10.10.10.0/24; };
Then you need to run the following command to allow VPN clients to connect to port 53.
sudo ufw insert 1 allow in from 10.10.10.0/24
Hi Xiao Guoan
I really love your awesome tutorials!!! Please dont stop and keep going on!!!
So I finally configured my own wireguard using your tutorial.
I have a question. I have changed the server wg0.conf “allowed client IP 10.10.10.2/32” to 10.10.10.2/24 “so that I am now able to have VPN tunnels with more clients but my VPN Clients are not able to ping eachother. please give me some advice on how to allow ping between VPN clients.
Thanks in advance
AN
Okii I notice a problem here. As soon as I changed the server wg0.conf “allowed client IP 10.10.10.2/32” to 10.10.10.2/24. So that I could have more VPN clients, e.g. 10.10.10.2,3,4 — / 24, and I was also able to surf the Internet with clients who had a public IP address through a tunnel. Everything was great. But I had always lost the packet. So something I could ping “10.10.10.1” and sometimes I couldn’t ping. After that i changed the server wg0.conf back to “allowed client IP 10.10.10.2/32”. So now i had no packet lose and everything was working great.
But now i have two questions.
How should I have more VPN clients? without lossing packets. In your tutorial, I can only have one VPN-client.
How can I allow ping between VPN clients?
Thanks in advance
AN
WireGuard is designed to associate one IP address to one VPN client.
To add more VPN clients, you need to create a unique private/public key pair for each client, then add each VPN client in the server’s config file (/etc/wireguard/wg0.conf) like this:
Then configure each VPN client as usual.
Thanks Xiao it works perfect. Yes you’r right every client should have a unique private/public key. I just didnt notice that. Thanks mate : )
Hi Xiao Guoan,
What a fantastic tutorial you have done! Awesome work
I have followed it to a tee i thought, though the status of the server is showing as “inactive (dead) when i use the wg-quick up command to run it and even the alternative command to start the server results in the same. i have restarted Ubuntu 20.04 and still same also. Any ideas where to start looking to resolve at all?
Check the log.
Hi Xiao,
I am not sure what it all means 🙂 , i know enough IT to follow your tutorial, just not enough linux to know what to do 🙂 This is the log output;
— Logs begin at Tue 2020-08-11 19:49:47 AEST, end at Sat 2020-08-15 18:56:29 AEST. —
Aug 15 14:08:35 Wattserver systemd[1]: Starting WireGuard via wg-quick(8) for wg0…
Aug 15 14:08:35 Wattserver wg-quick[173330]: wg-quick: `wg0′ already exists
Aug 15 14:08:35 Wattserver systemd[1]: [email protected]: Main process exited, code=exited, status=1/FAILURE
Aug 15 14:08:35 Wattserver systemd[1]: [email protected]: Failed with result ‘exit-code’.
Aug 15 14:08:35 Wattserver systemd[1]: Failed to start WireGuard via wg-quick(8) for wg0.
Aug 15 14:10:17 Wattserver systemd[1]: Starting WireGuard via wg-quick(8) for wg0…
Aug 15 14:10:17 Wattserver wg-quick[173379]: wg-quick: `wg0′ already exists
Aug 15 14:10:17 Wattserver systemd[1]: [email protected]: Main process exited, code=exited, status=1/FAILURE
Aug 15 14:10:17 Wattserver systemd[1]: [email protected]: Failed with result ‘exit-code’.
Aug 15 14:10:17 Wattserver systemd[1]: Failed to start WireGuard via wg-quick(8) for wg0.
Maybe there’s already a WireGuard process running. Stop it.
Then use systemd service to start WireGuard.
Worked! your the best Xiao! I will now go the next step and test from client.
Hi Xiao,
pinging from iOS after connecting WireGuard client and getting ‘204 bytes from xxx.xxx.x.xxx: Destination Unreachable’ . Any ideas of the issue here? Many thanks again
Thanks for this great tutorial. I am also trying to install Subspace (https://github.com/subspacecommunity/subspace) for self service configs with SSO. Subspace runs in a Docker container on the WireGuard server. It provides DNS (runs dnsmasq) which conflicts with anything running on port 53 on the WireGuard host. Do you have any recommendations for what to change/exclude from your instructions to deal with that?
Specifically with Ubuntu 20.04.
Dear Xiao Guoan,
Thank you so much for this tutorial. After repeatedly breaking my head over wireguarding to my ubuntu server, I finally made it with your help. Unfortunately most other tutorials don’t go into the iptables details and just make do with the conf files. I have found other tutorials made by you equally helpful. Pl. keep up the good work.
Hi Xiao Guoan
I follow your procedure and install on UBuntu 20,
I think I hit the wall, when I edit the before.rule file. I can’t get my UFW running.
it always say this error.
Problem running ‘/etc/ufw/before.rules’
[15:21] [localhost.com ~] # iptables -t nat -L POSTROUTING
and line 9 is in before rules is the iptable filter
here is my before.rule conf
could you point me to the right direction of troubleshooting this issues.
thanks
Jay
Hello Xiao!
I installed bind9 per your instructions, but when I try to start it it fails. I get an error message saying “/etc/bind/named.conf.options:25: unknown option ‘allow_recursion’ ” It worked before, but now the server is broken. If ‘allow_recursion’ is an unknown option, I must have missed something, but I can’t tell what.
Okay, I found the typo in named.conf.options; it was allow_recursion when it should have been allow-recursion. Got that problem fixed, but when I start Wireguard on the client it fails with the following status:
I checked the wg-client0.conf file, and it’s exactly as you specified in the Policy Routing section. Can you shed any light on this subject?
You know, all this computer stuff would be easier if I learned to type. I found the problem here; another typo. It should have been = after PostUp instead of -.
I don’t understand, though, why my Internet access stops after a few minutes. Web pages won’t load, email won’t send, nothing, but only after Wireguard has been running for a few minutes. At first everything works just fine. Do I need to tweak the PersistentKeepAlive parameter?
Hi Xiao, thanks for your great work, as always it was an awesome tutorial.
Unfortunately, I have a problem with WireGuard in MacOS. After it connects to the server, I can resolve websites IP address and ping them, but can’t open them in any browser.
Here are my configurations:
Server (Ubuntu 18.04 with kernel 5.4):
Client (MacOS Catalina):
WireGuard log in MacOS (1. connect, 2. try to open some websites, 3. disconnect):
Could you help me with this, please?
P.S: My iPhone doesn’t have any problem with the same config (with a different IP address and keys) and opens all websites without any problem.
Maybe you should shut down the WireGuard server.
Delete the following line in the server config file.
Configure the [peer]s.
Then start the WireGuard server.
Hi there.
I read a few winguard guides today. I have an ubuntu 20.04 server (wireguard server) and wanted to connect several devices to it (windows desktop pc, mobile phones)… I like your guide as it is very clear, but unfortunately, two things did not work for me.
1. the stuff from step 5 (# NAT table rules lines) did not work for me at the end of /etc/ufw/before.rules (with only one COMMIT line), so I had to move them to the start of the file and add COMMIT immediately after them.
2. once VPN was established I could only ping the client from the server (10.x.x.x IPs) and vice versa, both client’s traffic did not reach the internet. I found these two lines in another guide, and after I put them to my server’s wg0.conf, everything started to work ok:
So… did I mess something, or are these actually needed?
Cheers!
The two things are actually one thing. The VPN clients can’t browser the Internet because the firewall rules are not set up correctly.
By default, there’s only one table (the
filtertable) in the/etc/ufw/before.rulesfile. Each table must end with aCOMMITline, so there’s only oneCOMMITin this file and there’s nothing wrong with it. You can add thenattable rules at the end of this file.The iptables rules in the
PostUpandPostDownare actually meant to do the same thing as I instructed in step 5: set up masquerading and allow forwarding for the private network.It might be easier to add these rules directly in the
wg0.conffile. However, what if you have another VPN server like OpenConnect VPN running on the same host? If the WireGuard VPN server shuts down, then the firewall rules will also be deleted, and the OpenConnect VPN server won’t be working. By adding the firewall rules in the UFW config file instead ofwg0.conffile, this won’t happen.You are the best 🙂 Thanks 🙂
Nice guide, thanks!
On the wireguard client side your solution has got the problem that openresolv does not use the local “hosts” file. So I changed my setup as follows:
NO openresolv installation
sudo nano /etc/dnsmasq.conf:
Change Network Manager settings for the physical NIC as shown in the pic, so Network Manager will not override /etc/resolv.conf anymore.
sudo nano /etc/resolv.conf:
NO DNS entry in wg-client0.conf, but:
“Endpoint = target_url.nia:51820”
and an alias for raising the wireguard interface:
“wgup=’ping -4 -q -c1 -w5 target_url.nia && systemctl start [email protected]'”
in order to have target_url.nia resolved in DNS cache already.
I also suggest to disable ipv6 with: GRUB_CMDLINE_LINUX=”ipv6.disable=1″ whenever ipv6 is not needed for the VPN connection.
In contrast openresolv does no caching for the nameserver 10.10.10.1, so the dnsmasq solution is generally faster when dealing with lots of URLs from the internet.
My Ubuntu desktop computer uses

openresolvand/etc/hostsfile works like a charm. If you edit an entry in/etc/hostsfile, but it doesn’t seem to work, it’s perhaps because your web browser caches DNS results. You can clear your browser cache or restart the web browser.openresolvis just a framework for managing the content of the/etc/resolv.conf, i.e, setting the DNS server address. No more and no less. It’s not a local DNS resolver like dnsmasq.dnsmasqwas replaced bysystemd-resolvedsince Ubuntu 16.10. You should not compareopenresolvwithdnsmasq, because they are meant for doing different tasks. Rather, you should comparesystemd-resolvedwithdnsmasq.systemd-resolveddoes have caching capability.And it uses
/etc/hostsfile per default. If you take a look at/etc/systemd/resolved.conffile, you can find the following line.By default, Network Manager won’t override the DNS server setting in
/etc/resolvfile. As you can see from the screenshot below, I have 127.0.0.1 set as the DNS server in Network Manager.I always recommend using the default software on Ubuntu operating system rather than using alternative software, unless you really need to get a feature that’s not available in the default software.
Right you are. Meanwhile with another fresh setup of the ubuntu wireguard client /etc/hosts is being used properly.
However, systemd-resolved does not cache on client side:
where 30ms is about the ping time:
Also I have to know all LAN IPs on server side, as bind9 there does not resolve them via 10.10.10.1, so the only way is to put all corresponding entries into “/etc/hosts” on my client. In this special case we have to register 14 computing nodes inside the server LAN plus 4 more in an DMZ plus a couple of non-computing devices. I would’nt know how to avoid these hosts entries altogether.
When using
openresolvto set 10.10.10.1 as DNS server, DNS requests are sent directly to the 10.10.10.1 resolver, so there’s no cache.You can remove
openresolv(sudo apt remove openresolv), removeDNS = 10.10.10.1from thewg-client0.conffile and set the DNS resolver directly in systemd-resolved.You can set multiple DNS resolvers in this file like so:
Save and close the file. Then
I like this, going to implement it right away. Thanks!
Another little problem: Whenever openresolv kicks in, names in the client LAN do not get resolved anymore, as the nameserver at 10.10.10.1 does not know anythinǵ about them. So have to put all my clients LAN nodes into /etc/hosts as well.
I’m running WireGuard on my server and my laptop, per these instructions. I find, however, when I try to access the CUPS web interface and add (and share) a printer, I get a message reading “Forbidden” and on the next line “You cannot access this page.” Do I need to open another port (presumably 631) in the firewall? It worked well before installing WireGuard.
If your WireGuard VPN server and CUPS print server are running on the same box, and you want to access the CUPS web interface via 10.10.10.1:631, then you need to add the 10.10.10.0/24 IP range to the CUPS whitelist.
Edit the
/etc/cups/cupsd.conffile and add the 10.10.10.0/24 IP range to the whitelist.Save and close the file. Then restart CUPS for the changes to take effect.
Also, allow clients in 10.10.10.0/24 to access port 631.
Worked like a charm!
Hi
Thanks for another great tutorial…
One question:
Did you mean to remove the Port 22 from ufw at then end of the procedure?
As I thought VPN port was meant to be the only entry through ufw.
Then once VPN is connected then Port 22 for ssh can be connected only from 10.10.10.0/24 based on rule –> ALLOW Anywhere From 10.10.10.0/24
Isn’t that right?
Perhaps you have removed Port 22 from ufw somewhere I missed.
Thanks again,
Really appreciate the welth of tutorials..
Andras
This tutorial didn’t close port 22 from public access, but you can do so.
Closing port 22 carries a risk in that if your VPN server stops working, you would lock yourself out. If your VPS hosting provider allows VNC Console access, you can use the console to access the server and fix this problem.
My reason to think about implementing this VPN setup was because, on my servers I am now encountering houndreds of Fail2Ban Bans over SSH port, that it made me feel like I want to turn SSH port off.
At the same time I need to SSH into my servers for the obvious reason of maintenance, evry now and then.
So I thought I would implement a VPN server on every single one of my servers, so only when I am connected together a certain server through VPN, only then it would be possible to SSH into it.
Hence I thought Port 22 could be closed towards the public.
Thanks again,
Yes, you can set up VPN server on every server and add all the server IP addresses to the firewall whitelist, so if one VPN server stops working, you can connect to another VPN server and have SSH access. This greatly reduces the risk of locking yourself out.
Hi,
Thanks again for your tutorials.
It seems that there is something which doesn’t run properly on bind9.
Is the following output from my terminal nominal?
thierry@Server-TH:~$ systemctl status bind9
● named.service - BIND Domain Name Server
     Loaded: loaded (/lib/systemd/system/named.service; enabled; vendor preset: enabled)
     Active: active (running) since Wed 2021-03-17 07:37:06 CET; 1 day 4h ago
       Docs: man:named(8)
   Main PID: 949 (named)
      Tasks: 38 (limit: 18723)
     Memory: 259.7M
     CGroup: /system.slice/named.service
             └─949 /usr/sbin/named -f -u bind

mar 18 08:37:13 Server-TH named[949]: network unreachable resolving './DNSKEY/IN': 2001:500:12::d0d#53
mar 18 08:37:13 Server-TH named[949]: network unreachable resolving './DNSKEY/IN': 2001:500:2d::d#53
mar 18 08:37:13 Server-TH named[949]: network unreachable resolving './DNSKEY/IN': 2001:7fd::1#53
mar 18 08:37:13 Server-TH named[949]: network unreachable resolving './DNSKEY/IN': 2001:500:a8::e#53
mar 18 08:37:13 Server-TH named[949]: network unreachable resolving './DNSKEY/IN': 2001:dc3::35#53
mar 18 08:37:13 Server-TH named[949]: network unreachable resolving './DNSKEY/IN': 2001:503:c27::2:30#53
mar 18 08:37:13 Server-TH named[949]: network unreachable resolving './DNSKEY/IN': 2001:500:9f::42#53
mar 18 08:37:13 Server-TH named[949]: network unreachable resolving './DNSKEY/IN': 2001:500:1::53#53
mar 18 08:37:13 Server-TH named[949]: network unreachable resolving './DNSKEY/IN': 2001:7fe::53#53
mar 18 08:37:13 Server-TH named[949]: managed-keys-zone: Key 20326 for zone . is now trusted (acceptance timer complete)
Thanks in advance
It indicates your server network doesn’t provide IPv6 connectivity. You need to disable IPv6 in BIND.
Disable IPv6 in BIND on Ubuntu 20.04
open the /etc/default/named file
Add
-4to the OPTIONS.Save and close the file. Then restart BIND and you are done.
Disable IPv6 in BIND on Ubuntu 18.04
Open the /etc/default/bind9 file
Add “-4” to the OPTIONS.
Save and close the file. Then restart BIND and you are done.
Thanks Xiao, it solved the issue.
Hello thanks for the tutorial.
I’m very new to this and it seems I’m able to follow the guide up to the end where enabling the wg service from the client
but after that the I cannot connect to the client (raspberry pi) anymore locally on my PC and when checking the IP of the client it seems to use my Server IP. When I stop the service My PC can connect to my client again.
Is this how it should bahave?
VPN can change a client’s public IP address, so connections to the old public IP address will be dropped. A working VPN does not affect a client’s LAN connection.
Okay, got.
Then all I have to do is also add my PC as a additional client and connect to wireguard server to be connect to my client (raspberry).
Thanks for the quick response.
Hi Xiao,
Thank you for such an awesome and extensive article. I’ve seen a lot of content on setting up WireGuard, and yours is simply the best. Would you be able to elaborate on how to set up Wireguard to work with multiple IPs as exit points? For example, I have two IPs with my server that are both added to the same networking interface. I can use both as IPs endpoints to my clients to access and forward traffic on my server. However, both IPs still resolve to the same IP address on exit. So no matter which IP I use on the Wireguard client, when browsing and checking my IP, they both resolve to the default IP address of the server. I’ve search everywhere and unable to find a proper set up.
Hello, thanks for the tutorial.
I want to use the Wireguard in another ubuntu server as a client, but when I start Wireguard in the client ubuntu server, I lose ssh connection, apparently
You need to enable split tunneling on the client Ubuntu server, which is explained at the end of this article.
Excellent tutorial. I have followed it line by line… However, my client can now connect the server (no errors), but there is no internet connectivity.
client$ systemctl status [email protected]
When I connect: client$wg-quick up wg-client1
On my server: server# systemctl status [email protected]
On my client when I conect to the server:client$ wg
Can you ping from the VPN client to VPN server using the private IP address?
I see the VPN client is using 10.0.0.8/24 address, but VPN server is using 10.10.10.6/24 address. You need to use the same subnet for client and server.
Also I should mention that my server does not use ssh on port 22. I use ssh on a different port. I don’t know if this is a possible factor.
SSH doesn’t affect WireGuard VPN.
thanks for the follow up.. I just figured out my problem… I am on a VPS.. which has an external firewall. So even though I opened 51280 in UFW… I had forgotten to open the same port in the external firewall, which of course… fixed the problem and now everything works perfectly.. Thanks again for excellent tutorial!
Xiao,
I’ve just upgraded my mobile phone, and I can’t seem to get it onto the VPN (which was working perfectly with the old phone). I’ve followed your instructions on adding more VPN clients, but when I enable Wireguard on the phone (Android) it loses its net connection. When I try to ping the phone I get the following error:
I can’t find the problem, and I’d like to get it right before I add my wife’s phone (also and Android) to the VPN.
You can try installing a newer Linux kernel on the Ubuntu server.
Ubuntu 20.04
Ubuntu 18.04
Reboot the server.
Next, enable debug logging for WireGuard on the server with the following command.
Then you can view the debug logs with
or
I get repetitions of the following:
Is my Android’s MAC address incompatible somehow?
Never mind; I found the problem.
I had typos in the Peer’s Public key. I accidentally entered 0 for O in a couple of places. After I corrected that, the VPN worked perfectly.
Great, great article. Thanks in advance.
But I have a problem with it. My ip changes and when I did a DNS leak test, it didn’t have any leaks. But still, google can find my real ip and location, both on Ubuntu, and android. Although there are some vpns that I used on android that google couldn’t find my real location. What seems to be the problem?
Go to https://ipleak.net/ to test if your VPN has IP leak, DNS leak, or WebRTC leak problem.
Hint: I don’t have leak problems with the WireGuard setup in this tutorial.
How do you know Google can find your real IP address?
That site doesn’t show any leaks whatsoever. However, google can still find my actual location, and is not fooled by the vpn. When I search something on google and scroll the page all the way down, it has stated my real location and not the vps’ location.
That’s not my problem; The problem is, a lot of google services still forbid me.
The location at the bottom of the Google search result page isn’t accurate. It could use your past location. If you use a VPN and Google can’t update your current location, then it shows the old location.
If you can’t access Google services, then choose another location for your VPN server.
If you live in China and choose a server in China, then you still can’t access Google. You need to choose a location like Japan, or United States for the VPN server.
You’re right. The problem was with my VPS’ IP.
I changed my VPS and it’s working properly.
Thanks in Advance. If it wasn’t because of you, I wouldn’t have this vpn.
Is there a guide for when using Windows/iOS/Android devices to connect to the WireGuard VPN server I have hosted?
For each, download the WireGuard Client application, and fill the peer’s information, or, insert the configuration file (/etc/wireguard/wg0.conf). I recommend you to create a unique configuration file for each client.
As always, great tutorial. Most everything went off without a hitch. I did run into an issue where I couldn’t start the WG service (Ubuntu 20.04) but by creating a symbolic link that corrected that problem. Now the only problem I am having is icanhazip still shows my public IP and unless I add the policy routing to the config file on the client, I can’t access the internet while connected. I didn’t see any typos, and I added firewall rules to both my VPS host firewall rules and to the VPS UFW itself. Any suggestions on things to check? I have restarted all systems numerous times also.
Can you send the
/etc/wireguard/wg0.conf,/etc/wireguard/wg-client0.conf, and/etc/ufw/before.rulesfiles?First off thanks for the response. I appreciate it. If I can get this working between the one client and server, I can add all the other systems in my network to this also.
Here are the requested files. A little about my setup… I have multiple VPS’ serving different functions. One is a DNS server, another is a secondary. Both run Bind. The VPS this is going on is separate from the other 2. My personal network at my house is a dynamic setup provided by my cable provider. I installed Bind on the server with wireguard also and put in the allow recursion in both setups, just in case. I was able to ping between the single client and the server but as stated my public ip for my home network (70.125.x.x) was listed on icanhzip.com and also on WhatsMyIP. With wireguard running I wasn’t even able to access the ipleak website, but as soon as I turned off WG on my client I was able to access that site also.
wg0.conf
wg-client0.conf
/etc/ufw/before.rules
This was the command for the link I had to create to get the service started.
sudo ln -s /usr/bin/resolvectl /usr/local/bin/resolvconf
Hello, thanks for the tutorial.I follow your procedure and install on debian9 vps, the wg on the vps server can show transfer and received OK, but from my mobile phone client ping the server failed, Could you help me with this, please?
--------- beginning of system 12-16 09:44:31.821 3611 3611 D ActivityThread: ActivityThread,attachApplication 12-16 09:44:31.983 3611 3611 V ActivityThread: ActivityThread,callActivityOnCreate 12-16 09:44:32.091 3611 3611 D ActivityThread: add activity client record, r= ActivityRecord{f287416 token=android.os.BinderProxy@301cd3c {com.wireguard.android/com.wireguard.android.activity.MainActivity}} token= android.os.BinderProxy@301cd3c --------- beginning of events 12-16 09:44:32.093 3611 3611 I am_on_resume_called: [0,com.wireguard.android.activity.MainActivity,LAUNCH_ACTIVITY] 12-16 09:44:32.112 3611 3611 I am_on_paused_called: [0,com.wireguard.android.activity.MainActivity,handleRelaunchActivity] 12-16 09:44:32.114 3611 3611 I am_on_stop_called: [0,com.wireguard.android.activity.MainActivity,destroy] 12-16 09:44:32.116 3611 3611 D ActivityThread: Remove activity client record, r= ActivityRecord{f287416 token=android.os.BinderProxy@301cd3c {com.wireguard.android/com.wireguard.android.activity.MainActivity}} token= android.os.BinderProxy@301cd3c 12-16 09:44:32.122 3611 3611 V ActivityThread: ActivityThread,callActivityOnCreate 12-16 09:44:32.140 3611 3611 D ActivityThread: add activity client record, r= ActivityRecord{f287416 token=android.os.BinderProxy@301cd3c {com.wireguard.android/com.wireguard.android.activity.MainActivity}} token= android.os.BinderProxy@301cd3c 12-16 09:44:32.141 3611 3611 I am_on_resume_called: [0,com.wireguard.android.activity.MainActivity,handleRelaunchActivity] 12-16 09:44:40.204 3611 3611 I menu_item_selected: [0,编辑] 12-16 09:44:50.021 3611 3611 I menu_item_selected: [0,保存] 12-16 09:44:50.383 3611 3611 W ViewRootImpl[Toast]: EGLdebug relayoutWindow Surface isSurface(name=null) (appName =com.wireguard.android) ( mSurfaceControllerIsValid =false) (mNativeObject =0)/@0x17fac76,viewVisibility is0 12-16 09:44:50.406 3611 3611 W ViewRootImpl[Toast]: EGLdebug relayoutWindow Surface isSurface(name=null) (appName =com.wireguard.android) ( mSurfaceControllerIsValid =true) (mNativeObject =788d1af000)/@0x17fac76,relayoutResult is7 12-16 09:45:26.028 3611 3611 I am_on_paused_called: [0,com.wireguard.android.activity.MainActivity,handlePauseActivity] 12-16 09:45:26.239 3611 3611 I am_on_stop_called: [0,com.wireguard.android.activity.MainActivity,handleStopActivity] 12-16 09:46:28.688 3611 3611 I am_on_resume_called: [0,com.wireguard.android.activity.MainActivity,RESUME_ACTIVITY] 12-16 09:46:32.991 3611 3611 I menu_item_selected: [0,编辑] 12-16 09:46:33.155 3611 3611 I liblog : 65 12-16 09:46:33.242 3611 3611 I liblog : 357 12-16 09:46:46.145 3611 3611 I menu_item_selected: [0,保存] 12-16 09:46:46.456 3611 3611 W ViewRootImpl[Toast]: EGLdebug relayoutWindow Surface isSurface(name=null) (appName =com.wireguard.android) ( mSurfaceControllerIsValid =false) (mNativeObject =0)/@0x1a396d9,viewVisibility is0 12-16 09:46:46.478 3611 3611 W ViewRootImpl[Toast]: EGLdebug relayoutWindow Surface isSurface(name=null) (appName =com.wireguard.android) ( mSurfaceControllerIsValid =true) (mNativeObject =788cdd6000)/@0x1a396d9,relayoutResult is7 12-16 09:48:38.601 3611 3611 I am_on_paused_called: [0,com.wireguard.android.activity.MainActivity,handlePauseActivity] 12-16 09:48:38.642 3611 3611 I am_on_stop_called: [0,com.wireguard.android.activity.MainActivity,handleStopActivity] 12-16 09:48:50.971 3611 3611 I am_on_resume_called: [0,com.wireguard.android.activity.MainActivity,RESUME_ACTIVITY] 12-16 09:52:57.199 3611 3611 I am_on_paused_called: [0,com.wireguard.android.activity.MainActivity,handlePauseActivity] 12-16 09:52:57.241 3611 3611 I am_on_stop_called: [0,com.wireguard.android.activity.MainActivity,handleStopActivity] 12-16 09:53:28.589 3611 3611 I am_on_resume_called: [0,com.wireguard.android.activity.MainActivity,RESUME_ACTIVITY] 12-16 10:04:20.736 3611 3611 I am_on_paused_called: [0,com.wireguard.android.activity.MainActivity,handlePauseActivity] 12-16 10:04:20.782 3611 3611 I am_on_stop_called: [0,com.wireguard.android.activity.MainActivity,handleStopActivity] 12-16 10:04:54.911 3611 3611 I am_on_resume_called: [0,com.wireguard.android.activity.MainActivity,RESUME_ACTIVITY] 12-16 10:04:57.210 3611 3611 I menu_item_selected: [0,编辑] 12-16 10:05:04.416 3611 3611 I menu_item_selected: [0,保存] 12-16 10:05:04.786 3611 3611 W ViewRootImpl[Toast]: EGLdebug relayoutWindow Surface isSurface(name=null) (appName =com.wireguard.android) ( mSurfaceControllerIsValid =false) (mNativeObject =0)/@0x86215c5,viewVisibility is0 12-16 10:05:04.809 3611 3611 W ViewRootImpl[Toast]: EGLdebug relayoutWindow Surface isSurface(name=null) (appName =com.wireguard.android) ( mSurfaceControllerIsValid =true) (mNativeObject =788d1be000)/@0x86215c5,relayoutResult is7 12-16 10:05:11.376 3611 3611 I am_on_paused_called: [0,com.wireguard.android.activity.MainActivity,handlePauseActivity] 12-16 10:05:11.422 3611 3611 I am_on_stop_called: [0,com.wireguard.android.activity.MainActivity,handleStopActivity] 12-16 10:05:35.377 3611 3611 I am_on_resume_called: [0,com.wireguard.android.activity.MainActivity,RESUME_ACTIVITY] 12-16 10:05:39.077 3611 3611 I menu_item_selected: [0,编辑] 12-16 10:05:39.108 3611 3611 I liblog : 67 12-16 10:05:39.130 3611 3611 I liblog : 173 12-16 10:05:45.616 3611 3611 I menu_item_selected: [0,保存] 12-16 10:05:45.834 3611 3611 W ViewRootImpl[Toast]: EGLdebug relayoutWindow Surface isSurface(name=null) (appName =com.wireguard.android) ( mSurfaceControllerIsValid =false) (mNativeObject =0)/@0x7e8e707,viewVisibility is0 12-16 10:05:45.855 3611 3611 W ViewRootImpl[Toast]: EGLdebug relayoutWindow Surface isSurface(name=null) (appName =com.wireguard.android) ( mSurfaceControllerIsValid =true) (mNativeObject =788d1da000)/@0x7e8e707,relayoutResult is7 12-16 10:05:58.224 3611 3611 I menu_item_selected: [0,设置] 12-16 10:05:58.257 3611 3611 I am_on_paused_called: [0,com.wireguard.android.activity.MainActivity,handlePauseActivity] 12-16 10:05:58.293 3611 3611 V ActivityThread: ActivityThread,callActivityOnCreate 12-16 10:05:58.355 3611 3611 D ActivityThread: add activity client record, r= ActivityRecord{2e0f5d5 token=android.os.BinderProxy@30f45fc {com.wireguard.android/com.wireguard.android.activity.SettingsActivity}} token= android.os.BinderProxy@30f45fc 12-16 10:05:58.356 3611 3611 I am_on_resume_called: [0,com.wireguard.android.activity.SettingsActivity,LAUNCH_ACTIVITY] 12-16 10:05:58.648 3611 3611 I am_on_stop_called: [0,com.wireguard.android.activity.MainActivity,handleStopActivity] 12-16 10:06:02.164 3611 3611 I am_on_paused_called: [0,com.wireguard.android.activity.SettingsActivity,handlePauseActivity] 12-16 10:06:02.214 3611 3611 I am_on_resume_called: [0,com.wireguard.android.activity.MainActivity,RESUME_ACTIVITY] 12-16 10:06:02.444 3611 3611 I am_on_stop_called: [0,com.wireguard.android.activity.SettingsActivity,destroy] 12-16 10:06:02.452 3611 3611 D ActivityThread: Remove activity client record, r= ActivityRecord{2e0f5d5 token=android.os.BinderProxy@30f45fc {com.wireguard.android/com.wireguard.android.activity.SettingsActivity}} token= android.os.BinderProxy@30f45fc 12-16 10:06:07.756 3611 3611 I menu_item_selected: [0,设置] 12-16 10:06:07.780 3611 3611 I am_on_paused_called: [0,com.wireguard.android.activity.MainActivity,handlePauseActivity] 12-16 10:06:07.802 3611 3611 V ActivityThread: ActivityThread,callActivityOnCreate 12-16 10:06:07.825 3611 3611 D ActivityThread: add activity client record, r= ActivityRecord{913433c token=android.os.BinderProxy@9e9d598 {com.wireguard.android/com.wireguard.android.activity.SettingsActivity}} token= android.os.BinderProxy@9e9d598 12-16 10:06:07.826 3611 3611 I am_on_resume_called: [0,com.wireguard.android.activity.SettingsActivity,LAUNCH_ACTIVITY] 12-16 10:06:08.082 3611 3611 I am_on_stop_called: [0,com.wireguard.android.activity.MainActivity,handleStopActivity] 12-16 10:06:23.823 3611 3611 I am_on_paused_called: [0,com.wireguard.android.activity.SettingsActivity,handlePauseActivity] 12-16 10:06:23.871 3611 3611 I am_on_resume_called: [0,com.wireguard.android.activity.MainActivity,RESUME_ACTIVITY] 12-16 10:06:24.071 3611 3611 I am_on_stop_called: [0,com.wireguard.android.activity.SettingsActivity,destroy] 12-16 10:06:24.081 3611 3611 D ActivityThread: Remove activity client record, r= ActivityRecord{913433c token=android.os.BinderProxy@9e9d598 {com.wireguard.android/com.wireguard.android.activity.SettingsActivity}} token= android.os.BinderProxy@9e9d598 12-16 10:06:26.460 3611 3611 I menu_item_selected: [0,设置] 12-16 10:06:26.485 3611 3611 I am_on_paused_called: [0,com.wireguard.android.activity.MainActivity,handlePauseActivity] 12-16 10:06:26.501 3611 3611 V ActivityThread: ActivityThread,callActivityOnCreate 12-16 10:06:26.536 3611 3611 D ActivityThread: add activity client record, r= ActivityRecord{15eb07a token=android.os.BinderProxy@c870e36 {com.wireguard.android/com.wireguard.android.activity.SettingsActivity}} token= android.os.BinderProxy@c870e36 12-16 10:06:26.538 3611 3611 I am_on_resume_called: [0,com.wireguard.android.activity.SettingsActivity,LAUNCH_ACTIVITY] 12-16 10:06:26.815 3611 3611 I am_on_stop_called: [0,com.wireguard.android.activity.MainActivity,handleStopActivity] 12-16 10:06:33.055 3611 3611 I am_on_paused_called: [0,com.wireguard.android.activity.SettingsActivity,handlePauseActivity] 12-16 10:06:33.104 3611 3611 I am_on_resume_called: [0,com.wireguard.android.activity.MainActivity,RESUME_ACTIVITY] 12-16 10:06:33.321 3611 3611 I am_on_stop_called: [0,com.wireguard.android.activity.SettingsActivity,destroy] 12-16 10:06:33.329 3611 3611 D ActivityThread: Remove activity client record, r= ActivityRecord{15eb07a token=android.os.BinderProxy@c870e36 {com.wireguard.android/com.wireguard.android.activity.SettingsActivity}} token= android.os.BinderProxy@c870e36 12-16 10:06:34.443 3611 3611 I menu_item_selected: [0,设置] 12-16 10:06:34.465 3611 3611 I am_on_paused_called: [0,com.wireguard.android.activity.MainActivity,handlePauseActivity] 12-16 10:06:34.481 3611 3611 V ActivityThread: ActivityThread,callActivityOnCreate 12-16 10:06:34.513 3611 3611 D ActivityThread: add activity client record, r= ActivityRecord{726219e token=android.os.BinderProxy@6d20a9a {com.wireguard.android/com.wireguard.android.activity.SettingsActivity}} token= android.os.BinderProxy@6d20a9a 12-16 10:06:34.515 3611 3611 I am_on_resume_called: [0,com.wireguard.android.activity.SettingsActivity,LAUNCH_ACTIVITY] 12-16 10:06:34.769 3611 3611 I am_on_stop_called: [0,com.wireguard.android.activity.MainActivity,handleStopActivity] 12-16 10:06:35.836 3611 3611 I am_on_paused_called: [0,com.wireguard.android.activity.SettingsActivity,handlePauseActivity] 12-16 10:06:35.877 3611 3611 I am_on_resume_called: [0,com.wireguard.android.activity.MainActivity,RESUME_ACTIVITY] 12-16 10:06:36.082 3611 3611 I am_on_stop_called: [0,com.wireguard.android.activity.SettingsActivity,destroy] 12-16 10:06:36.090 3611 3611 D ActivityThread: Remove activity client record, r= ActivityRecord{726219e token=android.os.BinderProxy@6d20a9a {com.wireguard.android/com.wireguard.android.activity.SettingsActivity}} token= android.os.BinderProxy@6d20a9a 12-16 10:06:39.451 3611 3611 I menu_item_selected: [0,编辑] 12-16 10:08:42.031 3611 3611 I menu_item_selected: [0,保存] 12-16 10:08:42.343 3611 3611 W ViewRootImpl[Toast]: EGLdebug relayoutWindow Surface isSurface(name=null) (appName =com.wireguard.android) ( mSurfaceControllerIsValid =false) (mNativeObject =0)/@0x82ef6ec,viewVisibility is0 12-16 10:08:42.368 3611 3611 W ViewRootImpl[Toast]: EGLdebug relayoutWindow Surface isSurface(name=null) (appName =com.wireguard.android) ( mSurfaceControllerIsValid =true) (mNativeObject =788d1bd000)/@0x82ef6ec,relayoutResult is7 12-16 10:09:16.408 3611 3611 I am_on_paused_called: [0,com.wireguard.android.activity.MainActivity,handlePauseActivity] 12-16 10:09:16.622 3611 3611 I am_on_stop_called: [0,com.wireguard.android.activity.MainActivity,handleStopActivity] 12-16 10:09:30.877 3611 3611 I am_on_resume_called: [0,com.wireguard.android.activity.MainActivity,RESUME_ACTIVITY] 12-16 10:09:33.038 3611 3611 I menu_item_selected: [0,编辑] 12-16 10:10:15.586 3611 3611 I menu_item_selected: [0,保存] 12-16 10:10:15.925 3611 3611 I liblog : 579 12-16 10:10:15.925 3611 3611 W ViewRootImpl[Toast]: EGLdebug relayoutWindow Surface isSurface(name=null) (appName =com.wireguard.android) ( mSurfaceControllerIsValid =false) (mNativeObject =0)/@0x85c5b27,viewVisibility is0 12-16 10:10:15.935 3611 3611 W ViewRootImpl[Toast]: EGLdebug relayoutWindow Surface isSurface(name=null) (appName =com.wireguard.android) ( mSurfaceControllerIsValid =true) (mNativeObject =788cd3d000)/@0x85c5b27,relayoutResult is7 12-16 10:12:35.908 3611 3611 I menu_item_selected: [0,编辑] 12-16 10:12:47.364 3611 3611 I menu_item_selected: [0,保存] 12-16 10:12:47.598 3611 3611 W ViewRootImpl[Toast]: EGLdebug relayoutWindow Surface isSurface(name=null) (appName =com.wireguard.android) ( mSurfaceControllerIsValid =false) (mNativeObject =0)/@0x495fec3,viewVisibility is0 12-16 10:12:47.611 3611 3611 W ViewRootImpl[Toast]: EGLdebug relayoutWindow Surface isSurface(name=null) (appName =com.wireguard.android) ( mSurfaceControllerIsValid =true) (mNativeObject =788cfb2000)/@0x495fec3,relayoutResult is7 12-16 10:13:11.420 3611 3611 I am_on_paused_called: [0,com.wireguard.android.activity.MainActivity,handlePauseActivity] 12-16 10:13:11.463 3611 3611 I am_on_stop_called: [0,com.wireguard.android.activity.MainActivity,handleStopActivity] 12-16 10:13:23.582 3611 3611 I am_on_resume_called: [0,com.wireguard.android.activity.MainActivity,RESUME_ACTIVITY] 12-16 10:13:26.261 3611 3611 I menu_item_selected: [0,编辑] 12-16 10:13:26.371 3611 3611 I liblog : 2112 12-16 10:13:26.376 3611 3611 I liblog : 64 12-16 10:13:26.418 3611 3611 I liblog : 56 --------- beginning of main 12-16 10:13:46.850 3611 3611 I chatty : uid=10342(u0_a342) com.wireguard.android expire 1650 lines 12-16 10:13:46.851 3611 3611 I menu_item_selected: [0,保存] 12-16 10:13:47.067 3611 3704 I chatty : uid=10342(u0_a342) RenderThread expire 4 lines 12-16 10:13:47.113 3611 3611 W ViewRootImpl[Toast]: EGLdebug relayoutWindow Surface isSurface(name=null) (appName =com.wireguard.android) ( mSurfaceControllerIsValid =false) (mNativeObject =0)/@0xc3bbdc5,viewVisibility is0 12-16 10:13:47.138 3611 3611 W ViewRootImpl[Toast]: EGLdebug relayoutWindow Surface isSurface(name=null) (appName =com.wireguard.android) ( mSurfaceControllerIsValid =true) (mNativeObject =788cc54000)/@0xc3bbdc5,relayoutResult is7 12-16 10:18:24.158 3611 3611 I chatty : uid=10342(u0_a342) com.wireguard.android expire 8 lines 12-16 10:18:24.158 3611 3674 I chatty : uid=10342(u0_a342) DefaultDispatch expire 15 lines 12-16 10:18:24.186 3611 3793 I chatty : uid=10342(u0_a342) DefaultDispatch expire 19 lines 12-16 10:18:24.186 3611 3700 I chatty : uid=10342(u0_a342) DefaultDispatch expire 7 lines 12-16 10:18:24.187 3611 5419 I chatty : uid=10342(u0_a342) DefaultDispatch expire 1 line 12-16 10:18:24.195 3611 3787 I chatty : uid=10342(u0_a342) DefaultDispatch expire 3 lines 12-16 10:18:26.773 3611 3611 I menu_item_selected: [0,设置] 12-16 10:18:26.799 3611 3611 I am_on_paused_called: [0,com.wireguard.android.activity.MainActivity,handlePauseActivity] 12-16 10:18:26.821 3611 3611 V ActivityThread: ActivityThread,callActivityOnCreate 12-16 10:18:26.825 3611 3611 I chatty : uid=10342(u0_a342) com.wireguard.android expire 519 lines 12-16 10:18:26.855 3611 3611 D ActivityThread: add activity client record, r= ActivityRecord{6a1cdc7 token=android.os.BinderProxy@7eebaf7 {com.wireguard.android/com.wireguard.android.activity.SettingsActivity}} token= android.os.BinderProxy@7eebaf7 12-16 10:18:26.858 3611 3611 I am_on_resume_called: [0,com.wireguard.android.activity.SettingsActivity,LAUNCH_ACTIVITY] 12-16 10:18:26.860 3611 3704 I chatty : uid=10342(u0_a342) RenderThread expire 2 lines 12-16 10:18:26.874 3611 6804 I chatty : uid=10342(u0_a342) com.wireguard.android expire 1 line 12-16 10:18:26.908 3611 3611 I chatty : uid=10342(u0_a342) com.wireguard.android expire 21 lines 12-16 10:18:26.909 3611 3611 W ResourceType: For resource 0x7f12016c, entry index(364) is beyond type entryCount(182) 12-16 10:18:26.909 3611 3611 W ResourceType: For resource 0x7f1201a4, entry index(420) is beyond type entryCount(182) 12-16 10:18:26.909 3611 3611 W ResourceType: For resource 0x7f120275, entry index(629) is beyond type entryCount(182) 12-16 10:18:26.909 3611 3611 W ResourceType: For resource 0x7f1202f5, entry index(757) is beyond type entryCount(182) 12-16 10:18:26.909 3611 3611 W ResourceType: For resource 0x7f120216, entry index(534) is beyond type entryCount(182) 12-16 10:18:26.909 3611 3611 W ResourceType: For resource 0x7f1202b5, entry index(693) is beyond type entryCount(182) 12-16 10:18:26.909 3611 3611 W ResourceType: For resource 0x7f1202b5, entry index(693) is beyond type entryCount(182) 12-16 10:18:26.909 3611 3611 W ResourceType: For resource 0x7f12024a, entry index(586) is beyond type entryCount(182) 12-16 10:18:26.909 3611 3611 W ResourceType: For resource 0x7f12024e, entry index(590) is beyond type entryCount(182) 12-16 10:18:26.909 3611 3611 W ResourceType: For resource 0x7f12024c, entry index(588) is beyond type entryCount(182) 12-16 10:18:26.909 3611 3611 W ResourceType: For resource 0x7f1201fa, entry index(506) is beyond type entryCount(182) 12-16 10:18:26.909 3611 3611 W ResourceType: For resource 0x7f12025c, entry index(604) is beyond type entryCount(182) 12-16 10:18:26.909 3611 3611 W ResourceType: For resource 0x7f120233, entry index(563) is beyond type entryCount(182) 12-16 10:18:26.909 3611 3611 W ResourceType: For resource 0x7f120235, entry index(565) is beyond type entryCount(182) 12-16 10:18:26.909 3611 3611 W ResourceType: For resource 0x7f1201fa, entry index(506) is beyond type entryCount(182) 12-16 10:18:26.909 3611 3611 W ResourceType: For resource 0x7f1202d7, entry index(727) is beyond type entryCount(182) 12-16 10:18:26.909 3611 3611 W ResourceType: For resource 0x7f120236, entry index(566) is beyond type entryCount(182) 12-16 10:18:26.909 3611 3611 W ResourceType: For resource 0x7f120237, entry index(567) is beyond type entryCount(182) 12-16 10:18:26.909 3611 3611 W ResourceType: For resource 0x7f12029b, entry index(667) is beyond type entryCount(182) 12-16 10:18:26.909 3611 3611 W ResourceType: For resource 0x7f12029b, entry index(667) is beyond type entryCount(182) 12-16 10:18:26.909 3611 3611 W ResourceType: For resource 0x7f12023e, entry index(574) is beyond type entryCount(182) 12-16 10:18:26.909 3611 3611 W ResourceType: For resource 0x7f1202af, entry index(687) is beyond type entryCount(182) 12-16 10:18:26.909 3611 3611 W ResourceType: For resource 0x7f1201ff, entry index(511) is beyond type entryCount(182) 12-16 10:18:26.909 3611 3611 W ResourceType: For resource 0x7f120260, entry index(608) is beyond type entryCount(182) 12-16 10:18:26.909 3611 3611 W ResourceType: For resource 0x7f120245, entry index(581) is beyond type entryCount(182) 12-16 10:18:26.909 3611 3611 W ResourceType: For resource 0x7f120246, entry index(582) is beyond type entryCount(182) 12-16 10:18:26.909 3611 3611 W ResourceType: For resource 0x7f12025d, entry index(605) is beyond type entryCount(182) 12-16 10:18:26.909 3611 3611 W ResourceType: For resource 0x7f1202d6, entry index(726) is beyond type entryCount(182) 12-16 10:18:26.909 3611 3611 W ResourceType: For resource 0x7f1201ad, entry index(429) is beyond type entryCount(182) 12-16 10:18:26.909 3611 3611 W ResourceType: For resource 0x7f1202d4, entry index(724) is beyond type entryCount(182) 12-16 10:18:26.910 3611 3611 W ResourceType: For resource 0x7f1202b0, entry index(688) is beyond type entryCount(182) 12-16 10:18:26.910 3611 3611 W ResourceType: For resource 0x7f12025b, entry index(603) is beyond type entryCount(182) 12-16 10:18:26.910 3611 3611 W ResourceType: For resource 0x7f12026c, entry index(620) is beyond type entryCount(182) 12-16 10:18:26.910 3611 3611 W ResourceType: For resource 0x7f120244, entry index(580) is beyond type entryCount(182) 12-16 10:18:26.910 3611 3611 W ResourceType: For resource 0x7f1202b1, entry index(689) is beyond type entryCount(182) 12-16 10:18:26.910 3611 3611 W ResourceType: For resource 0x7f1201a4, entry index(420) is beyond type entryCount(182) 12-16 10:18:26.910 3611 3611 W ResourceType: For resource 0x7f12016f, entry index(367) is beyond type entryCount(182) 12-16 10:18:26.910 3611 3611 W ResourceType: For resource 0x7f120158, entry index(344) is beyond type entryCount(182)Hi Xiao Guoan!
Thank you for another excellent tutorial.
When I enable the VPN Kill Switch on the client I’m no longer able to SSH into it but I can SSH into the client from the VPN server.
How do I set up a port forward on the VPN server so I can access the client from an Internet connection?
Thank you!
You are the f#cking Man. Thankyou sir!
Hi,
great tutorial. Many thanks.
Some questions about kill switch. The following is my setting right now. I assume now kill swithc is implemented so far, isn`t it?
Wg0.conf:
[Interface]
Address = 10.13.13.1
ListenPort = 51820
PrivateKey = dfdfdfffffffffffffffffffffffffffff
PostUp = iptables -A FORWARD -i %i -j ACCEPT; iptables -A FORWARD -o %i -j ACCEPT; iptables -t nat -A POSTROUTING -o eth0 -j MASQUERADE
PostDown = iptables -D FORWARD -i %i -j ACCEPT; iptables -D FORWARD -o %i -j ACCEPT; iptables -t nat -D POSTROUTING -o eth0 -j MASQUERADE
[Peer]
# peer1
PublicKey = ffffffffffffffffffffffffffffffffffff
AllowedIPs = 10.13.13.2/32
[Peer]
# peer2
PublicKey = ffffffffffffffffffffffffff
AllowedIPs = 10.13.13.3/32
[Peer]
# peer3
PublicKey = ffffffffffffffffffffffffff
AllowedIPs = 10.13.13.4/32
—–
Peer1.conf:
[Interface]
Address = 10.13.13.2
PrivateKey = xxxxxxxxxxxxxxxxxxx
ListenPort = 51820
DNS = 46.182.19.48, 185.95.218.42, 185.95.218.43, 84.200.69.80, 9.9.9.9, 1.1.1.1
[Peer]
PublicKey = xxxxxxxxxxxxxxxxxxx
Endpoint = xy.xy.xy.xy:51820
AllowedIPs = 0.0.0.0/0, ::/0
—
So if i get you right, I have to add this to each client conf, not to the server con, right?
PostUp = iptables -I OUTPUT ! -o %i -m mark ! –mark $(wg show %i fwmark) -m addrtype ! –dst-type LOCAL -j REJECT
PreDown = iptables -D OUTPUT ! -o %i -m mark ! –mark $(wg show %i fwmark) -m addrtype ! –dst-type LOCAL -j REJECT
Thanks
Stefan
Yes, you need to add the PostUp and PostDown commands on each client.
Thanks. Does this also work if clients are not Linux clients, e.g. Windwos machines or iOs / Android smartphones?
Because the kill switch is iptables command, so it works on Linux clients, but not on Windows or iOS/Android clients.
I have maybe a different issue. Not really quite sure what it is to tell you the truth. I’ve had Wireguard up for almost two years…prior to it being added to the kernel. I recently changed the layout of my network (ie. what server does what) and in the process reassigned some Peer slots in my Wireguard servers config. Since I already have a working client config, from other machines, I thought it would be rather quick and painless….Wrong
I installed Wireguard and tools on a new Ubuntu 20.04 box. I generated the keys per the tutorial and set up the config file swapping the public keys between server and client configs. I use my public IP for the server:51820. The client interface comes up with no errors at the terminal, and sets the public ip to numeric as I’d expect (so resolving the name seems to work)….it just doesn’t handshake with the server.
I tried the same on another Raspbian 10 box I want to put on the VPN. Same result. No handshake…..and I can’t tell you how many times I’ve checked to make sure I’m using the full public keys.
The only thing I can think of at this point is that there must be some tweak (from pre kernel support to post kernel support) I’m not doing and not seeing. Any help would be greatly appreciated.
I’m planning this box as a remote mirror backup to my NAS so using the public ip scheme is a must.
I don’t remember I need to do anything special to switch from pre-kernel support to post-kernel support. Just upgraded the kernel and it worked.
I’ve followed your tutorial, but I can’t ping the client from the server and I can’t browse the ‘Net with the client on the VPN. What further info do you want?
You can try installing a newer Linux kernel on the Ubuntu server.
Ubuntu 20.04
Ubuntu 18.04
Reboot the server.
Next, enable debug logging for WireGuard on the server with the following command.
Then you can view the debug logs with
or
I can not believe i am now running on own WireGuard VPN thanks to LinuxBabe.com.
This is so cool!
Thank you very much LinuxBabe!
If you read this tutorial and set it up error-free because of the great instructions or need to post a question(s) to finish, please do not forget to send LinuxBabe.com a thank you!
Donate
Your article saved me many days of work. I connected my servers each to public IPs in the cloud successfully. Thanks so much for sharing your knowledge! Success!
HI Xiao,
Thanks for the tutorial, i followed everything but i am unable to connect my vpn. i called my isp and they gave me a static ip address and still no success.. any help will be appreciated here.
You have a spelling error in one of your commands:
sudo rdnc reconfig
should be:
sudo rdnc reconfig
Hi Xiao Guoan
I’m unable to receive email via Thunderbird port 993 from all of my clients.
Thx for your awesome tutorial
Cu
Thank you Xiao Guoan for this excellent tutorial. By following your instructions I was able to easily get WireGuard up and running without any difficulties at all. With WireGuard I have very noticeable performance increase over my OpenVPN setup. I also love the idea of using keys. Why didn’t I try this sooner? It’s great!
https://www.adulthubtube.com/
Thank you for the clear guide. I’m running into an issue where traffic is selectively responding through the tunnel. Ping to a remote host works; but a curl query to a known good address (can query from the wireguard server itself…both sides) fails. Looking at a packet capture shows the request go from another host on site A’s network to a host on my AWS VPC. We then see the SYN, ACK response from the server on AWS, but the client on site A never receives the response. We just see a bunch of TCP Retransmissions and an eventual timeout on the host on site A.
I’ve adjusted the MTU on both ends of the tunnel to be explicitly 1420 thinking that might be the issue. I’ve also verified the network segment for site A is also set to an MTU of 1420.
Any help would be appreciated. This has been a long week to do something that should have worked right away.
Excellent tutorial!
Xiao, can you give me some instructions on how to configure the Ubuntu 24 client to remotely access other devices on the client’s subnet via wireguard?
Thanks
Thank you so much! This article helped me a lot and it is very complete and useful! Thanks
Hi, few years already passed since your tutorial. Anyway, I setup my wireguard on a VPN following a tutorial from Vultr. Watched through yours and I see you are using bind9 resolver. What is the difference between using/not using a resolver?
Adding a killswitch as you suggested on Ubuntu 24.04 breaks/disconnects my ssh connection to the VPN client machine.
The killswitch:
Does NOT work, and prevents me from ssh’ing into my client machine.
Can you please post a working killswitch configuration for this?
Terrific write-up, kudos! Question: Do you have example Postup and Predown scripts for the current nftables default config in Ubuntu 22.04 and onwards?