How to Set Up SoftEther VPN Server on Ubuntu 22.04/20.04
This tutorial is going to show you how to run your own VPN server by installing SoftEther VPN server on Ubuntu 22.04/20.04. SoftEther VPN is an open-source multi-protocol VPN software that allows individual users to connect to a remote network.
Why Set Up Your Own VPN Server?
- Maybe you are a VPN service provider or a system administrator, which behooves you to set up our own VPN server.
- You don’t trust the no-logging policy of VPN service providers, so you go the self-host route.
- You can use VPN to implement network security policy. For example, if you run your own email server, you can require users to log in only from the IP address of the VPN server by creating an IP address whitelist in the firewall. Thus, your email server is hardened to prevent hacking activities.
- Perhaps you are just curious to know how VPN server works.

Features of SoftEther VPN
- Lightweight and fast. In my test, I can watch YouTube 4K videos with SoftEther VPN. YouTube is blocked in my country (China).
- Runs on Linux, FreeBSD, macOS, Solaris, and Windows servers, including support for X86, AMD64, ARM, PowerPC, MIPS architecture.
- Supports multi-protocols, including traditional protocols like OpenVPN, L2TP, IPSec, SSTP, and the in-house SoftEtherVPN protocol, which is an HTTPS-based VPN protocol.
- There is SoftEther client software for Linux, macOS, Windows, including support for ARM, PowerPC, and MIPS architecture.
- NAT Traversal allows for running SoftEther VPN server behind a NAT without port forwarding. (enabled by default).
- VPN over ICMP / VPN over DNS allows for establishing VPN connection by using ICMP or DNS even if the firewall or router blocks every TCP or UDP connection.
- An HTML5-based modern admin console.
Requirements
To follow this tutorial, you will need a VPS (Virtual Private Server) that can access blocked websites freely (Outside of your country or Internet filtering system). I recommend Kamatera VPS, which features:
- 30 days free trial.
- Starts at $4/month (1GB RAM)
- High-performance KVM-based VPS
- 9 data centers around the world, including United States, Canada, UK, Germany, The Netherlands, Hong Kong, and Isreal.
Follow the tutorial linked below to create your Linux VPS server at Kamatera.
Once you have a VPS running Ubuntu 22.04/20.04, follow the instructions below.
You also need a domain name to enable HTTPS for OpenConnect VPN. I registered my domain name from NameCheap because the price is low and they give whois privacy protection free for life.
Step 1: Install SoftEther VPN Server on Ubuntu 22.04/20.04
Run the following command to download the latest stable version of SoftEther VPN server.
wget https://www.softether-download.com/files/softether/v4.41-9787-rtm-2023.03.14-tree/Linux/SoftEther_VPN_Server/64bit_-_Intel_x64_or_AMD64/softether-vpnserver-v4.41-9787-rtm-2023.03.14-linux-x64-64bit.tar.gz
Extract the archive.
tar xvf softether-vpnserver-*.tar.gz
Change to the vpnserver directory.
cd vpnserver/
Install the following dependency packages on the server.
sudo apt install gcc binutils gzip libreadline-dev libssl-dev libncurses5-dev libncursesw5-dev libpthread-stubs0-dev
Then run the following command to start the build process.
make
Now make will make two binaries from the source code.
- vpnserver: The server binary.
- vpncmd: SoftEther VPN command line management utility
It will also check if your server environment can be used to run the EtherVPN server. As you can see, my server passed the check.

To keep the file system tidy and clean, it’s recommended to move the vpnserver directory to /opt/.
cd ..

sudo mv vpnserver /opt/softether
Step 2: Create Systemd Service Unit
The VPN server can be started with:
sudo /opt/softether/vpnserver start
Stop it with:
sudo /opt/softether/vpnserver stop
To make SoftEther VPN server automatically start at boot time, we can create a systemd service unit for it.
sudo nano /etc/systemd/system/softether-vpnserver.service
Add the following lines to this file.
[Unit]
Description=SoftEther VPN server
After=network-online.target
After=dbus.service

[Service]
Type=forking
ExecStart=/opt/softether/vpnserver start
ExecReload=/bin/kill -HUP $MAINPID

[Install]
WantedBy=multi-user.target
Save and close the file. Then start the VPN server.
sudo systemctl start softether-vpnserver
Enable auto-start at boot time.
sudo systemctl enable softether-vpnserver
You can check its status with:
systemctl status softether-vpnserver
Sample output:
● softether-vpnserver.service - SoftEther VPN server
     Loaded: loaded (/etc/systemd/system/softether-vpnserver.service; enabled; vendor preset: enabled)
     Active: active (running) since Sat 2022-09-17 10:49:15 UTC; 20s ago
   Main PID: 2944053 (vpnserver)
      Tasks: 32 (limit: 629145)
     Memory: 17.9M
        CPU: 603ms
     CGroup: /system.slice/softether-vpnserver.service
             ├─2944053 /opt/softether/vpnserver execsvc
             └─2944054 /opt/softether/vpnserver execsvc
Hint: If the above command doesn’t quit immediately, you can press the Q key to gain back control of the terminal.
If it’s not running, then you can check the journal to find out what’s wrong.
sudo journalctl -eu softether-vpnserver
Check the listening ports.
sudo ss -lnptu | grep vpnserver
Sample output:
udp   UNCONN 0      0            127.0.0.1:1194       0.0.0.0:*    users:(("vpnserver",pid=2952110,fd=62))
udp   UNCONN 0      0       12.234.224.168:1194       0.0.0.0:*    users:(("vpnserver",pid=2952110,fd=58))
udp   UNCONN 0      0              0.0.0.0:51612      0.0.0.0:*    users:(("vpnserver",pid=2952110,fd=5))
udp   UNCONN 0      0              0.0.0.0:53400      0.0.0.0:*    users:(("vpnserver",pid=2952110,fd=11))
udp   UNCONN 0      0              0.0.0.0:56452      0.0.0.0:*    users:(("vpnserver",pid=2952110,fd=53))
udp   UNCONN 0      0              0.0.0.0:40085      0.0.0.0:*    users:(("vpnserver",pid=2952110,fd=16))
tcp   LISTEN 0      128            0.0.0.0:992        0.0.0.0:*    users:(("vpnserver",pid=2952110,fd=40))
tcp   LISTEN 0      128            0.0.0.0:1194       0.0.0.0:*    users:(("vpnserver",pid=2952110,fd=44))
tcp   LISTEN 0      128            0.0.0.0:5555       0.0.0.0:*    users:(("vpnserver",pid=2952110,fd=48))
tcp   LISTEN 0      128            0.0.0.0:443        0.0.0.0:*    users:(("vpnserver",pid=2952110,fd=36))
As you can see, SoftEther VPN server listens on mutiple ports. That’s because it enables several VPN protocols at the same time (L2TP, IPsec, SSTP, OpenVPN, and in-house SoftEther VPN protocol). Port 5555 is used by the HTML5 admin console.
SSTP and SoftEtherVPN protocols uses TCP port 443. If there’s already a web server like Apache or Nginx using TCP port 443, then you won’t be able to connect to SoftEtherVPN server over TCP port 443.
Step 3: Open Ports In Firewall
If there’s a firewall running on your server, then you will need to open several ports. For example, if you use UFW, then run the following command.
sudo ufw allow 80,443,992,1194,555/tcp

sudo ufw allow 1194,51612,53400,56452,40085/udp
Step 4: Configure SoftEther VPN Server
Now we need to use vpncmd to configure SoftEther VPN Server.
/opt/softether/vpncmd
Choose 1 to configure the VPN server.

- The admin console is listening on port 5555. Enter
127.0.0.1:5555to access the admin console. - Then press
Enterto skip Virtual Hub selection. - By default, the password for the admin console is empty. We need to set a password by executing the
ServerPasswordSetcommand.

Next, we need to configure a virtual hub in SoftEtherVPN. We can use the default virtual hub named DEFAULT.
Hub DEFAULT

Then create a VPN account with the following command. Replace username with your preferred username.
UserCreate username
You will be asked to enter a group name, full name and user description. You can press Enter to leave them empty.

Set a password for this user.
UserPasswordSet username

Run the following command to enable virtual NAT and DHCP server function, otherwise VPN clients won’t be able to get an IP address from the VPN server.
SecureNatEnable
Next, we need to configure the NAT for VPN users by executing the DhcpSet command.
DhcpSet
You will be asked a series of questions. Use the following settings.
- Start Point for Distributed Address Band:
192.168.30.10 - End Point for Distributed Address Band:
192.168.30.200 - Subnet Mask:
255.255.255.0 - Lease Limit (Seconds):
7200 - Default Gateway:
192.168.30.1 - DNS Server 1:
192.168.30.1 - DNS server 2:
1.0.0.1 - Domain Name: Press
Enterto skip. - Save Log:
yes

To log out from the admin console, run
exit
Step 5: Install a DNS Resolver on the Server
Since we specify the VPN server as the DNS server for clients, we need to run a DNS resolver on the VPN server. We can install the bind9 DNS server.
sudo apt install bind9
Once it’s installed, BIND will automatically start. You can check its status with:
systemctl status named
Sample output:
● named.service - BIND Domain Name Server
     Loaded: loaded (/lib/systemd/system/named.service; enabled; vendor preset: enabled)
     Active: active (running) since Sun 2020-05-17 08:11:26 UTC; 37s ago
       Docs: man:named(8)
   Main PID: 13820 (named)
      Tasks: 5 (limit: 1074)
     Memory: 14.3M
     CGroup: /system.slice/named.service
             └─13820 /usr/sbin/named -f -u bind
If it’s not running, start it with:
sudo systemctl start named
Edit the BIND DNS server’s configuration file.
sudo nano /etc/bind/named.conf.options
Add the following line to allow VPN clients to send recursive DNS queries.
allow-recursion { 127.0.0.1; 192.168.30.0/24; };

Save and close the file. Then edit the /etc/default/named files.
sudo nano /etc/default/named
Add -4 to the OPTIONS to ensure BIND can query root DNS servers.
OPTIONS="-u bind -4"
Save and close the file.
By default, BIND enables DNSSEC, which ensures that DNS responses are correct and not tampered with. However, it might not work out of the box due to trust anchor rollover and other reasons. To make it work properly, we can rebuild the managed key database with the following commands.
sudo rndc managed-keys destroy
sudo rndc reconfig
Restart BIND9 for the changes to take effect.
sudo systemctl restart named
Then you need to run the following command to allow VPN clients to connect to port 53.
sudo ufw insert 1 allow in from 192.168.30.0/24
Step 6: Obtain a Trusted TLS Certificate from Let’s Encrypt
SoftEtherVPN server creates a self-signed TLS certificate during the installation process, but we will use Let’s Encrypt certificate. The advantage of using Let’s Encrypt certificate is that it’s free, easier to set up, and trusted by VPN client software.
Run the following commands to install Let’s Encrypt client (certbot) from the default Ubuntu repository.
sudo apt install certbot
To check the version number, run
certbot --version
Sample output:
certbot 1.21.0
I recommend using the standalone or webroot plugin to obtain TLS certificate.
Standalone Plugin
If there’s no web server running on your Ubuntu 22.04/20.04 server and you want SoftEther VPN server to use port 443, then you can use the standalone plugin to obtain TLS certificate from Let’s Encrypt. Run the following command. Don’t forget to set DNS A record for your domain name.
sudo certbot certonly --standalone --preferred-challenges http --agree-tos --key-type rsa --email [email protected] -d vpn.example.com
Where:
certonly: Obtain a certificate but don’t install it.--standalone: Use the standalone plugin to obtain a certificate--preferred-challenges http: Perform http-01 challenge to validate our domain, which will use port 80.--agree-tos: Agree to Let’s Encrypt terms of service.--email: Email address is used for account registration and recovery.-d: Specify your domain name.
If SSL certificate is successfully obtained, you will see the following texts.
Successfully received certificate.
Certificate is saved at: /etc/letsencrypt/live/vpn.example.com/fullchain.pem
Key is saved at:         /etc/letsencrypt/live/vpn.example.com/privkey.pem
This certificate expires on 2022-12-16.
These files will be updated when the certificate renews.
Certbot has set up a scheduled task to automatically renew this certificate in the background.

- - - - - - - - - - - - - - - - - - - - - - - - - - - - - - - - - - - - - - - -
If you like Certbot, please consider supporting our work by:
 * Donating to ISRG / Let's Encrypt:   https://letsencrypt.org/donate
 * Donating to EFF:                    https://eff.org/donate-le
Using webroot Plugin
If your Ubuntu 22.04/20.04 server has a web server listening on port 80 and 443, then it’s a good idea to use the webroot plugin to obtain a certificate because the webroot plugin works with pretty much every web server and we don’t need to install the certificate in the web server.
First, you need to create a virtual host for vpn.example.com.
Apache
If you are using Apache, then
sudo nano /etc/apache2/sites-available/vpn.example.com.conf
And paste the following lines into the file.
<VirtualHost *:80>
        ServerName vpn.example.com

        DocumentRoot /var/www/html/
</VirtualHost>
Save and close the file. Then create the web root directory.
sudo mkdir /var/www/html
Set www-data (Apache user) as the owner of the web root.
sudo chown www-data:www-data /var/www/html -R
Enable this virtual host.
sudo a2ensite vpn.example.com
Reload Apache for the changes to take effect.
sudo systemctl reload apache2
Once virtual host is created and enabled, run the following command to obtain Let’s Encrypt certificate using webroot plugin.
sudo certbot certonly --webroot --agree-tos --key-type rsa --email [email protected] -d vpn.example.com -w /var/www/html
Nginx
If you are using Nginx, then
sudo nano /etc/nginx/conf.d/vpn.example.com.conf
Paste the following lines into the file.
server {
      listen 80;
      server_name vpn.example.com;

      root /var/www/html/;

      location ~ /.well-known/acme-challenge {
         allow all;
      }
}
Save and close the file. Then create the web root directory.
sudo mkdir -p /var/www/html
Set www-data (Nginx user) as the owner of the web root.
sudo chown www-data:www-data /var/www/html -R
Reload Nginx for the changes to take effect.
sudo systemctl reload nginx
Once virtual host is created and enabled, run the following command to obtain Let’s Encrypt certificate using webroot plugin.
sudo certbot certonly --webroot --agree-tos --key-type rsa --email [email protected] -d vpn.example.com -w /var/www/html
Step 7: Install the Let’s Encrypt TLS Certificate in SoftEther VPN Server
Log into the VPN admin console as root.
sudo /opt/softether/vpncmd 127.0.0.1:5555
Choose 1 to manage the VPN server. You will need to enter the password set in step 2.

Then run the following command to set TLS Certificate and private key of VPN server.
ServerCertSet
Enter the following path for the certificate.
/etc/letsencrypt/live/vpn.yourdomain.com/fullchain.pem
Enter the following path for the private key.
/etc/letsencrypt/live/vpn.yourdomain.com/privkey.pem

Log out from the admin console.
exit
Restart VPN server.
sudo systemctl restart softether-vpnserver
Establish VPN Connection on Windows
You can use the Windows’s built-in tools to establish VPN connection.
Press Windows key + I to open the Settings app. Then select Network & Internet -> VPN -> Add a VPN Connection.
Enter the VPN Connection details:
- VPN Provider:
Windows (Built-in) - Connection Name:
SoftEther - Server Name or Address:
vpn.example.com(Please don’t add thehttps://prefix). - VPN Type:
Secure Socket Tunneling Protocol (SSTP) - Type of Sign-in info:
username and password - Username: Your SoftEther VPN username
- Password: Your SoftEther VPN password

Save the VPN settings, then select this VPN profile and click Connect.

Once the VPN is connected, you can open Windows Powershell and enter the following command to check your VPN adapter.
ipconfig

As you can see, the SoftEther network adapter has been given the private IP address 192.168.30.10.
Then you should go to https://icanhazip.com to check your public IP address. If it shows your VPN server’s public IP address, that means SoftEther VPN is working properly.
Install and Use SoftEtherVPN Client on Windows
Windows’s built-in VPN tool allows you to use the SSTP VPN protocol. If you want to use the SoftEther VPN protocol, then you need to install the SoftEther VPN client.
Go to SoftEtherVPN download page to download the SoftEther VPN client software for Windows, then run the installer. When selecting software components, choose the first one (SoftEther VPN client).

Once it’s installed, run the client software. Double click add VPN connection.

You will be prompted to create a virtual network adapter. Click Yes to continue.

Choose the default name for the virtual network adapter.

Once the virtual network adapter is created, double click add VPN connection again. The VPN connection setting properties window will appear. You need to enter
- the hostname of the VPN server: like
vpn.yourdomain.com. You need to create DNS A record for this hostname. - port number: You can use the default port
443. - Virtual Hub name:
DEFAULT. - VPN username and password.
Save your settings. Then double-click the name of this VPN connection. It will try to establish a VPN connection to the VPN server
Install SSTP VPN Client on Linux Desktop
Debian/Ubuntu
sudo apt install sstp-client network-manager-sstp
Fedora/CentOS/Rocky Linux/Alama Linux
sudo dnf install sstp-client NetworkManager-sstp
Then you can run the following command to establish VPN conenction.
sudo sstpc --cert-warn --save-server-route --user vpn_username --password vpn_password vpn.example.com:443 usepeerdns require-mschap-v2 noauth noipdefault nobsdcomp nodeflate
Then open another terminal window and run the following command to check if there’s is a network interface named ppp0.
ip addr
It it exists, then the VPN connections is successfully established. Next, run the following command to set the VPN server as the gateway.
sudo route add default ppp0
Now run the following command to check your public IP address. It should show the VPN server’s public IP address.
curl https://icanhazip.com
Auto-Connect on System Startup (Linux Client)
To make SoftEther VPN client automatically connect to the server at boot time, we can create a systemd service unit.
sudo nano /etc/systemd/system/softether-vpnclient.service
Put the following lines to the file. Replace the red text.
[Unit]
  Description=SoftEther VPN Client
  After=network-online.target systemd-resolved.service
  Wants=network-online.target

[Service]
  Type=simple
  ExecStart=/usr/sbin/sstpc --cert-warn --save-server-route --user vpn_username --password vpn_password vpn.example.com:443 usepeerdns require-mschap-v2 noauth noipdefault nobsdcomp nodeflate
  ExecStartPost=/bin/bash -c 'sleep 7; route add default ppp0'
  ExecStop=pkill sstpc
  Restart=Always

[Install]
  WantedBy=multi-user.target
Save and close the file. Then enable this service so that it will start at boot time.
sudo systemctl enable softether-vpnclient.service
To start this Systemd service immediately, run the following command. (If it doesn’t work the first time, then you can try running it again. )
sudo systemctl start softether-vpnclient.service
To stop this Systemd service, run
sudo systemctl stop softether-vpnclient.service
Speed
SoftEther VPN is pretty fast. I can use it to watch 4k videos on YouTube. As you can see from the screenshot below, the connection speed is 69867 Kbps, which translates to 68 Mbit/s.

Auto-Renew Let’s Encrypt Certificate
Edit root user’s crontab file.
sudo crontab -e
Add the following line at the end of the file. It’s necessary to reload html service for the VPN server to pick up new certificate and key file.
@daily certbot renew --quiet; systemctl restart softether-vpnserver
Optimization
You can enable TCP BBR to boost VPN speed. please check out the following tutorial.
Wrapping Up
That’s it! I hope this tutorial helped you install and configure SoftEther VPN on Ubuntu 22.04/20.04. As always, if you found this post useful, then subscribe to our free newsletter to get more tips and tricks 🙂


I think that
/opt/softether/vpnserverneeds to be made an executable.It’s executable by default.
If you use the Linux SSTP client and encounter the following error,
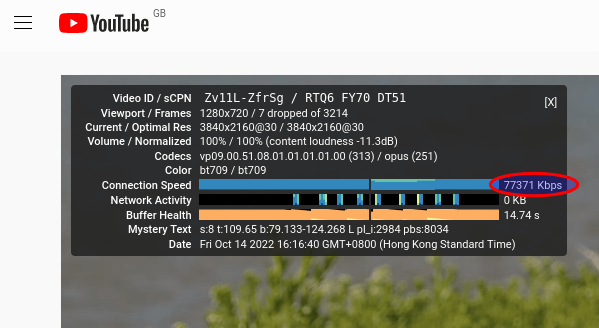
It could be that your connection to the VPN server isn’t good. I once helped my friend set up his SoftEtherVPN server, but packet loss rate is 43.75%, which is super high.
However, even under this unfavorable network condition, SoftherVPN works really well when you enable the TCP BBR algorithm in the Linux kernel. The following screenshot shows that Youtube video play speed is 77371 Kbps, which translates to 75 Mbit/s.
It uses the SSTP VPN protocol on port 443.
hey, how to proceed step 5 if i dont want to set a domain name and just use ip address?
I don’t think SoftEther will work without a domain name.
Thank you for this, and all your other tutorials. I’ve used SoftEther Server on Windows using the vpnazure option without requiring firewall ports to be opened, but never explored it on Linux. This tutorial is excellent. I havent tested it yet, but will do so at the earliest. Thanks again for all the efforts you put into your tutorial articles. God bless you.
Regarding the
error it might just be your password.
I had a password that ended in double exclamation marks (!!) and got that error. I wrapped my password in single quotes and it worked perfectly.
Thanks, Xiao!
Can i use this set up for android and ios ?
And can i control my hub with softether windows vpn manager?
Android users can use the Open SSTP Client app.
iOS users can use the SSTP Connect app.
Yes, you can control the hub with Softether VPN manager on Windows.
Dear sir
so many thanks for help,
only i can not configure android
i tried setup , but unsuccessful,
do youknow other app for android or do you set it for open sstp client app
hello , i used Open SSTP Client app for android
its great with adsl , but not working with mobile data , my location is in iran where unfortunetly has very very powerful internet censorship
hant you any idea for mobile data?
thank you
I have a problem when run the command ServerCertSet to set TLS Certificate and private key of VPN server.
To fix it you need to add ”
--key-type rsa --rsa-key-size 2048” to the end of “sudo certbot certonly --webroot --agree-tos --email [email protected] -d vpn.example.com -w /var/www/html”Like this
or this if you are using the standalone version
I sent you an email please check it regarding small work .
Great turtorial, however the sudo /opt/softether/vpnserver start command seems not to work on Ubuntu 24.
Have you tried it lately?
It looks to me like you moved vpnserver to a FILE named softether. Try “mv vpnserver /opt/softether/”
Notice the last slash.
Well, since it is already moved: “mv /opt/softether /opt/softether/vpnserver”