Part 4: Set Up SPF and DKIM with Postfix on CentOS 8/RHEL 8 Mail Server
After completing part 1 and part 2, we have a working Postfix SMTP server and Dovecot IMAP server. We can send and receive email using a desktop email client. Although I have created correct MX, A and PTR record, my emails were flagged as spam by Gmail and Outlook mail. So in this part, we are going to look at how to improve email delivery to recipient’s inbox by setting up SPF and DKIM on CentOS/RHEL server.
What are SPF and DKIM Records?
SPF and DKIM are two types of TXT records in DNS that can help with preventing email spoofing and making legitimate emails delivered into the recipient’s inbox instead of spam folder. If your domain is abused by email spoofing, then your emails are likely to landed in recipient’s spam folder if the recipient didn’t add you in address book.
SPF (Sender Policy Framework) record specifies which hosts or IP addresses are allowed to send emails on behalf of a domain. You should allow only your own email server or your ISP’s server to send emails for your domain.
DKIM (DomainKeys Identified Mail) uses a private key to add a signature to emails sent from your domain. Receiving SMTP servers verify the signature by using the corresponding public key, which is published in your domain’s DNS records.
Create an SPF Record in DNS
In your DNS management interface, create a new TXT record like below.
TXT @ v=spf1 mx ~all

Where:
- TXT indicates this is a TXT record.
- Enter @ in the name field to represent the apex domain name.
- v=spf1 indicates this is a SPF record and the SPF record version is SPF1.
- mx means all hosts listed in the MX records are allowed to send emails for your domain and all other hosts are disallowed.
- ~all indicates that emails from your domain should only come from hosts specified in the SPF record. Emails sent from other hosts will be flagged as untrustworthy. Possible alternatives are
+all,-all,?all, but they are rarely used.
-all means that emails sent from not-allowed hosts should be rejected, never to land in the recipient’s inbox or spam folder. I have seen it used by facebook.com, but we generally don’t need such a strict policy.
Some folks might think that -all will be better as it will reject emails from untrusted hosts. Well, using -all in your SPF policy can cause your own emails to be rejected when the recipient has two SMTP servers and the main SMTP server goes offline, your emails will be temporarily stored on the backup SMTP server. When the main SMTP server comes back online, the email will be relayed from the backup SMTP server to the main SMTP server. Since you didn’t list the recipient’s backup SMTP server in your SPF policy, the email will be rejected by the recipient’s main SMTP server. So you should use ~all in your SPF policy.
Note that some DNS managers require you to wrap the SPF record with double-quotes like below.
TXT @ "v=spf1 mx ~all"
To check if your SPF record is propagated to the public Internet, you can use the dig utility on your Linux box like below. (On CentOS/RHEL, you need to install the bind-utils package in order to use the dig command: sudo dnf install bind-utils.)
dig your-domain.com txt
The txt option tells dig that we only want to query TXT records.

You can also use online SPF validator such as spf.myisp.ch to see which hosts are allowed to send emails for your domain and debug your SPF record if any error occurs. The dmarcian SPF surveyor can help test your SPF record syntax.
Configuring SPF Policy Agent
We also need to tell our Postfix SMTP server to check the SPF record of incoming emails to detect forged emails. First install required packages:
sudo dnf install epel-release

sudo dnf install pypolicyd-spf
Then add a user for policyd-spf.
sudo adduser policyd-spf --user-group --no-create-home -s /bin/false
Edit the Postfix master process configuration file.
sudo nano /etc/postfix/master.cf
Add the following lines at the end of the file, which tells Postfix to start the SPF policy daemon when it’s starting itself. Policyd-spf will run as the policyd-spf user.
policyd-spf  unix  -       n       n       -       0       spawn
    user=policyd-spf argv=/usr/libexec/postfix/policyd-spf

Note: You should not run policyd-spf in a chroot environment.
Save and close the file. Next, edit Postfix main configuration file.
sudo nano /etc/postfix/main.cf
Append the following lines at the end of the file. The first line specifies the Postfix policy agent timeout setting (for querying DNS). The following lines will impose restrictions on incoming emails by checking SPF record.
policyd-spf_time_limit = 3600
smtpd_recipient_restrictions =
   permit_mynetworks,
   permit_sasl_authenticated,
   reject_unauth_destination,
   check_policy_service unix:private/policyd-spf
Save and close the file. Then restart Postfix.
sudo systemctl restart postfix
Next time, when you receive an email from a domain that has an SPF record, you can see the SPF check results in the raw email header. The following header indicates the sender sent the email from an authorized host.
Received-SPF: Pass (mailfrom) identity=mailfrom;
Setting Up DKIM
Two common pieces of software that can do DKIM signing and verification on Linux are OpenDKIM and Amavis. We will use OpenDKIM because it’s lightweight and OpenDMARC doesn’t work with Amavis.
Install and Configure OpenDKIM on CentOS 8/RHEL8
Install OpenDKIM from the EPEL (Extra Packages for Enterprise Linux) repository.
sudo dnf install epel-release

sudo dnf install opendkim opendkim-tools perl-Getopt-Long
Edit OpenDKIM main configuration file.
sudo nano /etc/opendkim.conf
Find the following line.
Mode v
By default, OpenDKIM runs in verification mode (v), which will verify the DKIM signature of incoming email messages. We need to sign outgoing emails, so change this line to the following to enable signing mode.
Mode sv
Then find the following lines.
## Specifies whether or not the filter should generate report mail back
## to senders when verification fails and an address for such a purpose
## is provided. See opendkim.conf(5) for details.
SendReports yes

## Specifies the sending address to be used on From: headers of outgoing
## failure reports. By default, the e-mail address of the user executing
## the filter is used (executing_user@hostname).
# ReportAddress "Example.com Postmaster" <[email protected]>
When a signature verification fails and the signature included a reporting request (“r=y”) and the signing domain advertises a reporting address (i.e. ra=user) in a reporting record in the DNS, OpenDKIM will send a structured report to that address containing details needed to reproduce the problem. You may want to use a particular From email address to send the report. Uncomment the ReportAddress parameter and change email address. Note that this will not create the backscatter problem, because report emails will sent to an email address specified in the sender domain’s DNS record.
Find the following line and comment it out, because we will use separate keys for each domain name.
KeyFile /etc/opendkim/keys/default.private
Next, find the following 4 lines and uncomment them.
# KeyTable            /etc/opendkim/KeyTable

# SigningTable        refile:/etc/opendkim/SigningTable

# ExternalIgnoreList  refile:/etc/opendkim/TrustedHosts

# InternalHosts       refile:/etc/opendkim/TrustedHosts
Save and close the file.
Create Signing Table, Key Table and Trusted Hosts File
Edit the signing table file.
sudo nano /etc/opendkim/SigningTable
Add the following line at the end of this file. This tells OpenDKIM that if a sender on your server is using a @your-domain.com address, then it should be signed with the private key identified by 20200308._domainkey.your-domain.com.
*@your-domain.com 20200308._domainkey.your-domain.com
20200308 is the DKIM selector. A domain name might have multiple DKIM keys. The DKIM selector allows you to choose a particular DKIM key. You can use whatever name for the DKIM selector, but I found it’s convenient to use the current date (March 8, 2020) as the DKIM selector. Save and close the file. Then edit the key table file.
sudo nano /etc/opendkim/KeyTable
Add the following line, which specifies the location of the DKIM private key.
20200308._domainkey.your-domain.com your-domain.com:20200308:/etc/opendkim/keys/your-domain.com/20200308.private
Save and close the file. Next, edit the trusted hosts file.
sudo nano /etc/opendkim/TrustedHosts
127.0.0.0.1 and ::1 are included in this file by default. Now add the following line. This tells OpenDKIM that if an email is coming from your own domain name, then OpenDKIM should not perform DKIM verification on the email.
.your-domain.com
Save and close the file.
Note: You should not add an asterisk in the domain name like this: *.your-domain.com. There should be only a dot before the domain name.
Generate Private/Public Keypair
Since DKIM is used to sign outgoing messages and verify incoming messages, you need to generate a private key to sign outgoing emails and a public key for receiving SMTP servers to verify the DKIM signature of your email. Public key will be published in DNS.
Create a separate folder for the domain.
sudo mkdir /etc/opendkim/keys/your-domain.com
Generate keys using opendkim-genkey tool.
sudo opendkim-genkey -b 2048 -d your-domain.com -D /etc/opendkim/keys/your-domain.com -s 20200308 -v
The above command will create 2048 bits keys. -d (domain) specifies the domain. -D (directory) specifies the directory where the keys will be stored. I use 20200308 as the DKIM selector. Once the command is executed, the private key will be written to 20200308.private file and the public key will be written to 20200308.txt file.

By default, only root can read and write to the key files. Make opendkim as the owner of the private key.
sudo chown opendkim:opendkim /etc/opendkim/keys/ -R
Publish Your Public Key in DNS Records
Display the public key
sudo cat /etc/opendkim/keys/your-domain.com/20200308.txt
The string after the p parameter is the public key.

In you DNS manager, create a TXT record, enter 20200308._domainkey in the name field. (You need to replace 20200308 with your own DKIM selector.) Then go back to the terminal window, copy everything in the parentheses and paste it into the value field of the DNS record. You need to delete all double quotes and line breaks in the value field. If you don’t delete them, then key test in the next step will probably fail.

Test DKIM Key
Enter the following command on your CentOS 8/RHEL 8 server to test your key.
sudo opendkim-testkey -d your-domain.com -s 20200308 -vvv
If everything is OK, you will see the key OK message.
opendkim-testkey: using default configfile /etc/opendkim.conf
opendkim-testkey: checking key '20200308._domainkey.linuxbabe.com'
opendkim-testkey: key OK
Note that your DKIM record may need sometime to propagate to the Internet. Depending on the domain registrar you use, your DNS record might be propagated instantly, or it might take up to 24 hours to propagate. You can go to https://www.dmarcanalyzer.com/dkim/dkim-check/, enter 20200308 as the selector and enter your domain name to check DKIM record propagation.
If you see “Key not secure”, don’t panic. This is because DNSSEC isn’t enabled on your domain name. DNSSEC is a security standard for secure DNS query. Most domain names haven’t enabled DNSSEC. You can continue to follow this guide.
Now we can start the opendkim service.
sudo systemctl start opendkim
And enable auto-start at boot time.
sudo systemctl enable opendkim
OpenDKIM listens on 127.0.0.1:8891.
Connect Postfix to OpenDKIM
Edit Postfix main configuration file.
sudo nano /etc/postfix/main.cf
Add the following lines at the end of this file, so Postfix will be able to call OpenDKIM via the milter protocol. Note that you should use 127.0.0.1 as the address. Don’t use localhost.
# Milter configuration
milter_default_action = accept
milter_protocol = 6
smtpd_milters = inet:127.0.0.1:8891
non_smtpd_milters = $smtpd_milters
Save and close the file. Then add postfix user to opendkim group.
sudo gpasswd -a postfix opendkim
Restart postfix service.
sudo systemctl restart postfix
SPF and DKIM Check
You can now send a test email from your mail server to your Gmail account to see if SPF and DKIM checks are passed. On the right side of an opened email message in Gmail, if you click the show original button from the drop-down menu, you can see the authentication results.

If your message is not signed and DKIM check failed, you may want to check postfix log (/var/log/maillog) to see what’s wrong in your configuration. Your email server will also perform SPF and DKIM check on sender’s domain. You can see the results in the email headers. The following is SPF and DKIM check on a sender using Gmail.
Received-SPF: Pass (mailfrom) identity=mailfrom; client-ip=2607:f8b0:4864:20::c2d; helo=mail-yw1-xc2d.google.com; [email protected]; receiver=<UNKNOWN>
Authentication-Results: mail.linuxbabe.com;
	dkim=pass (2048-bit key; unprotected) header.d=gmail.com [email protected] header.b="XWMRd2co";
	dkim-atps=neutral
Configuration Error in Email Client
DKIM signing could fail if you don’t use the correct SMTP/IMAP settings in your email client.
Correct Settings:
- SMTP protocol: enter
mail.your-domain.comas the server name, choose port 587 and STARTTLS. Choosenormal passwordas the authentication method. - IMAP protocol: enter
mail.your-domain.comas the server name, choose port 143 and STARTTLS. Choosenormal passwordas the authentication method.
or
- SMTP protocol: enter
mail.your-domain.comas the server name, choose port 465 and SSL/TLS. Choosenormal passwordas the authentication method. - IMAP protocol: enter
mail.your-domain.comas the server name, choose port 993 and SSL/TLS. Choosenormal passwordas the authentication method.
Wrong Settings:
- Use port 25 as the SMTP port in mail clients to submit outgoing emails.
- No encryption method was selected.
Port 25 should be used for SMTP server to SMTP server communication. Please don’t use it in your email client to submit outgoing emails.
You should select an encryption method (STARTTLS or SSL/TLS) in your email client.
Testing Email Score and Placement
Now you can go to https://www.mail-tester.com. You will see a unique email address. Send an email from your domain to this address and then check your score. As you can see, I got a perfect score.

Mail-tester.com can only show you a sender score. There’s another service called GlockApps that allow you to check if your email is placed in the recipient’s inbox or spam folder, or rejected outright. It supports many popular email providers like Gmail, Outlook, Hotmail, YahooMail, iCloud mail, etc

Microsoft Mailboxes (Hotmail.com, Outlook.com)
Microsoft seems to be using an internal blacklist that block many legitimate IP addresses. If your emails are rejected by outlook or hotmail, you need to submit the sender information form. After that, your email will be accepted by outlook/hotmail, but may still be labeled as spam. In my test, the email landed in my Gmail inbox. However, it’s stilled labeled as spam in my outlook.com email although both SPF and DKIM are passed.
What if Your Emails Are Still Being Marked as Spam?
I have more tips for you in this article: How to stop your emails being marked as spam.
Next Step
In part 5, we will see how to create DMARC record to protect your domain from email spoofing. As always, if you found this post useful, then subscribe to our free newsletter to receive more useful articles, or follow us on Twitter or like our Facebook page.


This worked like a dream. My new mailserver has working TLS, DKIM, SPF and DMARC. Thanks for the clear instructions!
greetings. I’m using centos8 on Kamatera and the guide has been great so far. I’m having problems getting the DKIM TXT value into DNS settings. How did you structure the value?
Is your domain name registered at Kamatera? I only use the VPS service at Kamatera. My domain was registered at NameCheap, then I migrated my domain to Cloudflare, so I edit my DNS records at Cloudflare.
mine was registered at namecheap as well. I hadn’t though of having cloudflare manage my DNS. Setting it up was very easy and now DKIM checker (https://www.dmarcanalyzer.com/dkim/dkim-check/) is reporting a valid DKIM record. Thanks!
regarding SPF: why not select the most restrictive method for forgers? As end user, you still get the mail with the forged enveloppe-from in your mailbox and most mail-users don’t bother with checking headers for “softfail”, and that’s understandable.
So in order to get something out of this, you’ll probably want another mechanism to pickup on the “softfail” header? Personally, I do like the noqueue option, not even wasting bandwith on forged emails. Just my way I guess? Are there good reasons to just go for softfail? I guess so since it appears to be the most generally used.
Using
-allin SPF policy will sometimes cause your own emails to be rejected. For example, if the recipient’s main mail server goes offline, and your email is sent to a backup mail server, then the backup mail server sends your email to the main mail server. Your email will be rejected. So use softfail (~all) in your SPF record.Nowadays, it’s a standard practice to combine SPF and DKIM to form a DMARC policy to reject forged emails.
Thanks for all of this, very helpful. But I am having issues with DKIM for some reason. All testing seems to be good on the server, but when actually sending an email from a client it fails.
Spent several hours searching and double checking things and can not figure out what I missed. Any help would be greatly appreciated.
This error message (invalid public key) is self-explanatory. The DKIM public key isn’t entered correctly in your DNS record.
Hello,
I’ve been following the tutorials from Part 1 to here. Everything is working flawlessly until this tutorial. After adding the SPF and DKIM, I am unable to send emails. I can still receive emails but not send.
What I’ve noticed, is that my DKIM record is good, then when I check it again, it’s bad. I’m using: https://www.dmarcanalyzer.com/dkim/dkim-check/ to test it with. I don’t change anything on my DNS server, but I test it about every 2-5 minutes and it’s mixed results. Pass, Fail, Fail, Pass, Pass, Fail, Pass, Fail, etc… My domain is dlhg.tk, mail server is mail.dlhg.tk (for reference).
Any direction on this would be beneficial.
If you have a tutorial on setting up your own public DNS server so I can resolve this, that would be awesome. On my internal network, I run two DNS servers; internal for ad blocking running dnsmasq, and one for DNS queries running bind9. The dnsmasq queries the bind9, which then queries the root servers. Both servers are Centos7. My bind9 server would be my public facing DNS server if this is a route you recommend (using my own DNS for public queries).
My DKIM listing is:
20201110._DOMAINKEY
And now on the server, I’m getting this error:
Please advise…
Thank you.
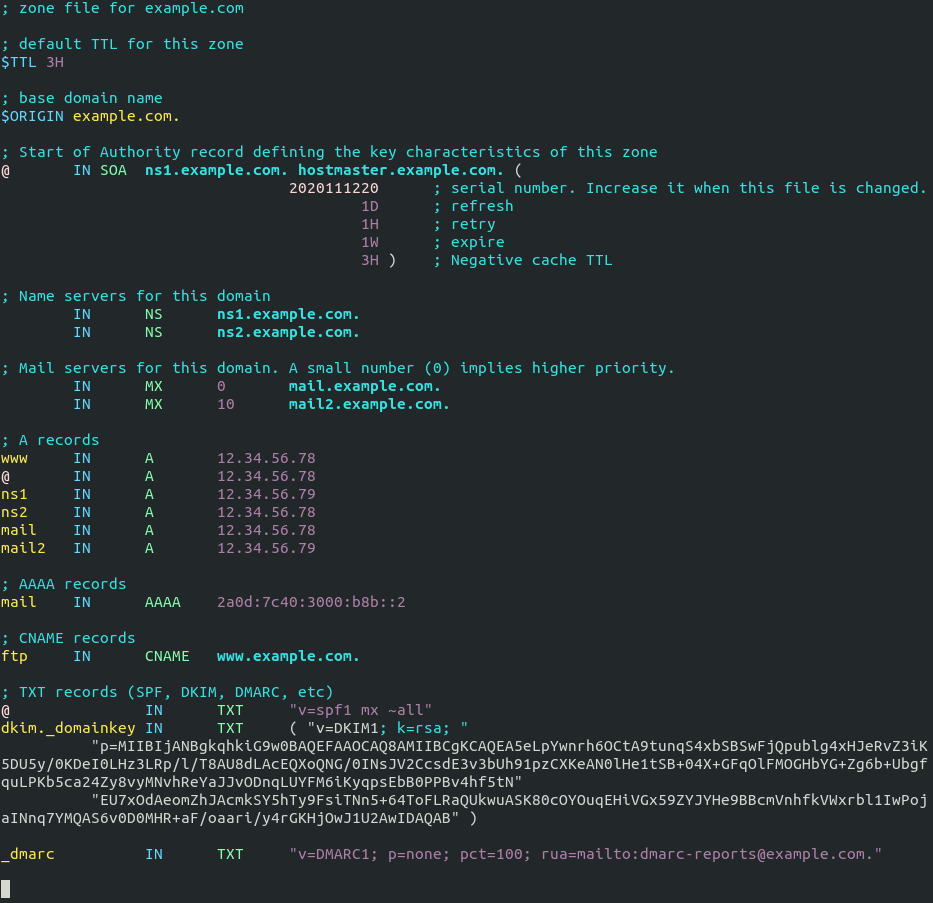
The DKIM record output by OpenDKIM is in BIND format.

If you run your own BIND authoritative DNS server, simply copy the entire DKIM record output by OpenDKIM and paste it to your BIND zone file.
The following screenshot shows an example DKIM record in a BIND zone file.
Ok, so my dns record has been good every time I’ve tested for the last few days using “https://www.dmarcanalyzer.com/dkim/dkim-check/” to test. However, when I run the command “opendkim-testkey -d dlhg.tk -s 20201110 -vvv”, it errors. From what I can see, they match between the DNS record and my server, but the server doesn’t accept it.
 cat keys/dlhg.tk/20201110.txt
20201110._domainkey     IN      TXT     ( "v=DKIM1; k=rsa; "
          "p=MIIBIjANBgkqhkiG9w0BAQEFAAOCAQ8AMIIBCgKCAQEAzCS3X6OevR+U8pEjEieYkp0LP68mGC4zMyO9r7sAhJODHabqxk5tip8+ZWV9ny7sTIXXH1c/hWDqwJDqI0BLcPMYEO2UyCyCEwk/GfhcwpkH5nhJ6PGOXAdcM5DfgPLSshjqhcPFxEVUYDfL57pfbeBnkon5VHkK1SL7myx/RUbVAFLBg6+NYGbK9XvW2PI7cJDxldMWlduSlq"
          "U0bHUHsjjttt9gYASN82N/u1c3896+9W4qBrIDOMzs4Z7tcwgndDvxiDILxG31hw8w8uEfCvG+AtaVT1nyOdkWo4u2bLaMvnB81oYWxG+gRtIo7kyKXDFEE1gGY0mPbTRDLXmz/QIDAQAB" )  ; ----- DKIM key 20201110 for dlhg.tk
[root@mail ~]# opendkim-testkey -d dlhg.tk -s 20201110 -vvv
opendkim-testkey: using default configfile /etc/opendkim.conf
opendkim-testkey: checking key '20201110._domainkey.dlhg.tk'
opendkim-testkey: syntax error in key data (ASCII 0x22 at offset 15)
[root@mail ~]#
Your thoughts on this error?
Your DKIM record has two backslashes.

Hello,
I believe the two ‘\’ are escape characters in Linux. When I go in and look at the field, this is what it shows:
I’ll try without the internal quotes. The ones between k=rsa;” and “p=MIIB…
Resolved – removing ALL the quotes and placing just a pair of quotes around the whole text works. It looks like this in my DNS record now:
Thank you for manual. There is one bug in add user postfix to opendkim group. Postfix will not send/sign mails after that and you will must remove postfix from opendkim group to get it working. See /var/log/mail.log with notice that have more users in opendkim group it’s not secure.
Never had this problem on my mail servers.
@Thomas,
Is the error you receive similar to the following (this is using the eM client in Windows):
[SMTP]Cannot send message (Email body not accepted due to the following reason:
    "4.7.1 Service unavailable - try again later
")
Once I followed this part of the tutorial, I could no longer send emails; even after getting the DKIM and SPF records setup correctly.
You should use port 587 or 465 as the SMTP port in mail clients to submit outgoing emails. Don’t use port 25.
Hi Xiao,
It’s amazing work.
i had setup my own mail server, SMTP, Dovecot and Postfix
everything almost works fine, however when i check my tls and ciphers using https://www.paubox.com/secure-email-check and other sites to check how secure my smtp it always
A- Your mail server is insecure and vulnerable due to the weak ciphers
B- Your system requires authentication (AUTH) on port 587 before the MAIL FROM command is issued If connection to either port 25 or 465 fails, you will receive a failed score
C- SPF Client Test Could, not conclusively decide if you are enforcing an SPF connection test as some servers tag SPF violators instead of rejecting them at a connection level.
TLS_DHE_RSA_WITH_CAMELLIA_256_CBC_SHA Non-compliant with HIPAA guidance
TLS_DHE_RSA_WITH_CAMELLIA_128_CBC_SHA Non-compliant with HIPAA guidance
TLS_RSA_WITH_CAMELLIA_256_CBC_SHA. Non-compliant with HIPAA guidance
TLS_RSA_WITH_CAMELLIA_128_CBC_SHA. Non-compliant with HIPAA guidance
this is the current configuration, how can i sort these issues? i am using Centos 8 .
Postfix
smtp_use_tls = yes
smtpd_use_tls = yes
smtpd_tls_auth_only = yes
smtp_tls_security_level = encrypt
#encrypt
smtpd_tls_security_level = may
smtpd_sasl_security_options = noanonymous, noplaintext
smtpd_sasl_tls_security_options = noanonymous
smtpd_tls_session_cache_database = btree:${data_directory}/smtpd_scache
smtp_tls_session_cache_database = btree:${data_directory}/smtp_scache
smtp_tls_ciphers = high
smtpd_tls_ciphers = high
smtp_tls_mandatory_ciphers = high
smtpd_tls_mandatory_ciphers = high
smtp_tls_note_starttls_offer = yes
tls_random_source = dev:/dev/urandom
#Force TLSv1.3 or TLSv1.2
smtpd_tls_mandatory_protocols = !SSLv2, !SSLv3, !TLSv1, !TLSv1.1
smtpd_tls_protocols = !SSLv2, !SSLv3, !TLSv1, !TLSv1.1
smtp_tls_mandatory_protocols = !SSLv2, !SSLv3, !TLSv1, !TLSv1.1
smtp_tls_protocols = !SSLv2, !SSLv3, !TLSv1, !TLSv1.1
smtpd_tls_mandatory_exclude_ciphers = D5, DES, ADH, RC4, PSD, SRP, 3DES, eNULL, aNULL, EXP, MEDIUM, LOW, SSLv2
smtpd_tls_exclude_ciphers = MD5, DES, ADH, RC4, PSD, SRP, 3DES, eNULL, aNULL, EXP, MEDIUM, LOW, SSLv2
smtp_tls_mandatory_exclude_ciphers = D5, DES, ADH, RC4, PSD, SRP, 3DES, eNULL, aNULL, EXP, MEDIUM, LOW, SSLv2
smtp_tls_exclude_ciphers = MD5, DES, ADH, RC4, PSD, SRP, 3DES, eNULL, aNULL, EXP, MEDIUM, LOW, SSLv2
#tls_ssl_options = 0x40000000, no_ticket, no_compression, NO_RENEGOTIATION
#tls_ssl_options = NO_RENEGOTIATION
#tls_ssl_options = no_ticket, no_compression
tls_ssl_options = 0x40000000
#tls_medium_cipherlist = ECDHE-ECDSA-AES128-GCM-SHA256:ECDHE-RSA-AES128-GCM-SHA256:ECDHE-ECDSA-AES256-GCM-SHA384:ECDHE-RSA-AES256-GCM-SHA384:ECDHE-ECDSA-CHACHA20-POLY1305:ECDHE-RSA-CHACHA20-POLY1305:DHE-RSA-AES128-GCM-SHA256:DHE-RSA-AES256-GCM-SHA384
tls_preempt_cipherlist = yes
tls_high_cipherlist = kEECDH:+kEECDH+SHA:kEDH:+kEDH+SHA:+kEDH+CAMELLIA:kECDH:+kECDH+SHA:kRSA:+kRSA+SHA:+kRSA+CAMELLIA:!aNULL:!eNULL:!SSLv2:!RC4:!MD5:!DES:!EXP:!SEED:!IDEA:!3DES
Lets Encrypt
ssl_protocols TLSv1.2 TLSv1.3;
ssl_prefer_server_ciphers off;
ssl_ecdh_curve secp384r1;
ssl_ciphers ECDHE-ECDSA-AES128-GCM-SHA256:ECDHE-RSA-AES128-GCM-SHA256:ECDHE-ECDSA-AES256-GCM-SHA384:ECDHE-RSA-AES256-GCM-SHA384:ECDHE-ECDSA-CHACHA20-POLY1305:ECDHE-RSA-CHACHA20-POLY1305:DHE-RSA-AES128-GCM-SHA256:DHE-RSA-AES256-GCM-SHA384;
After adding dkim in the postfix config I get following error in postfix when sending a mail:
postfix/cleanup[989056]: 68731120FEB: milter-reject: END-OF-MESSAGE from unknown[xxx.xxx.xxx.xxx]: 4.7.1 Service unavailable – try again later
After removing the milter configuration from the postfix main.cf file, mails can be send again.
Is there still some SELinux permission to be set?
Thanks!
The log indicates you have enabled greylisting, but it should not be in milter-reject. Can you post your configurations here?
No extra SELinux command is needed.
And are you using iRedMail? If yes, then you don’t need to follow this tutorial.
iRedMail is not being used.
The main.cf and master.cf config is shown below.
Thanks!
main.cf
master.cf
# # Postfix master process configuration file. For details on the format # of the file, see the master(5) manual page (command: "man 5 master" or # on-line: http://www.postfix.org/master.5.html). # # Do not forget to execute "postfix reload" after editing this file. # # ========================================================================== # service type private unpriv chroot wakeup maxproc command + args # (yes) (yes) (no) (never) (100) # ========================================================================== smtp inet n - n - - smtpd -v submission inet n - n - - smtpd smtps inet n - n - - smtpd -v pickup unix n - n 60 1 pickup cleanup unix n - n - 0 cleanup qmgr unix n - n 300 1 qmgr tlsmgr unix - - n 1000? 1 tlsmgr rewrite unix - - n - - trivial-rewrite bounce unix - - n - 0 bounce defer unix - - n - 0 bounce trace unix - - n - 0 bounce verify unix - - n - 1 verify flush unix n - n 1000? 0 flush proxymap unix - - n - - proxymap proxywrite unix - - n - 1 proxymap smtp unix - - n - - smtp relay unix - - n - - smtp -o syslog_name=postfix/$service_name showq unix n - n - - showq error unix - - n - - error retry unix - - n - - error discard unix - - n - - discard local unix - n n - - local virtual unix - n n - - virtual lmtp unix - - n - - lmtp anvil unix - - n - 1 anvil scache unix - - n - 1 scache # # ==================================================================== # Interfaces to non-Postfix software. Be sure to examine the manual # pages of the non-Postfix software to find out what options it wants. # # Many of the following services use the Postfix pipe(8) delivery # agent. See the pipe(8) man page for information about ${recipient} # and other message envelope options. # ==================================================================== mailman unix - n n - - pipe flags=FR user=list argv=/usr/lib/mailman/bin/postfix-to-mailman.py ${nexthop} ${user} # incomming mail to amavisd for spamfiltering with spamassasin and virus scanning with clamAV amavisfeed unix - - n - 2 lmtp -o lmtp_data_done_timeout=1200 -o lmtp_send_xforward_command=yes -o lmtp_tls_note_starttls_offer=no # # reinjecting the scanned mail into postfix for delivery 127.0.0.1:10025 inet n - n - - smtpd -o content_filter= -o smtpd_delay_reject=no -o smtpd_client_restrictions=permit_mynetworks,reject -o smtpd_helo_restrictions= -o smtpd_sender_restrictions= -o smtpd_recipient_restrictions=permit_mynetworks,reject -o smtpd_data_restrictions=reject_unauth_pipelining -o smtpd_end_of_data_restrictions= -o smtpd_restriction_classes= -o mynetworks=127.0.0.0/8 -o smtpd_error_sleep_time=0 -o smtpd_soft_error_limit=1001 -o smtpd_hard_error_limit=1000 -o smtpd_client_connection_count_limit=0 -o smtpd_client_connection_rate_limit=0 -o receive_override_options=no_header_body_checks,no_unknown_recipient_checks,no_milters -o local_header_rewrite_clients= -o smtpd_milters= -o local_recipient_maps= -o relay_recipient_maps=Apparently I somehow added a space in the path to the key file and didn’t catch the error in the opendkim logs.
I always get the following output when verifying the DKIM key:
I am not able to receive the TXT dns records via dig, I don't know why. I added them in my hosters dns and in cloudflare.
Do you have any idea what might be wrong?
I’m seeing this error a few times when sending to a microsoft account. It also happened when leatherman tried to email me. I did not receive the email. Here’s a paste of my maillog
https://p.twil.cx/yic.apache
I had a typo in the user creation command
Hi,
i have a problem: I completed all the steps and I get
re-cheching all steps I only found one difference:
launching
i get a txt file like this
why is there a “example.com” ??
thank you
When following this tutorial, you need to replace every instance of
your-domain.comwith your own domain name. I didn’t use example.com in this tutorial, so perhaps, there is some code in your configuration file that is copied from other places.HI xiao!
thanks for your quick answer!!
of course I followed your tutorial.
i found the error.. I forgot “-d” in the command. so it created the key for example.com
now if I check my DKIM on this site https://www.dmarcanalyzer.com/dkim/dkim-checker/
(20210808 – tuffoserver.tk) it says OK, but if I try to send an email to my gmail I get this:
what could I be missing?
thanks!
Looks like you made a typo or syntax error in your configuration file.
you were totally right. mispelled key. I love you, you are great!
Just wondering, what DNS manager are you using? I can’t find it on my server? Not sure how to edit the zone file manually unless I see how it appears in the zone file.
Would it look like the spf record?
TIA
If you need an easy way, you can go to your DNS hosting service (usually your domain registrar like NameCheap) to create DNS records. Your domain registrar usually provides this service for free.
You can also set up your own authoritative DNS server, but it requires time and skill to maintain.
This is a fantastic howto. I used it for a Centos 7.9 based system, and it was basically exactly what is needed to get spf/dkim and postfix integrated. I have a complicated setup with 4 domains, 3 of which are virtual, so I was concerned that it might break things that took me a lot of time and experimentation to setup and get working.
The only gotcha I found was that the /etc/opendkim.conf setup instructions seem to be missing one point, which is that you need to add
or the open dkim service will immediately stop with an error. I don’t know if this is a default entry in that file in the Centos8 package but it’s not in the one you get with Centos7.
Great job!
Yes, this entry is included by default on CentOS 8.
Hi Xiao,
I am using a freshly installed CentOS Stream 8. While following the step “Generate Private/Public Keypair” I noticed that I don’t have the command “opendkim-keygen” but instead “opendkim-default-keygen”. And this version don’t work the same way. So I fixed this with installing opendkim-tools:
dnf install opendkim-tools
After that the correct command “opendkim-keygen” was available.
Thanks and you did a great job 🙂
Cheers,
Pascal
Hi,
your guide is very good so far but i’m using RHEL8 and opendkim does not work for me…
[root@rhel8-prod opendkim]# sudo opendkim-default-keygen -b 2048 -d example.com -D /etc/opendkim/keys/example.com -s 20200308 -v
Generating default DKIM keys: /sbin/opendkim-default-keygen: line 30: /usr/sbin/opendkim-genkey: No such file or directory
chmod: cannot access ‘/etc/opendkim/keys/default.private’: No such file or directory
chmod: cannot access ‘/etc/opendkim/keys/default.txt’: No such file or directory
Default DKIM keys for red-panda.cz created in /etc/opendkim/keys.
unfortunately keys we’ve not generated..
Any idea how i can make this work ?
Thanks,
David.
Maybe you need to run:
Thanks ! This helped !
Will there be an AlmaLinux 9 update for this series?
Thank you for your awesome step by step how-tos they usually work for me everytime but this time I am experiencing the following error when I uncomment the following line:
currently I commented it out because I am not getting any emails and see the following error in maillog:
Do you happen to know why this is?
I am running AlmaLinux 8 with Python 3.6.8
I think the answer is dnf install python3-authres : you can read more : https://www.lsmodena.com/wordpress/?p=331
Hi,
I run Alma Linux 9 and I have exactly the same error as Michael have:
The error started a day before Alma Linux 9.1 was released – I was running Alma Linux 9.0, then I have updated the system to Alma Linux 9.1 and the error is still present. I was running the mail server with the same settings/unchanged configuration without problems for months before this error appeared.
The only solution for now is the same as Michael did – disable the policyd-spf checking.
Does anybody have the same problem? A solution would be much appreciated.
Best regards
I think I resolved the issue run:
then restart postifx….so far I have not seen the issue again…
Hi Michael,
thank you for your reply.
I have also solved the problem, but I have used a different approach – I have rebuild and installed the rpm package from the Fedora 37/38 source https://src.fedoraproject.org/rpms/python-authres
as there is currently no rpm in EPEL 9. After uncommenting the check_policy_service unix:private/policyd-spf and restarting postfix the policyd-spf checking works again!
If I would have Alma Linux 8 server I would prefer to install the rpm package from EPEL 8 repository by simply executing the command “dnf install python-authres” – I prefer this way 🙂
Anyway, thank you for pointing me to the right direction!
Best regards,
I ran a dnf update the other day and it seems to have broken my ability to receive email. Here’s what I get out of /var/log/maillog
“`
Dec 8 13:04:31 toph postfix/smtpd[1639603]: connect from mail-ot1-f52.google.com[209.85.210.52]
Dec 8 13:04:31 toph postfix/smtpd[1639603]: discarding EHLO keywords: CHUNKING
Dec 8 13:04:31 toph postfix/smtpd[1639603]: Anonymous TLS connection established from mail-ot1-f52.google.com[209.85.210.52]: TLSv1.3 with cipher TLS_AES_128_GCM_SHA256 (128/128
Dec 8 13:04:31 toph postfix/smtpd[1639603]: discarding EHLO keywords: CHUNKING
Dec 8 13:04:32 toph postfix/spawn[1639607]: warning: command /usr/libexec/postfix/policyd-spf exit status 1
Dec 8 13:04:32 toph postfix/smtpd[1639603]: warning: premature end-of-input on private/policyd-spf while reading input attribute name
Dec 8 13:04:33 toph postfix/spawn[1639607]: warning: command /usr/libexec/postfix/policyd-spf exit status 1
Dec 8 13:04:33 toph postfix/smtpd[1639603]: warning: premature end-of-input on private/policyd-spf while reading input attribute name
Dec 8 13:04:33 toph postfix/smtpd[1639603]: warning: problem talking to server private/policyd-spf: Connection reset by peer
Dec 8 13:04:33 toph postfix/smtpd[1639603]: NOQUEUE: reject: RCPT from mail-ot1-f52.google.com[209.85.210.52]: 451 4.3.5 : Recipient address rejected: Server conf
“`
I tried running `policyd-spf` manually and get this error:
“`
[twiclo@toph ~]$ sudo -u policyd-spf /usr/libexec/postfix/policyd-spf
Traceback (most recent call last):
File “/usr/libexec/postfix/policyd-spf”, line 6, in
from pkg_resources import load_entry_point
File “/usr/lib/python3.9/site-packages/pkg_resources/__init__.py”, line 3239, in
def _initialize_master_working_set():
File “/usr/lib/python3.9/site-packages/pkg_resources/__init__.py”, line 3222, in _call_aside
f(*args, **kwargs)
File “/usr/lib/python3.9/site-packages/pkg_resources/__init__.py”, line 3251, in _initialize_master_working_set
working_set = WorkingSet._build_master()
File “/usr/lib/python3.9/site-packages/pkg_resources/__init__.py”, line 567, in _build_master
ws.require(__requires__)
File “/usr/lib/python3.9/site-packages/pkg_resources/__init__.py”, line 884, in require
needed = self.resolve(parse_requirements(requirements))
File “/usr/lib/python3.9/site-packages/pkg_resources/__init__.py”, line 770, in resolve
raise DistributionNotFound(req, requirers)
pkg_resources.DistributionNotFound: The ‘spf-engine==2.9.3’ distribution was not found and is required by the application
“`
In fact I’m missing quite a few modules here. When I installed spf-engine with pip3 it went on to tell me I’m missing pydns. I can’t install pydns becuase I’m missing “Type”
Did my DNF update remove python2? That’s probably for the best but is there a replacement spf thing for python3?
Again, fantastic guide. Learning tons. Everything works well, DKIM shows up in mxtoolbox et al but when I send emails, all the headers read “dkim=none”. Google doesn’t even give me one. Does it take time to work its way around? Am I being impatient? I followed the guide to the end
Just following up to my own question to maybe help anyone else. I miss pretty obvious stuff sometimes and I was combing through the mail logs /var/log/maillog and kept seeing a failure of postfix to connect to 127.0.0.1:8891. After more red herrings it occurred to me to see if something was listening on 8891. Turns out that nothing was.
After more reading and searching, I wound up back at /etc/opendkim.conf. I found the “Socket” line and simply uncommented “Socket inet:8891@localhost” and commented the “opendkim.sock” line. Saved, restarted opendkim and sent an email. My valid DKIM suddenly showed up in the message header.
Isso funcionou pra mim. Me ajudou obrigao!
It works for me. Helped me thanks
Alternatively, since the default socket in AlmaLinux (and probably Rocky / Cent) is:
local:/run/opendkim/opendkim.sock
It might be better to replace the entry from main.cf in the guide above from:
smtpd_milters = inet:127.0.0.1:8891
to:
smtpd_milters = local:/run/opendkim/opendkim.sock
No need to expose a port to internet traffic if a local socket will get the job done.
This works for me in AlmaLinux 9.4
This might help some people: using opendkim-2.11.0-0.36.el9.x86_64 on Almalinux, I ran into trouble with the default opendkim config: /etc/opendkim.conf contained the lines:
# Socket inet:8891@localhost
Socket local:/run/opendkim/opendkim.sock
i.e. the dkim server did not listen on port 8891 as specified in the postfix main.cf config given above:
smtpd_milters = inet:127.0.0.1:8891
This resulted in this error in the /var/log/maillog:
postfix/submission/smtpd[8872]: warning: connect to Milter service inet:127.0.0.1:8891: Connection refused
Edit opendkim.conf to uncomment the 8891 line, and comment out the .sock line, and restart opendkim with “systemctl restart opendkim”, and now postfix can talk to the milter and add the DKIM headers to emails OK.
Sorry, just saw Brad answered this above. I had searched for the error message but no-one on that thread actually quoted it, so I missed their comment 🙂
Wonderful guide. Second server I’ve used it for. Anyone else love Rocky Linux as much as I do?
Just in case anyone is having an issue with dkim not writing to the email even though everything else seems to be fine: In the spots where you configure 127.0.0.1:8891, it needs to match with the Socket entry in the opendkim.conf.
You’ll see a generic socket there. That has to be commented out and a new Socket has to be defined:
Socket inet:[email protected] else everything will work but your emails won’t be signed. Remember to restart opendkim after. systemctl restart opendkim
I only figured this out by randomly checking to see if opendkim was even listening on 8891. I saw telnet had no entries for the port. Tried netstat which didn’t find anything either. Then after some internet searches I saw some socket talk but no one mentioned changing it to 127.0.0.1 because most older posts seem to use localhost, apparently.
Either way, hope this helps. Good luck with your servers.
hahahaha! Second guy that didn’t see the same thing answered above.
I guess that’s the problem with long comment sections.
This is an absolutely great series of articles! My second time setting up a server based on it.
One minor addition for EL9 distros:
opendkim and opendkim-tools need dependencies from CodeReadyBuilder repo:
That and the inet socket thing mentioned above in comments
Hi
I’m trying to setup using almalinux 10, but it seems pypolicyd-spf rpm does not exist. Any suggestions?
Thank you