Part 3: PostfixAdmin – Create Virtual Mailboxes on Debian 11/10 Mail Server
In previous articles, we discussed how to set up your own mail server on Debian from scratch. In part 1 and part 2 of this tutorial series, we learned how to set up Postfix SMTP server and Dovecot IMAP server, but so far we can only have email addresses for users with local Unix account. This tutorial is going to show you how to create virtual mailboxes on Debian mail server with PostfixAdmin, which is an open-source web-based interface to configure and manage a Postfix-based email server for many domains and users.
With virtual mailboxes, we don’t need to create local Unix account for each email address. If you are going to set up a mail server for a company or organization, it’s always better to have an easy way to create virtual mailboxes in a web-based interface, which also allows users to change their passwords. That’s where PostfixAdmin comes in.
PostfixAdmin Features
- manage mailboxes, virtual domains, and aliases
- vacation/out-of-office messages (Personally I think this feature is better done in Roundcube Webmail.)
- alias domains (forwarding one domain to another with recipient validation)
- users can manage their own mailbox (change alias, password, and vacation message)
- quota support for single mailboxes and total quota of a domain
- fetchmail integration: You can fetch emails from your original email address to your new email address.
- command line client postfixadmin-cli for those who don’t want to click around in a web interface 😉
Note: Once you finish part 3, you can no longer use local Unix accounts as email addresses. You must create email addresses from the PostfixAdmin web interface.
Requirements
I assume that you have followed part 1 and part 2 of this tutorial series. If you followed mail server tutorials on other websites, I recommend purging your configurations (sudo apt purge postfix dovecot-core) and start over with my tutorial series, so you are not going to be confused by different setup processes.
Once the above requirements are met, let’s install and configure PostfixAdmin.
Step 1: Install MariaDB Database Server
PostfixAdmin is written in PHP and requires a database (MySQL/MariaDB, PostgreSQL or SQLite). This article will use MariaDB database, which is a drop-in replacement for MySQL. It is developed by former members of MySQL team who are concerned that Oracle might turn MySQL into a closed-source product. Enter the following commands to install MariaDB on Debian.
sudo apt update

sudo apt install mariadb-server mariadb-client
After it’s installed, MariaDB server should be automatically started. Use systemctl to check its status.
systemctl status mariadb
Sample output:
● mariadb.service - MariaDB 10.5.12 database server
     Loaded: loaded (/lib/systemd/system/mariadb.service; enabled; vendor preset: enabled)
     Active: active (running) since Fri 2021-10-29 23:44:59 EDT; 1min 12s ago
       Docs: man:mariadbd(8)
             https://mariadb.com/kb/en/library/systemd/
    Process: 435260 ExecStartPre=/usr/bin/install -m 755 -o mysql -g root -d /var/run/mysqld (code=exited, status=0/SUCCESS)
    Process: 435261 ExecStartPre=/bin/sh -c systemctl unset-environment _WSREP_START_POSITION (code=exited, status=0/SUCCESS)
    Process: 435263 ExecStartPre=/bin/sh -c [ ! -e /usr/bin/galera_recovery ] && VAR= ||   VAR=`cd /usr/bin/..; /usr/bin/galera_recovery`; [ $? -eq 0 ]   && systemctl set-environment _WSREP_START_POSITIO>
    Process: 435322 ExecStartPost=/bin/sh -c systemctl unset-environment _WSREP_START_POSITION (code=exited, status=0/SUCCESS)
    Process: 435324 ExecStartPost=/etc/mysql/debian-start (code=exited, status=0/SUCCESS)
   Main PID: 435310 (mariadbd)
     Status: "Taking your SQL requests now..."
      Tasks: 9 (limit: 1095)
     Memory: 78.7M
        CPU: 741ms
     CGroup: /system.slice/mariadb.service
             └─435310 /usr/sbin/mariadbd
If it’s not running, start it with this command:
sudo systemctl start mariadb
To enable MariaDB to automatically start at boot time, run
sudo systemctl enable mariadb
Now run the post-installation security script.
sudo mysql_secure_installation
When it asks you to enter MariaDB root password, press Enter key as the root password isn’t set yet. Your root account is already secured, so you should answer n to not set password.

Next, you can press Enter to answer all remaining questions, which will remove anonymous user, disable remote root login and remove test database. This step is a basic requirement for MariaDB database security. (Notice that Y is capitalized, which means it is the default answer. )

Step 2: Download PostfixAdmin on Debian Server
PostfixAdmin is included in the default Debian repository. However, I don’t recommend it for the following reasons:
- It can create problems when you upgrade the Ubuntu system to a new version, resulting in upgrade failure.
- If you use Nginx, the
postfixadminpackage might automatically install Apache on your system. - If you use MySQL, this package might remove MySQL from your system.
- The default
postfixadminpackage has a login loop issue from time to time.
So I will show you how to install the latest version of PostfixAdmin. Go to PostfixAdmin Gitbub page to download the latest version. You can use the wget tool to download it from command line. The download link is always available in the format below. If a new version comes out, simply replace 3.3.11 with the new version number.
sudo apt install wget

wget https://github.com/postfixadmin/postfixadmin/archive/postfixadmin-3.3.11.tar.gz
Once downloaded, extract the archive to the /var/www/ directory and rename it to postfixadmin.
sudo mkdir -p /var/www/

sudo tar xvf postfixadmin-3.3.11.tar.gz -C /var/www/

sudo mv /var/www/postfixadmin-postfixadmin-3.3.11 /var/www/postfixadmin
Step 3: Setting Up Permissions
PostfixAdmin requires a templates_c directory, and the web server needs read and write access to this directory, so run the following commands.
sudo mkdir /var/www/postfixadmin/templates_c

sudo apt install acl
sudo setfacl -R -m u:www-data:rwx /var/www/postfixadmin/templates_c/
Starting with Dovecot 2.3.11, the web server user needs permission to read Let’s Encrypt TLS certificate in order to do password hashing. Run the following two commands to grant permissions.
sudo setfacl -R -m u:www-data:rx /etc/letsencrypt/live/ /etc/letsencrypt/archive/
Step 4: Create a Database and User for PostfixAdmin
Log into MySQL/MariaDB shell as root with the following command.
sudo mysql -u root
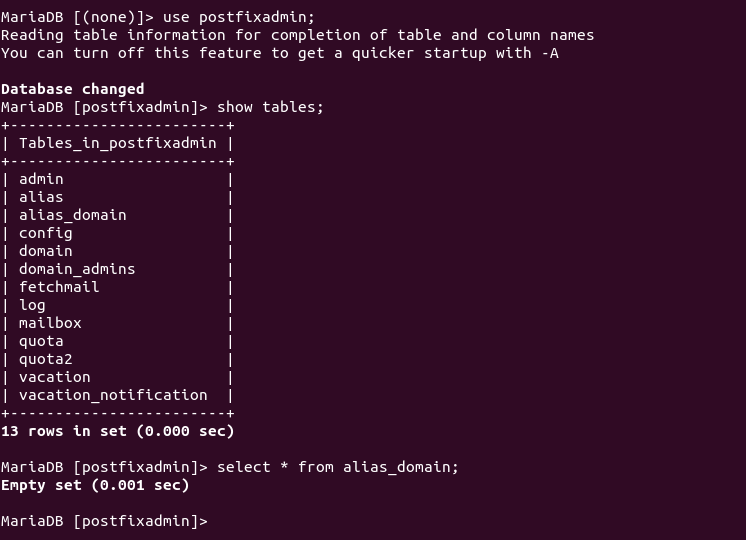
Once you are logged in, create a database for PostfixAdmin using the following command. I named it postfixadmin, but you can use whatever name you like. (Don’t leave out the semicolon.)
create database postfixadmin;
Then enter the command below to create a database user for PostfixAdmin. This command also grants all privileges of postfixadmin database to the user. Replace postfixadmin_password with your preferred password. Note that the password should not contain the # character, or you might not be able to log in later.
grant all privileges on postfixadmin.* to 'postfixadmin'@'localhost' identified by 'postfixadmin_password';
Flush the privileges table for the changes to take effect and then get out of MariaDB shell.
flush privileges;

exit;
Step 5: Configure PostfixAdmin
The default PostfixAdmin configuration file is config.inc.php. We need to create a config.local.php file and add custom configurations.
sudo nano /var/www/postfixadmin/config.local.php
Add the following lines in the file, so PostfixAdmin can connect to MySQL/MariaDB database. Replace postfixadmin_password with the real PostfixAdmin password created in step 4.
<?php
$CONF['configured'] = true;
$CONF['database_type'] = 'mysqli';
$CONF['database_host'] = 'localhost';
$CONF['database_port'] = '3306';
$CONF['database_user'] = 'postfixadmin';
$CONF['database_password'] = 'postfixadmin_password';
$CONF['database_name'] = 'postfixadmin';
$CONF['encrypt'] = 'dovecot:ARGON2I';
$CONF['dovecotpw'] = "/usr/bin/doveadm pw -r 5";
if(@file_exists('/usr/bin/doveadm')) { // @ to silence openbase_dir stuff; see https://github.com/postfixadmin/postfixadmin/issues/171
    $CONF['dovecotpw'] = "/usr/bin/doveadm pw -r 5"; # debian
}
Save and close the file. Note that we will use the ARGON2I password scheme.
Step 6: Create Apache Virtual Host or Nginx Config File for PostfixAdmin
Apache
If you use Apache web server, create a virtual host for PostfixAdmin.
sudo nano /etc/apache2/sites-available/postfixadmin.conf
Put the following text into the file. Replace postfixadmin.example.com with your real domain name and don’t forget to set DNS A record for it.
<VirtualHost *:80>
  ServerName postfixadmin.example.com
  DocumentRoot /var/www/postfixadmin/public

  ErrorLog ${APACHE_LOG_DIR}/postfixadmin_error.log
  CustomLog ${APACHE_LOG_DIR}/postfixadmin_access.log combined

  <Directory />
    Options FollowSymLinks
    AllowOverride All
  </Directory>

  <Directory /var/www/postfixadmin/>
    Options FollowSymLinks MultiViews
    AllowOverride All
    Order allow,deny
    allow from all
  </Directory>

</VirtualHost>
Save and close the file. Then enable this virtual host with:
sudo a2ensite postfixadmin.conf
Reload Apache for the changes to take effect.
sudo systemctl reload apache2
Now you should be able to see the PostfixAdmin web-based install wizard at http://postfixadmin.example.com/setup.php.
Nginx
If you use Nginx web server, create a virtual host for PostfixAdmin.
sudo nano /etc/nginx/conf.d/postfixadmin.conf
Put the following text into the file. Replace postfixadmin.example.com with your real domain name and don’t forget to set DNS A record for it.
server {
   listen 80;
   listen [::]:80;
   server_name postfixadmin.example.com;

   root /var/www/postfixadmin/public/;
   index index.php index.html;

   access_log /var/log/nginx/postfixadmin_access.log;
   error_log /var/log/nginx/postfixadmin_error.log;

   location / {
       try_files $uri $uri/ /index.php;
   }

   location ~ ^/(.+\.php)$ {
        try_files $uri =404;
        fastcgi_pass unix:/run/php/php7.4-fpm.sock;
        fastcgi_index index.php;
        fastcgi_param SCRIPT_FILENAME $document_root$fastcgi_script_name;
        include /etc/nginx/fastcgi_params;
   }
}
Note: Debian 11 ships PHP7.4 and Debian 10 ships with PHP7.3. If you use Debian 10, then change php7.4-fpm to php7.3-fpm in the above file.
Save and close the file. Then test Nginx configuration.
sudo nginx -t
If the test is successful, reload Nginx for the changes to take effect.
sudo systemctl reload nginx
Now you should be able to see the PostfixAdmin web-based install wizard at http://postfixadmin.example.com/setup.php.
Step 7: Install Required and Recommended PHP Modules
Run the following command to install PHP modules required or recommended by PostfixAdmin on Debian 11.
sudo apt install php7.4-fpm php7.4-imap php7.4-mbstring php7.4-mysql php7.4-json php7.4-curl php7.4-zip php7.4-xml php7.4-bz2 php7.4-intl php7.4-gmp
If you use Debian 10, run the following command.
sudo apt install php7.3-fpm php7.3-imap php7.3-mbstring php7.3-mysql php7.3-json php7.3-curl php7.3-zip php7.3-xml php7.3-bz2 php7.3-intl php7.3-gmp
If you use Apache, you also need to install the libapache2-mod-php package.
sudo apt install libapache2-mod-php
Then restart Apache.
sudo systemctl restart apache2
Step 8: Enabling HTTPS
To encrypt the HTTP traffic, we can enable HTTPS by installing a free TLS certificate issued from Let’s Encrypt. Run the following command to install Let’s Encrypt client (certbot) on Debian server.
sudo apt install certbot
If you use Apache, install the Certbot Apache plugin.
sudo apt install python3-certbot-apache
And run this command to obtain and install TLS certificate.
sudo certbot --apache --agree-tos --redirect --hsts --staple-ocsp --email [email protected] -d postfixadmin.example.com
If you use Nginx, then you also need to install the Certbot Nginx plugin.
sudo apt install python3-certbot-nginx
Next, run the following command to obtain and install TLS certificate.
sudo certbot --nginx --agree-tos --redirect --hsts --staple-ocsp --email [email protected] -d postfixadmin.example.com
Where
--nginx: Use the nginx plugin.--apache: Use the Apache plugin.--agree-tos: Agree to terms of service.--redirect: Force HTTPS by 301 redirect.--hsts: Add the Strict-Transport-Security header to every HTTP response. Forcing browser to always use TLS for the domain. Defends against SSL/TLS Stripping.--staple-ocsp: Enables OCSP Stapling. A valid OCSP response is stapled to the certificate that the server offers during TLS.
The certificate should now be obtained and automatically installed, which is indicated by the message below.

Step 9: Enable Statistics in Dovecot
PostfixAdmin needs to read Dovecot statistics. Edit the Dovecot configuration file.
sudo nano /etc/dovecot/conf.d/10-master.conf
Add the following lines to the end of this file.
service stats {
    unix_listener stats-reader {
    user = www-data
    group = www-data
    mode = 0660
}

unix_listener stats-writer {
    user = www-data
    group = www-data
    mode = 0660
  }
}
Save and close the file. Then add the web server to the dovecot group.
sudo gpasswd -a www-data dovecot
Restart Dovecot.
sudo systemctl restart dovecot
Grant permissions to the www-data user.
sudo setfacl -R -m u:www-data:rwx /var/run/dovecot/stats-reader /var/run/dovecot/stats-writer
Step 10: Finish the Installation in Web Browser
Go to postfixadmin.example.com/setup.php to run the web-based setup wizard. First, you need to create a setup password for PostfixAdmin.

After creating the password hash, PostfixAdmin will display a line like below.
$CONF['setup_password'] = '$2y$10$58fIawuOb5y538RMBol/DOoqv2bJ7zhPRzRO.4Xq7MLeQJHmaFwF2';
You need to open the config.local.php file.
sudo nano /var/www/postfixadmin/config.local.php
Add the line displayed on PostfixAdmin setup page to the end of the file like below.

After saving the file, you need to refresh the PostfixAdmin setup page and enter the setup password again, then create the admin account. Please don’t use a Gmail, Yahoo Mail, or Microsoft email address for the admin account, or you might not be able to log in later. Use an email address on your own domain. You can create the email address later in PostfixAdmin.

Once the superadmin account is created, you can log into PostfixAdmin at postfixadmin.example.com/login.php.

Step 11: Configure Postfix to Use MySQL/MariaDB Database
By default, Postfix delivers emails only to users with a local Unix account. To make it deliver emails to virtual users whose information is stored in the database, we need to configure Postfix to use virtual mailbox domains.
First, we need to add MySQL map support for Postfix by installing the postfix-mysql package.
sudo apt install postfix-mysql
Then edit the Postfix main configuration file.
sudo nano /etc/postfix/main.cf
Add the following lines at the end of this file.
virtual_mailbox_domains = proxy:mysql:/etc/postfix/sql/mysql_virtual_domains_maps.cf
virtual_mailbox_maps =
   proxy:mysql:/etc/postfix/sql/mysql_virtual_mailbox_maps.cf,
   proxy:mysql:/etc/postfix/sql/mysql_virtual_alias_domain_mailbox_maps.cf
virtual_alias_maps =
   proxy:mysql:/etc/postfix/sql/mysql_virtual_alias_maps.cf,
   proxy:mysql:/etc/postfix/sql/mysql_virtual_alias_domain_maps.cf,
   proxy:mysql:/etc/postfix/sql/mysql_virtual_alias_domain_catchall_maps.cf
Where:
virtual_mailbox_domainspoints to a file that will tell Postfix how to look up domain information from the database.virtual_mailbox_mapspoints to files that will tell Postfix how to look up email addresses from the database.virtual_alias_mapspoints to files that will tell Postfix how to look up aliases from the database.
We want to use dovecot to deliver incoming emails to the virtual users’ message store, so also add the following line at the end of this file.
virtual_transport = lmtp:unix:private/dovecot-lmtp

Save and close the file. Next, we need to create the .cf files one by one. Create the sql directory.
sudo mkdir /etc/postfix/sql/
Create the mysql_virtual_domains_maps.cf file.
sudo nano /etc/postfix/sql/mysql_virtual_domains_maps.cf
Add the following content. Replace password with the postfixadmin password you set in Step 2.
user = postfixadmin
password = postfixadmin_password
hosts = localhost
dbname = postfixadmin
query = SELECT domain FROM domain WHERE domain='%s' AND active = '1'
#query = SELECT domain FROM domain WHERE domain='%s'
#optional query to use when relaying for backup MX
#query = SELECT domain FROM domain WHERE domain='%s' AND backupmx = '0' AND active = '1'
#expansion_limit = 100
Create the mysql_virtual_mailbox_maps.cf file.
sudo nano /etc/postfix/sql/mysql_virtual_mailbox_maps.cf
Add the following content.
user = postfixadmin
password = postfixadmin_password
hosts = localhost
dbname = postfixadmin
query = SELECT maildir FROM mailbox WHERE username='%s' AND active = '1'
#expansion_limit = 100
Create the mysql_virtual_alias_domain_mailbox_maps.cf file.
sudo nano /etc/postfix/sql/mysql_virtual_alias_domain_mailbox_maps.cf
Add the following content.
user = postfixadmin
password = postfixadmin_password
hosts = localhost
dbname = postfixadmin
query = SELECT maildir FROM mailbox,alias_domain WHERE alias_domain.alias_domain = '%d' and mailbox.username = CONCAT('%u', '@', alias_domain.target_domain) AND mailbox.active = 1 AND alias_domain.active='1'
Create the mysql_virtual_alias_maps.cf file.
sudo nano /etc/postfix/sql/mysql_virtual_alias_maps.cf
Add the following content.
user = postfixadmin
password = postfixadmin_password
hosts = localhost
dbname = postfixadmin
query = SELECT goto FROM alias WHERE address='%s' AND active = '1'
#expansion_limit = 100
Create the mysql_virtual_alias_domain_maps.cf file.
sudo nano /etc/postfix/sql/mysql_virtual_alias_domain_maps.cf
Add the following content.
user = postfixadmin
password = postfixadmin_password
hosts = localhost
dbname = postfixadmin
query = SELECT goto FROM alias,alias_domain WHERE alias_domain.alias_domain = '%d' and alias.address = CONCAT('%u', '@', alias_domain.target_domain) AND alias.active = 1 AND alias_domain.active='1'
Create the mysql_virtual_alias_domain_catchall_maps file.
sudo nano /etc/postfix/sql/mysql_virtual_alias_domain_catchall_maps.cf
Add the following content.
# handles catch-all settings of target-domain
user = postfixadmin
password = postfixadmin_password
hosts = localhost
dbname = postfixadmin
query = SELECT goto FROM alias,alias_domain WHERE alias_domain.alias_domain = '%d' and alias.address = CONCAT('@', alias_domain.target_domain) AND alias.active = 1 AND alias_domain.active='1'
Since the database passwords are stored in plain text so they should be readable only by user postfix and root, which is done by executing the following two commands.
sudo chmod 0640 /etc/postfix/sql/*
sudo setfacl -R -m u:postfix:rx /etc/postfix/sql/
Next, we need to change the value of the mydestination parameter in Postfix. Display the current value:
sudo postconf mydestination
Sample output:
mydestination = $myhostname, linuxbabe.com, localhost.$mydomain, localhost
The mydestination parameter contains a list of domain names that will receive emails delivered to local Unix accounts. In part 1, we added the apex domain name (like linuxbabe.com) to mydestination. Since we are going to use virtual mailbox, we need to remove the apex domain name from the list by issuing the following command.
sudo postconf -e "mydestination = \$myhostname, localhost.\$mydomain, localhost"
Now let’s open the Postfix main configuration file again.
sudo nano /etc/postfix/main.cf
Add the following lines at the end of this file.
virtual_mailbox_base = /var/vmail
virtual_minimum_uid = 2000
virtual_uid_maps = static:2000
virtual_gid_maps = static:2000
The first line defines the base location of mail files. The remaining 3 lines define which user ID and group ID Postfix will use when delivering incoming emails to the mailbox. We use the user ID 2000 and group ID 2000.
Save and close the file. Restart Postfix for the changes to take effect.
sudo systemctl restart postfix
Next, we need to create a user named vmail with ID 2000 and a group with ID 2000.
sudo adduser vmail --system --group --uid 2000 --disabled-login --no-create-home
Create the mail base location.
sudo mkdir /var/vmail/
Make vmail as the owner.
sudo chown vmail:vmail /var/vmail/ -R
Step 12: Configure Dovecot to Use MySQL/MariaDB Database
We also need to configure the Dovecot IMAP server to query user information from the database. First, run the following command to add MySQL support for Dovecot.
sudo apt install dovecot-mysql
Then edit the 10-mail.conf file.
sudo nano /etc/dovecot/conf.d/10-mail.conf
In part 2, we used the following mail_location. Email messages are stored under the Maildir directory under each user’s home directory.
mail_location = maildir:~/Maildir
Since we are using virtual mailbox domain now, we need to enable mail_home for the virtual users by adding the following line in the file, because virtual users don’t have home directories by default.
mail_home = /var/vmail/%d/%n/

Save and close the file. Then edit the 10-auth.conf file.
sudo nano /etc/dovecot/conf.d/10-auth.conf
In part 2, we used the following value for auth_username_format.
auth_username_format = %n
The %n would drop the domain if it was given. Because in part 2 we were using local Unix account for the username of every email address, we must use %n to drop the domain, so users were able to login with the full email address.
Now we are using virtual mailbox domains, which means the username of every email address includes the domain part, so we need to change the auth_username_format as follows. %u won’t drop away the domain. This allows users to log in with the full email address.
auth_username_format = %u
Then find the following line.
#auth_default_realm =
Change it to
auth_default_realm = example.com
This is to ensure users who didn’t enter the @example.com part in the username field can still log in. Dovecot will append the @example.com part if it’s not given by users.
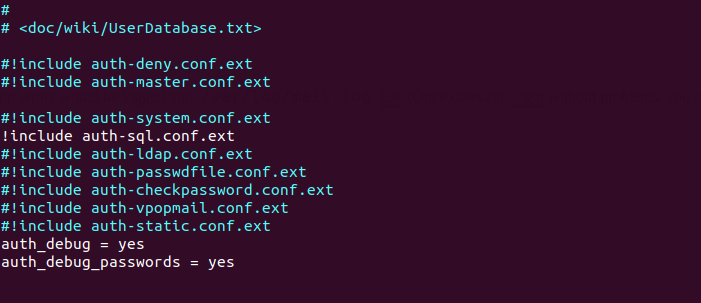
Next, uncomment the following line at the end of this file, so Dovecot can query user information from MySQL/MariaDB database.
!include auth-sql.conf.ext
Now you probably don’t want local Unix users to send emails without registering email addresses in PostfixAdmin, then comment out the following line by adding the # character at the beginning, so Dovecot won’t query the local /etc/passwd or /etc/shadow file.
#!include auth-system.conf.ext
It can be helpful to add the following two lines in this file to debug login issues. The login errors would be logged into /var/log/mail.log file. (Once users can login without problems, you can comment out the following two lines.)
auth_debug = yes
auth_debug_passwords = yes
Save and close the file.
Edit the dovecot-sql.conf.ext file.
sudo nano /etc/dovecot/dovecot-sql.conf.ext
Here is the content that you should have in this file. By default, all lines in this file are commented out, so you can simply copy and paste them at the bottom. Replace postfixadmin_password with the postfixadmin password you set in Step 2.
driver = mysql

connect = host=localhost dbname=postfixadmin user=postfixadmin password=postfixadmin_password

default_pass_scheme = ARGON2I

password_query = SELECT username AS user,password FROM mailbox WHERE username = '%u' AND active='1'

user_query = SELECT maildir, 2000 AS uid, 2000 AS gid FROM mailbox WHERE username = '%u' AND active='1'

iterate_query = SELECT username AS user FROM mailbox
Restart Dovecot.
sudo systemctl restart dovecot
When a user tries to log in, Dovecot would use the Argon2 algorithm to generate a password hash from the password entered by the user, then compare it with the password hash stored in the database. If they match, then the user can log in successfully.
Step 13: Add Domain and Mailboxes in PostfixAdmin
Log in to PostfixAdmin web interface as the admin. Click the Domain List tab and select New Domain to add a domain. You can choose how many aliases and mailboxes are allowed for this domain.

Then click Virtual List tab and select Add Mailbox to add a new email address for your domain.

Next, you can open your desktop email client such as Mozilla Thunderbird and add a mail account.
- In the incoming server section, select IMAP protocol, enter
mail.your-domain.comas the server name, choose port 143 and STARTTLS. Choosenormal passwordas the authentication method. - In the outgoing section, select SMTP protocol, enter
mail.your-domain.comas the server name, choose port 587 and STARTTLS. Choosenormal passwordas the authentication method.

Hint: You can also use port 993 with SSL/TLS encryption for IMAP, and use port 465 with SSL/TLS encryption for SMTP. You should not use port 25 as the SMTP port in mail clients to submit outgoing emails.
You should now be able to connect to your own email server and also send and receive emails with your desktop email client! Note that you cannot use local Unix accounts to login now. You must log in with the virtual user created from PostfixAdmin web interface.
Troubleshooting Tips
As a rule of thumb, you should always check the mail log (/var/log/mail.log) on your mail server when an error happens. The following is a list of specific errors and troubleshooting tips.
Can’t login from Mail Clients
If you can’t log into your mail server from a desktop mail client, scan your mail server to find if the ports are open. Note that you should run the following command from another Linux computer or server. If you run it on your mail server, then the ports will always appear to be open.
sudo nmap mail.your-domain.com
And check if Dovecot is running.
systemctl status dovecot
You can also check the mail log (/var/log/mail.log), which may give you some clues. If Dovecot fails to start, the error might not be logged to the /var/log/mail.log file, you can run the following command to see what’s wrong.
sudo journalctl -eu dovecot
If you see the following error in the mail log, it’s likely that you didn’t set a correct password in the .cf files under /etc/postfix/sql/ directory.
postfix/trivial-rewrite[28494]: warning: virtual_alias_domains: proxy:mysql:/etc/postfix/sql/mysql_virtual_alias_maps.cf: table lookup problem
postfix/trivial-rewrite[28494]: warning: virtual_alias_domains lookup failure
If you see the following error in the mail log, it’s because you forgot to add mail_location = maildir:~/Maildir in the /etc/dovecot/conf.d/10-mail.conf file.
open(/var/mail/[email protected]) failed: Permission denied (euid=2000(vmail) egid=2000(vmail) missing +w perm: /var/mail, we're not in group 8(mail), dir owned by 0:8 mode=0775
Cloudflare DNS
As I said in part 1, if you use Cloudflare DNS service, you should not enable the CDN (proxy) feature when creating DNS A record and AAAA record for the hostname of your mail server. Cloudflare doesn’t support SMTP or IMAP proxy.
Relay Access Denied
If you see the “relay access denied” error when trying to send emails from a mail client, it’s most likely that you use port 25 as the SMTP port in your mail client. As I said a while ago, you should use port 587 or 465 as the SMTP port in mail clients (Mozilla Thunberbird, Microsoft Outlook, etc) to submit outgoing emails. Port 25 should be used for SMTP server to SMTP server communications.

iOS Mail App
If you use the iOS Mail app to log into your mail server and encounter the following error.

You can try to fix it by enforcing SSL encryption, for both SMTP and IMAP.

Fun fact: It seems the iOS Mail app has difficulty in supporting STARTTLS on IMAP port 143, but it supports STARTTLS on the submission port 587.
Temporary Lookup Failure
If your mail server was working fine for some time, but suddenly you find the following error in the mail log,
Aug 25 20:25:24 mx postfix/trivial-rewrite[3313]: warning: virtual_alias_domains: proxy:mysql:/etc/postfix/sql/mysql_virtual_alias_maps.cf: table lookup problem
Aug 25 20:25:24 mx postfix/trivial-rewrite[3313]: warning: virtual_alias_domains lookup failure
Aug 25 20:25:24 mx postfix/submission/smtpd[3464]: NOQUEUE: reject: 451 4.3.0 <[email protected]>: Temporary lookup failure;  proto=ESMTP
Aug 25 20:25:24 mx postfix/submission/smtpd[3464]: Temporary lookup failure
It’s likely that your MariaDB/MySQL database stopped somehow. You can use the following command to check when your database server stopped.
sudo journalctl -eu mariadb
or
sudo journalctl -eu mysql
A common cause for this situation is that your server is out-of-memory. Check if your server has enough memory.
htop
or
free -m
Automatically Clean the Junk Folder and Trash Folder
To delete emails in Junk folder for all users, you can run
sudo doveadm expunge -A mailbox Junk all
To delete emails in Trash folder, run
sudo doveadm expunge -A mailbox Trash all
I think it’s better to clean emails that have been in the Junk or Trash folder for more than 2 weeks, instead of cleaning all emails.
sudo doveadm expunge -A mailbox Junk savedbefore 2w
Then add a cron job to automate the job.
sudo crontab -e
Add the following line to clean Junk and Trash folder every day.
@daily doveadm expunge -A mailbox Junk savedbefore 2w;doveadm expunge -A mailbox Trash savedbefore 2w
You also need to allow the www-data user to read certificate files by adding the following line.
@daily setfacl -R -m u:www-data:rx /etc/letsencrypt/live/ /etc/letsencrypt/archive/
To receive report when a Cron job produces an error, you can add the following line above all Cron jobs.
MAILTO="[email protected]"
Save and close the file. And you’re done.
Change User Password in PostfixAdmin
Users can log into PostfixAdmin at https://postfixadmin.example.com/users/login.php, then change their passwords.
Restricting Access to Sendmail
By default, any local user can use the sendmail binary to submit outgoing emails. Now that your mail server is using virtual mailboxes, you might want to restrict access to the sendmail binary to trusted local users only, so a malicious user can’t use it to send a large volume of emails to damage your mail server’s reputation. Edit the Postfix main configuration file.
sudo nano /etc/postfix/main.cf
Add the following line to the end of this file, so that only the root, www-data and vmail user can submit emails via sendmail. You can also add other usernames.
authorized_submit_users = root,www-data,vmail
Save and close the file. Then restart Postfix.
sudo systemctl restart postfix
How to Upgrade PostfixAdmin
Sometimes there might be bugs in the current PostfixAdmin that can be fixed by upgrading to a new version. It’s very simple to upgrade PostfixAdmin. When a new version of PostfixAdmin comes out, then you need to
- Make a copy of the
/var/www/postfixadmin/config.local.phpfile to your home directory. - Remove the PostfixAdmin web directory (
sudo rm /var/www/postfixadmin/ -r) - Go through step 2, step 3, step 5, and step 10 again in this tutorial. When doing step 5, simply copy the
config.local.phpfile from your home directory. In step 10, the PostfixAdmin database schema will be automatically updated when you visit thesetup.phpweb page.
I once had a login loop problem in my PostfixAdmin installation and it’s fixed by upgrading PostfixAdmin to the latest version.
Next Step
I hope this tutorial helped you install and use PostfixAdmin on Debian to create virtual mailboxes. In part 4, I will show you how to set up SPF and DKIM with Postfix to improve email deliverability, and in a future tutorial, I’m going to show you how to host multiple email domains with PostfixAdmin.
If you want to access emails from a web browser, then I recommend Roundcube, which is a very popular and featured-rich open-source webmail client. As always, if you found this post useful, subscribe to our free newsletter to get more tips and tricks. Take care 🙂


Do you consider PostfixAdmin a better alternative than ViMbAdmin?
Never heard it before. Looks like it’s a fork of PostfixAdmin. Looking at the ViMbAdmin screenshots, I don’t find any particular feature that convinces me to migrate to it.
Well, it seems that there are more development going on with WiMbAdmin.
When i test it by sending mail from [email protected] to my gmail address the sender name is john instead of John Doe, is there any way to fix this?
If you don’t set a name in your mail client (such as Thunderbird), then gmail will use your account username (john).
To display your full name (John Doe), simply set a name in your mail client.
Thank you, it’s showing the full name now after setting name in outlook.
Hi
For more than a week, I’m stuck at setting up Postfix Admin.
Managed to create setup password but having issues with the following warnings and errors:
Warnings
    ⚠ Database - PostgreSQL (pdo_pgsql) extension not found
    ⚠ Change the database_type to 'sqlite' in config.local.php if you want to use SQLite
Errors (MUST be fixed)
    ⛔Password Hashing - attempted to use configured encrypt backend (dovecot:ARGON2I) triggered an error: /usr/bin/doveadm pw -r 5 failed, see error log for details
    ⛔You will have problems logging into PostfixAdmin.
    ⛔Check out our Dovecot documentation at https://github.com/postfixadmin/postfixadmin/blob/master/DOCUMENTS/DOVECOT.txt, specifically around '3. Permissions'.
Can you, please, help me out?
I did quite a lot of googling and tried suggested steps but nothing seems to work.
Maybe you need to run this command:
Looks like somehow I missed to make that step.
Now it works.
Thank you!
If there some Maildirs in /home/~, how to move the content to the new VirtualMailboxes?
First, back up your current maildir directory.
Then sync the Maildir for the virtual user. For example,
Next, change the ownership to
vmailuser.Thank You!
Hi, I get the following error in photo attached. Thanks for any tip
found the solution by giving following permission:
chown root:www-data /etc/letsencrypt/live/mail.example.com/privkey.pem
Or, use the following command.
Please take a look at this alternative installation of postfixadmin.
It substitutes step 2 and 3. Perhaps except:
(I had done that before I used the alternative installation of postfixadmin.) This alternative installation made all three errors disappear and made login possible.
Xiao, thank you for your really, really good howto!!!
This does not work anymore due to some secutity problems with root install of php-compare. You might delete the comment.
In this tutorial you reference using either Apache or NginX webservers for Postfixadmin. However, I have not found a tutorial by you that addresses setting up NginX. Since many of your tutorials assume some of your previous tutorials. Can you recommend a good NginX setup tutorial which will be compatible with your email tutorials?. Thanks…RDK
There’s no need to “set up Nginx” after installing Nginx. Simply copy the
/etc/nginx/conf.d/postfixadmin.conffile and you are good to go.Xiao….Well, I’m back to this project after a long delay. Regarding my question about “setting up NginX” you replied that “There’s no need to “set up Nginx” after installing Nginx. Simply copy the /etc/nginx/conf.d/postfixadmin.conf file and you are good to go.”
I just looked at my Part 1 work and I’m not clear on which file to copy. I don’t find a postfixadmin.conf file in my current (before NginX install) setup. Can you clarify? Thanks….Rob
Xiao….OK, thanks. I’ve just stated Part 2 and have not gotten to that step in Part 3. Thanks for the clarification….Rob
I mean you should copy the content of
/etc/nginx/conf.d/postfixadmin.confin step 6 on this web page to your mail server.I could not make postfixadmin work. But, this installation of the php-stuff worked:
sudo apt install git
$ cd /var/www
$ sudo git clone https://github.com/postfixadmin/postfixadmin.git
$ cd /var/www/postfixadmin
$ sudo -u bash install.sh
$ sudo chown -R www-data. /var/www/postfixadmin
I had a relay access denied problem. It disappeared when I changed mail.example.org to example.org everywhere on the server, and did the same in the mx record. I don’t why, but I guess dovecot expected login like this: [email protected]. Just a suggestion about what could give problems.
You should always check the mail log file (/var/log/mail.log) and post it here so I can give you advice. Also enable debugging in /etc/dovecot/conf.d/10-auth.conf to find out what’s wrong.
The entire mail server tutorial serious assumes you are using mail.example.org as the hostname. It you change it, you may have problem in later parts of this tutorial serious.
First of all. Thank you very much for this splendid tutorial. It is really good because because it works!!! But, also because you explain why one should do as you recommend. It is also helpful that you show images of how the files should look after changes; this makes it easy to check whether one has made errors.
But, now to my problem:
I tried again to set the mail server up as you recommend calling it mail.example.org, and again I got access relay denied. So, I had to return to call the server example.org, and not mail.example.org; now it works again.
hostname and mailname: mail.example.org
MX:
Domain: example.org
MX exchanger: mail.example.org
Setup in thunderbird: imap-server mail.example.org:143 login: [email protected]
starttls
smtp-server mail.example.org: 587
Thunderbird asks me to accept an unauthorised certifikate on example.org:143 (not mail.example.org:143). It does so again and again, and nothing happens.
From /etc/
grep -RI example.org /etc
/etc/resolv.conf:domain example.org
/etc/resolv.conf:search example.org
/etc/mailname:mail.example.org
/etc/hosts:200.200.200.200 example.org
/etc/apache2/sites-available/postfixadmin.conf:  ServerName postfixadmin.example.org
/etc/apache2/sites-enabled/postfixadmin.conf:  ServerName postfixadmin.example.org
/etc/postfix/main.cf:smtpd_tls_cert_file=/etc/letsencrypt/live/mail.example.org/fullchain.pem
/etc/postfix/main.cf:smtpd_tls_key_file=/etc/letsencrypt/live/mail.example.org/privkey.pem
/etc/postfix/main.cf:myhostname = mail.example.org
/etc/hostname:mail.example.org
/etc/letsencrypt/accounts/acme-v02.api.letsencrypt.org/directory/77cfd455857928bcfcd35b648932a284/meta.json:{"creation_dt": "2022-03-23T09:45:31Z", "creation_host": "example.org"}
/etc/letsencrypt/renewal/mail.example.org.conf:archive_dir = /etc/letsencrypt/archive/mail.example.org
/etc/letsencrypt/renewal/mail.example.org.conf:cert = /etc/letsencrypt/live/mail.example.org/cert.pem
/etc/letsencrypt/renewal/mail.example.org.conf:privkey = /etc/letsencrypt/live/mail.example.org/privkey.pem
/etc/letsencrypt/renewal/mail.example.org.conf:chain = /etc/letsencrypt/live/mail.example.org/chain.pem
/etc/letsencrypt/renewal/mail.example.org.conf:fullchain = /etc/letsencrypt/live/mail.example.org/fullchain.pem
From mail.log:
In
/etc/dovecot/conf.d/10-ssl.conf, make sure you have the following lines:Because you have TLS certificate for mail.example.com, instead of example.com.
Also, in
/etc/postfix/main.cf, the TLS configuration should be:Then, restart Postfix and Dovecot.
I set it up online according to the tutorial, but I encountered problems in using it. I added my domain name, but I can’t see anything in the domain name list. If I add the domain name again, it will show that adding the domain name failed. What should I do?There are some things below.
like this.In fact, I have added the domain name, but there is nothing displayed。Thank you.I did quite a lot of googling and tried suggested steps but nothing seems to work.Could you please help me?
Once you add a domain name, you need to add email addresses for this domain name.
I can’t guarantee it will work if you don’t add the domain from the web interface.
I never tried to add a domain name using MySQL/MariaDB console commands.
I added domain from the web interface, not using PGSQL console commands. I mean, if I add a domain name like this, it will be displayed in my database, but I can’t see the list of domain names in my web interface. How should I add an e-mail address after adding a domain name? I don’t see the option of adding an e-mail address.
If you’re talking about add mailbox, I did. However, due to unknown reasons, the domain I added cannot be displayed. Although I saw the domain I added in the database, I was unable to select a domain name for it. I think there may be a problem that caused postfix to not read the domain in my database.
你好,非常感谢你之前对我的帮助。虽然我没有找到具体原因,但是我卸载了php7.0并安装了php7.4,它可以进行正常的工作了。我是用postfixadmin新建了域和邮箱,并使用我的QQ邮箱向它发送邮件在我的/home/mail下可以收到邮件,但它似乎又出了问题,我不能发送邮件。如果我用postfixadmin web界面发送邮件,在我的/var/log/maillog显示
Mar 28 17:43:27 mail postfix/smtpd[21091]: connect from VM-0-2-centos[::1]
Mar 28 17:43:27 mail postfix/smtpd[21091]: NOQUEUE: reject: RCPT from VM-0-2-centos[::1]: 454 4.7.1 : Relay access denied; from= to= proto=ESMTP helo=
Mar 28 17:43:27 mail postfix/smtpd[21091]: warning: non-SMTP command from VM-0-2-centos[::1]: To: [email protected]
Mar 28 17:43:27 mail postfix/smtpd[21091]: disconnect from VM-0-2-centos[::1]
如果我尝试用foxmail登录,它会显示
Mar 28 17:50:07 mail postfix/smtpd[22328]: warning: unknown[14.120.115.228]: SASL LOGIN authentication failed: Connection lost to authentication server
Mar 28 17:50:17 mail postfix/smtpd[22328]: warning: unknown[14.120.115.228]: SASL PLAIN authentication failed: Connection lost to authentication server
Mar 28 17:50:17 mail postfix/smtpd[22328]: lost connection after AUTH from unknown[14.120.115.228]
Mar 28 17:50:17 mail postfix/smtpd[22328]: disconnect from unknown[14.120.115.228]
[root@mail DOCUMENTS]# tail /var/log/maillog
Mar 28 17:43:27 mail postfix/smtpd[21091]: warning: non-SMTP command from VM-0-2-centos[::1]: To: [email protected]
Mar 28 17:43:27 mail postfix/smtpd[21091]: disconnect from VM-0-2-centos[::1]
Mar 28 17:46:47 mail postfix/anvil[21093]: statistics: max connection rate 1/60s for (smtp:::1) at Mar 28 17:43:27
Mar 28 17:46:47 mail postfix/anvil[21093]: statistics: max connection count 1 for (smtp:::1) at Mar 28 17:43:27
Mar 28 17:46:47 mail postfix/anvil[21093]: statistics: max cache size 1 at Mar 28 17:43:27
Mar 28 17:49:56 mail postfix/smtpd[22328]: connect from unknown[14.120.115.228]
Mar 28 17:50:07 mail postfix/smtpd[22328]: warning: unknown[14.120.115.228]: SASL LOGIN authentication failed: Connection lost to authentication server
Mar 28 17:50:17 mail postfix/smtpd[22328]: warning: unknown[14.120.115.228]: SASL PLAIN authentication failed: Connection lost to authentication server
Mar 28 17:50:17 mail postfix/smtpd[22328]: lost connection after AUTH from unknown[14.120.115.228]
Mar 28 17:50:17 mail postfix/smtpd[22328]: disconnect from unknown[14.120.115.228]
似乎是身份验证出现了问题,我是按照官方postfixadmin的教程设置postfix和dovecot的,因为我使用的数据库和你的不一样。
我运行systemctl status dovecot 得到一条错误信息Can’t open PID file /var/run/dovecot/master.pid (yet?) after start: No such file or directory,但是查看/var/run/dovecot目录下面存在这个文件,我试着停止dovecot进程并删除这个文件再重启dovecot,但是没有效果。我在谷歌上搜索了很多,但是也没有找到解决办法。非常感谢你的帮助!
这是我的postfix的main.cf
queue_directory = /var/spool/postfix
command_directory = /usr/sbin
daemon_directory = /usr/libexec/postfix
data_directory = /var/lib/postfix
mail_owner = postfix
myhostname = smtp.bnrevive.com
mydomain = bnrevive.com
myorigin = $mydomain
inet_interfaces = all
inet_protocols = all
unknown_local_recipient_reject_code = 550
mynetworks = 0.0.0.0/0
alias_maps = hash:/etc/aliases
alias_database = hash:/etc/aliases
home_mailbox = Maildir/
debug_peer_level = 2
debugger_command =
PATH=/bin:/usr/bin:/usr/local/bin:/usr/X11R6/bin
ddd $daemon_directory/$process_name $process_id & sleep 5
sendmail_path = /usr/sbin/sendmail.postfix
newaliases_path = /usr/bin/newaliases.postfix
mailq_path = /usr/bin/mailq.postfix
setgid_group = postdrop
html_directory = no
manpage_directory = /usr/share/man
sample_directory = /usr/share/doc/postfix-2.10.1/samples
readme_directory = /usr/share/doc/postfix-2.10.1/README_FILES
virtual_uid_maps = static:200
virtual_gid_maps = static:12
smtpd_sasl_type = dovecot
smtpd_sasl_path = private/auth
smtpd_sasl_authenticated_header = yes
smtpd_sasl_auth_enable = yes
smtpd_sasl_security_options = noanonymous
broken_sasl_auth_clients = yes
smtpd_relay_restrictions = permit_mynetworks,permit_sasl_authenticated,defer_unauth_destination
virtual_alias_maps = pgsql:/etc/postfix/pgsql/virtual_alias_maps.cf
virtual_mailbox_domains = pgsql:/etc/postfix/pgsql/virtual_domains_maps.cf
virtual_mailbox_maps = pgsql:/etc/postfix/pgsql/virtual_mailbox_maps.cf
virtual_mailbox_base = /home/mail
relay_domains = $mydestination, proxy:pgsql:/etc/postfix/pgsql/relay_domains.cf
virtual_mailbox_limit = 512000000
virtual_minimum_uid = 8
virtual_transport = virtual
local_transport = virtual
local_recipient_maps = $virtual_mailbox_maps
这是我的master.cf
smtp inet n – n – – smtpd
submission inet n – n – – smtpd
-o syslog_name=postfix/submission
-o smtpd_tls_security_level=encrypt
-o smtpd_sasl_auth_enable=yes
-o smtpd_sasl_type=dovecot
-o smtpd_sasl_path=private/auth
-o smtpd_tls_wrappermode=no
-o mynetworks=127.0.0.0/8
-o smtpd_relay_restrictions=permit_mynetworks,permit_sasl_authenticated,defer_unauth_destination
-o milter_macro_daemon_name=ORIGINATING
pickup unix n – n 60 1 pickup
cleanup unix n – n – 0 cleanup
qmgr unix n – n 300 1 qmgr
tlsmgr unix – – n 1000? 1 tlsmgr
rewrite unix – – n – – trivial-rewrite
bounce unix – – n – 0 bounce
defer unix – – n – 0 bounce
trace unix – – n – 0 bounce
verify unix – – n – 1 verify
flush unix n – n 1000? 0 flush
proxymap unix – – n – – proxymap
proxywrite unix – – n – 1 proxymap
smtp unix – – n – – smtp
relay unix – – n – – smtp
showq unix n – n – – showq
error unix – – n – – error
retry unix – – n – – error
discard unix – – n – – discard
local unix – n n – – local
virtual unix – n n – – virtual
lmtp unix – – n – – lmtp
anvil unix – – n – 1 anvil
scache unix – – n – 1 scache
dovecot unix – n n – – pipe
flags=DRhu user=mailreader:mailreader argv=/usr/libexec/dovecot/deliver -f ${sender} -d ${recipient}
这是我的dovecot.conf
dict {
#quota = mysql:/etc/dovecot/dovecot-dict-sql.conf.ext
#expire = sqlite:/etc/dovecot/dovecot-dict-sql.conf.ext
}
!include conf.d/*.conf
auth_verbose = yes
auth_debug = yes
auth_debug_passwords = yes
mail_location = maildir:/var/mail/vmail/%u/
protocols = imap pop3
login_greeting = Dovecot ready.
ssl = yes
ssl_cert = </etc/postfix/certs/www.bnrevive.com_bundle.pem
ssl_key = </etc/postfix/certs/www.bnrevive.com.key
userdb {
driver = sql
args = /etc/dovecot/dovecot-sql.conf
}
passdb {
driver = sql
args = /etc/dovecot/dovecot-sql.conf
}
first_valid_uid = 200
login_greeting = My Mail Server
disable_plaintext_auth = yes
auth_mechanisms = plain login
mail_plugins = $mail_plugins zlib
namespace inbox {
type = private
inbox = yes
location =
mailbox Drafts {
special_use = \Drafts
}
mailbox Junk {
special_use = \Junk
}
mailbox Sent {
special_use = \Sent
}
mailbox "Sent Messages" {
special_use = \Sent
}
mailbox Trash {
special_use = \Trash
}
prefix =
}
service auth {
unix_listener /var/spool/postfix/private/auth {
mode = 0666
user = postfix
group = postfix
}
user = postfix
group = postfix
}
service imap {
executable = imap
}
plugin {
zlib_save_level = 6
zlib_save = gz
}
protocol imap {
mail_plugins = $mail_plugins imap_zlib
}
mail_max_userip_connections = 50
log_path = /var/log/dovecot.log
If you didn’t follow my tutorial, then I can’t help you. I don’t want to fix other people’s problems when they don’t follow my advice.
But I can tell you that your configuration is ridiculous.
You are making the whole Internet as your own network.
If you use PostgreSQL, then follow this tutorial: Set Up PostfixAdmin Virtual Mailboxes on Debian Mail Server (PostgreSQL)
I successfully set up PostfixAdmin and it seems to work except for catch-all aliases. I traced the issue down to what appears to be a defective query in /etc/postfix/sql/mysql_virtual_alias_domain_catchall_maps.cf. I apparently can’t post the query text without triggering a “hacking blocker.”
Reading this, one can see it is attempting to join the alias and alias_domain tables with a condition that never matches, leading to empty results for any catchall alias. Further, it *requires* the existence of an alias_domain, so setting a catchall for a single domain (
) cannot work). It is possible to make it work across domains (
) by altering the query (changing join field), but that is obviously undesirable. It could probably also be made to work in both cases by more extensive alteration (left join + OR condition), but that seems ridiculous.
I realize you didn’t write this query (it is nearly 15 years old, according to the source), but have you tested it? Am I possibly misunderstanding something?
This tutorial series has been useful and I’m grateful for it. But it would be even more helpful if you could document your sources more thoroughly.
thank you.
To create a catch-all in Postfixadmin, use * as alias.
The SQL query in
/etc/postfix/sql/mysql_virtual_alias_domain_catchall_maps.cffile is correct. To test, You can send an email to a random address on my domain like[email protected]I did exactly like that. But keep getting “Recipient address rejected: User unknown in virtual mailbox table” in the log when sending to the alias.
If this works for you I am curious what your alias_domain table contains? Because any of those virtual_alias queries will return an empty result and thus fail when that table is empty. Joining (non-LEFT) to an empty table always returns an empty result.
I found that I could make the single-domain catchall work by manually inserting into alias_domain a record having the same domain for *both* alias_domain and target_domain. But I saw no way to do this from the web UI and it really shouldn’t be necessary in the first place.
My
alias_domaintable is empty.When you create a catchall alias, the record is stored in the

aliastable.The above screenshot shows that a catchall alias is created for linuxbabe.com. Emails coming for nonexistent addresses for linuxbabe.com will be sent to the [email protected] address.
The SQL query in the
mysql_virtual_alias_domain_catchall_maps.cffile is only used for alias domains.For example, when you create an alias domain
Any emails coming for domain1.tld will be sent to the corresponding address on domain2.tld.
If the target domain (domain2.tld) doesn’t have an email address ([email protected]), then emails coming for [email protected] will be rejected because Postfix can’t find this address on the target domain.
But if you create a catchall alias on the target domain
Then emails coming for [email protected] will be sent to [email protected]. This is when the SQL query in the
mysql_virtual_alias_domain_catchall_maps.cffile does the work.The
/etc/postfix/main.cffile contains the following configuration.When Postfix tries to find an alias from the database, it uses SQL queries in the specified order. If it successfully found the alias using the SQL query in the
mysql_virtual_alias_maps.cffile, it won’t use other SQL queries.AARGH! I finally found the problem. I had copied the wrong query into one of the files. Sorry for wasting your time but thanks for helping me figure it out.
Hello,
At beginning : thanks a lot for your tutorial !
So, sorry to disturb you but I’m little confusing cause I would like to use my actual configuration that I did with postfix and dovecot but it’s not actually with postfixadmin that is not really practical to manage users.
So my databases tables right now is :
My postfix config with Mariadb in main.cf is :
virtual_mailbox_domains = mysql:/etc/postfix/mysql-virtual-mailbox-domains.cf
virtual_mailbox_maps = mysql:/etc/postfix/mysql-virtual-mailbox-maps.cf
virtual_alias_maps = mysql:/etc/postfix/mysql-virtual-alias-maps.cf,
        mysql:/etc/postfix/mysql-virtual-email2email.cf
My mysql-virtual-alias-maps.cf :
My mysql-virtual-email2email.cf :
My mysql-virtual-mailbox-domains.cf :
My mysql-virtual-mailbox-maps.cf :
So my question is : how could I “mix” the actual database with the postfixadmin database to retreive my actuals users / domains / alias in the postfixadmin’s database ? (which is which ? in fact ..) cause when I append this, nothing appear on postfixadmin web UI (cause it’s not the good structure indeed)
Is it possible or it is better to do again all the config and lost all my actuals emails .. ?
Thanks by advance for your time and your answer (and so sorry for my bad english language ..)
Your emails will not be lost when you change to the PostfixAdmin database. Just make sure the
mail_locationparameter in Dovecot is the same as before.hi
thx for the tutorial. it is very useful 🙂
I would like to set a forward rule in roundcube, but it is finished with fail because of this line in main.cf authorized_submit_users = root,www-data. how can I add a virtual user to this rule?
thx for your reply
Virtual users are not affected by this rule. You can delete this rule if your server doesn’t have other Unix user accounts.
sadly it is affacted because roundcube rules works with vmail user. but i don’t want allow every user to use forward and any other roundcube rule. can you suggest something? thank you
I guess you can write a shell script to automatically disable any forward rule in other email accounts.
Xiao…..I’m up to Part 3 step 6: “Nginx Config File for PostfixAdmin” and now I have some confusion and thus some questions:
1. you are using an example Server_name of “postfixadmin.example.com”. I assume I should change it to postfixadmin.mydomain.com? Is that going to be the URL address for the PostfixAdmin GUI which will be served from the same computer as postfix but only available on the internal network? Please note that www.mydomin.eu is served from a completely different computer on a different public IP address but on the same internal network.
2. In Step 8: “Enabling HTTPS”, I will again be installing the LetsEncrypt certs. Didn’t I already install them in Part 2 Step 2? Or was that only for the e-mail setup and this one is for the PostfixAdmin GUI webserver? Also, if this “postfixadmin.mydomain.com” GUI address is only going to be accessed internally, is a SSL cert needed?
At this point, assuming I understand your answers, I will proceed to Step 11: “Configure Postfix to Use MySQL/MariaDB Database”, which looks to be rather involved/complicated so I will take my time. After that is completed, access to e-mail will require new PostfixAdmin controlled ID/PW pairs and thus user testing will be suspended until I can create new ID/PW user credentials.
Thanks for your time….RDK
Hi RDK,
1. Yes, use
postfixadmin.mydomain.comas server_name in the Nginx config file. This is the URL for the PostfixAdmin web GUI, which should be installed on the same computer as the Postfix SMTP server.2. In part 2, we installed a Let’s Encrypt certificate for
mail.mydomain.com, which is used by Postfix SMTP server and Dovecot IMAP/POP3 server. This article installs a certificate forpostfixadmin.mydomain.com, which will be used by Nginx to serve the web GUI.You can block public access to your PostfixAdmin Web GUI by adding
allowanddenyrules in Nginx like this:server { listen 443 ssl; listen [::]:443 ssl http; server_name postfixadmin.mydomain.com; # Allow access for localhost and local network only. allow 127.0.0.1; allow 10.0.15.0/24; # Deny all other IP addresses. deny all; root /var/www/postfixadmin/public/; index index.php index.html; access_log /var/log/nginx/postfixadmin_access.log; error_log /var/log/nginx/postfixadmin_error.log; location / { try_files $uri $uri/ /index.php; } location ~ ^/(.+\.php)$ { try_files $uri =404; fastcgi_pass unix:/run/php/php7.4-fpm.sock; fastcgi_index index.php; fastcgi_param SCRIPT_FILENAME $document_root$fastcgi_script_name; include /etc/nginx/fastcgi_params; } }Read the following article for full detail.
How to Secure Email Server Against Hacking
If you don’t want to obtain a new TLS certificate for PostfixAdmin, you can configure Nginx to serve PostfixAdmin under a sub-directory:
https://mail.example.com/postfixadmin/.Edit the Nginx virtual host.
Add the following lines in the
server {...}block.location /postfixadmin { alias /var/www/postfixadmin/public; index index.php index.html index.htm; try_files $uri $uri/ /index.php; location ~ ^(.+\.php)(.*)$ { fastcgi_pass unix:/run/php/php7.4-fpm.sock; fastcgi_index index.php; fastcgi_param SCRIPT_FILENAME $request_filename; include fastcgi_params; fastcgi_split_path_info ^(.+\.php)(.*)$; fastcgi_param PATH_INFO $fastcgi_path_info; fastcgi_param PATH_TRANSLATED $document_root$fastcgi_path_info; fastcgi_read_timeout 180; fastcgi_buffers 4 256k; fastcgi_buffer_size 128k; } location ~ \.php { include /etc/nginx/fastcgi_params; fastcgi_param SCRIPT_FILENAME $request_filename; fastcgi_pass unix:/run/php/php7.4-fpm.sock; fastcgi_index index.php; } #static files location ~ /.*\.(js|css|svg|ico|png)$ { try_files $uri $uri/ /index.php$is_args$args; } }Xiao….Again thanks for the tutorial. I have finished part 3 and starting on the SPF and DKIM steps. The server is working and I can send and receive e-mails. Today I found this note from Cron complaining about not finding Trash and Junk mailboxes for the mailbox cleanup CRON job. Did I miss something in the tutorial?…RDK
I forgot to attach the error messages:
doveadm([email protected]): Error: Syncing mailbox ‘Junk’ failed: Mailbox doesn’t exist: Junk
doveadm([email protected]): Error: Syncing mailbox ‘Trash’ failed: Mailbox doesn’t exist: Trash
You need to create the
TrashandJunkfolder for [email protected].Thank you for your excellent step by step instructions. I am having the same issue and I cannot figure out on how to create those folder. I checked back twice with your instructions but there is not mentioning of it.
Never mind I finally figured it out. On Debian you just go to and edit the following file: /etc/dovecot/conf.d/15-mailboxes.conf
and add
auto = create
like so:
mailbox Junk {
special_use = \Junk
auto = create
}
save and close the file and restart dovecot
Hello, Xiao, thank you for this amazing tutorial. I’ve finished already all the steps but I’m stuck with dovecot which returns me the following error:
Do you know what could be wrong? Thank you!
Edit
/etc/dovecot/conf.d/auth-sql.conf.extfile. Make sure it contains the following content.passdb { driver = sql args = /etc/dovecot/dovecot-sql.conf.ext } userdb { driver = sql args = /etc/dovecot/dovecot-sql.conf.ext }Then restart Dovecot.
My
file contains already the code you sent me and the issue persist. I noticed about the previous error occurred when I tried to login from Thunderbird. Besides, the
admin dashbaord works perfect.
Any thoughts in advice? Thanks again
For everyone who had the same problem like me, I solved the issue with this references: https://serverfault.com/questions/1106125/dovecot-stops-with-no-passdbs-specified-in-configuration-file-error
That’s exactly what I instructed you should do in step 12.

hi
thanks for the great tutorial.
I tried to upgrade to 3.4-dev beacuse password validation has new features what I would like to use
but I get http 500 error
This is in the log:
PHP Fatal error: require_once(): Failed opening required ‘/var/www/postfixadmin/vendor/autoload.php’ (include_path=’.:/usr/share/php’) in /var/www/postfixadmin/common.php on line 3
can you help me what is the problem?
thx
I am running a Debian (v11) server, and I would like to setup my own mail server. I followed your explanations
So far, my MX server georges.mx.glitchr.dev is working and I can connect IMAP server via port 993 (SSL) and SMTP port 25 (StartTLS) from my favorite webmail client using my domain. I can also send and receive email from/to local virtual users and from/to the true computer accounts via LMTP. I can even send email from my @gmail address and receive it on @glitchr.dev
The issues begin when I want to send an email to an external email address like @gmail.com. I have been investigating and so far it seems that port 25 is closed (as mentioned in Linuxbabe)..
I tried to switch to port 587, but postfix is still trying to send through port 25. I have configured my master.cf as following (and as recommended by Linuxbabe in “Step 3: Enable Submission Service in Postfix”, https://www.linuxbabe.com/mail-server/install-dovecot-imap-server-debian):
    submission     inet     n    -    y    -    -    smtpd
  -o syslog_name=postfix/submission
  -o smtpd_tls_security_level=encrypt
  -o smtpd_tls_wrappermode=no
  -o smtpd_sasl_auth_enable=yes
  -o smtpd_relay_restrictions=permit_sasl_authenticated,reject
  -o smtpd_recipient_restrictions=permit_mynetworks,permit_sasl_authenticated,reject
  -o smtpd_sasl_type=dovecot
  -o smtpd_sasl_path=private/auth
It looks like the connexion is initiated but gets lost and that’s it.. so far I couldn’t guess/debug more
My questions in a nutshell are :
Is there any further tests I can make to find out the origin of the problem ?
Is there a way to make sure Postfix is using port 587 (seems not the case..)
What about smtp relay, is that relevant ? I have read many peoples are using this.. But I don’t understand why I could not just configure my SMTP server on 587 and avoid using relay..
How email-sending works
You can submit emails over port 587 or 465 to your Postfix SMTP server, but your Postfix must use port 25 to connect to the recipient’s SMTP server.
The recipient’s SMTP server won’t accept incoming emails on port 587, it only accepts incoming emails on port 25. That’s why you can’t configure Postfix to use port 587 to connect to the recipient’s SMTP server.
The following line in your log means your ISP/hosting provider blocked your Postfix SMTP server from establishing connection on port 25, as a way to control spam.
To bypass port 25 blocking, you need to set up SMTP relay.
Great tutorials and information on your site. I have followed all the steps and even went back through and don’t see that I am missing anything. The issue I am having is when I create a mailbox it only seems to create the Inbox. There is no Sent, Junk, or Trash folders. This is causing errors when I try to run through the Automatically Clean the Junk Folder and Trash Folder steps. So when I run the first command sudo doveadm expunge -A mailbox Junk all I get the error message
Any ideas on what I might have missed?
Thanks
Maybe you need to use the email address for some time and those folders will be created automatically in the process.
On a fresh debian 11 installation, I got problems with setup.php for postfixadmin. Apache would not execute php-scripts though I indeed could execute small php-scripts in /var/www/postfix/public. The problem was that apache would not execute the scripts in /var/www/postfix which the scripts in /var/www/postfix/public depended on. I just had to allow execution of scripts in /var/www/postfix by changing your suggestion in /etc/apache2/sites-available/postfixadmin.conf from:
    Options FollowSymLinks MultiViews
    AllowOverride All
    Order allow,deny
    allow from all
to
    Options Indexes Includes FollowSymLinks ExecCGI MultiViews
    AllowOverride All
    Order allow,deny
    allow from all
Please, consider to change the tutorial.
Hi, so far I have successfully completed parts 1 and 2 of the tutorial, for which I would like to sincerely thank you. That was really fun! But unfortunately the 3rd part was not so easy anymore and I stupidly got stuck on the website https://postfixadmin/setup.php. Question: Do you agree if I skip Part 3 and continue with Part 4?
Kind regards, Louis
I don’t think it is a good idea to skip part 3. I had problems with setup.php. I solved it as described just above. I think there was a problem with permissions a well. I will check out.
You also need to run:
You need not change permissions.
Perhaps you need to add
to the end of
Thank you very, very, very much for your comment! I’m in!
greets Xiao,
here the next great thx for the tutotial!
had some ‘hickups’ while setting up till now, but:
IT WORKS !!! …
even on a raspi4 with 1g memory – had to enlarge the swapfile to 512mb –
18:51:49 up 1 day,  7:03,  2 users,  load average: 0.06, 0.13, 0.10
               total        used        free      shared  buff/cache   available
Mem:           908Mi       288Mi       119Mi       214Mi       500Mi       333Mi
Swap:          511Mi       171Mi       340Mi
with distributed mariadb on my main server, -a quadCore Xeon with 12gb and 2x 6tb raid10 NAS –
PostfixAdmin runs also on the main server. sending mails from the PostixAdmin gui yet does’nt work. have to fix the local postfix on this machine.
so far, all fine, i have a hint for you 🙂
wonderd, why there is only a Maildir and no subsequent Trash, Draft, Junk, Sent Message directories automagic created, and found the reason why 🙂
you have to edit:
sudo nano /etc/dovecot/conf.d/15-mailboxes.conf
to look like in the sniplet, line 47-91:
# NOTE: Assumes "namespace inbox" has been defined in 10-mail.conf.
namespace inbox {
  # These mailboxes are widely used and could perhaps be created automatically:
  mailbox Drafts {
    auto= subscribe
    special_use = \Drafts
  }
  mailbox Junk {
    auto= subscribe
    special_use = \Junk
  }
  mailbox Trash {
    auto= subscribe
    special_use = \Trash
  }

  # For \Sent mailboxes there are two widely used names. We'll mark both of
  # them as \Sent. User typically deletes one of them if duplicates are created.
  mailbox Sent {
    special_use = \Sent
  }
  mailbox "Sent Messages" {
    auto= subscribe
    special_use = \Sent
  }
after saving with ^o / ^x
reload dovecot with sudo systemctl reload dovecot.service
everything works like a charm.
when creating a new mail-account all directories are creatad automagically
greets from vienna/austria,
have phun!
ralph
hi again from vienna,
forgot to mention:
not only postfix and dovecot is running on the little pi4,
with configured spf / dkim / dmarc all up and running!
also spamassassin and fail2ban are working like a charm.
all configured as in your tutorials 1-10, except roundcube, which i’ll setup on the 4x 3,5Ghz xeon-machine
next is setting up a multidomain-enviroment ……
take care,
have phun!
best ralph
My /etc/dovecot/conf.d/15-mailboxes.conf looks exactly like yours without i edit something. But it don’t create the folders. I have no clue why.
hi again from vienna,
next hint:
after enabling:
i got:
when sending mails.
solution:
add debian-spamd to the authorized_submit_users and save as follows:
pls note the added whitespaces after ‘,’ without this postfix throw:
take care,
have phun!
best ralph
Great work!!
I tried twice and the second time everything worked like a charm.
Know you how to restrict POP3/IMAP access by virtual mailbox?
Thanks!!
Awesome Guide. Followed it step by step. Fresh Debian 11 install. Everything worked perfect up to part 3. The LMTP service is failing to create the vmail directories with this error?
Mar 17 10:11:07 mailbx dovecot: lmtp(36024, testbox@mydomain): Error: lmtp-server: conn unix:pid=36022,uid=116 [1]: rcpt testbox@mydomain: Failed to initialize user: Namespace ”: Mail storage autodetection failed with home=/var/vmail/mydomain/testbox/
Rights on /var/vmail are set to vmail. I removed my real domain.
Any ideas? Seems like some step is missing in part 3 for rights or ??
I figured it out by retracing my steps, I accidentally commented out mail_location = maildir:~/Maildir when adding the mail_home line – oops. All good!
Hi, thanks for the great tutorial.
Postfixadmin running like a charm, and I configured thunderbird to get emails, but I got the following error with dovecot:
Error: Mail access for users with UID 2000 not permitted (see first_valid_uid in config file, uid from userdb lookup).
thanks again
Hello, thank you very much for this awesome tutorial.
Everithing goes fine. I just wondering, any chance that postfixadmin allow me read virtualbox of any user?
Thank you very much for this perfect tutorial!
Great explanations, works really good on my RasPi 4!
Is there any reason not to use the postfixadmin package that is still relevant with Debian 12? The first reason given cites Ubuntu anyway, the issue with it installing Apache if you don’t use it didn’t show up on my lighttpd system. Which leaves the login loop – is that still relevant with the version of postfixadmin in Debian 12?
Great tutorial, in fact the best I have seen so far. It is not just an installation guide, but it brought me a lot of knowledge and understanding in configuring a mailserver. This makes troubleshooting a lot easier. Thanks a lot!
I am using Debian bookworm 12.6 and used the offical Postfixadmin package provide by this distribution. No issues, only a few little changes needed to point to the right directory for (change /var/www/postfixadmin/public to /usr/share/postfixadmin/public )
Hi, i’m a beginner with system administration.
Could you give me some advices on the mysql_secure_installation script.
You mentioned not setting a password for ‘root’ and not using unix_socket authentification. Interestingly, the mysql_secure_installation script seems to suggest the same “If you’ve just installed MariaDB, andhaven’t set the root password yet, you should just press enter here.”
However, in other tutorial about installing MariaDB, they recommend setting a strong password for ‘root’ and enabling unix_socket authentication.
I’m a bit confused and unsure about the best approach. Could you help clarify the best practices here?
Thanks a lot for your help and time. This tutorial is awesome.
Well, I just read this https://mariadb.com/kb/en/authentication-from-mariadb-10-4/
I think I understand a little more now.
How can I create and set up a cert for smtp.mydomain.com ??
Can’t send emails with thunderbird because the cert was issued for mail.mydomain.com
I have used your tutourials to build many mail servers without a hitch and have tremendous appreciation for your work. I am building on Debian 13 behind pfsense and HAproxy, I have just discovered that in STEP 10 of this tutourial the URL for the web-based setup should be
######################################################################################################
Step 10: Finish the Installation in Web Browser
Go to postfixadmin.example.com/postfixadmin/setup.php to run the web-based setup wizard. First, you need to create a setup password for PostfixAdmin.
######################################################################################################
I hope this saves other using this tutourial some time