Ocserv Advanced (Split Tunneling, IPv6, Static IP, Per User Configs, Virtual Hosting)
This tutorial will show you how to use the OpenConnect VPN (ocserv) like a pro. You will learn:
- Disable insecure TLS protocols
- Per-user/Per-group configurations
- Assign static private IP address
- Split Tunneling
- Enable IPv6
- Virtual hosting
- How to run multiple instances of ocserv
Requirement
To follow this tutorial, it’s assumed that you have already set up an OpenConnect VPN server with a Let’s Encrypt TLS server certificate. If not, please follow one of the following tutorials.
- Set up OpenConnect VPN Server (ocserv) on Ubuntu 20.04 with Let’s Encrypt
- Set Up OpenConnect VPN Server (ocserv) on Debian 11 Bullseye with Let’s Encrypt
- Set Up OpenConnect VPN Server (ocserv) on CentOS 8/RHEL 8 with Let’s Encrypt
How to Disable TLS 1.0 and TLS 1.1 in ocserv
The PCI council deprecated TLS 1.0 in June 30, 2018 and main stream web browsers are going to disable TLS 1.0 and TLS 1.1 in 2020. We should do the same with VPN server. Edit the main configuration file.
sudo nano /etc/ocserv/ocserv.conf
Find the following line:
tls-priorities = "NORMAL:%SERVER_PRECEDENCE:%COMPAT:-RSA:-VERS-SSL3.0:-ARCFOUR-128"
To disable TLS 1.0 and TLS 1.1 in OpenConnect VPN server, just add -VERS-TLS1.0 and -VERS-TLS1.1 in the line.
tls-priorities = "NORMAL:%SERVER_PRECEDENCE:%COMPAT:-RSA:-VERS-SSL3.0:-ARCFOUR-128:-VERS-TLS1.0:-VERS-TLS1.1"
Save and close the file. Then restart ocserv.
sudo systemctl restart ocserv
Now ocserv will only accept TLS 1.3 and TLS 1.2. For further information on configuring the TLS parameter in ocserv, please see GnuTLS priority strings.
To check if TLS 1.0 is supported in your OpenConnect VPN server, run the following command.
openssl s_client -connect vpn.your-domain.com:443 -tls1
And check TLS 1.1
openssl s_client -connect vpn.your-domain.com:443 -tls1_1
If you see the following message in the output, that means the TLS version is not supported.
New, (NONE), Cipher is (NONE)
Secure Renegotiation IS NOT supported
Per-User or Per Group Configuration
Ocserv allows per user and per group configurations. To enable this feature, uncomment the following two lines in /etc/ocserv/ocserv.conf file.
config-per-user = /etc/ocserv/config-per-user/
config-per-group = /etc/ocserv/config-per-group/
Save and close the file. Then create the per user and per-group config directory.
sudo mkdir /etc/ocserv/config-per-user/
sudo mkdir /etc/ocserv/config-per-group/
Next, you can create a file under these two directories. For example, create the user1 file to allow custom configuration for user1.
sudo nano /etc/ocserv/config-per-user/user1
You can also create the group1 file to allow custom configuration for the group named group1.
sudo nano /etc/ocserv/config-per-group/group1
You can add something like below in the file to enable split tunneling.
route = 10.10.10.0/255.255.255.0
tunnel-all-dns = false
dns = 8.8.8.8
dns = 1.1.1.1
Where:
- The first line means that after
user1or users ingroup1connect to this VPN server, only traffic to the10.10.10.0/24network will be routed via VPN server. Traffic to other IP addresses are routed via the original gateway. - The second line disables tunneling DNS queries.
- The third and fourth lines set DNS servers for VPN clients.
I use this trick to allow my another VPS (virtual private server) to connect to this VPN server without disrupting normal traffic, so the TUN device (vpns0) of my VPN server is always turned on, which means the private address of my VPN server 10.10.10.1 is always enabled. If you don’t have another VPS, you can also install the command-line OpenConnect client on the server itself, and then establish a VPN connection to itself.
Save and close the file. Restart ocserv for the changes to take effect.
sudo systemctl restart ocserv
Note that if you enable IPv6 in ocserv, then you also need to add the IPv6 network range to use split tunneling.
route = 10.10.10.0/255.255.255.0
route = fda9:4efe:7e3b:03ea::/48
tunnel-all-dns = false
dns = 8.8.8.8
dns = 1.1.1.1
If you want to exclude an IP address from the default route, then use no-route.
no-route = 12.34.56.78/32
This means all other traffic will go through the VPN tunnel except traffic to IP 12.34.56.78. route and no-route paramater accept both netmask notation (10.10.10.0/255.255.255.0) and CIDR notation (12.34.56.78/32)
If you see the following error after enabling split tunneling, it’s probably because you didn’t use the netmask or CIDR notation.
could not parse proxy protocol header; discarding connection
How to Assign a Static IP Address to a User
ocserv doesn’t support assigning static private IP addresses to every user. However, I will show you a trick to assign static private IP address to a particular user.
First, you need to enable the per-user configuration as shown in the previous section. Then add the following two lines in the per-user config file.
ipv4-network = 10.10.10.0
ipv4-netmask = 255.255.255.252
This set the netmask to 255.255.255.252 instead of the default 255.255.255.0, so there will be only 4 IP addresses available.
- 10.10.10.0
- 10.10.10.1
- 10.10.10.2
- 10.10.10.3
Actually, there’s only one IP address that can be assigned to this VPN user (10.10.10.2).
- 10.10.10.0 is the network address
- 10.10.10.1 is always used by the VPN server.
- 10.10.10.3 is the broadcast address.
So the VPN user can only use the 10.10.10.2 address.
You can’t apply the above method to every user. If you want to assign static IP to every VPN user, WireGuard VPN is a better choice.
Split Tunneling by Country
Let’s say you only want traffic to foreign countries to be tunneled by the VPN. Traffic to your own country should use the normal route. You can use the no-route directive in ocserv configuration file to achieve this.
First, you need to download the IP range for your country by going to this web page: https://www.ip2location.com/free/visitor-blocker, which allows you to download the IP address range in CIDR format.
Save the IP range in a text file ip2location.txt, and run the following command in your Linux terminal to add the no-route = directive to the beginning of each line.
sed 's/^/no-route = /' -i ip2localtion.txt
Now open the file in a text editor and copy all the lines in it. We need to add these lines in the ocserv configuration file. If there are too many lines, you can and add these lines to the the per-user configuration file.
sudo nano /etc/ocserv/config-per-user/user1
You can also add them to the per-group configuration file, then add users to the group.
Restart ocserv for the changes to take effect.
sudo systemctl restart ocserv
Note: The iOS AnyConnect app has a feature called Connect On Demand that allows you to configure what domains should or should not use the VPN.
How to Enable IPv6 in OpenConnect VPN
If your VPN server has a public IPv6 address, you can enable IPv6 in OpenConnect VPN. Edit ocserv configuariton file.
sudo nano /etc/ocserv/ocserv.conf
Find the following two lines and uncomment them.
ipv6-network = fda9:4efe:7e3b:03ea::/48
ipv6-subnet-prefix = 64
Save and close the file. Restart ocserv for the change to take effect.
sudo systemctl restart ocserv
Then we need to enable IP forwarding for IPv6. Edit sysctl.conf file.
sudo nano /etc/sysctl.conf
Add the following line at the end of this file.
net.ipv6.conf.all.forwarding=1
Save and close the file. Then apply the changes with the below command.
sudo sysctl -p
Next, we need to set up IPv6 masquerading in the server firewall, so that the server becomes a virtual router for VPN clients.
sudo nano /etc/ufw/before6.rules
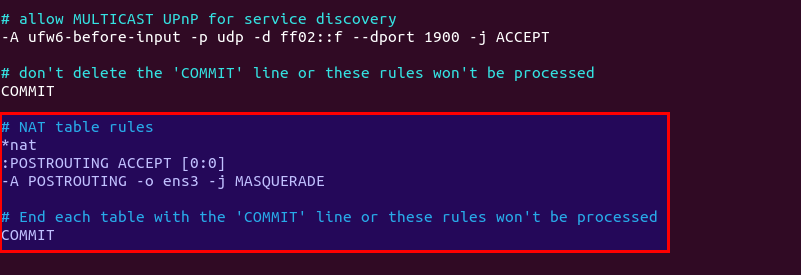
By default, there are some rules for the filter table. Add the following lines at the end of this file. Replace ens3 with your own network interface name.
# NAT table rules
*nat
:POSTROUTING ACCEPT [0:0]
-A POSTROUTING -o ens3 -j MASQUERADE

# End each table with the 'COMMIT' line or these rules won't be processed
COMMIT
In Nano text editor, you can go to the end of the file by pressing Ctrl+W, then pressing Ctrl+V.
By default, UFW forbids packet forwarding. We can allow forwarding for our private IPv6 network. Find the ufw6-before-forward chain in this file and add the following 3 lines, which will accept packet forwarding if the source IP or destination IP is in the fda9:4efe:7e3b:03ea::/48 range.

Save and close the file. Restart UFW for the change to take effect.
sudo systemctl restart ufw
Now if you list the rules in the POSTROUTING chain of the NAT table by using the following command:
sudo ip6tables -t nat -L POSTROUTING
You can see the Masquerade rule.

Disconnect the current VPN connection, add an AAAA record for vpn.example.com and re-establish VPN connection. Then go to https://test-ipv6.com/ to check your IPv6 connectivity.
If you run your own BIND DNS resolver on the VPN server, you can add the following line in /etc/ocserv/ocserv.conf file to set the VPN server as the DNS resolver for VPN clients.
dns = fda9:4efe:7e3b::1
Save and close the file. To query DNS names in IPv6, we need to configure BIND to allow IPv6 VPN clients.
sudo nano /etc/bind/named.conf.options
Find the allow-recursion parameter and change it to:
allow-recursion { 127.0.0.1; 10.10.10.0/24; fda9:4efe:7e3b:03ea::/48; };
Save and close the file. Restart BIND9.
sudo systemctl restart named
We also need to allow IPv6 VPN client in the firewall.
sudo ufw allow in from fda9:4efe:7e3b:03ea::/48
Virtual Hosting
Note: If you just want to have the ability to use multiple hostnames for the VPN server, you can use certbot to obtain a multi-domain certificate. Then restart ocserv and you are done.
To add a new virtual host in ocserv, first you need to use the method in step 3 to obtain a TLS certificate for the new virtual host. Then edit ocserv configuration file.
sudo nano /etc/ocserv/ocserv.conf
Go to the bottom of this file. In Nano text editor, you can press Ctrl+W, then Ctrl+V to jump to the bottom of a file. Add the following lines. Replace vpn2.example.com with the hostname of the second virtual host.
[vhost:vpn2.example.com]
#Allow password authentication and certificate authentication
enable-auth = "plain[passwd=/etc/ocserv/ocpasswd]"
auth = "certificate"

tcp-port = 443

#uncomment the two lines if ocserv runs behind HAProxy.
#listen-host = 127.0.0.1
#listen-proxy-proto = true

# SSL/TLS configuration
ca-cert = /etc/ocserv/ssl/ca-cert.pem
server-cert = /etc/letsencrypt/live/vpn2.example.com/fullchain.pem
server-key = /etc/letsencrypt/live/vpn2.example.com/privkey.pem
cert-user-oid = 0.9.2342.19200300.100.1.1

#Networking configuration. Use a different network range for this virtual host.
device = vpns
ipv4-network = 10.10.20.0
ipv4-netmask = 255.255.255.0
route = default
dns = 8.8.8.8
tunnel-all-dns = true

compression = true
max-clients = 0
max-same-clients = 0
try-mtu-discovery = true
idle-timeout=1200
mobile-idle-timeout=2400

config-per-user = /etc/ocserv/config-per-user/
config-per-group = /etc/ocserv/config-per-group/
Save and close the file. Then restart ocserv.
sudo systemctl restart ocserv
Edit the UFW configuration file.
sudo nano /etc/ufw/before.rules
Find the ufw-before-forward chain in this file and add the following 2 lines, which will accept packet forwarding if the source IP or destination IP is in the 10.10.20.0/24 range.
-A ufw-before-forward -s 10.10.20.0/24 -j ACCEPT
-A ufw-before-forward -d 10.10.20.0/24 -j ACCEPT
Save and close the file. Then restart UFW.
sudo systemctl restart ufw
Note that the ocserv daemon might tell you some parameters will be ignored for virtual host. However, I found that some of the ignored parameters are actually needed. For example, if you delete the device = vpns line from the virtual host, you might encounter the following error when establishing VPN connection to the virtual host.
VPN service unavailable; reason: Server configuration error
And the VPN server would produce the following error message in the log.
no networks are configured; rejecting client
Also Note that the AnyConnect VPN client on iOS doesn’t support TLS SNI, so iOS users will connect to the default virtual host.
How to Run Multiple Instances of ocserv
One ocserv process can bind to only one TCP or UDP port on your server. If you want to allow ocserv to bind to multiple TCP or UDP ports, then you need to run multiple ocserv processes. It’s very simple. Copy the /lib/systemd/system/ocserv.service to a new file.
sudo cp /lib/systemd/system/ocserv.service /etc/systemd/system/ocserv2.service
Then edit the new file.
sudo nano /etc/systemd/system/ocserv2.service
Change
/etc/ocserv/ocserv.conf
to
/etc/ocserv/ocserv2.conf
Save and close the file. Next, you can edit the /etc/ocserv/ocserv2.conf file and add your custom configurations. Once you are done, start the second ocserv service.
sudo systemctl start ocserv2
Wrapping Up
That’s it! I hope this tutorial helped you install and configure OpenConnect VPN server. As always, if you found this post useful, then subscribe to our free newsletter to get more tips and tricks 🙂


Hello, I’m trying to do the following setup:
Client_1 > server > Client_2
Client_1 & Client_2 are connect to the same server. I want Client_1 to take internet from Client_2. Which means all internet traffic of Client_1 will be routed through Client_2.
How to do that? Thanks.
Why masquerading for IPv6?
All of the outgoing traffic for OpenConnect clients will be as OCSERV IPv6 interface.
The whole purpose of IPv6 is to not use NAT.
Hi, when one of my ubuntu client is connect to server cannot parse ipv6 dns server ! how I can solve this problem ? (last line )
root@ubuntu:~# journalctl -fu openconnect
— Logs begin at Fri 2023-01-20 14:44:13 UTC. —
Jan 22 17:46:07 ubuntu bash[3252]: Connected to HTTPS on …………………………….
Jan 22 17:46:09 ubuntu bash[3252]: XML POST enabled
Jan 22 17:46:09 ubuntu bash[3252]: Please enter your username.
Jan 22 17:46:09 ubuntu bash[3252]: POST https://…………………..
Jan 22 17:46:09 ubuntu bash[3252]: Please enter your password.
Jan 22 17:46:09 ubuntu bash[3252]: POST https://……………..
Jan 22 17:46:12 ubuntu bash[3252]: Got CONNECT response: HTTP/1.1 200 CONNECTED
Jan 22 17:46:12 ubuntu bash[3252]: CSTP connected. DPD 60, Keepalive 30
Jan 22 17:46:12 ubuntu bash[3252]: Connected as 172.16.22.156 + fda9:4efe:7e3b:8622:f721:248e:fc74:2b49/64, using SSL + LZ4, with DTLS disabled
Jan 22 17:46:12 ubuntu bash[3326]: Failed to parse ‘2606:4700:4700::1111’ as byte (unsigned 8bit integer): Invalid argument
Hi, I followed your ‘split tunneling by country’ tutorial but it does not work for me. The client does not go through the tunnel at all — public ip changed from ocserv’s public ip to the client’s real ip. What’s the probelm with it?
i’ve searched alot and found out no-route purpose dosent work with Openconnect-GUI
but it has to work on cisco-anyconnect properly.
hi there.
how can i add users to the group?
no-route purpose dosent work with Openconnect-GUI but it has to work on cisco-anyconnect properly.do you have any solve
split tunnel dosen’t work with no-route
please help
It seems that Anyconnect client cannot support TLS SNI not only on iOS, but also on Linux and Windows.
Thanks for your awesome tutorial. I have problem connecting to IPv6 via Cisco Secure Client in iOS. The only message in Cisco log is “Connection attempt has failed.”
I’ve added following line in my ocserv.conf:
custom-header = “X-CSTP-Split-Include-IP6: 2000::/3”
but nothing happens. By the way…
1) I have no problem in OpenConnect (Android)
2)I don’t have ipv6 route and didn’t uncomment ipv6 lines in ocserv.conf (because client are ipv4/ipv6 and are not ipv6-only)
I’m looking forward for your help.
You can set specific IP address per client using this:
explicit-ipv4 = 192.168.1.111
Hi! Thanks for tutorial.
How to assign a client to a group?