How To Increase Virtualbox Disk Size For Dynamically Allocated Disks
In this tutorial, I’m going to show you how to increase Virtualbox disk size for dynamically allocated storage. This method will only work if your virtual disk is in .vdi or vhd format. I also assume that your host OS is Linux. If you want to know how to increase the size of a fixed size disk, then read the next article.
Find Out If Your Virtual Disk is Dinamically Allocated
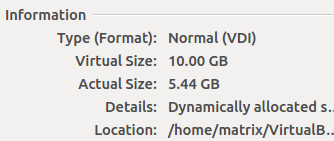
Open you virtual machine settings and click Storage on the left pane. Select your virtual disk under Storage Tree. You can see the information about your virtual disk on the right. You can see that my virtual disk is dynamically allocated.

BackUp Your Virtual Hard Disk
Before we increase the size of our virtual hard disk, it’s always a good idea to make a backup of it in case something go wrong.
First, right click on the location line and copy the location of your virtual hard disk.

Then click the minus icon to remove the virtual disk from virtual machine.

Next open up a terminal on your host OS and run the following command to backup the virtual hard disk.
cp /location-of-virtual-disk /location-of-backup-of-virtual-disk
Repalce the location with the real location of your virtual disk. For example, I executed this command:
cp "/home/matrix/VirtualBox VMs/ubuntu/ubuntu.vdi" "/home/matrix/VirtualBox VMs/ubuntu/ubuntu-backup.vdi"
Note that because the location of my virtual disk contains space, so I added double quotes around the location. Make sure your backup disk name is different from the origial disk name.
Increase Virtualbox Disk Size For Dynamically Allocated Disks
Now you can use the vboxmanage comand to enlarge your virtual disk. The syntax is as follows:
vboxmanage modifyhd /location-of-your-virtual-disk --resize size-in-MB
Specify the new size in Megabytes. For instance, I entered the following command to increase my virtual disk to 10GB.
vboxmanage modifyhd "/home/matrix/VirtualBox VMs/ubuntu/ubuntu.vdi" --resize 10240
You can’t make your virtual disk smaller using this command.
Now open your virtualbox settings to attach the virtual disk back to your virtual machine. Click the plus icon, and select Add Hard Disk.

Choose your enlarged virtual disk. Once your added your virtual disk back, you can check out the new size of it. You can see that my virtual disk is now 10GB in size.

Use Gparted to Expand the File System of Your Guest OS
Although your virtual disk size is increased, your guest OS can’t use all of them right now. So you need to boot your virtual machine from a Live CD/DVD that contains Gparted to enlarge the file system of your guest OS.
To boot your virtual machine from a Live CD/DVD, follow these steps.
Open you virtual machine settings and click Storage on the left pane. Under storage tree, click Controller: IDE then click the optical drive icon to add a Live CD/DVD image file. I use the ubuntu live ISO file because it contains Gparted.

Now click System on the left pane, in Boot Order, make sure Optical is first on the list. Save your settings and start your virtual machine.

Now you are in a Live OS. Open Gparted program.

As you can see there’re 2GB of unallocated space. To use this unallocated space, first disable swap partition. Right click on the linux-swap partition and select swapoff.

Then right click on linux-swap partion and select delete. Next right click on the extended partition and select delete. Apply your changes.
Now you can enlarge your root file system. After you enlarged your root file system, shut down your virtual machine and boot it for virtual disk. You should be able to use the extra spaced added.


thanks it worked
Great this helped me a lot. Ubuntu host with 32gb Win10 guest. Now increased to 50gb. Good info
Best not to hit that minus key until you have successfully copied the vdi, not just it’s location.
Thanks for the great howto, I just got a problem with the guest OS refusing to see the increased size.
In attributes it shows the correct virtual size (I increased the size for the guest OS, a Win7, to 40000 MB aka 39,06 GB) but neither the Win7 nor the gparted that I booted from iso sees more than the former size of 29 GB.
Is there anything else I can do about that?
If you are using a newer version of VirtualBox (I have 5.2.12 ) , you can resize the dsk in the VBox manager app under
File->VirtualMediaManager. Select the disk, and move the slider to the new size.
Don’t forget to reattach the .vdi to your VM after resizing.
I attached the gparted-live-0.31.0-1-amd64.iso to my VM, and booted from it.
touché!
it really help!
Thanks
THIS! thank you, so much easier, and I was getting an error with the original guidance. Thank you so much!
Worked like a charm ! Thanks!
thank you so much every other answer to this looked so complicated
Thanks a lot for the simple explanation
Thanks a lot, it worked for me, instructions are straight forward.
My disk is .vhd?
Honestly, all of this makes me want to delete my VM and just start over. Why is it so complicated that GParted, installed to Mint, can’t extend the partition w/o having to boot an ISO? It’s not like you’re working with the system drive?
This article is now 4 years old. Are we still stuck with this clunky back & forth?
1) .vhd is the default hard disk format in Virtualbox. After all, it’s a virtual hard disk. Note that this is not a file system formart like ext4.
2). You can’t edit a disk partition if it’s mounted. If your Linux mint has only one partition, which is typical in Virtualbox, you can’t edit the disk partition from within the Linux Mint system, because it’s always mounted at
/. You need to boot an ISO, so the Linux mint partition can be unmounted and then edited.Thanks a lot for the instructions, but how can I do the following: “Now you can enlarge your root file system. After you enlarged your root file system, shut down your virtual machine and boot it for virtual disk. You should be able to use the extra spaced added.” ?
After deleting the extended partition and applying changes, I closed the virtual machine. When I tried to boot it again, a black screen showed up stating:
error, no such partition.
Entering rescue mode…
grub rescue>
A fascinating discussion is definitely worth comment.
I believe that you should write more on this issue, it might not be a taboo
matter but generally people do not talk about these issues.
To the next! Cheers!!
There’s a couple problems I had with this tutorial.
1. Gparted is not included in my newly installed OS ubuntu. I don’t use Linux that much so I had to search gparted and how to install it. “sudo apt install gparted” command works (you need your root password). Why not add that simple line to tell people how to install this other program.
2. I didn’t see any swap partitions to delete. I used the virtualbox media manager to add the extra space to the hard drive.
3. Now you can enlarge your root file system. After you enlarged your root file system…
Wait what? You just skipped over how to enlarge the root file system? How does this make sense to you. Who makes a tutorial then skips the final step and says “there you go it’s all done!”. LOL Please read my comment number four for more information. After reading comment number four you’re all set to go on my comment!
5. Thanks for reading!!