How to Install qBittorrent on Ubuntu 18.04 Desktop or Server
This tutorial will be showing you how to install qBittorrent on Ubuntu 18.04. qBittorrent is a free, open-source, fast and lightweight P2P BitTorrent client written in C++ / Qt, available for Linux, FreeBSD, MacOS and Windows. It aims to provide an open-source alternative to uTorrent., which is a very popular BitTorrent client among Windows users.
qBittorrent features:
- A uTorrent-like interface
- Supports main BitTorrent extensions like DHT, peer exchange, full encryption.
- It provides a good integrated search engine
- It also comes with UPnP port forwarding / NAT-PMP
- You can also remotely control it via the qBittorrent Web interface.
Install qBittorrent on Ubuntu 18.04 Desktop via PPA
qBittorrent is included in the default Ubuntu software repository. You can easily install it on Ubuntu 18.04 desktop by running the following command in a terminal window.
sudo apt install qbittorrent
However, it is outdated (v4.0.3). The latest version 4.1.6 was released on May 6, 2019. To get the latest version of qBittorrent, you need to install it from the official qBitorrent PPA (Personal Package Archive). First, run the following command to add the PPA.
sudo add-apt-repository ppa:qbittorrent-team/qbittorrent-stable

Press Enter to continue. It will update the software repository index. After that, run the following command to install the latest version of qBittorrent.
sudo apt install qbittorrent
This PPA also works on other Linux distributions that are based on Ubuntu, such as Linux Mint and Elementary OS. If your system already has qBittorrent installed, then the above commands will update qBittorrent to the latest version. Don’t worry, your existing torrents are safe. Once installed, you can start qBittorrent from application menu.

How to Enable qBittorrent Web UI on Ubuntu 18.04 Desktop
The web UI allows you to remotely control qBittorrent in a web browser.
- In the qBittorrent application window, go to
tools>Preferences>Web UI. - Tick on the
Web User Interface (Remote Control)option. - You can also choose to use UPnP/NAT-PMP to forward the port from your router, so that you will be able access qBittorrent from outside network.
- By default, the web UI is accessible on port 8080. If there’s another service using port 8080, you need to change the port number in qBittorrent.
- Set a username and password. (By default “admin” and “adminadmin” respectively).
- At the bottom, you can also choose to use one of two dynamic DNS services: DynDNS and No-IP.
- Click
Applybutton.

Now in my local network, I can access qBittorrent web interface via 192.168.0.102:8080.

Make qBittorrent Automatically Start at System Boot Time
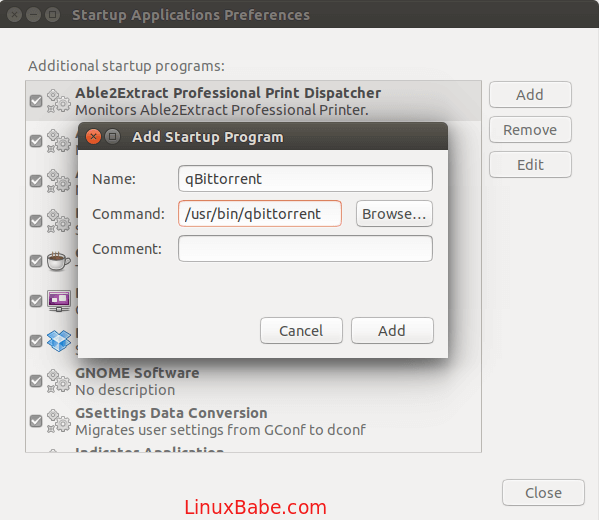
To enable autostart, open the Startup Applications from your applications menu. It can also be launched by issuing the following command in the terminal window.
gnome-session-properties
Then click Add button to add a new startup program. In the Name field, you can enter something like “qBittorrent”. In the Command field, enter /usr/bin/qbittorrent. You can leave the comment field blank. After that, click Add button.
You may want to use a VPN to hide your IP address when downloading torrents.
How to Install qBittorrent on Ubuntu 18.04 Server
You can install qBittorrent command line client on a headless Ubuntu 18.04 server and manage it via the qBittorrent web interface (You control it in a web browser). SSH into your Ubuntu 18.04 server and use the same PPA to install qBittorrent daemon.
sudo add-apt-repository ppa:qbittorrent-team/qbittorrent-stable

sudo apt install qbittorrent-nox
Note that we need to install qbittorrent-nox (without X), instead of qbittorrent. qBittorrent-nox is meant to be controlled via its feature-rich Web UI which is accessible as a default on http://localhost:8080. The Web UI access is secured and the default account username is “admin” with “adminadmin” as a password. You can start qBitorrent-nox with:
qbittorrent-nox
However, starting qBittorrent-nox this way isn’t recommended, because you can’t run other command while it’s running. Press Ctrl+C to quit it now. We can create a systemd service unit so it can run in the background and also start at system boot time.
Create the qbittorrent-nox user and group so that it can run as an unprivileged user, which will increase your server’s security.
sudo adduser --system --group qbittorrent-nox
The --system flag means we are creating a system user instead of normal user. A system user doesn’t have password and can’t login, which is what you would want for a torrent client. A home directory /home/qbittorent-nox will be created for this user. You might want to add your user account to group qbittorrent-nox with the following command so that the user account has access to the files downloaded by qBittorrent-nox. Files are downloaded to /home/qbittorrent-nox/Downloads/ by default. Note that you need to re-login for the groups change to take effect.
sudo adduser your-username qbittorrent-nox
Then create a systemd service file for qbittorrent-nox with your favourite text editor such as nano.
sudo nano /etc/systemd/system/qbittorrent-nox.service
Copy and paste the following lines into the file. If there’s another service using port 8080, then you need to change the port number for qBitorrent to something else like 8081. Also note that the -d (daemonize) option is needed in this systemd service unit.
[Unit]
Description=qBittorrent Command Line Client
After=network.target

[Service]
#Do not change to "simple"
Type=forking
User=qbittorrent-nox
Group=qbittorrent-nox
UMask=007
ExecStart=/usr/bin/qbittorrent-nox -d --webui-port=8080
Restart=on-failure

[Install]
WantedBy=multi-user.target
To save a file in Nano text editor, press Ctrl+O, then press Enter to confirm. Press Ctrl+X to exit. Now start qBittorrent-nox with the following command.
sudo systemctl start qbittorrent-nox
Note that if you change a systemd service file, you need to reload the systemd daemon for the change to take effect.
sudo systemctl daemon-reload
You might also want to enable auto start at system boot time.
sudo systemctl enable qbittorrent-nox
Check its status:
systemctl status qbittorrent-nox

You can see that qBittorrent-nox is running and auto start at boot time is enabled.
Accessing qBittorrent Web UI
To access the qBittorrent Web UI from local network, enter the Ubuntu server’s private IP address followed by the port number like below.
192.168.0.102:8080
Username is admin. Default password is “adminadmin”.

The default web interface.

It’s strongly recommended to change the default username and password. Go to Tools > Options and select the Web UI tab. Under the Authentication section, change both username and password.

And now you can start downloading torrents on your Ubuntu 18.04 server. You have the option to upload local torrents or add magnet links. Files are downloaded to /home/qbittorrent-nox/Downloads/ by default.
Using External Hard Drive as the Download Destination Folder
You can change the default download destination folder in Tools -> Options -> Downloads. In order to download torrrent, the qbittorrrent-nox user needs to have write permission to the download destination folder. If your external hard drive is mounted at /external-hdd, then run the following command grant the qbittorrrent-nox user write permission to the download destination folder.
sudo setfacl -R -m "u:qbittorrent-nox:rwx" /external-hdd
In my opinion, using setfacl (set file access control list) rather than chown is a more flexible and better approach to manager permissions. setfacl will not change the ownership of a folder, it just grant permissions to additional users.
You may need to delete your torrent and re-add it after your run the setfacl command.
Accessing qBittorrent Web Interface Outside of Your Home Network
If you want to access qBittorrent Web UI remotely from your mobile phone or public Wi-fi, then you need to set up port forwarding in your router. Also I recommend setting up Nginx reverse proxy and enable HTTPS protocol to encrypt the communication.
Set Up Nginx Reverse Proxy for qBittorrent WebUI
A reverse proxy is a proxy for another web server, in this case the qBittorrent WebUI. Setting up Nginx reverse proxy makes it easy to enable HTTPS protocol. Install Nginx on Ubuntu 18.04.
sudo apt install nginx
Start Nginx.
sudo systemctl start nginx
Then create a Nginx server block file for qBittorrent WebUI.
sudo nano /etc/nginx/conf.d/qbittorrent-webui.conf
Copy and paste the following texts into the file. Replace the red-colored text with your own domain name and the IP address of your Ubuntu server. You should also set the A record for your domain name. If you don’t have a domain name yet, then I recommend buying domain name from Namecheap because their price is lower than GoDaddy and they give you whois privacy protection free of charge.
server {
  listen 80;
  server_name torrent.your-domain.com;

  access_log /var/log/nginx/torrent.your-domain.com.access;
  error_log /var/log/nginx/torrent.your-domain.com.error;

  location / {
    proxy_pass              http://your-server-ip:8080/;
    proxy_set_header        X-Forwarded-Host        $server_name:$server_port;
    proxy_hide_header       Referer;
    proxy_hide_header       Origin;
    proxy_set_header        Referer                 '';
    proxy_set_header        Origin                  '';
    add_header              X-Frame-Options         "SAMEORIGIN";
  }
}
Save and close the file. Then test Nginx configuration.
sudo nginx -t
If the test is successful, reload Nginx
sudo systemctl reload nginx
Now in your router, forward HTTP request (port 80) to the IP address of your Ubuntu server. After that, you can access qBittorrent WebUI via your domain name (torrent.your-domain.com).
Note: If your ISP gives you a NAT-ed IP address, i.e. not a public IP address, then port forwarding won’t work. Instead, you need to use PageKite to expose local web server to the Internet.
Enable HTTPS to Encrypt Communications
To secure the Web UI, you can install a free TLS certificate issued by Let’s Encrypt. First you need to install the Let’s Encrypt client (certbot) on Ubuntu 18.04 server.
sudo apt install software-properties-common

sudo add-apt-repository ppa:certbot/certbot

sudo apt install certbot python3-certbot-nginx
Python3-certbot-nginx is the Certbot Nginx plugin. After they are installed, run the following command to automatically obtain and install Let’s Encrypt certificate.
sudo certbot --nginx --redirect --agree-tos --hsts --staple-ocsp --email your-email-address -d torrent.your-domain.com
Once that’s done, refresh the qBittorrent Web UI. It will be automatically redirected to HTTPS connection.

Troubleshooting A Problem in Version 4.1.2
There’s a a problem in the old version 4.1.2. I write it down here just for note-taking purpose.
By default, qBittorrent-nox 4.1.2 listens on TCP port 8080 of 0.0.0.42, as can be seen with the following command. Port 8999 is used to connect to peers.
sudo netstat -lnpt | grep qbittorrent

This IP address (0.0.0.42) is very strange and prevents me from accessing the web interface. If I run the following command,
curl http://localhost:8080
I get this error.
curl: (7) Failed to connect to localhost port 8080: Connection refused
I don’t know why 0.0.0.42 is set as a default. To access the web interface, I created the qBittorrent configuartion file.
sudo nano /home/qbittorrent-nox/.config/qBittorrent/qBittorrent.conf
Copy and paste the following text into the file. Change 12.34.56.78 to the IP address of your Ubuntu server.
[LegalNotice]
Accepted=true

[Network]
Cookies=@Invalid()

[Preferences]
WebUI\Address=12.34.56.78
Save and close the file. Then restart qBittorrent-nox.
sudo systemctl restart qbittorrent-nox
Wrapping Up
I hope this tutorial helped you install qBittorrent on Ubuntu 18.04 desktop or server. Take care.


First of all thank you for your guide.
Thanks to your guides, I realized the deluge setup and it works fine.
My problem,
after installing all the steps in this guide to ubuntu server. The system works and the ports appear to be active, so everything is normal. Picture of the run link: “https://image.ibb.co/hhtx9p/1.png”
But when I connect to ipadress: 8080 I get the error that you have received “curl: (7) Failed to connect to localhost port 8080: Connection refused”
I’ve created. Creating image: ” https://image.ibb.co/gjZ7aU/2.png ”
But when I look at it after creating it and restarting the system, the program gives an error, you can access the error image from this link:
https://image.ibb.co/eV7SaU/3.png
I worked for about 6 hours, I investigated, but I could not solve the problem. Can you help me? Where is the mistake?
From the screenshot, the error is that “start request repeated too quickly”.
Comment out the following line in qbittorrent systemd service file.
Reload systemd.
Then restart qbittorrent-nox.
This problem is solved in the latest version of qBittorrent. Now you don’t need to create
/home/qbittorrent-nox/.config/qBittorrent/qBittorrent.confconfiguration file.Hi,
Thanks for your tutorials, I followed your steps everything is okay but webUI don’t show texts.
“https://imgur.com/BAHnVJZ”
I use Ubuntu 16.04, I followed your tutorial for Ubuntu 16.04 , I get same result, I followed this tutorial and get same same result.
Super super tuto ! excellent et fonctionne à la merveille ! no problème , merci
This is a great tutorial but I’m at the end of my rope here. I have followed this exactly word for word. I have qbittorrent-nox installed on ubuntu server 18.04.2. The service starts without issue, the web interface works fine but whenever I try to download an actual torrent it shoots up to 2-5 MBps then slowly plummets to 0. Almost like a firewall is catching all the connections and rejecting them one by one. I have checked ufw and it is “inactive” I have tried so many things it just doesn’t make sense.
I started using this guide as a vm mounted on a Windows 10 host machine and it worked perfectly fine. I attached the same vm to a linux host and it didn’t work. I then took the time to move everything over to its own ubuntu server and I still can’t download anything. Any ideas would be so helpful. Thank you in advance.
Hi,
I have the same issue that I can’t fix. I’ve tried many things but I didn’t find the solution.
I’ve tried to reinstall qbittorrent-nox, then I noticed if I don’t do the qbittorrent-nox.service file the program can download the torrents. But it’s not the best way, because every time the server reboot or I log out from my profile qbittorrent-nox stops working.
It’s important that my ubuntu os and qbittorrent-nox is on a ssd and I mounted a 3TB hdd to /data folder. When I add a torrent, the program accept the destination folder but if I would like to change (after adding) it says can’t write to this folder. I’ve found another tutorial and I tried to change the service file by this two lines:
Of course I changed media-volume for my setup, but it still doesn’t work. If I change the destination folder to qbittorrent-nox’s download folder the download works properly.
I’ve also tried to give 777 permissions to /data but nothing has changed.
How is it possible? Before adding the service file the program can write to the destination folder and after it can’t?
Please help me out because I’m going to tear out my hair.
I’ve found something that helped me.
sudo chown -R qbittorrent-nox:qbittorrent-nox /your-folder
sudo systemctl daemon-reload
sudo systemctl restart qbittorrent-nox
Hope this helps for others.
I’m new with Linux and it’s possible that it’s not the safest solution, so if you have a better one please tell me.
Hi Rudi,
Using setfacl (set file access control list) rather than chown is better approach to give the qbittorrrent-nox user write permission to the download destination folder.
setfacl will not change the ownership of a folder, it just grant permissions to additional users.
You may need to delete your torrent and re-add it after your run the setfacl command.
Hi,
Thank you for your answer.
One more question: how can I backup chown for the origanal?
Normally, you would want your login user and the qbittorrent-nox user to have read and write permission to the download destination folder. You can run multiple setfacl commands like below, so both users can access the folder.
The ownership doesn’t matter.
Thank you very much!
Great tutorial, got me up and running fast, thanks !
Thanks a lot
P E R F E C T !
It works on ubuntu server 20.04 like a charm!
Thank you.
I have a question. Why use daemon mode instead of normal? Since we are using systemd, is it really necessary to use the daemon mode?
Fukcin A man! Great tut
Hello, there is a slight problem with the blog. Please instruct users to perform `apt update` after adding the ppa to so that the new version will be installed.
Starting from 18.04, Ubuntu will automatically do “apt update” after adding a PPA.
I’m having difficulties getting qbittorrent-nox with the service variant to work. I mounted a SMB share via fstab and when running via systemd, the downloads are stuck at “Downloading metadata”; even if I change the file save location from the SMB share to /home/qbittorrent-nox/. I confirmed qbittorrent-nox has write-permissions in the target folder; so maybe it’s something with an incorrect UMask?
excellent tutorial … got qbittorrent-nox up & running very quickly. Thank you ∫≤µkoy999
My Problem is, i cant configure RSS for the Server Edition. Is this possible?
Great guide!
I was wondering. When I create a system user, how does qbittorrent-nox know to run it as the user qbittorrent-nox instead of the regular user (myself)?
Because there are two lines in the
/etc/systemd/system/qbittorrent-nox.servicefile.Hah yes I realized. This was a super dumb question sorry 🙂
Thanx for the answer and great website!
I do have another question. Could you tell me what the UMask does? The man page is rather unclear.
I am trying to save all my downloads in a NAS that I mounted but I keep getting “Cannot write to directory” I assume it was because of said permissions you mentioned in the Saving to External HDD section, but I tried using setfacl and I keep getting “Operation not supported”, so I ran out of options and tried using chown instead, it doesn’t give me any errors but also doesn’t solve my problem.
I’m really exhausted and out of options, any help?
this tutorial also work on armbian
Hi, thank you for the tutorial.
Details about my setup:
Ubuntu Server – 22.04.1
Web Server – Nginx
Personal Domain – Godaddy
Public IP address type – Dynamic IP (using noip)
I have Qbittorrent-nox running on my server over my internal LAN network. However, I can’t get the reverse proxy to function. I can access the WebUI via subdomain.(noipfreedomain).net:port. But what I’ve been trying to do is like the tutorial said to create an A record for a subdomain and forward it to the Public IP of the Ubuntu server. Problem is, this is a straight forward solution for users with static IP addresses. I have a dynamic IP so I can’t use A record to point to an IP but I can use the noip ddns url and it works. Only problem is that the url is long ugly and has the port on display. I would rather have my godaddy subdomain in the url. I have tried subdomain forwarding with masking but that is not working. It doesn’t load the WebUI.
Is there a way this setup can be implemented with Dynamic IP servers.
Thanks
The qbittorrent-nox guide isn’t working on current Debian Testing. Following the guide step by step, the systemctl service fails to start:
Status checking shows:
$ sudo systemctl status qbittorrent-nox.service
× qbittorrent-nox.service - qBittorrent Headless
     Loaded: loaded (/etc/systemd/system/qbittorrent-nox.service; enabled; preset: enabled)
     Active: failed (Result: signal) since Tue 2024-12-17 10:12:41 CET; 2min 37s ago
   Duration: 14ms
    Process: 24005 ExecStart=/usr/bin/qbittorrent-nox -d --webui-port=8080 (code=killed, signal=ABRT)
        CPU: 12ms

Dec 17 10:12:41 micro systemd[1]: Starting qbittorrent-nox.service - qBittorrent Headless...
Dec 17 10:12:41 micro qbittorrent-nox[24005]: Could not create required directory '/nonexistent/.cache/qBittorrent'
Dec 17 10:12:41 micro systemd[1]: qbittorrent-nox.service: Control process exited, code=killed, status=6/ABRT
Dec 17 10:12:41 micro systemd[1]: qbittorrent-nox.service: Failed with result 'signal'.
Dec 17 10:12:41 micro systemd[1]: Failed to start qbittorrent-nox.service - qBittorrent Headless.
The interesting part here is “Could not create required directory ‘/nonexistent/.cache/qBittorrent”
/nonexistent is the (non-existent) home directory for system users, at least on Debian, so the guide needs to take into account that this is how system users work.
For me, because this is a setup for a simple low-wattage mini PC that is ONLY used for torrents and such, I simply changed the user in the service script to be me, and it works. This also makes file permissions simpler to manage 🙂
If you could also explain parts of the systemctl service script, that’d be great. Like, why “do not change to ‘simple’,” for instance. Also. does “Restart=on-failure” mean that it’ll restart when it crashes? Are there other options? Such like that 🙂
Thanks for the script, even if the guide didn’t work, I got it up and running great using my own user account for the service :*