Quickly Set Up a Mail Server on Debian 12 Bookworm with Modoboa
Setting up a mail server on Linux from scratch is a pain in the neck. This tutorial is going to show you how to quickly set up your own email server on Debian 12 with Modoboa, saving you lots of time and headaches. Modoboa is a free and open-source mail hosting and management platform designed to work with Postfix SMTP server and Dovecot IMAP/POP3 server.
Modoboa is written in Python, released under the terms of ISC license. At the time of writing, the latest version is v2.20.0, released on September 01, 2023. Main features of Modoboa are as follows:
- Modoboa by default uses Nginx web server to serve the webmail client and web-based admin panel.
- Compatible with Postfix and Dovecot.
- Supports MySQL/MariaDB, and PostgreSQL database.
- Easily create unlimited mailboxes and unlimited mail domains in a web-based admin panel.
- Easily create email alias in the web-based admin panel.
- The webmail client provides an easy-to-use message filter to help you organize messages to different folders.
- It can help you protect your domain reputation by monitoring email blacklists and generating DMARC reports, so your emails have a better chance to land in the inbox instead of the spam folder.
- Includes amavis frontend to block spam and detect viruses in email.
- Calendar and address book.
- Integration with Let’s Encrypt to get a valid SSL/TLS certificate.
- A policy daemon for Postfix that allows you to define daily sending limits for domains and individual accounts.
- Includes AutoMX to allow end-users to easily configure mail account in a desktop or mobile mail client.
Step 1: Choose the Right Hosting Provider and Buy a Domain Name
To set up a complete email server with Modoboa, you need a server with at least 3GB RAM, because after the installation, your server will use more than 2GB of RAM.
It is highly recommended that you install Modoboa on a clean install of Debian 12 server.
This tutorial is done on a $9/month Kamatera VPS (virtual private server) with 1 CPU and 3GB RAM. They offer a 30-day free trial.
Kamatera is a very good option to run a mail server because
- They don’t block port 25, so you can send unlimited emails (transactional email and newsletters) without spending money on SMTP relay service. Kamatera doesn’t have any SMTP limits. You can send a million emails per day.
- The IP address isn’t on any email blacklist. (At least this is true in my case. I chose the Dallas data center.) You definitely don’t want to be listed on the dreaded Microsoft Outlook IP blacklist or the spamrats blacklist. Some blacklists block an entire IP range and you have no way to delist your IP address from this kind of blacklist.
- You can edit PTR record to improve email deliverability.
- They allow you to send newsletters to your email subscribers with no hourly limits or daily limits, whatsoever.
- You can order multiple IP addresses for a single server. This is very useful for folks who need to send a large volume of emails. You can spread email traffic on multiple IP addresses to achieve better email deliverability.
Other VPS providers like DigitalOcean blocks port 25. DigitalOcean would not unblock port 25, so you will need to set up SMTP relay to bypass blocking, which can cost you additional money. If you use Vultr VPS, then port 25 is blocked by default. They can unblock it if you open a support ticket, but they may block it again at any time if they decide your email sending activity is not allowed. Vultr actually may re-block it if you use their servers to send newsletters.
Go to Kamatera website to create an account, then create your server in your account dashboard.

I recommend following the tutorial linked below to properly set up your Linux VPS server on Kamatera.
Once you created a server, Kamatera will send you an email with the server SSH login details. To log into your server, you use an SSH client. If you are using Linux or macOS on your computer, then simply open up a terminal window and run the following command to log into your server. Replace 12.34.56.78 with your server’s IP address.
ssh [email protected]
You will be asked to enter the password.
You also need a domain name. I registered my domain name from NameCheap because the price is low and they give whois privacy protection free for life.
Step 2: Creating MX Record and A Record in DNS
The MX record specifies which host or hosts handle emails for a particular domain name. For example, the host that handles emails for linuxbabe.com is mail.linuxbabe.com. If someone with a Gmail account sends an email to [email protected], then Gmail server will query the MX record of linuxbabe.com. When it finds out that mail.linuxbabe.com is responsible for accepting email, it then query the A record of mail.linuxbabe.com to get the IP address, thus the email can be delivered.
You can log in to your domain registrar’s website (such as NameCheap) to create DNS records.
In your DNS manager, create a MX record for your domain name. Enter @ in the Name field to represent the main domain name, then enter mail.your-domain.com in the Value field.

Note: The hostname for MX record can not be an alias to another name. Also, It’s highly recommended that you use hostnames, rather than bare IP addresses for MX record.
Your DNS manager may require you to enter a preference value (aka priority value). It can be any number between 0 and 65,356. A small number has higher priority than a big number. You can enter 0 for your email server, or accept the default value.
After creating MX record, you also need to create an A record for mail.your-domain.com , so that it can be resolved to an IP address. If your server uses IPv6 address, be sure to add AAAA record.
If you use Cloudflare DNS service, you should not enable the CDN feature when creating A record for your mail server. Cloudflare does not support SMTP proxy.
Step 3: Set up Mail Server on Debian 12 Stretch with Modoboa Installer
Log into your server via SSH, then run the following command to update existing software packages.
sudo apt update

sudo apt upgrade -y
I strongly recommend creating a sudo user for managing your server rather than using the default root user to improve server security. Run the following command to create a user. Replace username with your preferred username.
adduser username

Then add the user to the sudo group.
adduser username sudo
Switch to the new user.
su - username
Debian by default ships with Exim SMTP server. Since Modoboa will use Postfix SMTP server, we need to remove Exim.
sudo apt remove exim4 exim4-base exim4-daemon-light
Download modoboa installer from Github.
sudo apt install git -y

git clone https://github.com/modoboa/modoboa-installer
Modoboa is written in Python. Run the following command to install the necessary Python software.
sudo apt-get install python3-virtualenv python3-pip -y
Then navigate to the modoboa-installer directory and create a configuration file. Replace example.com with your own domain name.
cd modoboa-installer

sudo ./run.py --stop-after-configfile-check example.com

Edit the configuration file installer.cfg with a command line text editor like nano.
sudo nano installer.cfg
To obtain a valid TLS certificate from Let’s Encrypt for your mail server, in [certificate] section, change the value of type from self-signed to letsencrypt.
type = letsencrypt
And change the email address from [email protected] to your real email address, which will be used for account recovery and important notifications. You will not be able to obtain and install Let’s Encrypt certificate if you use the default email address.

By default, Modoboa installer will install PostgreSQL database server, as indicated by the following lines in the config file.
[database]
engine = postgres
host = 127.0.0.1
install = true
If you would like to use MariaDB database server, then change the engine from postgres to mysql. (Modoboa will install MariaDB instead of MySQL.)

To save the file in Nano text editor, press Ctrl+O, then press Enter to confirm. Press Ctrl+X to exit.
Next, you should use a fully-qualified domain name (FQDN) as the hostname for your mail server, such as mail.example.com. Run the following command to set the hostname.
sudo hostnamectl set-hostname mail.example.com
Now we need to verify if the DNS records are propagated to the Internet. Depending on the domain registrar you use, your DNS record might be propagated instantly, or it might take up to 24 hours to propagate. You can go to https://dnsmap.io, enter your mail server’s hostname (mail.example.com) to check DNS propagation.
If your DNS record are propagated, run the following command to start the installation. (Please replace example.com with your main domain name such as linuxbabe.com. Do not use a sub-domain like mail.example.com in this command).
sudo ./run.py --interactive example.com

The installation process can take a while. It took 10 minutes on my server. If you experience an error during the installation, you can use the --debug option to see more detailed output.
sudo ./run.py --interactive --debug example.com
After Modoboa finishes installation, you can log into the admin panel with username admin and password password.
- If your browser can’t connect to the admin panel, it could be that Nginx is not running. Start it with
sudo systemctl restart nginx. - If you see the internal error message, please use the solution here.

Once you are logged in, you should go to Admin -> Settings -> Profile to change the password.

Step 4: Adding Mailboxes in Modoboa Admin Panel
Please note that the default admin account isn’t an email account. It can only be used to administer the mail server. To send emails, you need to add mailboxes with the admin account.
Go to Domains tab and click Add button to add a new domain.

Then enter your main domain name in the Name field. It is highly recommended that you enable DKIM signing, which can help with your domain reputation. In Key selector filed, you can enter a random word like modoboa. Choose 2048 for the key length.

In the next screen, you can choose to create an admin account for this particular domain name. The SMTP protocol requires that a mail server should have a [email protected] address.

Click the Submit button and your domain name will be added in Modoboa.
To add email addresses, go to Domains tab and click your domain name.

Then click mailboxes.

Click Add button and choose Account.

Then choose Simple user as the role. Enter an email address in Username field and enter a password.

In the next screen, you can optionally create an alias for this email address.

After clicking the submit button, the email address is created.
Step 5: Sending Test Emails
To login to the webmail, you need to log out the admin account first and then enter the user credentials.

Once you are logged into Modoboa webmail, you can send a test email from your private email server to your other email address and vice versa.

Inbound emails will be delayed for a few minutes, because by default Modoboa enables greylisting, which tells other sending SMTP server to try again in a few minutes. This is useful to block spam. The following message in /var/log/mail.log indicates greylisting is enabled.
postfix/postscreen[20995]: NOQUEUE: reject: RCPT from [34.209.113.130]:36980: 450 4.3.2 Service currently unavailable;
However, greylisting can be rather annoying. You can disable it by editing the Postfix main configuration file.
sudo nano /etc/postfix/main.cf
Find the following lines at the end of the file and comment them out. (Add a # character at the beginning of each line.)
postscreen_pipelining_enable = yes
postscreen_pipelining_action = enforce

postscreen_non_smtp_command_enable = yes
postscreen_non_smtp_command_action = enforce

postscreen_bare_newline_enable = yes
postscreen_bare_newline_action = enforce
Save and close the file. Then restart Postfix for the changes to take effect.
sudo systemctl restart postfix
Now you should be able to receive emails without waiting several minutes.
Adding Swap Space
ClamAV is used to scan viruses in email messages. ClamAV can use a fair amount of RAM. If there’s not enough RAM on your server, ClamAV won’t work properly, which will prevent your mail server from sending emails. You can add a swap file to your server to increase the total RAM on your server. (Note that using swap space on the server will degrade server performance. If you want better performance, you should upgrade the physical RAM instead of using swap space.)
To add swap space on the server, first, use the fallocate command to create a file. For example, create a file named swapfile with 1G capacity in root file system:
sudo fallocate -l 1G /swapfile
Then make sure only root can read and write to it.
sudo chmod 600 /swapfile
Format it to swap:
sudo mkswap /swapfile
Output:
Setting up swapspace version 1, size = 1024 MiB (1073737728 bytes)
no label, UUID=0aab5886-4dfb-40d4-920d-fb1115c67433
Enable the swap file
sudo swapon /swapfile
To mount the swap space at system boot time, edit the /etc/fstab file.
sudo nano /etc/fstab
Add the following line at the bottom of this file.
/swapfile swap swap defaults 0 0
Save and close the file. Then reload systemd and restart ClamAV.
sudo systemctl daemon-reload

sudo systemctl restart clamav-daemon
Step 6: Checking If Port 25 (outbound) is blocked
Your ISP or hosting provider won’t block incoming connection to port 25 of your server, which means you can receive emails from other mail servers. However, many ISP/hosting providers block outgoing connection to port 25 of other mail servers, which means you can’t send emails.
If your email didn’t arrive at your other email address such as Gmail, then run the following command on your mail server to check if port 25 (outbound) is blocked.
telnet gmail-smtp-in.l.google.com 25
If it’s not blocked, you would see messages like below, which indicates a connection is successfully established. (Hint: Type in quit and press Enter to close the connection.)
Trying 74.125.68.26...
Connected to gmail-smtp-in.l.google.com.
Escape character is '^]'.
220 mx.google.com ESMTP y22si1641751pll.208 - gsmtp
If port 25 (outbound) is blocked, you would see something like:
Trying 2607:f8b0:400e:c06::1a...
Trying 74.125.195.27... telnet: Unable to connect to remote host: Connection timed out
In this case, your Postfix can’t send emails to other SMTP servers. Ask your ISP/hosting provider to open it for you. If they refuse your request, you need to set up SMTP relay to bypass port 25 blocking.
Still Can’t Send Email?
If port 25 (outbound) is not blocked, but you still can’t send emails from your own mail server to your other email address like Gmail, then you should check the mail log (/var/log/mail.log).
sudo nano /var/log/mail.log
For example, some folks might see the following lines in the file.
host gmail-smtp-in.l.google.com[2404:6800:4003:c03::1b] said: 550-5.7.1 [2a0d:7c40:3000:b8b::2] Our system has detected that 550-5.7.1 this message does not meet IPv6 sending guidelines regarding PTR 550-5.7.1 records and authentication. Please review 550-5.7.1 https://support.google.com/mail/?p=IPv6AuthError for more information
This means your mail server is using IPv6 to send the email, but you didn’t set up IPv6 records. You should go to your DNS manager, set AAAA record for mail.your-domain.com, then you should set PTR record for your IPv6 address, which is discussed in step 8.
Step 7: Using Mail Clients on Your Computer or Mobile Device
Fire up your desktop email client such as Mozilla Thunderbird and add a mail account.
- In the incoming server section, select IMAP protocol, enter
mail.your-domain.comas the server name, choose port 143 and STARTTLS. Choosenormal passwordas the authentication method. - In the outgoing section, select SMTP protocol, enter
mail.your-domain.comas the server name, choose port 587 and STARTTLS. Choosenormal passwordas the authentication method.

You can also use IMAP on port 993 with SSL/TLS encryption.
Step 8: Improving Your Email Server Reputation
To prevent your emails from being flagged as spam, you should set PTR, SPF, DKIM and DMARC records.
PTR record
A pointer record, or PTR record, maps an IP address to an FQDN (fully qualified domain name). It’s the counterpart to the A record and is used for reverse DNS lookup, which can help with blocking spammers. Many SMTP servers reject emails if no PTR record is found for the sending server.
To check the PTR record for an IP address, run this command:
dig -x IP-address +short
or
host IP-address
PTR record isn’t managed by your domain registrar. It’s managed by the organization that gives you an IP address. Because you get IP address from your hosting provider or ISP, not from your domain registrar, so you must set PTR record for your IP in the control panel of your hosting provider or ask your ISP. Its value should be your mail server’s hostname: mail.your-domain.com. If your server uses IPv6 address, be sure to add a PTR record for your IPv6 address as well.
To edit the reverse DNS record for your Kamatera VPS, log into the Kamatera client area, then open a support ticket and tell them to add PTR record for your server IP addresss to point the IP address to mail.your-domain.com. It’s not convenient, you might think, but this is to keep spammers away from the platform, so legitimate email senders like us will have a great IP reputation.
SPF Record
SPF (Sender Policy Framework) record specifies which hosts or IP address are allowed to send emails on behalf of a domain. You should allow only your own email server or your ISP’s server to send emails for your domain. In your DNS management interface, create a new TXT record like below.

Explanation:
- TXT indicates this is a TXT record.
- Enter @ in the name field to represent the main domain name.
- v=spf1 indicates this is a SPF record and the version is SPF1.
- mx means all hosts listed in the MX records are allowed to send emails for your domain and all other hosts are disallowed.
- ~all indicates that emails from your domain should only come from hosts specified in the SPF record. Emails that are from other hosts will be flagged as forged.
To check if your SPF record is propagated to the public Internet, you can use the dig utility on your Linux machine like below:
dig your-domain.com txt
The txt option tells dig that we only want to query TXT records.
DKIM Record
DKIM (DomainKeys Identified Mail) uses a private key to digitally sign emails sent from your domain. Receiving SMTP servers verify the signature by using the public key, which is published in the DNS DKIM record.
When we were adding domain name in Moboboa admin panel earlier, we enabled DKIM signing, so the signing part is taken care of. The only thing left to do is creating DKIM record in DNS manager. First go to Modoboa admin panel as the admin user and select your domain name. In the DNS section, click Show key button.

The public key will be revealed. There are two formats. We only need the Bind/named format.

Go to your DNS manager, create a TXT record, enter modoboa._domainkey in the Name field. (Recall that we used modoboa as the selector when adding domain name in the admin panel.) Copy everything in the parentheses and paste into the value field. Delete all double quotes. Your DNS manager may require you to delete other invalid characters, such as carriage return.

Note that your DKIM record may need sometime to propagate to the Internet. Depending on the domain registrar you use, your DNS record might be propagated instantly, or it might take up to 24 hours to propagate. You can go to https://www.dmarcanalyzer.com/dkim/dkim-check/, enter modoboa as the selector and enter your domain name to check DKIM record propagation.
DMARC Record
DMARC stands for Domain-based Message Authentication, Reporting and Conformance. DMARC can help receiving email servers to identify legitimate emails and prevent your domain name from being used by email spoofing.
To create a DMARC record, go to your DNS manager and add a TXT record. In the name field, enter _dmarc. In the value field, enter the following:
v=DMARC1; p=none; pct=100; rua=mailto:[email protected]

The above DMARC record is a safe starting point. To see the full explanation of DMARC, please check the following article.
Step 9: Testing Email Score and Placement
After creating PTR, SPF, DKIM record, go to https://www.mail-tester.com. You will see a unique email address. Send an email from your domain to this address and then check your score. As you can see, I got a perfect score.

Mail-tester.com can only show you a sender score. There’s another service called GlockApps that allow you to check if your email is placed in the recipient’s inbox or spam folder, or rejected outright. It supports many popular email providers like Gmail, Outlook, Hotmail, YahooMail, iCloud mail, etc

Email is Rejected by Microsoft Mailbox?
Microsoft uses an internal blacklist that blocks many legitimate IP addresses. If your emails are rejected by Outlook or Hotmail, you need to follow the tutorial linked below to bypass Microsoft Outlook blacklist.
What if Your Emails Are Still Being Marked as Spam?
I have more tips for you in this article: How to stop your emails from being marked as spam. Although it requires some time and effort, your emails will eventually be placed in inbox after applying these tips.
Auto-Renew Let’s Encrypt TLS Certificate
Modoboa installed the latest version of Let’s Encrypt client (certbot) as /opt/certbot-auto. Let’s Encrypt TLS certificate is valid for 90 days. To automatically renew the certificate, edit root user’s crontab file.
sudo crontab -e
Add the following line at the end of this file.
@daily /opt/certbot-auto renew -q && systemctl reload nginx postfix dovecot
Save and close the file. This tells Cron to run the certbot renew command every day. If the certificate has 30 days left, certbot will renew it. It’s necessary to reload Nginx web server, Postfix SMTP server and Dovecot IMAP server so they can pick up the new certificate.
Enabling SMTPS Port 465
If you are going to use Microsoft Outlook client, then you need to enable SMTPS port 465 in Postfix SMTP server.
Troubleshooting
First, please use a VPS with at least 2GB RAM. Running Modoboa on a 1GB RAM VPS will cause the database, SpamAssassin, or ClamAV to be killed because of out-of-memory problem. If you really want to use a 1GB RAM VPS, you are going to lose incoming emails and have other undesirable outcomes.
If the Modoboa web interface isn’t accessible, like a 502 gateway error, you should check the Nginx logs in /var/log/nginx/ directory to find clues. You may also want to check the mail log /var/log/mail.log.
Check if the various services are running.
systemctl status postfix

systemctl status dovecot

systemctl status nginx

systemctl status mariadb

systemctl status clamav-daemon

systemctl status amavis

systemctl status uwsgi

systemctl status supervisor
If you enabled the firewall, you should open the following ports in the firewall.
HTTP port:  80
HTTPS port: 443
SMTP port:  25
Submission port: 587 (and 465 if you are going to use Microsoft Outlook mail client)
IMAP port:  143 and 993
If you would like to use the UFW firewall, check my guide here: Getting started with UFW firewall on Debian and Ubuntu.
I found that the clamav-daemon service has a tendency to stop without clear reason even when there’s enough RAM. This will delay emails for 1 minute. We can configure it to automatically restart if it stops via the systemd service unit. Copy the original service unit file to the /etc/systemd/system/ directory.
sudo cp /lib/systemd/system/clamav-daemon.service /etc/systemd/system/clamav-daemon.service
Then edit the service unit file.
sudo nano /etc/systemd/system/clamav-daemon.service
Add the following two lines in the [service] section.
Restart=always
RestartSec=3
Like this:
[Service]
ExecStart=/usr/sbin/clamd --foreground=true
# Reload the database
ExecReload=/bin/kill -USR2 $MAINPID
StandardOutput=syslog
Restart=always
RestartSec=3
Save and close the file. Then reload systemd and restart clamav-daemon.service.
sudo systemctl daemon-reload
sudo systemctl restart clamav-daemon
Sorry, an internal error has occurred
If you see the internal server error message when trying to log into the Modoboa admin panel, then edit the settings.py file.
sudo nano /srv/modoboa/instance/instance/settings.py
Turn on debugging mode.
DEBUG = True
Restart uwsgi for the changes to take effect.
sudo systemctl restart uwsgi
Next, try to log into Modoboa admin panel again. This time you will see the exact internal error. For example, on my mail server it’s
database connection isn't set to UTC

So I need to edit the settings.py file
sudo nano /srv/modoboa/instance/instance/settings.py
and turn off time zone.
USE_TZ = False
Save and close the file. Restart uwsgi for the changes to take effect.
sudo systemctl restart uwsgi
(Optional) Set Up Autodiscover and AutoConfig to Automate Mail Client Configuration
Autodiscover and AutoConfig make it easy to configure a desktop or mobile mail client. The end user just need to enter a name, email address and password to set up his/her mail account, without having to enter the SMTP or IMAP server details. Autodiscover is supported by Microsoft Outlook mail client and AutoConfig is supported by Mozilla Thunderbird mail client.
Modoboa uses AutoMX to implement this feature on your mail server. All we need to do now is add CNAME records in DNS. In your DNS manager, create two CNAME records.
autoconfig.yourdomain.com       CNAME         mail.yourdomain.com
autodiscover.yourdomain.com     CNAME         mail.yourdomain.com
Go to the Domains tab in your Modoboa admin panel, if the autoconfig is in green, that means your CNAME records are correct. (Modoboa checks DNS records for your mail server every 30 minutes, so you might need to wait some time for autoconfig to turn green.)

Once the CNAME records are propagated to Internet, you don’t have to enter the SMTP or IMAP server details when setting up mail account in Microsoft Outlook and Mozilla Thunderbird.
Host Multiple Domains in Modoboa
See the following article:
Wrapping Up
I hope this tutorial helped you set up a mail server on Debian 12 Stretch with Modoboa. As always, if you found this post useful, then subscribe to our free newsletter to get more tips and tricks. Take care 🙂


I mentioned this in the article, but I want to say it again: The best practice to run Modoboa is using a clean fresh OS.
Generally speaking, if there’s a script that will install lots of software, it’s a good practice to install it on a clean freash OS. Otherwise, the install script might mess up the existing configurations of your software, making it unusable. Or maybe a component of the softwar stack needs to bind to a port, but it’s already been taken by an existing process on the server, resulting in installation failure.
Unless you are very knowledgeable about every piece of software on the server and can spead lots of time debugging, it’s not recommended to install Modoboa on a server that has other applications running.
I have seen many folks who didn’t follow this advice bork the applications on their servers.
Amavis and ClamAV use about 1.3GB RAM. If your server doesn’t have enough RAM, you might not be able to receive emails. If you don’t need AntiVirus on your mail server, you can disable Amavis and ClamAV. This will save you 1.3GB RAM.
Edit Postfix master configuration file.
Find the following lines in this file and comment them out.
Save and close the file. Then restart Postfix.
Now you can stop Amavis and ClamAV.
And disable auto-start at boot time.
Please i am getting error with my domain. DNS and A record.
do i need a nameserver for my domain or do i need to host the domain first? please help
You can use your domain’s registrar’s name server and you can create DNS record at your domain registar’s website.
You don’t need to host a website before setting up mail server.
I did everything. the installation was successful. but my domain is not connecting even after creating the DNS and A record. here is my domain name. NETEASEACCOUNTS.COM. I tried to ping the domain name and it said host could not be found. i tried running –debug and i got the below error.
http-01 challenge for mail.neteaseaccounts.com
Waiting for verification…
Challenge failed for domain mail.neteaseaccounts.com
http-01 challenge for mail.neteaseaccounts.com
Cleaning up challenges
Some challenges have failed.
IMPORTANT NOTES:
– The following errors were reported by the server:
Domain: mail.neteaseaccounts.com
Type: connection
Detail: dns :: DNS problem: NXDOMAIN looking up A for
mail.neteaseaccounts.com
To fix these errors, please make sure that your domain name was
entered correctly and the DNS A/AAAA record(s) for that domain
contain(s) the right IP address. Additionally, please check that
your computer has a publicly routable IP address and that no
firewalls are preventing the server from communicating with the
client. If you’re using the webroot plugin, you should also verify
that you are serving files from the webroot path you provided.
Can’t open /etc/letsencrypt/renewal/mail.neteaseaccounts.com.conf: No such file or directory.
I see you are using NameCheap’s name server, but I didn’t find the MX record for neteaseaccounts.com and the A record for mail.neteaseaccounts.com.
Create the two records in your NameCheap account.
Maybe you should wait some time after creating DNS records, because it can take some time for the DNS records to be propagated to the Internet.
Use
digcommand to check your MX record.Check your A record.
I see there’s A record for neteaseaccounts.com, but there’s no A record for mail.neteaseaccounts.com.
How do i set up a record for mail.neteaseaccounts.com?
my imput on namecheap is
@ IP
AND I USED https://www.whatsmydns.net/#MX/NETEASEACCOUNTS.COM to check my MX and A record both are pointing to my server.
I did everything both the A / MX record and still the login page is not coming up it showing below error on my browser. is there something im doing wrong?
This site can’t be reached mail.neteaseaccounts.com’s server IP address could not be found.
Try running Windows Network Diagnostics.
DNS_PROBE_FINISHED_NXDOMAIN
Replace
with
I see there’s A record for mail.neteaseaccounts.com now.
You should now run the following command to complete the Modoboa installation.
Thank you so much. its working now. another question bro. I am trying to build my own mass mailer application that works on windows, a .exe software that send up to 3k mails in less than 2seconds. is there a tutorial you can direct me to. i would really appreciate. thanks again.
My smtp on port 587 is not working. i tried using it on third party app but its not connecting and its showing error.
I don’t teach people how to install something on Windows. This is a Linux blog.
Check if you can login from a desktop mail client.
I tried connecting it with desktop mail client mozilla thunderbird and its not connecting. so i need to set anything from the admin?
Hi bro, still having issue connecting with thunderbird
Maybe you have enabled a firewall, and you need to open port 587. Also open the IMAP port 143 and 993.
I can send directly from the web, but not connecting with other mail client. i also tried to ping the smtp but failed to connect as well. please how can i enable the port? is it from my server terminal or my hosting panel?
Are you running Modoboa on a clean install of Debian 9 OS?
Yes i got my server from cloudcone.com
By default, a clean Debian 9 OS does not enable firewall. So you may need to find if there’s any firewall settings in your hosting panel.
Also, check the mail log (/var/log/mail.log), which may give you some clue.
Hi bro this is the error message im getting from the mail.log
No DNS record found for autodiscover.neteaseaccounts.com
Autodiscover and AutoConfig make it easy to configure a desktop or mobile mail client, but it’s not mandatory.
If you want to enable them, simply create two CNAME records in your DNS manager.
It’s optional.
You can use the nmap command from another Linux box to scan your email server’s open port to see if port 587, 143 and 993 is open.
If the ports are open but you still can’t login, you might as well start it over, because running the run.py scipt multiple times can corrupt some files. It’s not a big task to reinstall Debian 9 and Modoboa.
Thanks a lot bro. its working now. one more question please. is there any app on linux for sending bulk messages?
I’m currently using Mailtrain to send newsletters/bulk emails. You can check out the following article. (It’s written for Ubuntu 18.04, but most of the commands works on Debian 9.)
How to Install Mailtrain on Ubuntu 18.04 without docker
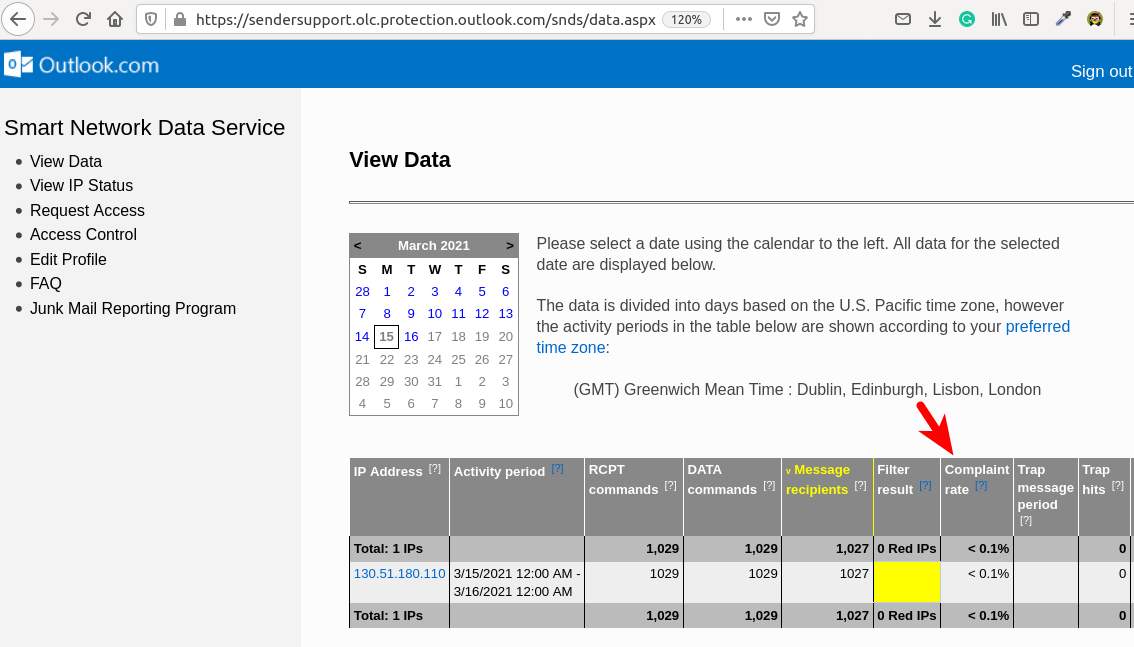
I’m using Kamatera VPS to send newsletters and I don’t see my IP address being blacklisted by Exchange mail servers.
As you can see from the screenshot below, The IP address (130.51.180.110) of my mail server (mail.linuxbabe.com) isn’t on any blacklist.
On March 15, 2021, I sent 1029 email messages to Microsoft users. The complaint rate is less than 0.1%.
You can follow the tutorial below to properly set up a VPS on Kamatera.
https://www.linuxbabe.com/linux-server/how-to-create-a-linux-vps-server-on-kamatera
If you send bulk emails, it’s important that you follow bulk email sending best practices.
Hello
How to use ssl cloudflare on the file configuration ?
Sorry for my English i am french.
You can’t use Cloudflare SSL certificate on your mail server, because they can be only used on Cloudflare’s edge servers. By the way, you shouldn’t enable CDN on the mail server hostname (mail.your-domain.com) in Cloudflare.
Installed modoboa, message camethat I now can enjoy Modoboa at… but when I try to open the link I get nothing. Website is not available. If I ping mail.mydomain.eu my server responds. I would appreciate any help
When I try: service nginx status
I get the following:
root@mail:~/modoboa-installer# nginx -t nginx: [emerg] BIO_new_file("/etc/letsencrypt/live/mail.sacred-skies.eu/fullchain.pem") failed (SSL: error:02001002:system library:fopen:No such file or directory:fopen('/etc/letsencrypt/live/mail.sacred-skies.eu/fullchain.pem','r') error:2006D080:BIO routines:BIO_new_file:no such file) nginx: configuration file /etc/nginx/nginx.conf test failed root@mail:~/modoboa-installer# sudo lsof -i:80 root@mail:~/modoboa-installer# service nginx status ● nginx.service - A high performance web server and a reverse proxy server Loaded: loaded (/lib/systemd/system/nginx.service; enabled; vendor preset: enabled) Active: failed (Result: exit-code) since Mon 2019-10-07 17:09:25 UTC; 4min 40s ago Docs: man:nginx(8) Process: 29673 ExecStartPre=/usr/sbin/nginx -t -q -g daemon on; master_process on; (code=exited, status=1/FAILURE) Main PID: 15402 (code=exited, status=0/SUCCESS) Oct 07 17:09:25 mail.sacred-skies.eu systemd[1]: Starting A high performance web server and a reverse proxy server... Oct 07 17:09:25 mail.sacred-skies.eu nginx[29673]: nginx: [emerg] BIO_new_file("/etc/letsencrypt/live/mail.sacred-skies.eu/fullchain.pem") failed (SSL: error:02001002:system library:fopen:No such file or directory:fopen('/etc/letsencrypt Oct 07 17:09:25 mail.sacred-skies.eu nginx[29673]: nginx: configuration file /etc/nginx/nginx.conf test failed Oct 07 17:09:25 mail.sacred-skies.eu systemd[1]: nginx.service: Control process exited, code=exited status=1 Oct 07 17:09:25 mail.sacred-skies.eu systemd[1]: Failed to start A high performance web server and a reverse proxy server. Oct 07 17:09:25 mail.sacred-skies.eu systemd[1]: nginx.service: Unit entered failed state. Oct 07 17:09:25 mail.sacred-skies.eu systemd[1]: nginx.service: Failed with result 'exit-code'.It’s probably because you didn’t open port 80 and 443 in firewall, so certbot failed to obtain SSL certificate.
If you use UFW firewall, run the following command to open the ports.
Please run the following command to install Let’s Encrypt client software (certbot).
Then obtain a TLS certificate with the following command.
Then edit Postfix configuration file.
Find the following two directives.
Add your certificate and private key.
Save and close the file. Then edit Dovecot TLS configuration file.
Find the following two directives.
Add your certificate and private key.
Save and close the file. Now restart Nginx, Postfix and Dovecot.
Hello,
There is no more update? Nothing on the deposit for several months!
Thank you
Modoboa hasn’t updated since July 5, 2019.
Yes in July correction of a bug but more development …
On Motoboa it is stated that my DKIM is found and correct. Yet when I test with mail-tester he m’inque: Your message is not signed with DKIM.
I missed some things.
Thank you
As in december 2019, could I use Modoboa-installer on Debian 10 Buster?
The Modoboa installer hasn’t been updated since July 5, 2019. It’s currently not compatible with Debian 10, because it requires the
ripoleandzoopackages, which are removed from Debian 10 repository.But you can install Modoboa on Debian 9, then upgrade to Debian 10.
Hello, I would not use quarantine and have the span in the span of my webmail. Has anyone already done this? Thank you
Hello Xiao,
thank you so much for this short AND effective guide. It works like a charm on Debian 9 stretch.
Question1: Hardening /Securing
–> Could you please update your guide and add an hardening section for example for fail2ban and firewall configuration (ufw and iptables) ?
I was searching in the internet how to make my Modoboa mail server secure but I could not find any guide or howto.
If you have a link to an existing guide/howto for us, please post it here so we can benefit from securing Modoboa.
Question2: Debian Buster 10
–> You wrote in the past, that you have Buster on your to do list. Could you please give us a status?
Question3: Supporting your engagement
–> Could you please give us a possibility to donate you some coffees to show you our gratefulness and or to motivate you for new guides like Debian 10 Buster *hearteyes* :-)))))))
Thank you so much in advance yours
Nejat Hakan
1.) You can read the following article to learn how to use UFW.
Getting Started with UFW Firewall on Debian, Ubuntu, Linux Mint Server
I will write a fail2ban tutorial in the future.
To secure the Modoboa web application, to best way is probably create a whitelist and allow only your own IP address to access it. I will probably explain this in detail in the future.
2.) The Modoboa installer hasn’t been updated since July 5, 2019. It’s currently not compatible with Debian 10, because it requires the
riproleandzoopackages, which are removed from Debian 10 repository.But you can install Modoboa on Debian 9, then upgrade to Debian 10.
3.) Glad to hear you want to make a donation. Unlike other Linux blogs, my blog doesn’t have any intrusive and unpleasant advertisement. I do need some motivation so I can put more time and energy to write more articles.
Currently you can go to the donation page to find how you can support this site.
Inspired by your kind words, I’m planning to set up a web page like Patreon, but it will be self-hosted with my own bitcoin payment processor on the lightning network to reduce transaction fees. It will also support credit card payment.
Hello Xiao,
thank you verry much for your answers. Not only to me but all the other answers to the other folks too *hearteyes*. Helps me and everyone so much.
Peace be with you
SHALOM
SELAMU ALEYKUM
*and best greetings in your own mother language as well of course*
Yours Nejat
Hello and thank you very much for this guide, at the moment it works in Debian 10.
At the moment I am receiving emails with the text *** UNCHECKED ***.
It can be fixed?
Thank you very much
If you can copy and paste the email here (redact sensitive information), that would be better for me to understand your situation.
Thanks for answering, the problem was that spamassassin and clamav were not working, I had a 1GB VPS and these applications need 2GB as you indicated at the beginning of the tutorial and I confirm that at the moment it works fine in Debian 10.
I have two questions please:
1. Is it safe to make this email server?
2. I just need to have “green” DNSBL, I see that the problem is common with “spam.dnsbl.sorbs.net” and “b.barracudacentral.org”, how do you solve it?
Thank you very much for your passivity.
As I said 1GB is not enough to run Modoboa mail server, your database, SpamAssassin, or ClamAV could be killed due to out-of-memory problem.
1.) If Modoboa is not safe, then I wouldn’t write this article.
2.) You go to the sorbs.net and barracudacentral.org website, then request delisting your IP address.
Hello, I already asked the question without answer and I have not found elsewhere.
I would just like spam mails to be directed to the spam directory of the webmail and not in the quarantine.
As I do not use the Modoboa webmail (too limited) I do not see spam. Can we do that?
Thank you
Hi Xiao Guoan,
your blog is great!
i have a question.. how to setup the rdns correctly
ip to mail.domain.com
mail.domain.com to ip
but how to setup a second ip now?
secondip to mail.domain.com is not possible for me
i can only setup
secondip to mail2.domain.com
mail2.domain.com
but if i do this the mail header is incorrect right?
second ip send with rdns for ip 1
If you have two mail servers, then create two MX records with different hostnames.
This is fine. Receiving SMTP servers only care about the SMTP client’s IP address.
Hi, Is there any way to upload a contacts list in whatever required format into an individual Motoboa email account? If it is possible, let me know how and I’ll donate to your cause. David
Nice job. Needs some branding features in the UI such as set logo, title bar header. Would be nice to see openssh integration and the ability to encrypt emails, and also to be able to install a third party SSL cert for email signing as well for each individual account profile. And a way to force the dns checks to update for when it detected error, and you made corrections so you can see if it is all green now.