Install LEMP Stack On Fedora22/23 (Nginx, MariaDB, PHP-FPM)
This tutorial will show you how to install LEMP stack on Fedora22/23. Specifically We are going to install Nginx Web Server, MariaDB database server and PHP-FPM. In a previous tutorial, I showed you how to install LEMP stack on CentOS/Redhat server, the process on Fedora is a little bit different. So without further ado, let’s get started.
Installing Nginx Web Server
First log into your Fedora Server then issue the following command to install Nginx.
sudo dnf install nginx
Start Nginx web server:
sudo systemctl start nginx
Check if it’s running:
sudo systemctl status nginx
My outputs:
● nginx.service - The nginx HTTP and reverse proxy server
 Loaded: loaded (/usr/lib/systemd/system/nginx.service; disabled; vendor preset: disabled)
 Active: active (running) since Sat 2015-11-21 15:55:29 CST; 15s ago
 Process: 2635 ExecStart=/usr/sbin/nginx (code=exited, status=0/SUCCESS)
 Process: 2616 ExecStartPre=/usr/sbin/nginx -t (code=exited, status=0/SUCCESS)
 Process: 2607 ExecStartPre=/usr/bin/rm -f /run/nginx.pid (code=exited, status=0/SUCCESS)
 Main PID: 2641 (nginx)
 CGroup: /system.slice/nginx.service
 ├─2641 nginx: master process /usr/sbin/nginx
 ├─2642 nginx: worker process
 ├─2643 nginx: worker process
 ├─2645 nginx: worker process
 └─2646 nginx: worker process
Start Nginx automatically on system boot:
sudo systemctl enable nginx
Check Nginx version:
[user@www ~] $ nginx -v
nginx version: nginx/1.8.0
Type your server ip address in your web browser, if you see the following, then Nginx is correctly installed.

You can find you server public IP address using the following command:
ip address
or
curl http://icanhazip.com
If you can’t see the above page, then you may need to adjust your firewall settings to allow remote client to visit your web page.
sudo firewall-cmd --permanent --add-service=http

sudo firewall-cmd --permanent --add-service=https
Restart firewall
sudo firewall-cmd --reload
Now visit your web server and you should see the Nginx welcome page. With Nginx your server can host static html files, but in order to server a dynamic website such as a WordPress site, we need to install MariaDB and PHP.
Installing MariaDB Database Server
MariaDB is a drop-in relpacement for MySQL. Install it using following commmand:
sudo dnf install mariadb-server mariadb
After it’s installed, we need to start it.
sudo systemctl start mariadb
Check status:
sudo systemctl status mariadb
outputs:
● mariadb.service - MariaDB 10.0 database server
 Loaded: loaded (/usr/lib/systemd/system/mariadb.service; disabled; vendor preset: disabled)
 Active: active (running) since Sat 2015-11-21 19:30:01 CST; 4s ago
 Process: 7498 ExecStartPost=/usr/libexec/mysql-check-upgrade (code=exited, status=0/SUCCESS)
 Process: 7357 ExecStartPost=/usr/libexec/mysql-wait-ready $MAINPID (code=exited, status=0/SUCCESS)
 Process: 7224 ExecStartPre=/usr/libexec/mysql-prepare-db-dir %n (code=exited, status=0/SUCCESS)
 Process: 7180 ExecStartPre=/usr/libexec/mysql-check-socket (code=exited, status=0/SUCCESS)
 Main PID: 7356 (mysqld_safe)
 CGroup: /system.slice/mariadb.service
 ├─7356 /bin/sh /usr/bin/mysqld_safe --basedir=/usr
 └─7468 /usr/libexec/mysqld --basedir=/usr --datadir=/var/lib/my...
Check version:
[user@www ~] $ mysql --version
 mysql Ver 15.1 Distrib 10.0.21-MariaDB, for Linux (x86_64) using readline 5.1
Now run the security script
sudo mysql_secure_installation
When the script ask you for the current root password, just leave it blank and press enter. Then enter Y and set a root password. After you set the root password, you can simply press enter to answer all of other questions.
After the script is completed, we need to enable MariaDB to start on system boot.
sudo systemctl enable mariadb
Now let’s move on to the PHP part.
Installing PHP
Install PHP and related packages using the following command:
sudo dnf install php-fpm php-mysql php-common
Edit the php-fpm main config file:
sudo vi /etc/php.ini
Find the following line:
;cgi.fix_pathinfo=1
remove the preceding semicolon and set it’s value to 0
cgi.fix_pathinfo=0
Save and close the file.
Now edit the php-fpm www.conf config file:
sudo vi /etc/php-fpm.d/www.conf
Find the following two lines:
;listen.owner = nobody
;listen.group = nobody
remove the preceding semicolons.
Then change the user and group value from “apache” to “nginx”:
user = nginx
group = nginx
Once your save and close the file, start the PHP Processor:
sudo systemctl start php-fpm
Next, enable php-fpm to start on system boot.
sudo systemctl enable php-fpm
Configuring Nginx Server Block
Create a new server block file in /etc/nginx/conf.d directory
sudo vi /etc/nginx/conf.d/example.com.conf
add the following lines to it.
server {
     listen 80;
     server_name www.example.com example.com
     root /usr/share/nginx/html;
     index index.php index.html index.htm;
location / {
     try_files $uri $uri/ index.php$query_string;
}
     error_page 404 /404.html;
     error_page 500 502 503 504 /50x.html;
location = /50x.html {
     root /usr/share/nginx/html;
}
location ~ \.php$ {
    try_files $uri =404;
    fastcgi_pass unix:/run/php-fpm/php-fpm.sock;
    fastcgi_index index.php;
    fastcgi_param SCRIPT_FILENAME $document_root$fastcgi_script_name;
    include fastcgi_params;
}
}
Save and close the file. then restart nginx:
sudo systemctl restart nginx
You can add additional server block files to host multiple website on a single server.
Testing PHP
Create a info.php file in the web root directory:
sudo vi /usr/share/nginx/html/info.php
Put the following text into info.php file
<?php
   phpinfo();
?>
Save and close it.
Then visit you newly created file by typing the following in your browser:
server ip address/info.php
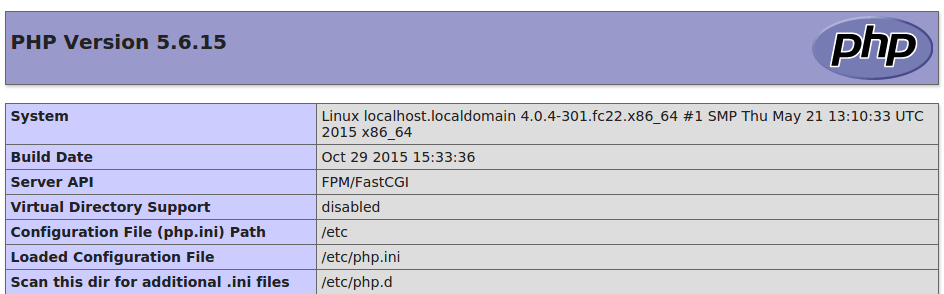
If you can see something like this, then your PHP is working correctly.
Congrats! You have successfully installed LEMP stack on Fedora. It’s time to host your website.


