How to Install Resilio Sync on Ubuntu 16.04 and Ubuntu 16.10
Resilio Sync, formerly known as BitTorrent Sync, is a free, fast, peer-to-peer file sharing and syncing tool released by Resilio, Inc. It’s available for Linux, Mac, FreeBSD, Windows, Android, iOS and NAS devices. The latest stable version was 2.4.4, released on December 9, 2016. In this tutorial, we’re going to look at how to install Resilio Sync on Ubuntu 16.04 and Ubuntu 16.10.
Installing Resilio Sync on Ubuntu 16.04 and Ubuntu 16.10 via Official Repository
Open up a terminal window and edit the sources.list file with nano or your preferred text editor.
sudo nano /etc/apt/sources.list
Append the following APT line at the end of this file.
deb http://linux-packages.resilio.com/resilio-sync/deb resilio-sync non-free

Save and close the file.
In order for APT to authenticate packages from the above repository, we need to import Resilio Sync’s public key. First download the public key with wget.
wget https://linux-packages.resilio.com/resilio-sync/key.asc
Then import the public key with apt-key.
sudo apt-key add key.asc
Now let’s update local package index and install Resilio Sync.
sudo apt update

sudo apt install resilio-sync
Managing Resilio Sync
To start Resilio Sync, use systemctl command.
sudo systemctl start resilio-sync
And enable auto start at boot time using the following command:
sudo systemctl enable resilio-sync
Check its status.
systemctl status resilio-sync

Once running, The Resilio Sync daemon will listen on 127.0.0.1:8888 as specified in /etc/resilio-sync/config.json configuration file.
Now you can type the following in your web browser address bar to access the Resilio Sync Web UI.
127.0.0.1:8888
You will be asked to set a username and password to secure the Web UI.

Then choose a name for your device and click Get started.

Next, click the Add Folder link on the upper left corner to choose your shared folder.

You might encounter the following error message. That’s because Resilio Sync is running as rslsync user.
Don’t have permissions to write to selected folder.
Let’s say you selected your home folder /home/your-username/ as the shared folder. To fix the above error, all you need to do is to grant permissions on your home folder to the rslsync user with the following command.
sudo setfacl -R -m "u:rslsync:rwx" /home/your-username
The above command won’t change the owner of the shared folder. The owner has the same permissions as usual. What it does is to grant read, write and execute permissions to one more user, namely rslsync. Note that -R (recursive) flag must come before -m (modify) flag, which is immediately followed by the access control list entry (u:rslsync:rwx).
If you see this error:
sudo: setfacl: command not found
Then install the acl package and re-run the above setfacl command.
sudo apt install acl
Now you should be able to add your home folder as the shared folder.
Using Resilio Sync on Ubuntu 16.04, 16.10 Server
By default, Resilio Sync only listens on 127.0.0.1:8888. So if you install Resilio Sync on Ubuntu 16.04/16.10 server, you won’t be able to access the Web GUI from your local computer. To be able to access the Web GUI from a remote connection, we can set up Nginx reverse proxy for Resilio sync.
First install Nginx on Ubuntu 16.04, 16.10 server.
sudo apt install nginx
Start Nginx and enable auto start.
sudo systemctl start nginx

sudo systemctl enable nginx
Then create a server block file under /etc/nginx/conf.d/.
sudo nano /etc/nginx/conf.d/resilio-sync.conf
Paste the following lines in the file. Replace resilio.yourdomain.com with your real domain name. You should also add an A record that point your domain name to the IP address of your Ubuntu 16.04, 16.10 server.
server {
  listen 80;
  server_name resilio.yourdomain.com;

  access_log /var/log/nginx/resilio_access.log;
  error_log /var/log/nginx/resilio_error.log;
  location / {
    proxy_pass http://127.0.0.1:8888;
  }
}
Save and close this file. Reload Nginx.
sudo systemctl reload nginx
Now in your browser’s address bar type your domain name and you should be able to access the Web GUI.
Secure the Resilio Sync Web GUI by Installing a TLS Certificate
To prevent hackers sniffing username and password, you can acquire and install a TLS certificate. As you may already know, Let’s Encrypt now provide free TLS certificate which can be easily obtained and installed.
Here’s how to install and configure Let’s Encrypt TLS certificate with Nginx on Ubuntu 16.04, 16.10 server.
Run the following commands to install Let’s Encrypt client (certbot).
sudo apt install software-properties-common
sudo add-apt-repository ppa:certbot/certbot
sudo apt update
sudo apt install certbot
If you use Nginx, then you also need to install the Certbot Nginx plugin.
sudo apt install python3-certbot-nginx
Next, run the following command to obtain and install TLS certificate.
sudo certbot --nginx --agree-tos --redirect --hsts --staple-ocsp --email [email protected] -d resilio.example.com
Where
--nginx: Use the nginx plugin.--agree-tos: Agree to terms of service.--redirect: Force HTTPS by 301 redirect.--hsts: Add the Strict-Transport-Security header to every HTTP response. Forcing browser to always use TLS for the domain. Defends against SSL/TLS Stripping.--staple-ocsp: Enables OCSP Stapling. A valid OCSP response is stapled to the certificate that the server offers during TLS.
The certificate should now be obtained and automatically installed.

Go to your Resilio Sync Web GUI again, you will find HTTP connection is automatically redirected to HTTPS secure connection.
I hope this tutorial helped you install Resilio Sync on Ubuntu 16.04 and Ubuntu 16.10 desktop or server. As always, if you found this post useful, then subscribe to our free newsletter. You can also follow us on Google+, Twitter or like our Facebook page.


You are a life saver man….much much much more simplified and streamlined than the official guideline….they should hire u!!
I am having trouble getting the SSL/TLS certificate, I have a home server with a ddns domain pointing to it. I get a timeout error when trying to get the certificate, as well as when trying to access the ddns domain on a browser. I’ve never setup nginx before, are there any ports I should open or any other settings to change. Thank you!
As Resilio Sync is blocked by GFW, so I couldn’t use it now. so how can I uninstall it from my ubuntu linux? Are there any command used for terminal? I am a greenhand but linux amateur. Could you give me some help? I used ” sudo apt uninstall resilio-sync” but it doesn’t work.
i can’t move or delete files in rslsync folder, its said “error permission denied”. The case is like this, i shared my backup camera files on android and sync it to my desktop via key and place it to default folder /home/rslsync and i wanna move or trash that files and the pop up showing like this “unable to trash file : permission denied” and if I cut or copy it the pop up still showing up “unable to move file : permission denied” . help please, how can i change this permission denied
this article is much better than the official docs lol
thanks
Thanks a lot, that’s exactly what I searched for. Easy to follow, complete!!!!! and works flawlesssly! Thanks again for your work!!!!!!
it’s awesome. eazy, simple and workable. all of tons tutorials nothing work but this is it.
Thank you, great post!!
I seem to be having a problem with nginx. Resilio sync works fine, however setting up nginx to redirect to the page just brings up a default nginx is working webpage.
connection failed, message is below:
******
–2018-12-21 20:45:46– https://linux-packages.resilio.com/resilio-sync/key.asc
Resolving linux-packages.resilio.com (linux-packages.resilio.com)… 69.171.234.48
Connecting to linux-packages.resilio.com (linux-packages.resilio.com)|69.171.234.48|:443… failed: Connection refused.
**********
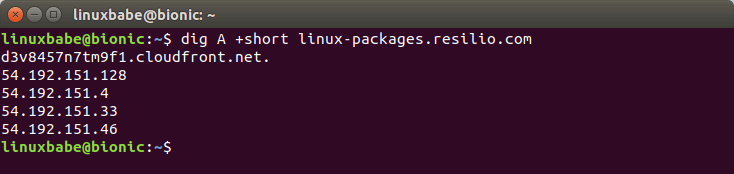
Looks like you have a DNS problem. I got the following answer when querying the A record of linux-packages.resilio.com. You can change it in your /etc/hosts file.
great article and easy setup.
But.. how do I get Resilio to start automatically after reboot?
Run the following command:
I have a different view on ready and reliable access / administering of Resilio-Sync after installation.
i.e. “By default, Resilio Sync only listens on 127.0.0.1:8888”
Yes! This is on purpose and is the best case operation from a security / privacy perspective. IMO to spin up nginx (or anything for that matter) just to gain ready and reliable access to the Resilio-Sync control-plane is foolish. I see this approach as an unnecessary expenditure of hardware resource as well as an unnecessary additional attack vector.
To easily access and administer Resilio-Sync after successful installation, simply use one’s terminal to:
$ ssh your-server -L 8888:localhost:8888
And then open: http://localhost:8888/gui in one’s web browser.
Script as desired.