Installing Mailtrain on Ubuntu 18.04 Server Without Docker
This tutorial will show you how to install Mailtrain on Ubuntu 18.04 without Docker. Mailtrain is an open-source self-hosted newsletter app, an alternative to commercial email service providers like Mailchimp. You can use Mailtrain to send emails to your email subscribers via your own email server or by using any SMTP relay service (Mailjet, SendGrid, AmazonSES, Mailgun, etc).
Mailtrain is released under the terms of GPL v3.0 license, built on Node.js and MySQL/MariaDB. The latest version is v1.24.1, released on September 28, 2018. Features of Mailtrain are as follows:
- It allows you to easily manage large mailing lists (like 1 million subscribers).
- You can add subscribers manually, through the API, or import from a CSV file.
- It supports custom fields (text fields, numbers, drop-downs or check boxes), merge tags and custom forms.
- List segmentation.
- RSS campaign: auto-generate newsletter from RSS feed and send it to subscribers.
- Subscribers can upload their GPG public keys and Mailtrain will encrypt the newsletter for them.
- Allows you to check individual click statistics for every link.
- Advanced email template editors and HTML code editor.
- Automation: send specific emails when user activates your predefined trigger.
- You can create open email list (allow public subscription) and closed email list (subscribers are added to the list by admin).
- It allows you to resume old email campaigns (send old campaigns to new subscribers).
Prerequisites
To run Mailtrain, you need a server with at least 1GB RAM. You can click this special link to get $50 free credit on DigitalOcean. (For new users only). If you are already a DigitalOcean user, then you can click this special link to get $50 free credit on Vultr (for new users only). Once you have an account at DigitalOcean or Vultr, install Ubuntu 18.04 on your server and follow the instructions below.
You also need to have a domain name. I registered my domain name from NameCheap because the price is low and they give whois privacy protection for free.
Install Mailtrain on Ubuntu 18.04 without Docker
In a previous tutorial, I explained how to install Mailtrain using Docker. Docker is great for people who want to get an application up and running quickly, but it’s also very resource hungry. On a VPS with 1GB RAM that has Mailtrain installed using Docker, the MySQL container often shuts down because RAM is running out. So I’m going to show you a RAM-friendly way to install Mailtrain on Ubuntu 18.04, which can save about 400MB RAM.
Note: Mailtrain provides an install script, but it may be outdated and you will likely encounter errors when executing the install script. This tutorial explains each step so that you can understand how it works and get it installed.
Step 1: Install MariaDB Database Server
Your subscribers data will be stored in a database. Mailtrain supports MySQL and MariaDB. MariaDB is a drop-in replacement for MySQL. It is developed by former members of MySQL team who are concerned that Oracle might turn MySQL into a closed-source product. So let’s install the MariaDB database server.
Enter the following command to install it on Ubuntu 18.04.
sudo apt install mariadb-server mariadb-client
After it’s installed, MariaDB server should be automatically stared. Use systemctl to check its status.
systemctl status mariadb
Sample output:
● mariadb.service - MariaDB 10.1.34 database server
   Loaded: loaded (/lib/systemd/system/mariadb.service; enabled; vendor preset: enabled)
   Active: active (running) since Sat 2018-09-08 11:13:27 UTC; 21s ago
     Docs: man:mysqld(8)
           https://mariadb.com/kb/en/library/systemd/
 Main PID: 3473 (mysqld)
   Status: "Taking your SQL requests now..."
    Tasks: 27 (limit: 505)
   CGroup: /system.slice/mariadb.service
           └─3473 /usr/sbin/mysqld
If it’s not running, start it with this command:
sudo systemctl start mariadb
To enable MariaDB to automatically start at system boot time, run
sudo systemctl enable mariadb
Now run the post installation security script.
sudo mysql_secure_installation
When it asks you to enter MariaDB root password, press Enter key as the root password isn’t set yet. Then enter y to set the root password for MariaDB server.
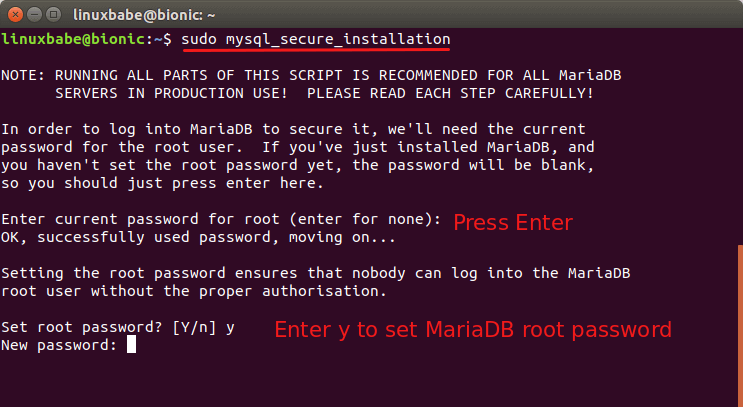
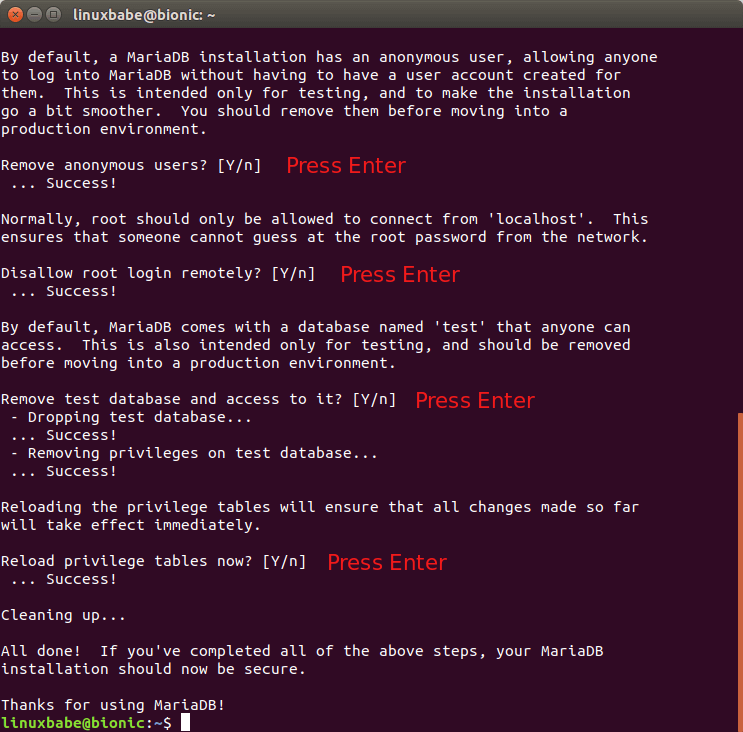
Next, you can press Enter to answer all remaining questions, which will remove anonymous user, disable remote root login and remove test database. This step is a basic requirement for MariaDB database security. (Note that the letter Y is capitalized, which means it’s the default answer.)
mariadb --version
Output:
mariadb Ver 15.1 Distrib 10.1.34-MariaDB, for debian-linux-gnu (x86_64) using readline 5.2
Step 2: Create a Database and User for Mailtrain
Now we need to log in to MariaDB console and create a database and user for Mailtrain. By default, the MaraiDB package on Ubuntu uses unix_socket to authenticate user login, which basically means you can use username and password of the OS to log into MariaDB console. So you can run the following command to login without providing MariaDB root password.
sudo mariadb -u root
Create a database for Mailtrain using the following command. I named it mailtrain, but you can use whatever name you like. (Don’t leave out the semicolon.)
create database mailtrain;
Then enter the command below to create a database user for Mailtrain and grant all privileges of the mailtrain database to the user. Replace mtuser and your-password with your preferred username and password.
grant all privileges on mailtrain.* to mtuser@localhost identified by 'mtuser_password';
Next, create a user with read only access to mailtrain database. I named this user mt_readonly.
grant select on mailtrain.* TO mt_readonly@localhost identified by 'mt_readonly_password';
Flush the privileges table for the changes to take effect and then get out of MariaDB console.
flush privileges;

exit;
Step 3: Install Node.js
Mailtrain is built on Node.js, which is a JavaScript run-time environment that translates human-readable JavaScript code into machine code. So we need to install Node.js on Ubuntu 18.04 in order to run Mailtrain. Mailtrain requires Node.js 7+. This tutorial will install the current LTS release of Node.js (V8.x) from NodeSource repository.
curl -sL https://deb.nodesource.com/setup_8.x | sudo -E bash -
sudo apt install -y nodejs
Note: The latest LTS release of Node.js is now v12, but it doesn’t work with Mailtrain v1.24.1.
The nodejs package contains the npm (Node.js package manager) binary, so there’s no need to install it separately. To check your Node.js and npm version, run
node -v

npm -v
Output:

To compile and install native addons from npm you also need to install build tools:
sudo apt install -y build-essential
Step 4: Run Mailtrain
Go to /var/www/ and fetch Mailtrain files from Github.
cd /var/www/

sudo git clone https://github.com/Mailtrain-org/mailtrain.git
Import the initial SQL data to the mailtrain database by using the following command. You need to enter the password of mtuser.
mariadb -u mtuser -p mailtrain < /var/www/mailtrain/setup/sql/mailtrain.sql
Create the production.toml configuration file.
sudo nano /var/www/mailtrain/config/production.toml
In this file, you can add configurations that override the default configurations in /var/www/mailtrain/config/default.toml file. We only need to add the following configurations.
user="mailtrain"
group="mailtrain"
[log]
level="error"
[www]
secret="Replace this with some random characters"
[mysql]
user="mtuser"
password="mtuser_password"
[queue]
processes=5
Save and close the file. Then create the mailtrain user and group for the mailtrain daemon to run as. Note that we don’t need to create password for this user, so we create a system user instead of a normal user.
sudo adduser --system --group mailtrain
Create a configuration file for the report worker.
sudo nano /var/www/mailtrain/workers/reports/config/production.toml
Add the following configurations. This report worker will have read-only access to mailtrain database.
[log]
level="error"
[mysql]
user="mt_readonly"
password="mt_readonly_password"
Save and close the file. Then change the permission of /var/www/mailtrain/.
sudo chown mailtrain:mailtrain /var/www/mailtrain/ -R

sudo chmod o-rwx /var/www/mailtrain/config/
And install required node packages.
cd /var/www/mailtrain

sudo npm install --no-progress --production --unsafe-perm=true
Copy the systemd service unit file to /etc/systemd/system/ directory.
sudo cp /var/www/mailtrain/setup/mailtrain.service /etc/systemd/system/
Open this file.
sudo nano /etc/systemd/system/mailtrain.service
Change /opt/mailtrain to /var/www/mailtrain. You may also want to comment out the following line. Because, with the following line enabled, if MySQL/MariaDB restarts, then the mailtrain.service will also restart, and if the MySQL/MariaDB server is being upgraded, then mailtrain.service will stop. I think there’s no need to require the mysql.service.
Requires=mysql.service
Save and close this file. Then start mailtrain.service.
sudo systemctl start mailtrain.service
Check its status. Make sure it is running.
sudo systemctl status mailtrain.service
Enable auto-start at system boot time.
sudo systemctl enable mailtrain.service
Now that Mailtrain is running, you can access Mailtrain web interface via port 3000.
your-server-ip:3000

Step 5: Set up Reverse Proxy and Enabling HTTPS
Before using the Mailtrain web interface, let’s put it behind Nginx and then enable HTTPS. Install Nginx web server on Ubuntu 18.04 with:
sudo apt install nginx
Now you can copy the example mailtrain-nginx.conf file to /etc/nginx/conf.d/ directory.
sudo cp /var/www/mailtrain/setup/mailtrain-nginx.conf /etc/nginx/conf.d/
Open this file.
sudo nano /etc/nginx/conf.d/mailtrain-nginx.conf
Find the following line.
server_name mailtrain.org www.mailtrain.org;
Change the value of server_name parameter to your own domain name like newsletter.your-domain.com. Don’t forget to create an A record for this sub-domain.
server_name newsletter.linuxbabe.com;
Save and close the file. Then test Nginx configurations.
sudo nginx -t
If the test if successful, reload Nginx for the changes to take effect.
sudo systemctl reload nginx
You should now be able to access Mailtrain web interface via your sub-domain: newsletter.your-domain.com.
Now edit /var/www/mailtrain/config/production.toml file.
sudo nano /var/www/mailtrain/config/production.toml
In the [www] section, add the following two lines to indicate that mailtrain is behind the Nginx proxy and make it listen on local host address only.
host="127.0.0.1"
proxy=true
Save and close the file. Then restart Mailtrain for the change to take effect.
sudo systemctl restart mailtrain
Step 6: Enable HTTPS With Let’s Encrypt
Install Let’s Encrypt client (certbot) on your Ubuntu 18.04 server.
sudo apt install software-properties-common

sudo add-apt-repository ppa:certbot/certbot

sudo apt install certbot python3-certbot-nginx
Then you can use the Nginx plugin to automatically obtain and install a TLS certificate by executing the following command.
sudo certbot --nginx --agree-tos --redirect --hsts --staple-ocsp --email your-email-address -d newsletter.your-domain.com

Now you can access Mailtrain web interface via your domain name and a secure HTTPS connection.

htop command tells me that my server is using about 500MB RAM. If I run Mailtrain with Docker, it’s about 900MB.

Login with username admin and password test. Then change your account email address and password. Go to settings page to change default configurations. You should change the service address from http://localhost:3000/ to your sub-domain (https://newsletter.your-domain.com).
admin to something else. The Mailtrain web interface doesn’t provide such option, but you can change the username in MariaDB database using SQL command.In the Mailer Settings, you can use SMTP if you have your own email server or use Amazon SES. Actually, you can also use other SMTP relay services in the SMTP tab. In the screenshot below, I use my own email server. Emails will be submitted on port 587 with STARTTLS encryption.

If Mailtrain is installed on your email server, then you should use the following SMTP settings. The hostname should be 127.0.0.1 and port should 25. There’s no need to enable encryption or authentication when talking to localhost.

Save your settings. Then you can create a list to test the functionalities of Mailtrain.
How to Handle Bounce Messages in Mailtrain
Sooner or later, your email list will contain addresses that you can’t send emails to. For example, when a subscriber who uses a company email address leaves the company, that email address will be deleted. So your email server will receive bounce message saying that the email can’t be delivered.
If you use an SMTP relay service to send email, they will handle bounce messages for you. If you use your own email server to send email, then you need to handle bounce messages in Mailtrain. Mailtrain offers two ways to handle bounced messages.
- via VERP
- via Postfix log
I personally use the VERP method, because it’s widely used in the email community and also because the second method causes high CPU usage on my server.
VERP Bounce Handling
With VERP (variable envelope return path), your email list manager uses unique envelope addresses for each subscriber. To enable VERP, edit the production.toml file.
sudo nano /var/www/mailtrain/config/production.toml
If your Mailtrain host has no SMTP server running, then add the following text.
[verp]
enabled=true
port=25
disablesenderheader=true
If your Mailtrain server has a SMTP server like Postfix running, then add the following text. The bounce handling server will listen on 127.0.0.1:2525.
[verp]
enabled=true
port=2525
host="127.0.0.1"
disablesenderheader=true
Save and close the file. Then restart Mailtrain for the changes to take effect.
sudo systemctl restart mailtrain
In Mailtrain web interface, go to Settings -> VERP Bounce Handlding. Check Use VERP to catch bounces. Save your settings.

Next, you need to create a MX record for the server hostname (bounces.your-domain.com), then add A record for this hostname, pointing to your Mailtrain host, so bounce messages can be sent to your Mailtrain host. Each subscriber in your list will have an unique envelope address like [email protected].
Note that if you deployed DMARC record for your domain name, then the SPF alignment must be set to relaxed mode. If it’s set to strict mode, then your newsletter could fail DMARC check.
If the Mailtrain bounce handling server is listening on port 2525 of 127.0.0.1 and Postfix SMTP server is listening on port 25 of the public IP address, then you need to set up transport map so that Postfix can relay the bounce message to Mailtrain. Create the transport map file.
sudo nano /etc/postfix/transport
Add the following line to this file. This tells Postfix to relay emails with address like [email protected] to the Mailtrain bounce handling server.
bounces.your-domain.com smtp:[127.0.0.1]:2525
Save and close the file. Then generate the index file.
sudo postmap /etc/postfix/transport
Edit Postfix main configuration file.
sudo nano /etc/postfix/main.cf
Add the following line to the file.
transport_maps = hash:/etc/postfix/transport
Note: If you used iRedMail to set up your mail server, then the transport_maps parameter has some other values. You should append the value at the end like below.
transport_maps =
     proxy:mysql:/etc/postfix/mysql/transport_maps_user.cf
     proxy:mysql:/etc/postfix/mysql/transport_maps_maillist.cf
     proxy:mysql:/etc/postfix/mysql/transport_maps_domain.cf
     hash:/etc/postfix/transport
Save and close the file. Then restart Postfix for the change to take effect.
sudo systemctl restart postfix
Handling Bounced Messages via Postfix Log
Mailtrain is able to detect bounced messages from Postfix mail log by finding lines that contains status=bounced. First, you need to enable the Postfix log reading server. Edit the production.toml file.
sudo nano /var/www/mailtrain/config/production.toml
Add the following text.
[postfixbounce]
enabled=true
Save and close the file. Then restart Mailtrain for the changes to take effect.
sudo systemctl restart mailtrain
Now the Postfix log reading server is listening on 127.0.0.1:5699. To let it read Postfix log, run the following command.
tail -F /var/log/mail.log | nc localhost 5699 -
To make it run in the background, you can create a systemd service unit.
sudo nano /etc/systemd/system/bouncetail.service
Add the following text.
[Unit]
Description=Postfix bounce notifier
After=mailtrain.service

[Service]
ExecStart=/bin/sh -c '/usr/bin/tail -F /var/log/mail.log | nc localhost 5699 -'
Type=simple
Restart=always
RestartSec=10

[Install]
WantedBy=multi-user.target
Save and close the file. Then start this service and enable auto-start at boot time.
sudo systemctl start bouncetail

sudo systemctl enable bouncetail
Be sure to restart bouncetail service after you restart mailtrain service. I found the bouncetail service causes high CPU usage on my server, so I don’t use this method.
Update
After using Mailtrain on my own server for some time, I found that they are other reasons that cause email bounce. The following are soft bounces.
- The recipient’s mailbox is full.
- Your IP address is on a blacklist.
- Recipient email server is down or offline.
There’s also hard bounce, i.e. the recipient’s email address doesn’t exist. By default, Mailtrain unsubscribes an email address if one bounce is detected, which is fine for hard bounce, but it’s a good idea to allow several soft bounces before you unsubscribe the bad email address. You can ask the receiving email server to remove your IP address from blacklist and then resubscribe the related email address.
Uploading Images in Mailtrain
To upload images in Mailtrain, you need to install the imagemagick package. Without it, Mailtrain might throw errors when you upload images.
sudo apt install imagemagick
How to Insert a Sign up Form on Your Website
First, you need to enable cross-origin resource sharing. Edit the production.toml file.
sudo nano /var/www/mailtrain/config/production.toml
Add the following line in the file to whitelist your website.
[cors]
# Allow subscription widgets to be embedded
origins=['https://www.example.com']
Save and close the file. Then restart Mailtrain for the change to take effect.
sudo systemctl restart mailtrain
Next, add the following code on your website to display the sign up form. Replace the red colored text with the Mailtrain domain name and your own list ID.
<div data-mailtrain-subscription-widget data-url="https://newsletter.example.com/subscription/8ljDT9KMGr/widget">
     <a href="https://newsletter.example.com/subscription/8ljDT9KMGr">Subscribe to our list</a>
</div>
<script src="https://newsletter.example.com/subscription/widget.js"></script>
Then add custom CSS rules to make it more visually appealing.
How to Create Additional Users in Mailtrain
Mailtrain v2 will allow the admin to create multiple users with granular user permissions and flexible sharing. But with the current version v.1.24.1, you can create users only through the database. Log into MySQL/MariaDB console.
sudo mysql -u root
Use the mailtrain database.
USE mailtrain;
Then create a user entry with the following SQL command.
INSERT INTO `users` (`username`, `password`, `email`, `access_token`, `reset_token`, `reset_expire`, `created`) VALUES ('your-username',PASSWORD("your-password"),'[email protected]',NULL,NULL,NULL,NOW());
Exit the database server.
EXIT;
I found that users created in this way can’t log in to the Mailtrain web interface the first time. Users need to use the “forgot password” link on the login page to reset his/her password, then the login should work. Also note that all users have administrative permission in the Mailtrain web interface.
How To Import Email List From MailChimp
First, you need to go to the Audience tab in your MailChimp dashboard. Click the View Contacts button to show all subscribers. Then click the Export Audience button to export your list as a CSV file.
Then go to Mailtrain dashboard and select your email list. Select the List Actions drop-down button and click Import Subscribers.

In the next page, you will need to upload the CSV file downloaded from MailChimp.

Then you need to match the fields in MailChimp to the fields in your Mailtrain email list. If some of the fields in MailChimp don’t exist in Mailtrain email list, then you can create them in Mailtrain dashboard.

Please note that if your MailChimp fields contain radio buttons, then you should also create radio buttons in Mailtrain fields. However, you need to segment your MailChimp list based on the value of the radio button, then export these segments to different CSV files and import them to Mailtrain one segment at a time. That’s because Mailtrain doesn’t provide a way to match each radio button values from MailChimp.
Cron Job to Automatically Clean Unsubscribed Email Addresses
You can manually delete unsubscribed email addresses in the Mailtrain web-based admin panel, but it’s much more efficient to delete them using MySQL/MariaDB commands, then you just create a Cron job to automate this task.
First, log into MySQL/MariaDB database server.
sudo mysql -u root
Then connect to the mailtrain database.
use mailtrain;
The subscribers’ info are stored in the subscription tables. If you have several mailing lists, then you will have several subscription tables. You can list all these tables using the following SQL command.
show tables like 'subscription%';
Output on my server.
+-------------------------------------+
| Tables_in_mailtrain (subscription%) |
+-------------------------------------+
| subscription                        |
| subscription__1                     |
| subscription__2                     |
+-------------------------------------+
The first table is an empty table. I have two lists in Mailtrain. They are stored in subscription__1 and subscription__2 table. Subscribed email addresses have status code set to 1. Unsubscribed email addresses have status code set to 2. So, to delete unsubscribed email addresses, you can run the following SQL commands.
DELETE FROM subscription__1 where status = '2';
DELETE FROM subscription__2 where status = '2';
To exit MySQL/MariaDB database server, run
exit;
Now open the root user’s crontab file.
sudo crontab -e
Add the following two lines.
# Delete unsubscribed email addresses from mailing list daily
@daily /usr/bin/mysql -u root mailtrain -Bse "DELETE FROM subscription__1 where status = '2';DELETE FROM subscription__2 where status = '2';"
Save and close the file. And you’re done.
How to Export Your Email Lists in Mailtrain
There’s no export button in the Mailtrain admin panel. However, if you have installed phpMyAdmin on the server, you can export your email lists from there. Select the mailtrain database in phpMyAdmin, then select the table that stores your email lists. In my case, the subscription__1 and subscription__2 tables store subscribers’ information.
Then click the export button to save the table as a file. Note that there are 2 export buttons. You need to click the second export button to export the entire table. The first export button will only export the current visible records in the table.

Next, you can choose the file format for the export file. Finally, click the Go button.

How to Hide the Mailtrain Home Page
If you don’t want visitors to see your mailtrain home page, you can set up a 301 permanent redirect to redirect visitors to your website’s home page, by adding the following code in Mailtrain’s Nginx configuration file.
location = / {
   return 301 http://www.your-domain.com;
}
Save and close the file. Then reload Nginx for the change to take effect.
sudo systemctl reload nginx
You need to remember the Mailtrain login URL.
https://newsletter.your-domain.com/users/login
By default, the login button will redirect you to the Mailtrain home page, so you need to remember another URL.
https://newsletter.your-domain.com/lists
This allows you to manage your lists and other stuff in the dashboard.
How to Insert Options on the Signup Form
If you want to give options on the signup form for the visitor to select, then you need to create custom fields. Go to your list and select custom fields in the List Actions drop-down menu and create custom field.
First, you need to create a field that will become the header question for the option list. In Field Type, you can select radio button (for single choice) or checkboxes (for multiple choices). In Group, don’t select anything, because this field will become a group for the options.
Then create custom field for each option. You need to choose option for a group value in Field Type, and choose the previous custom filed name in Group.
How to Change Field Type
By default, the Mailtrain web interface doesn’t allow you to change filed type, but you can change it in the mailtrain database. For example, I need to change a field type from checkboxes to radio button.
I recommend backing up the database before changing anything in the database. You can run the following command to backup mailtrain database.
sudo mysqldump -u root mailtrain > mailtrain.sql
Then log into MariaDB database server.
sudo mysql -u root
Use the mailtrain database.
USE mailtrain;
All custom fields are stored in the custom_fields table. You can check its content with:
SELECT * FROM custom_fields;
Find the custom field you want to modify and run the following SQL command to change its type. Replace the id number with your own.
UPDATE custom_fields SET type = 'radio' Where id = 3;
Exit the database server.
EXIT;
How to Clean Your Email List in Mailtrain
Unengaged subscribers won’t make you money and because they don’t open your email, mailbox providers will reduce your domain reputation. To make sure your future email will get into the inbox, you should remove unengaged subscribers from your email list.
You can create a segment for people who didn’t open your email in the last 60 days, then delete their email addresses. The rule for this segment is as follows:

Reactivate RSS Campaign
By default, RSS campaigns will check new entries in RSS feed every 10 minutes. If the RSS feed doesn’t update for a long time, then the RSS campaign could stop checking the RSS feed.
If this happens, you need to restart mailtrain.service to reactivate the RSS campaign.
sudo systemctl restart mailtrain.service
Wrapping Up
I hope this tutorial helped you install Mailtrain on Ubuntu 18.04. You can go to Mailtrain wiki to find more information on using Mailtrain. As always, if you found this post useful, then subscribe to our free newsletter to get more tips and tricks. Take care.


Hi, thank you for the tutorial
During the Npm install I get a lot of errors then mailtrain service could not be started.
root@Server:/var/www/mailtrain# sudo npm install –no-progress –production –unsafe-perm=true
npm WARN deprecated [email protected]: Jade has been renamed to pug, please install the latest version of pug instead of jade
npm WARN deprecated [email protected]: Please update to at least constantinople 3.1.1
npm WARN deprecated [email protected]: please upgrade to graceful-fs 4 for compatibility with current and future versions of Node.js
npm WARN deprecated [email protected]: Deprecated, use jstransformer
npm WARN deprecated [email protected]: please upgrade to graceful-fs 4 for compatibility with current and future versions of Node.js
npm WARN deprecated [email protected]: CircularJSON is in maintenance only, flatted is its successor.
npm WARN deprecated [email protected]: This version is no longer maintained. Please upgrade to the latest version.
npm WARN deprecated [email protected]: This version is no longer maintained. Please upgrade to the latest version.
npm WARN deprecated [email protected]: This version is no longer maintained. Please upgrade to the latest version.
> [email protected] install /var/www/mailtrain/node_modules/dtrace-provider
> node-gyp rebuild || node suppress-error.js
make: Entering directory ‘/var/www/mailtrain/node_modules/dtrace-provider/build’
TOUCH Release/obj.target/DTraceProviderStub.stamp
make: Leaving directory ‘/var/www/mailtrain/node_modules/dtrace-provider/build’
> [email protected] install /var/www/mailtrain/node_modules/posix
> node-gyp rebuild
make: Entering directory ‘/var/www/mailtrain/node_modules/posix/build’
CXX(target) Release/obj.target/posix/src/posix.o
SOLINK_MODULE(target) Release/obj.target/posix.node
COPY Release/posix.node
make: Leaving directory ‘/var/www/mailtrain/node_modules/posix/build’
npm notice created a lockfile as package-lock.json. You should commit this file.
npm WARN [email protected] requires a peer of ajv@^5.0.0 but none is installed. You must install peer dependencies yourself.
npm WARN optional SKIPPING OPTIONAL DEPENDENCY: [email protected] (node_modules/fsevents):
npm WARN notsup SKIPPING OPTIONAL DEPENDENCY: Unsupported platform for [email protected]: wanted {“os”:”darwin”,”arch”:”any”} (current: {“os”:”linux”,”arch”:”x64″})
added 717 packages from 757 contributors and audited 15247 packages in 39.321s
found 33 vulnerabilities (22 low, 10 moderate, 1 critical)
run `npm audit fix` to fix them, or `npm audit` for details
did find the solution for it? I do have the same issue.
They are warnings, not errors, and they won’t prevent Mailtrain from starting.
hi,
excellent tuto, thank you very much!!
my issue that on my server i have postal mail (https://github.com/atech/postal/wiki) already running which uses https with nginx.
How to enable both sub-domains (postal.mydomain.com and mailtrain.mydomain.com) to run https with nginx ?
Thank you for help
i’m using vultr vps with ubuntu 18.04
Hi, quick questions. How do I connect to a remote mysql database without having to install a DB server. Do I remove the dependency to the database service?
You need to create the database and user on the remote MySQL database server and then edit the
/var/www/mailtrain/config/production.toml. Change the mysql host configuration from localhost to the IP address of remote MySQL database server.You can see the default mysql configuration in
/var/www/mailtrain/config/default.tomlfile. Configurations in production.toml file overrides that in default.toml file.You also need to configure the remote MySQL database server to listen on the public IP address instead of localhost, so it can allow users to remotely login.
Hello,
thank you for the post, i followed it step by step. After I set up the bounce handling i got an error (i using modoboa):
553 5.7.1 : The sender’s address has been rejected: not owned by user info @ mydomain
Do you have any idea what causes this error?
If the “Use VERP to Bounce Accept” checkbox is unchecked, I can send mail.
Thanks!
That’s because you use the info@yourdomain as the login username, but use another email address as the sender address. You can create the sender address in Modoboa and use it as the login username.
Thanks for the reply. I tried to various combinations, but does not work. Now i have four identites in Modoboa, admin, csszokolai@ postmaster@ and info@. In Mailtrain the sender are info@ the smtp authentication user are postmaster@.
Do you have any other idea in this case?
You should use info@yourdomain as the SMTP authentication user.
Good day Xiao,
Thanks for the tutorial.
I am having the same issue, I unchecked Use VERP to catch bounces and was able to send. But when checked I get “Sender address rejected: not owned by user”
Please can you shed more light on how to setup VERP bounce handling. I setup Mailtrain on a separate sever from my mail server.
Do I create the bounce handling on Mailtrain Server or Mail Server?
hi Xiao, i follow your tutorial but i have got an error when i use the command :
Any idea of how i can correct this ?
Thanks
You can check the mailtrain service log.
Great tutorial thanks.
But if you setup 301 redirect to hide homepage what looks like the final mailtrain-nginx.conf ?
How do you set the 301 on / while maintaining the rest (proxy_pass…) ?
Thanks.
It will look like this:
server {
    server_name newsletter.linuxbabe.com;
    access_log /var/log/nginx/mailtrain.access;
    error_log /var/log/nginx/mailtrain.error;

    location = / {
             return 301 http://www.linuxbabe.com;
     }

    location / {
           proxy_set_header X-Real-IP $remote_addr;
           proxy_set_header X-Forwarded-For $proxy_add_x_forwarded_for;
           proxy_set_header HOST $http_host;
           proxy_set_header X-NginX-Proxy true;

          proxy_pass http://127.0.0.1:3000;
          proxy_redirect off;
    }
    .....
    .....
}
The 301 redirect only applies when there is no path specified after the domain name. The proxy_pass applies when there is path specified after the domain name.
Are you using your own email server or using any external SMTP service to deliver mails?
If you are using your own email server, then what was your setup look like?
Hi Xiao,
Thanks for this awesome tutorial! I’ve just struggled a few days with the MT v.2 installs I wish I had seen your post before that, it would much more easily and would have saved me tons of time ;(.
I have a question about your “Update” section, how do you implement that if I use my own mail server and VERP Bounce Handling: “allow several soft bounces before you unsubscribe” as all bounces will arrive at the bounce address?
Kind regads,
When doing the git pull, it pulls version 2. You might want to state which version to use.